Operating Guide
Page 1
Operating Guide DCR-DVD405/DVD805 © 2006 Sony Corporation 2-661-363-11(1) Enjoying with your DVD Handycam 14 Getting Started 20 Easy Handycam 33 Recording /Playback 40 Playback on DVD devices 54 Using the Recorded disc 61 Using the Setup items 64 Editing on DVD Handycam 84 Dubbing, Printing 92 Using a Computer 99 Troubleshooting 105 Additional Information 128 Glossary, Index 141
Operating Guide DCR-DVD405/DVD805 © 2006 Sony Corporation 2-661-363-11(1) Enjoying with your DVD Handycam 14 Getting Started 20 Easy Handycam 33 Recording /Playback 40 Playback on DVD devices 54 Using the Recorded disc 61 Using the Setup items 64 Editing on DVD Handycam 84 Dubbing, Printing 92 Using a Computer 99 Troubleshooting 105 Additional Information 128 Glossary, Index 141
Operating Guide
Page 5
...not installed and used rechargeable batteries to the collection and recycling location nearest you call upon your Sony dealer regarding recycling of Conformity Trade Name: SONY Model No.: DCR-DVD405 Responsible Party:Sony Electronics Inc. For more information regarding this equipment. Refer to these numbers whenever you . ... is no guarantee that may result. If this manual thoroughly, and retain it for the FCC related matters only. Model No. DCR-DVD Serial No. If you may cause harmful interference to radio communications. Bernardo Dr, San Diego, CA 92127 U.S.A. CAUTION You are ...
...not installed and used rechargeable batteries to the collection and recycling location nearest you call upon your Sony dealer regarding recycling of Conformity Trade Name: SONY Model No.: DCR-DVD405 Responsible Party:Sony Electronics Inc. For more information regarding this equipment. Refer to these numbers whenever you . ... is no guarantee that may result. If this manual thoroughly, and retain it for the FCC related matters only. Model No. DCR-DVD Serial No. If you may cause harmful interference to radio communications. Bernardo Dr, San Diego, CA 92127 U.S.A. CAUTION You are ...
Operating Guide
Page 6
...can be used with the equipment in order to comply with the computer connected (stored on use in your camcorder You can use 8cm DVD-Rs, 8cm DVD-RWs and 8cm DVD+RWs only. Reorient or relocate the receiving antenna. - Increase the separation between the equipment and receiver. -... "Memory Stick Duo" (This size can use Your camcorder is connected. - Consult the dealer or an experienced radio/ TV ...
...can be used with the equipment in order to comply with the computer connected (stored on use in your camcorder You can use 8cm DVD-Rs, 8cm DVD-RWs and 8cm DVD+RWs only. Reorient or relocate the receiving antenna. - Increase the separation between the equipment and receiver. -... "Memory Stick Duo" (This size can use Your camcorder is connected. - Consult the dealer or an experienced radio/ TV ...
Operating Guide
Page 8
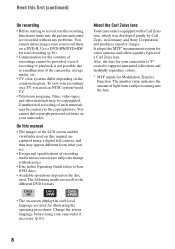
...lens, which was developed jointly by Carl Zeiss, in Germany, and Sony Corporation, and produces superior images. Also, the lens for your recordings on a TV, you record them on a DVD-R. To view your camcorder is T*coated to suppress unwanted reflections and faithfully reproduce colors. * MTF...video cameras and offers a quality typical of the camcorder, storage media, etc. • TV color systems differ depending on your camcorder if necessary (p.81). It adopts the MTF* measurement system for the different DVD formats. Use a DVD-RW/DVD+RW for trial recording (p.16). • ...
...lens, which was developed jointly by Carl Zeiss, in Germany, and Sony Corporation, and produces superior images. Also, the lens for your recordings on a TV, you record them on a DVD-R. To view your camcorder is T*coated to suppress unwanted reflections and faithfully reproduce colors. * MTF...video cameras and offers a quality typical of the camcorder, storage media, etc. • TV color systems differ depending on your camcorder if necessary (p.81). It adopts the MTF* measurement system for the different DVD formats. Use a DVD-RW/DVD+RW for trial recording (p.16). • ...

Operating Guide
Page 10
... Step 2: Charging the battery pack 21 Step 3: Turning the power on, and holding your camcorder with automatic settings Using Easy Handycam operation 33 Recording with ease 34 Playing back with ease 36 Preparation for playing back on a DVD player (Finalizing 38 Recording/Playback Recording 40 Playback 42 Functions used for recording/playback, etc...
... Step 2: Charging the battery pack 21 Step 3: Turning the power on, and holding your camcorder with automatic settings Using Easy Handycam operation 33 Recording with ease 34 Playing back with ease 36 Preparation for playing back on a DVD player (Finalizing 38 Recording/Playback Recording 40 Playback 42 Functions used for recording/playback, etc...

Operating Guide
Page 11
...on a TV 52 Playback on DVD devices Making the disc compatible with playback on DVD devices or DVD drives (Finalizing 54 Playing back a disc on DVD devices, etc 58 Playing back a disc on a computer with a DVD drive installed 59 Using the Recorded disc (DVD-RW/DVD+RW) Recording additional scenes after finalizing... 61 Deleting all of the scenes on the disc (Formatting 62 Using the Setup items Using the Setup items 64 Setup items 66 CAMERA SET 68 Settings to adjust your camcorder to the recording conditions ...
...on a TV 52 Playback on DVD devices Making the disc compatible with playback on DVD devices or DVD drives (Finalizing 54 Playing back a disc on DVD devices, etc 58 Playing back a disc on a computer with a DVD drive installed 59 Using the Recorded disc (DVD-RW/DVD+RW) Recording additional scenes after finalizing... 61 Deleting all of the scenes on the disc (Formatting 62 Using the Setup items Using the Setup items 64 Setup items 66 CAMERA SET 68 Settings to adjust your camcorder to the recording conditions ...
Operating Guide
Page 12
... MODE/LCD/VF SET/USB SPEED, etc.) TIME/LANGU 81 (CLOCK SET/AREA SET/LANGUAGE, etc.) Customizing Personal Menu 82 Editing on DVD Handycam Copying the still images 84 Deleting still images from the "Memory Stick Duo 86 Editing the original data 87 Creating the Playlist 88 Playing the... Playlist 91 Dubbing, Printing Dubbing to VCR/DVD devices 92 Recording images from a TV or VCR/DVD device 94 Printing recorded still images (PictBridge compliant printer 96 Jacks to connect external devices 98 Using a Computer ...
... MODE/LCD/VF SET/USB SPEED, etc.) TIME/LANGU 81 (CLOCK SET/AREA SET/LANGUAGE, etc.) Customizing Personal Menu 82 Editing on DVD Handycam Copying the still images 84 Deleting still images from the "Memory Stick Duo 86 Editing the original data 87 Creating the Playlist 88 Playing the... Playlist 91 Dubbing, Printing Dubbing to VCR/DVD devices 92 Recording images from a TV or VCR/DVD device 94 Printing recorded still images (PictBridge compliant printer 96 Jacks to connect external devices 98 Using a Computer ...

Operating Guide
Page 14
...42) The VISUAL INDEX screen allows you want to recording, you can start recording (p.34, 40) Recorded images are accidentally overwritten. Enjoying with your DVD Handycam What you desire. The disc does not wear out no risk that shows the same 16:9 angle of view as a wide TV. The precious ...• Still images can also be recorded on the disc so there is touch the scene you to do with your DVD Handycam Your DVD Handycam records image data on 8cm DVD*. Taking beautiful shots easily No rewinding to start shooting any time you can do is no matter how many times you ...
...42) The VISUAL INDEX screen allows you want to recording, you can start recording (p.34, 40) Recorded images are accidentally overwritten. Enjoying with your DVD Handycam What you desire. The disc does not wear out no risk that shows the same 16:9 angle of view as a wide TV. The precious ...• Still images can also be recorded on the disc so there is touch the scene you to do with your DVD Handycam Your DVD Handycam records image data on 8cm DVD*. Taking beautiful shots easily No rewinding to start shooting any time you can do is no matter how many times you ...
Operating Guide
Page 15
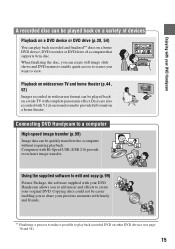
...surround sound to provide full sound on other DVD devices (see page 38 and 54). 15 Playback on a home DVD device, DVD recorder or DVD drive of devices Playback on a DVD device or DVD drive (p.38, 54) You can play back recorded DVD on a home theater. Connecting DVD Handycam to a computer High-speed image transfer ... effect. Using the supplied software to edit and copy (p.99) Picture Package, the software supplied with your DVD Handycam A recorded disc can create still image slide shows and DVD menus to enable quick access to scenes you want to view. When finalizing the disc, you can be...
...surround sound to provide full sound on other DVD devices (see page 38 and 54). 15 Playback on a home DVD device, DVD recorder or DVD drive of devices Playback on a DVD device or DVD drive (p.38, 54) You can play back recorded DVD on a home theater. Connecting DVD Handycam to a computer High-speed image transfer ... effect. Using the supplied software to edit and copy (p.99) Picture Package, the software supplied with your DVD Handycam A recorded disc can create still image slide shows and DVD menus to enable quick access to scenes you want to view. When finalizing the disc, you can be...
Operating Guide
Page 16
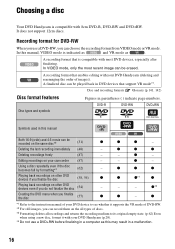
... disc becomes full by formatting*3 (62) - Choosing a disc Your DVD Handycam is compatible with most recent image can be erased. It does not support 12cm discs. Recording format for DVD-RW When you use a DVD+RW before finalizing in a computer as this manual, VIDEO mode is ... to see whether it with your camcorder (87) - A recording format that support VR mode*1. A recording format that enables editing with your DVD Handycam (p.28). *4 Do not use a DVD-RW, you finalize the disc (38, 54) z - Playing back recordings on other DVD devices if you can be played back...
... disc becomes full by formatting*3 (62) - Choosing a disc Your DVD Handycam is compatible with most recent image can be erased. It does not support 12cm discs. Recording format for DVD-RW When you use a DVD+RW before finalizing in a computer as this manual, VIDEO mode is ... to see whether it with your camcorder (87) - A recording format that support VR mode*1. A recording format that enables editing with your DVD Handycam (p.28). *4 Do not use a DVD-RW, you finalize the disc (38, 54) z - Playing back recordings on other DVD devices if you can be played back...
Operating Guide
Page 17
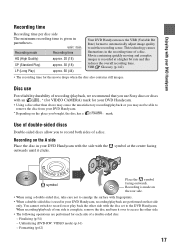
... or you bought, the disc has a mark. VBR Glossary (p.142) • The recording time for each side of a disc. Disc use Sony discs or discs with fingerprints. • When a double-sided disc is recorded at the center facing symbol Place the symbol facing outwards. Finalizing (p.54... also contains still images. symbol at a higher bit rate and this reduces the overall recording time. Enjoying with the disc set to the DVD Handycam. When recording/playback of one side is given in the recording time of a double-sided disc. - Formatting (p.62) 17 This technology...
... or you bought, the disc has a mark. VBR Glossary (p.142) • The recording time for each side of a disc. Disc use Sony discs or discs with fingerprints. • When a double-sided disc is recorded at the center facing symbol Place the symbol facing outwards. Finalizing (p.54... also contains still images. symbol at a higher bit rate and this reduces the overall recording time. Enjoying with the disc set to the DVD Handycam. When recording/playback of one side is given in the recording time of a double-sided disc. - Formatting (p.62) 17 This technology...
Operating Guide
Page 18
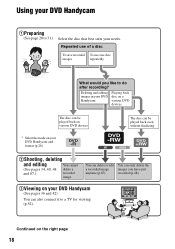
...delete or edit You can also connect it to a TV for viewing (p.52). Continued on a various DVD devices The disc can be played back on various DVD devices * Select the mode on your DVD Handycam (See pages 36 and 42) You can only delete the a recorded image images you like to 31.)... Select the disc that best suits your needs. recorded (p.48). 3Viewing on your DVD Handycam and format (p.28). Repeated use of a disc To save recorded To use one disc images repeatedly What would you have just anytime (p.87). The...
...delete or edit You can also connect it to a TV for viewing (p.52). Continued on a various DVD devices The disc can be played back on various DVD devices * Select the mode on your DVD Handycam (See pages 36 and 42) You can only delete the a recorded image images you like to 31.)... Select the disc that best suits your needs. recorded (p.48). 3Viewing on your DVD Handycam and format (p.28). Repeated use of a disc To save recorded To use one disc images repeatedly What would you have just anytime (p.87). The...
Operating Guide
Page 19
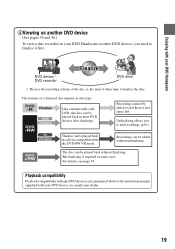
...played back in some cases. But finalizing is not guaranteed. Refer to the instruction manual supplied with your DVD device or consult your DVD Handycam on other DVD devices, you to finalize the disc. Recordings can be played back without unfinalizing. Playback compatibility Playback compatibility... the recording volume of a finalized disc depend on disc type. Recordings cannot be added without finalizing. Enjoying with your DVD Handycam 4Viewing on another DVD device (See pages 54 and 58.) To view a disc recorded on your dealer. 19 Unfinalizing allows you need to...
...played back in some cases. But finalizing is not guaranteed. Refer to the instruction manual supplied with your DVD device or consult your DVD Handycam on other DVD devices, you to finalize the disc. Recordings can be played back without unfinalizing. Playback compatibility Playback compatibility... the recording volume of a finalized disc depend on disc type. Recordings cannot be added without finalizing. Enjoying with your DVD Handycam 4Viewing on another DVD device (See pages 54 and 58.) To view a disc recorded on your dealer. 19 Unfinalizing allows you need to...

Operating Guide
Page 28
... recording side facing your camcorder, then press the center of the camcorder, then open it further. • Be careful not to your camcorder even when your camcorder is turned off. Step 7: Inserting a disc or a "Memory Stick Duo" Inserting a disc A new 8cm DVD-R, DVD-RW, or DVD+RW is required for ...recording (p.16). • Remove dust or fingerprints from the disc beforehand, using the cleaning cloth supplied with your hand or other objects, etc., when opening melody sounds once, and the camcorder beeps. Set the disc with...
... recording side facing your camcorder, then press the center of the camcorder, then open it further. • Be careful not to your camcorder even when your camcorder is turned off. Step 7: Inserting a disc or a "Memory Stick Duo" Inserting a disc A new 8cm DVD-R, DVD-RW, or DVD+RW is required for ...recording (p.16). • Remove dust or fingerprints from the disc beforehand, using the cleaning cloth supplied with your hand or other objects, etc., when opening melody sounds once, and the camcorder beeps. Set the disc with...
Operating Guide
Page 29
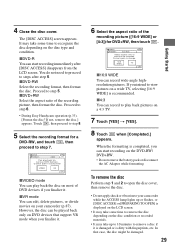
... depending on a wide TV, selecting [16:9 WIDE] is dirty with fingerprints, etc. Cannot edit in Camcorder VIDEO VR OK xVIDEO mode You can start recording on various DVD devices. If you finalize it . 6 Select the aspect ratio of the recording picture, then format the disc...camcorder (p.87). However, the disc can record to steps after [DISC ACCESS] disappears from the LCD screen. 4 Close the disc cover. To remove the disc Perform step 1 and 2 to open the disc cover, then remove the disc. • Do not apply shock or vibration to step 6. • During Easy Handycam...
... depending on a wide TV, selecting [16:9 WIDE] is dirty with fingerprints, etc. Cannot edit in Camcorder VIDEO VR OK xVIDEO mode You can start recording on various DVD devices. If you finalize it . 6 Select the aspect ratio of the recording picture, then format the disc...camcorder (p.87). However, the disc can record to steps after [DISC ACCESS] disappears from the LCD screen. 4 Close the disc cover. To remove the disc Perform step 1 and 2 to open the disc cover, then remove the disc. • Do not apply shock or vibration to step 6. • During Easy Handycam...
Operating Guide
Page 30
...off , eject the "Memory Stick Duo," or remove the battery pack. Do not shake or knock your camcorder is lit or flashing, your camcorder, turn the power off when inserting and removing it from a DVD-RW/DVD+RW, then to use it again to use only a "Memory Stick Duo" marked with or (p.131).... • The number of the previously recorded pictures from your camcorder. 30 ACCESS lamp ("Memory Stick Duo") • If you started to ...
...off , eject the "Memory Stick Duo," or remove the battery pack. Do not shake or knock your camcorder is lit or flashing, your camcorder, turn the power off when inserting and removing it from a DVD-RW/DVD+RW, then to use it again to use only a "Memory Stick Duo" marked with or (p.131).... • The number of the previously recorded pictures from your camcorder. 30 ACCESS lamp ("Memory Stick Duo") • If you started to ...
Operating Guide
Page 31
... on your TV (16:9/4:3) (p.52). • When viewing 16:9 (wide) pictures with a DVD-R/DVD-RW (VIDEO mode)/ DVD+RW inserted while 4:3 is set. when using a DVD+RW - To play back pictures after connecting your camcorder to a TV Set [TV TYPE] to [16:9] or [4:3] according to your device. POWER... switch WIDE SELECT * When viewing on a DVD-R/DVDRW (VIDEO mode). - when [D.EFFECT] is recommended. when you ...
... on your TV (16:9/4:3) (p.52). • When viewing 16:9 (wide) pictures with a DVD-R/DVD-RW (VIDEO mode)/ DVD+RW inserted while 4:3 is set. when using a DVD+RW - To play back pictures after connecting your camcorder to a TV Set [TV TYPE] to [16:9] or [4:3] according to your device. POWER... switch WIDE SELECT * When viewing on a DVD-R/DVDRW (VIDEO mode). - when [D.EFFECT] is recommended. when you ...
Operating Guide
Page 33
... screen. • If you turn off the power without canceling Easy Handycam operation, your camcorder with just one press of Easy Handycam operation. • is a function for making nearly all settings automatic with automatic settings Easy Handycam - using a DVD-RW disc formatted in Easy Handycam operation automatically when you turn on the power. If you set...
... screen. • If you turn off the power without canceling Easy Handycam operation, your camcorder with just one press of Easy Handycam operation. • is a function for making nearly all settings automatic with automatic settings Easy Handycam - using a DVD-RW disc formatted in Easy Handycam operation automatically when you turn on the power. If you set...

Operating Guide
Page 36
... each of each movie clip in the direction of the scene/ previous scene Stop (go to be played back. Previous 6 pictures Next 6 pictures Disc type DVD-RW recording format Appears with ease Slide the POWER switch in the VISUAL INDEX screen. 2 Start playing back.
... each of each movie clip in the direction of the scene/ previous scene Stop (go to be played back. Previous 6 pictures Next 6 pictures Disc type DVD-RW recording format Appears with ease Slide the POWER switch in the VISUAL INDEX screen. 2 Start playing back.
Operating Guide
Page 38
... with DVD devices and DVD drives of power during Easy Handycam operation. creating a DVD menu to play back still images on a DVD player, etc. Preparation for playing back on a DVD player (Finalizing) Finalizing makes the recorded DVD compatible for finalizing a disc 1 Place your camcorder. With Easy Handycam operation, your camcorder and press EASY to set to Easy Handycam (p.33). [Easy Handycam operation...
... with DVD devices and DVD drives of power during Easy Handycam operation. creating a DVD menu to play back still images on a DVD player, etc. Preparation for playing back on a DVD player (Finalizing) Finalizing makes the recorded DVD compatible for finalizing a disc 1 Place your camcorder. With Easy Handycam operation, your camcorder and press EASY to set to Easy Handycam (p.33). [Easy Handycam operation...


