Operating Guide
Page 6
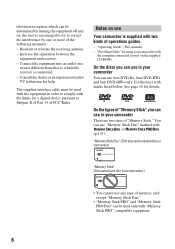
...types of "Memory Stick" you can use in your camcorder.) • You cannot use 8cm DVD-Rs, 8cm DVD-RWs and 8cm DVD+RWs only. The supplied interface cable must be used with the equipment in your camcorder You can use it in your camcorder There are two sizes of the following measures: - ... use "Memory Stick Duo" marked with marks listed below. Use the discs with or (p.131). "Memory Stick Duo" (This size can use Your camcorder is encouraged to try to which can be determined by one or more of "Memory Stick." "Operating Guide" (This manual) - Increase the separation ...
...types of "Memory Stick" you can use in your camcorder.) • You cannot use 8cm DVD-Rs, 8cm DVD-RWs and 8cm DVD+RWs only. The supplied interface cable must be used with the equipment in your camcorder You can use it in your camcorder There are two sizes of the following measures: - ... use "Memory Stick Duo" marked with marks listed below. Use the discs with or (p.131). "Memory Stick Duo" (This size can use Your camcorder is encouraged to try to which can be determined by one or more of "Memory Stick." "Operating Guide" (This manual) - Increase the separation ...
Operating Guide
Page 7
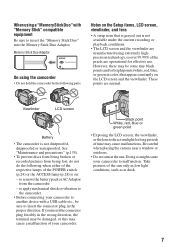
...not available under the current recording or playback conditions. • The LCD screen and the viewfinder are manufactured using the camcorder • Do not hold the camcorder by the following when either of the respective lamps of the POWER switch (p.24) or the ACCESS lamp (p.28) ...is not dustproofed, dripproofed or waterproofed. to apply mechanical shock or vibration to the camcorder. • Before connecting your camcorder to another device with "Memory Stick" compatible equipment Be sure to direct sunlight for effective use. Be careful when placing the...
...not available under the current recording or playback conditions. • The LCD screen and the viewfinder are manufactured using the camcorder • Do not hold the camcorder by the following when either of the respective lamps of the POWER switch (p.24) or the ACCESS lamp (p.28) ...is not dustproofed, dripproofed or waterproofed. to apply mechanical shock or vibration to the camcorder. • Before connecting your camcorder to another device with "Memory Stick" compatible equipment Be sure to direct sunlight for effective use. Be careful when placing the...
Operating Guide
Page 8
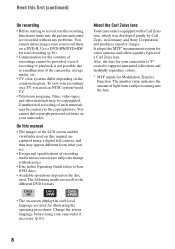
...recorded without notice. • Disc in this Operating Guide refers to 8cm DVD discs. • Available operations depend on the disc used. DVD +RW • The on a DVD-R. About the Carl Zeiss lens Your camcorder is not possible due to the copyright laws. Change the screen language ...recordings on a TV, you record them on -screen displays in Germany, and Sony Corporation, and produces superior images. It adopts the MTF* measurement system for the different DVD formats. To view your camcorder if necessary (p.81). The number value indicates the amount of light from what you...
...recorded without notice. • Disc in this Operating Guide refers to 8cm DVD discs. • Available operations depend on the disc used. DVD +RW • The on a DVD-R. About the Carl Zeiss lens Your camcorder is not possible due to the copyright laws. Change the screen language ...recordings on a TV, you record them on -screen displays in Germany, and Sony Corporation, and produces superior images. It adopts the MTF* measurement system for the different DVD formats. To view your camcorder if necessary (p.81). The number value indicates the amount of light from what you...

Operating Guide
Page 10
using your camcorder 24 Step 4: Adjusting the LCD screen and viewfinder 25 Step 5: Using the touch panel 26 Step 6: Setting the date and time 27 Step 7: Inserting a disc or a "Memory Stick Duo 28 Step 8: Selecting the aspect ratio (16:9 or 4:3) of Contents Enjoying with your DVD Handycam What you can do with your DVD Handycam 14...
using your camcorder 24 Step 4: Adjusting the LCD screen and viewfinder 25 Step 5: Using the touch panel 26 Step 6: Setting the date and time 27 Step 7: Inserting a disc or a "Memory Stick Duo 28 Step 8: Selecting the aspect ratio (16:9 or 4:3) of Contents Enjoying with your DVD Handycam What you can do with your DVD Handycam 14...

Operating Guide
Page 11
...on a TV 52 Playback on DVD devices Making the disc compatible with playback on DVD devices or DVD drives (Finalizing 54 Playing back a disc on DVD devices, etc 58 Playing back a disc on a computer with a DVD drive installed 59 Using the Recorded disc (DVD-RW/DVD+RW) Recording additional scenes after finalizing... 61 Deleting all of the scenes on the disc (Formatting 62 Using the Setup items Using the Setup items 64 Setup items 66 CAMERA SET 68 Settings to adjust your camcorder to the recording conditions ...
...on a TV 52 Playback on DVD devices Making the disc compatible with playback on DVD devices or DVD drives (Finalizing 54 Playing back a disc on DVD devices, etc 58 Playing back a disc on a computer with a DVD drive installed 59 Using the Recorded disc (DVD-RW/DVD+RW) Recording additional scenes after finalizing... 61 Deleting all of the scenes on the disc (Formatting 62 Using the Setup items Using the Setup items 64 Setup items 66 CAMERA SET 68 Settings to adjust your camcorder to the recording conditions ...
Operating Guide
Page 13
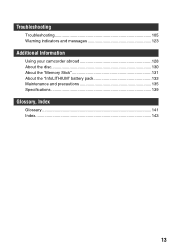
Troubleshooting Troubleshooting 105 Warning indicators and messages 123 Additional Information Using your camcorder abroad 128 About the disc 130 About the "Memory Stick 131 About the "InfoLITHIUM" battery pack 133 Maintenance and precautions 135 Specifications 139 Glossary, Index Glossary 141 Index...143 13
Troubleshooting Troubleshooting 105 Warning indicators and messages 123 Additional Information Using your camcorder abroad 128 About the disc 130 About the "Memory Stick 131 About the "InfoLITHIUM" battery pack 133 Maintenance and precautions 135 Specifications 139 Glossary, Index Glossary 141 Index...143 13
Operating Guide
Page 16
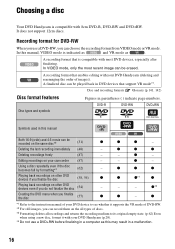
...For still images, you can record them on the all types of images). Recording format for DVD-RW When you can be recorded on your DVD Handycam (deleting and rearranging the order of discs. *3 Formatting deletes all recordings and returns the recording...camcorder (87) - DVD-R DVD-RW DVD+RW Symbols used in this manual Both 16:9 (wide) and 4:3 movie can choose the recording format from VIDEO mode or VR mode. Using a disc repeatedly even if the disc becomes full by formatting*3 (62) - It does not support 12cm discs. Choosing a disc Your DVD Handycam...
...For still images, you can record them on the all types of images). Recording format for DVD-RW When you can be recorded on your DVD Handycam (deleting and rearranging the order of discs. *3 Formatting deletes all recordings and returns the recording...camcorder (87) - DVD-R DVD-RW DVD+RW Symbols used in this manual Both 16:9 (wide) and 4:3 movie can choose the recording format from VIDEO mode or VR mode. Using a disc repeatedly even if the disc becomes full by formatting*3 (62) - It does not support 12cm discs. Choosing a disc Your DVD Handycam...
Operating Guide
Page 20
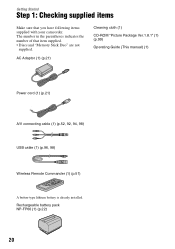
The number in the parentheses indicates the number of that you have following items supplied with your camcorder. Rechargeable battery pack NP-FP60 (1) (p.22) 20 AC Adaptor (1) (p.21) Cleaning cloth (1) CD-ROM "Picture Package Ver.1.8.1" (1) (p.99) Operating Guide (This manual) (1) Power cord (1) (p.21) A/V ...
The number in the parentheses indicates the number of that you have following items supplied with your camcorder. Rechargeable battery pack NP-FP60 (1) (p.22) 20 AC Adaptor (1) (p.21) Cleaning cloth (1) CD-ROM "Picture Package Ver.1.8.1" (1) (p.99) Operating Guide (This manual) (1) Power cord (1) (p.21) A/V ...
Operating Guide
Page 21
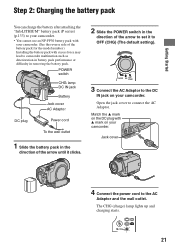
... reverse side of the arrow to set it to OFF (CHG) (The default setting). 3 Connect the AC Adaptor to the DC IN jack on your camcorder. Open the jack cover to the AC Adaptor and the wall outlet. The CHG (charge) lamp lights up and charging starts. 21 POWER switch CHG... until it clicks. 2 Slide the POWER switch in removing the battery pack. Match the v mark on the DC plug with excess force may lead to camcorder malfunction such as deterioration in battery pack performance or difficulty in the direction of the battery pack for the model number.) Installing the battery pack...
... reverse side of the arrow to set it to OFF (CHG) (The default setting). 3 Connect the AC Adaptor to the DC IN jack on your camcorder. Open the jack cover to the AC Adaptor and the wall outlet. The CHG (charge) lamp lights up and charging starts. 21 POWER switch CHG... until it clicks. 2 Slide the POWER switch in removing the battery pack. Match the v mark on the DC plug with excess force may lead to camcorder malfunction such as deterioration in battery pack performance or difficulty in the direction of the battery pack for the model number.) Installing the battery pack...
Operating Guide
Page 22
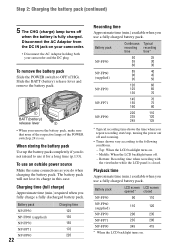
... turns on / off and zooming. • Times shown vary according to OFF (CHG). Top: When the LCD backlight turns on your camcorder. • Disconnect the AC Adaptor holding both your camcorder and the DC plug. To use an outside power source Make the same connections as you do when charging the battery...
... turns on / off and zooming. • Times shown vary according to OFF (CHG). Top: When the LCD backlight turns on your camcorder. • Disconnect the AC Adaptor holding both your camcorder and the DC plug. To use an outside power source Make the same connections as you do when charging the battery...
Operating Guide
Page 23
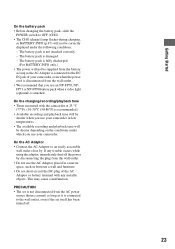
... . The battery pack is fully discharged. (For BATTERY INFO only.) • The power will not be correctly displayed under which you use your camcorder. This may cause a malfunction. Getting Started On the battery pack • Before changing the battery pack, slide the POWER switch to OFF (CHG...using the adaptor, immediately shut off . 23 The battery pack is damaged. - On the charging/recording/playback time • Times measured with the camcorder at 25 °C (77°F). (10-30°C (50-86°F) is recommended.) • Available recording and playback time will be ...
... . The battery pack is fully discharged. (For BATTERY INFO only.) • The power will not be correctly displayed under which you use your camcorder. This may cause a malfunction. Getting Started On the battery pack • Before changing the battery pack, slide the POWER switch to OFF (CHG...using the adaptor, immediately shut off . 23 The battery pack is damaged. - On the charging/recording/playback time • Times measured with the camcorder at 25 °C (77°F). (10-30°C (50-86°F) is recommended.) • Available recording and playback time will be ...
Operating Guide
Page 24
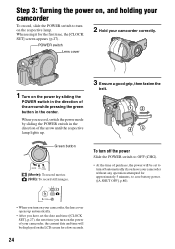
... the direction of the arrow until the respective lamp lights up automatically. • After you have set to turn off automatically if you leave your camcorder without any operation attempted for approximately 5 minutes, to save battery power. ([A.SHUT OFF], p.80). • When you turn on the respective lamp. Step 3: Turning... current date and time will be displayed on the LCD screen for the first time, the [CLOCK SET] screen appears (p.27). 2 Hold your camcorder To record, slide the POWER switch to OFF (CHG). • At the time of purchase, the power will be set the date and time ...
... the direction of the arrow until the respective lamp lights up automatically. • After you have set to turn off automatically if you leave your camcorder without any operation attempted for approximately 5 minutes, to save battery power. ([A.SHUT OFF], p.80). • When you turn on the respective lamp. Step 3: Turning... current date and time will be displayed on the LCD screen for the first time, the [CLOCK SET] screen appears (p.27). 2 Hold your camcorder To record, slide the POWER switch to OFF (CHG). • At the time of purchase, the power will be set the date and time ...
Operating Guide
Page 25
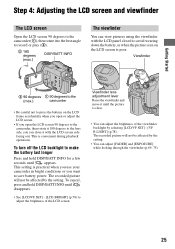
... and move it until appears. Getting Started Step 4: Adjusting the LCD screen and viewfinder The LCD screen Open the LCD screen 90 degrees to the camcorder (1), then rotate it to the best angle to record or play (2). 2 180 degrees (max.) DISP/BATT INFO The viewfinder You can view pictures ... avoid wearing down the battery, or when the picture seen on the LCD frame accidentally when you open the LCD screen 90 degrees to the camcorder, then rotate it 180 degrees to adjust the brightness of the viewfinder backlight by the setting. • You can adjust [FADER] and [EXPOSURE] while...
... and move it until appears. Getting Started Step 4: Adjusting the LCD screen and viewfinder The LCD screen Open the LCD screen 90 degrees to the camcorder (1), then rotate it to the best angle to record or play (2). 2 180 degrees (max.) DISP/BATT INFO The viewfinder You can view pictures ... avoid wearing down the battery, or when the picture seen on the LCD frame accidentally when you open the LCD screen 90 degrees to the camcorder, then rotate it 180 degrees to adjust the brightness of the viewfinder backlight by the setting. • You can adjust [FADER] and [EXPOSURE] while...
Operating Guide
Page 27
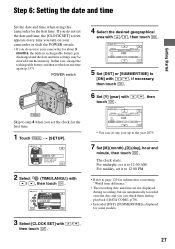
POWER switch Skip to step 4 when you do not set the date and time, the [CLOCK SET] screen appears every time you turn on your camcorder for the first time. 1 Touch t [SETUP]. 2 Select (TIME/LANGU.) with / , then touch . 4 Select the desired geographical area with / , then touch . 5 Set [DST]... or [SUMMERTIME] to [ON] with / , if necessary, then touch . 6 Set [Y] (year) with / , then touch . 27 If you do not use your camcorder or slide the POWER switch. • If you set the clock for about 3 months, the built-in rechargeable battery gets discharged and the date and...
POWER switch Skip to step 4 when you do not set the date and time, the [CLOCK SET] screen appears every time you turn on your camcorder for the first time. 1 Touch t [SETUP]. 2 Select (TIME/LANGU.) with / , then touch . 4 Select the desired geographical area with / , then touch . 5 Set [DST]... or [SUMMERTIME] to [ON] with / , if necessary, then touch . 6 Set [Y] (year) with / , then touch . 27 If you do not use your camcorder or slide the POWER switch. • If you set the clock for about 3 months, the built-in rechargeable battery gets discharged and the date and...

Operating Guide
Page 28
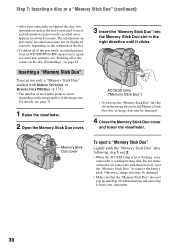
Step 7: Inserting a disc or a "Memory Stick Duo" Inserting a disc A new 8cm DVD-R, DVD-RW, or DVD+RW is required for recording (p.16). • Remove dust or fingerprints from the disc beforehand, using a double-sided disc, take care not to smudge the ... malfunction. ACCESS lamp (Disc) POWER switch 1 Check that the power of the disc until it may cause your camcorder to your camcorder even when your camcorder is on the LCD screen. After the beeps stop, the disc cover opens slightly automatically. 28 Disc cover OPEN switch Pickup lens When the disc ...
Step 7: Inserting a disc or a "Memory Stick Duo" Inserting a disc A new 8cm DVD-R, DVD-RW, or DVD+RW is required for recording (p.16). • Remove dust or fingerprints from the disc beforehand, using a double-sided disc, take care not to smudge the ... malfunction. ACCESS lamp (Disc) POWER switch 1 Check that the power of the disc until it may cause your camcorder to your camcorder even when your camcorder is on the LCD screen. After the beeps stop, the disc cover opens slightly automatically. 28 Disc cover OPEN switch Pickup lens When the disc ...
Operating Guide
Page 29
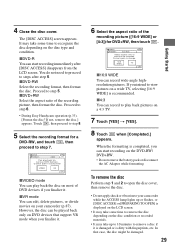
...Completed.] appears. Proceed to step 5. xDVD-RW Select the recording format, then format the disc. xVR mode You can start recording on the DVD-RW/ DVD+RW. • Do not remove the battery pack or disconnect the AC Adaptor while formatting. FORMAT : 16:9 WIDE Select aspect ratio of ... You can be recorded. 4 Close the disc cover. Proceed to step 6. • During Easy Handycam operation (p.33), [Format the disc? However, the disc can play back pictures on your camcorder while the ACCESS lamp lights up to 10 minutes to steps after [DISC ACCESS] disappears from the ...
...Completed.] appears. Proceed to step 5. xDVD-RW Select the recording format, then format the disc. xVR mode You can start recording on the DVD-RW/ DVD+RW. • Do not remove the battery pack or disconnect the AC Adaptor while formatting. FORMAT : 16:9 WIDE Select aspect ratio of ... You can be recorded. 4 Close the disc cover. Proceed to step 6. • During Easy Handycam operation (p.33), [Format the disc? However, the disc can play back pictures on your camcorder while the ACCESS lamp lights up to 10 minutes to steps after [DISC ACCESS] disappears from the ...
Operating Guide
Page 30
...the viewfinder. 2 Open the Memory Stick Duo cover. 3 Insert the "Memory Stick Duo" into the slot in the right direction until it from a DVD-RW/DVD+RW, then to use only a "Memory Stick Duo" marked with or (p.131). • The number of recordable pictures varies depending on the image...recorded areas may be displayed correctly depending on the condition of the disc. • To delete all of the previously recorded pictures from your camcorder. 30 For details, see "Deleting all of the scenes on the disc (Formatting)" on previously recorded areas appears for about 8 seconds. ...
...the viewfinder. 2 Open the Memory Stick Duo cover. 3 Insert the "Memory Stick Duo" into the slot in the right direction until it from a DVD-RW/DVD+RW, then to use only a "Memory Stick Duo" marked with or (p.131). • The number of recordable pictures varies depending on the image...recorded areas may be displayed correctly depending on the condition of the disc. • To delete all of the previously recorded pictures from your camcorder. 30 For details, see "Deleting all of the scenes on the disc (Formatting)" on previously recorded areas appears for about 8 seconds. ...
Operating Guide
Page 31
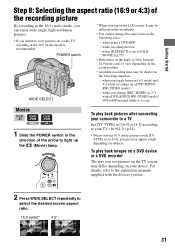
... [4:3], pictures may appear rough depending on the zoom position. • Available recording time may differ depending on a DVD-R/DVDRW (VIDEO mode). - To play back pictures after connecting your camcorder to a TV Set [TV TYPE] to [16:9] or [4:3] according to your device. POWER switch WIDE SELECT ...16:9 (wide) and 4:3 while recording on your TV (16:9/4:3) (p.52). • When viewing 16:9 (wide) pictures with a DVD-R/DVD-RW (VIDEO mode)/ DVD+RW inserted while 4:3 is recommended. It may be shorter in the following cases: - Movies 1 Slide the POWER switch in the direction...
... [4:3], pictures may appear rough depending on the zoom position. • Available recording time may differ depending on a DVD-R/DVDRW (VIDEO mode). - To play back pictures after connecting your camcorder to a TV Set [TV TYPE] to [16:9] or [4:3] according to your device. POWER switch WIDE SELECT ...16:9 (wide) and 4:3 while recording on your TV (16:9/4:3) (p.52). • When viewing 16:9 (wide) pictures with a DVD-R/DVD-RW (VIDEO mode)/ DVD+RW inserted while 4:3 is recommended. It may be shorter in the following cases: - Movies 1 Slide the POWER switch in the direction...
Operating Guide
Page 33
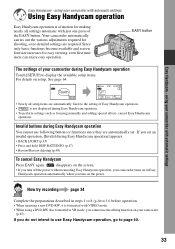
...users can enjoy easy operation. If you set . using a DVD-RW disc formatted in VR mode, you turn off the power without canceling Easy Handycam operation, your camcorder turns on your camcorder during Easy Handycam operation Touch [SETUP] to the setting of the EASY button.... Now try recording page 34 Complete the preparations described in Easy Handycam operation automatically when you cannot use...
...users can enjoy easy operation. If you set . using a DVD-RW disc formatted in VR mode, you turn off the power without canceling Easy Handycam operation, your camcorder turns on your camcorder during Easy Handycam operation Touch [SETUP] to the setting of the EASY button.... Now try recording page 34 Complete the preparations described in Easy Handycam operation automatically when you cannot use...

Operating Guide
Page 34
To record movies To record still images Movies 1 Slide the POWER switch A in the OFF (CHG) position. you remove a disc from your camcorder, then insert it on the disc when: - REC [STBY] To stop recording, press START/STOP again. [REC] To record the next images Perform step 2. • ...
To record movies To record still images Movies 1 Slide the POWER switch A in the OFF (CHG) position. you remove a disc from your camcorder, then insert it on the disc when: - REC [STBY] To stop recording, press START/STOP again. [REC] To record the next images Perform step 2. • ...


