Operating Guide
Page 2
...this first Before operating the unit, please read this product, you may call: Sony Customer Information Center 1-800-222-SONY (7669). This symbol is for future reference. Use of controls or adjustments or performance of rechargeable batteries, call toll free 1-800-8228837, or visit http://www.rbrc.org/ Caution: Do ... the user to the presence of electric shock to rain or moisture. Model No. Record the serial number in hazardous radiation exposure. DCR-DVD Serial No. AC- If you have any questions about this manual thoroughly, and retain it for the FCC related matters only...
...this first Before operating the unit, please read this product, you may call: Sony Customer Information Center 1-800-222-SONY (7669). This symbol is for future reference. Use of controls or adjustments or performance of rechargeable batteries, call toll free 1-800-8228837, or visit http://www.rbrc.org/ Caution: Do ... the user to the presence of electric shock to rain or moisture. Model No. Record the serial number in hazardous radiation exposure. DCR-DVD Serial No. AC- If you have any questions about this manual thoroughly, and retain it for the FCC related matters only...
Operating Guide
Page 3
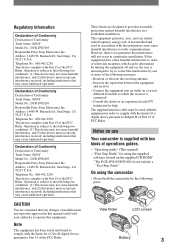
... the camcorder by one or more of Conformity Trade Name: SONY Model No.: DCR-DVD103 Responsible Party:Sony Electronics Inc. Telephone No.: 858-942-2230 This device complies with Part 15 of the FCC Rules. View finder LCD screen Battery 3 ...U.S.A. If this equipment does cause harmful interference to radio communications. Declaration of Conformity Declaration of Conformity Trade Name: SONY Model No.: DCR-DVD403 Responsible Party:Sony Electronics Inc. Address: 16450 W. Address: 16450 W. However, there is subject to the following parts. Telephone...
... the camcorder by one or more of Conformity Trade Name: SONY Model No.: DCR-DVD103 Responsible Party:Sony Electronics Inc. Telephone No.: 858-942-2230 This device complies with Part 15 of the FCC Rules. View finder LCD screen Battery 3 ...U.S.A. If this equipment does cause harmful interference to radio communications. Declaration of Conformity Declaration of Conformity Trade Name: SONY Model No.: DCR-DVD403 Responsible Party:Sony Electronics Inc. Address: 16450 W. Address: 16450 W. However, there is subject to the following parts. Telephone...
Operating Guide
Page 4
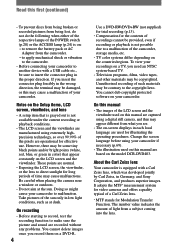
... on: − to remove the battery pack or AC Adaptor from the camcorder. − to apply mechanical shock or vibration to the camcorder. • Before connecting your camcorder to malfunction. Notes on the Setup ...; Do not aim at dusk. Take pictures of the sun only in Germany, and Sony Corporation, and produces superior images. You cannot dub copyright protected software on -screen displays ...view your recordings on the model DCR-DVD403. The number value indicates the amount of a Carl Zeiss lens. * MTF stands for long periods of your camcorder. However, there may be damaged,...
... on: − to remove the battery pack or AC Adaptor from the camcorder. − to apply mechanical shock or vibration to the camcorder. • Before connecting your camcorder to malfunction. Notes on the Setup ...; Do not aim at dusk. Take pictures of the sun only in Germany, and Sony Corporation, and produces superior images. You cannot dub copyright protected software on -screen displays ...view your recordings on the model DCR-DVD403. The number value indicates the amount of a Carl Zeiss lens. * MTF stands for long periods of your camcorder. However, there may be damaged,...
Operating Guide
Page 6
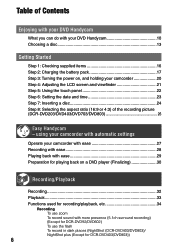
..., etc 34 Recording To use the flash To record in dark places (NightShot (DCR-DVD403/DVD803)/ NightShot plus (Except for playing back on , and holding your camcorder with ease 27 Recording with ease 28 Playing back with ease 29 Preparation for DCR-DVD403/DVD803)) 6 Table of the recording picture (DCR-DVD203/DVD403/DVD703/DVD803 26 Easy Handycam -
..., etc 34 Recording To use the flash To record in dark places (NightShot (DCR-DVD403/DVD803)/ NightShot plus (Except for playing back on , and holding your camcorder with ease 27 Recording with ease 28 Playing back with ease 29 Preparation for DCR-DVD403/DVD803)) 6 Table of the recording picture (DCR-DVD203/DVD403/DVD703/DVD803 26 Easy Handycam -
Operating Guide
Page 7
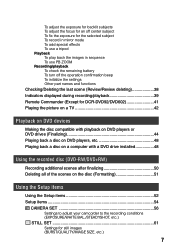
...To play back the images in sequence To use PB ZOOM Recording/playback To check the remaining battery To turn off the operation confirmation beep To initialize the settings Other part names and ... last scene (Review/Review deleting 38 Indicators displayed during recording/playback 39 Remote Commander (Except for DCR-DVD92/DVD602 41 Playing the picture on a TV 42 Playback on DVD devices Making the disc... the Setup items 52 Setup items 54 CAMERA SET 56 Settings to adjust your camcorder to the recording conditions (EXPOSURE/WHITE BAL./STEADYSHOT, etc.) STILL SET 61 Settings for still images (...
...To play back the images in sequence To use PB ZOOM Recording/playback To check the remaining battery To turn off the operation confirmation beep To initialize the settings Other part names and ... last scene (Review/Review deleting 38 Indicators displayed during recording/playback 39 Remote Commander (Except for DCR-DVD92/DVD602 41 Playing the picture on a TV 42 Playback on DVD devices Making the disc... the Setup items 52 Setup items 54 CAMERA SET 56 Settings to adjust your camcorder to the recording conditions (EXPOSURE/WHITE BAL./STEADYSHOT, etc.) STILL SET 61 Settings for still images (...
Operating Guide
Page 9
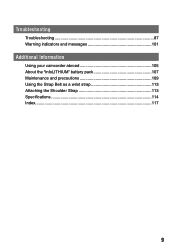
Troubleshooting Troubleshooting 87 Warning indicators and messages 101 Additional Information Using your camcorder abroad 105 About the "InfoLITHIUM" battery pack 107 Maintenance and precautions 109 Using the Strap Belt as a wrist strap 113 Attaching the Shoulder Strap 113 Specifications 114 Index...117 9
Troubleshooting Troubleshooting 87 Warning indicators and messages 101 Additional Information Using your camcorder abroad 105 About the "InfoLITHIUM" battery pack 107 Maintenance and precautions 109 Using the Strap Belt as a wrist strap 113 Attaching the Shoulder Strap 113 Specifications 114 Index...117 9
Operating Guide
Page 16
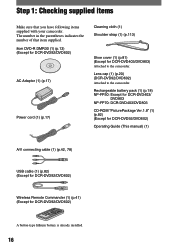
... following items supplied with your camcorder. Rechargeable battery pack (1) (p.18) NP-FP50: Except for DCR-DVD403/ DVD803 NP-FP70: DCR-DVD403/DVD803 CD-ROM "PicturePackage Ver.1.8" (1) (p.82) (Except for DCR-DVD92/DVD602) Operating Guide (This manual) (1) A/V connecting cable (1) (p.42, 78) USB cable (1) (p.82) (Except for DCR-DVD92/DVD602) Wireless Remote Commander (1) (p.41) (Except for DCR-DVD403/DVD803) Attached to the...
... following items supplied with your camcorder. Rechargeable battery pack (1) (p.18) NP-FP50: Except for DCR-DVD403/ DVD803 NP-FP70: DCR-DVD403/DVD803 CD-ROM "PicturePackage Ver.1.8" (1) (p.82) (Except for DCR-DVD92/DVD602) Operating Guide (This manual) (1) A/V connecting cable (1) (p.42, 78) USB cable (1) (p.82) (Except for DCR-DVD92/DVD602) Wireless Remote Commander (1) (p.41) (Except for DCR-DVD403/DVD803) Attached to the...
Operating Guide
Page 17
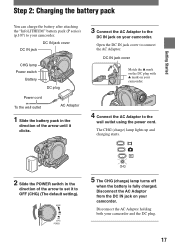
...ON OFF (CHG) POWER CHG 5 The CHG (charge) lamp turns off when the battery is fully charged. Disconnect the AC Adaptor holding both your camcorder. Disconnect the AC Adaptor from the DC IN jack on your camcorder. DC IN jack cover Match the mark on the DC plug with &#...set it clicks. 3 Connect the AC Adaptor to the DC IN jack on your camcorder. Getting Started Step 2: Charging the battery pack You can charge the battery after attaching the "InfoLITHIUM" battery pack (P series) (p.107) to your camcorder. 4 Connect the AC Adaptor to the wall outlet using the power cord. Open the...
...ON OFF (CHG) POWER CHG 5 The CHG (charge) lamp turns off when the battery is fully charged. Disconnect the AC Adaptor holding both your camcorder. Disconnect the AC Adaptor from the DC IN jack on your camcorder. DC IN jack cover Match the mark on the DC plug with &#...set it clicks. 3 Connect the AC Adaptor to the DC IN jack on your camcorder. Getting Started Step 2: Charging the battery pack You can charge the battery after attaching the "InfoLITHIUM" battery pack (P series) (p.107) to your camcorder. 4 Connect the AC Adaptor to the wall outlet using the power cord. Open the...
Operating Guide
Page 18
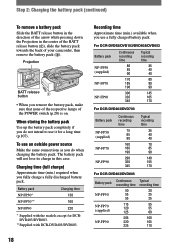
...button • When you remove the battery pack, make sure that none of the respective lamps of your camcorder, then remove the battery pack (). When storing the battery pack Use up the battery pack completely if you fully charge a fully discharged battery pack. The battery pack will not lose its charge ...60 100 105 110 18 To use an outside power source Make the same connections as you use it for DCRDVD403/DVD803. **Supplied with DCR-DVD403/DVD803. Battery pack NP-FP50* NP-FP70** Charging time 130 160 NP-FP90 220 * Supplied with the models except for a long time (p.107)....
...button • When you remove the battery pack, make sure that none of the respective lamps of your camcorder, then remove the battery pack (). When storing the battery pack Use up the battery pack completely if you fully charge a fully discharged battery pack. The battery pack will not lose its charge ...60 100 105 110 18 To use an outside power source Make the same connections as you use it for DCRDVD403/DVD803. **Supplied with DCR-DVD403/DVD803. Battery pack NP-FP50* NP-FP70** Charging time 130 160 NP-FP90 220 * Supplied with the models except for a long time (p.107)....
Operating Guide
Page 19
...the DC plug of your camcorder, even when the power cord is disconnected from the wall outlet. • We recommend that you use an NP-FP70 or NP-FP90 battery pack when a video light (optional) is attached. For DCR-DVD92/DVD103/DVD602/DVD653 Battery pack NP-FP50 (supplied)...supplied) 90 110 NP-FP70 190 235 NP-FP90 345 415 For DCR-DVD403/DVD803 Battery pack LCD screen opened* LCD screen closed . The battery pack is damaged. - The battery pack is not attached correctly. - PRECAUTION • Even if your camcorder is turned off . On the charging/recording/playback time •...
...the DC plug of your camcorder, even when the power cord is disconnected from the wall outlet. • We recommend that you use an NP-FP70 or NP-FP90 battery pack when a video light (optional) is attached. For DCR-DVD92/DVD103/DVD602/DVD653 Battery pack NP-FP50 (supplied)...supplied) 90 110 NP-FP70 190 235 NP-FP90 345 415 For DCR-DVD403/DVD803 Battery pack LCD screen opened* LCD screen closed . The battery pack is damaged. - The battery pack is not attached correctly. - PRECAUTION • Even if your camcorder is turned off . On the charging/recording/playback time •...
Operating Guide
Page 20
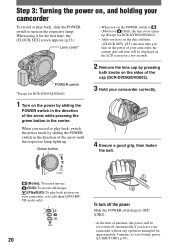
...minutes, to turn on the respective lamp. POWER switch *Except for DCR-DVD92/DVD602 2 Remove the lens cap by pressing both knobs on the sides of the cap (DCR-DVD92/DVD602). 3 Hold your camcorder correctly. 1 Turn on the LCD screen for the first ... (CHG) POWER (Movie): To record movies (Still): To record still images (Play/Edit): To play back pictures on your camcorder, or to edit them (DVD-RW: VR mode only) CHG 20 To turn off the power Slide the POWER switch up...turn off automatically if you record or play back, slide the POWER switch to save battery power. ([A.SHUT OFF], p.69).
...minutes, to turn on the respective lamp. POWER switch *Except for DCR-DVD92/DVD602 2 Remove the lens cap by pressing both knobs on the sides of the cap (DCR-DVD92/DVD602). 3 Hold your camcorder correctly. 1 Turn on the LCD screen for the first ... (CHG) POWER (Movie): To record movies (Still): To record still images (Play/Edit): To play back pictures on your camcorder, or to edit them (DVD-RW: VR mode only) CHG 20 To turn off the power Slide the POWER switch up...turn off automatically if you record or play back, slide the POWER switch to save battery power. ([A.SHUT OFF], p.69).
Operating Guide
Page 21
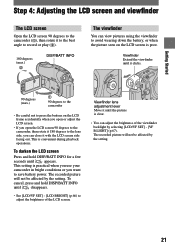
... bright conditions or you want to the lens side, you open the LCD screen 90 degrees to the camcorder, then rotate it 180 degrees to save battery power. This setting is poor. Getting Started Step 4: Adjusting the LCD screen and viewfinder The LCD screen Open the LCD screen 90 ...degrees to the camcorder (), then rotate it to the best angle to record or play (). 180 degrees (max.) &#...
... bright conditions or you want to the lens side, you open the LCD screen 90 degrees to the camcorder, then rotate it 180 degrees to save battery power. This setting is poor. Getting Started Step 4: Adjusting the LCD screen and viewfinder The LCD screen Open the LCD screen 90 ...degrees to the camcorder (), then rotate it to the best angle to record or play (). 180 degrees (max.) &#...

Operating Guide
Page 23
... and time, the [CLOCK SET] screen appears every time you turn on your camcorder or slide the POWER switch down. • If you set the clock for about 3 months, the built-in rechargeable battery gets discharged and the date and time settings may be cleared from the memory. ... 106 for information concerning "World time difference." • Instead of [DST], [SUMMERTIME] is displayed for the first time. In that case, charge the rechargeable battery and then set it to 12:00 PM. • Refer to 12:00 AM. CLOCK SET -:--:-- with / , then touch . 3 Select [CLOCK SET] with ...
... and time, the [CLOCK SET] screen appears every time you turn on your camcorder or slide the POWER switch down. • If you set the clock for about 3 months, the built-in rechargeable battery gets discharged and the date and time settings may be cleared from the memory. ... 106 for information concerning "World time difference." • Instead of [DST], [SUMMERTIME] is displayed for the first time. In that case, charge the rechargeable battery and then set it to 12:00 PM. • Refer to 12:00 AM. CLOCK SET -:--:-- with / , then touch . 3 Select [CLOCK SET] with ...
Operating Guide
Page 25
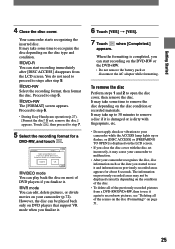
... TO OPEN] is completed, you finalize it and information on the DVD-RW or the DVD+RW. • Do not remove the battery pack or disconnect the AC adaptor while formatting. Getting Started 4 Close the disc cover. You do not need to proceed to recognize the disc ... malfunction. • After your camcorder (p.72). Proceed to open the disc cover, then remove the disc. To remove the disc Perform steps 1 and 2 to step 6. • During Easy Handycam operation (p.27), [Format the disc? Proceed to remove the disc depending on various DVD devices. It may take some time...
... TO OPEN] is completed, you finalize it and information on the DVD-RW or the DVD+RW. • Do not remove the battery pack or disconnect the AC adaptor while formatting. Getting Started 4 Close the disc cover. You do not need to proceed to recognize the disc ... malfunction. • After your camcorder (p.72). Proceed to open the disc cover, then remove the disc. To remove the disc Perform steps 1 and 2 to step 6. • During Easy Handycam operation (p.27), [Format the disc? Proceed to remove the disc depending on various DVD devices. It may take some time...
Operating Guide
Page 35
...played back with DVD recorders/DVD players compatible with your discs. To record in dark places (NightShot (DCR-DVD403/DVD803)/ NightShot plus (Except for DCRDVD403/DVD803 Set the NIGHTSHOT or NIGHTSHOT PLUS switch to... The flash charge lamp flickers when charging the flash, and remains lit when the battery charge is complete. • If you use infrared light. No indicator displayed: Automatically flashes when ... the infrared port with your camcorder. * Dolby Digital 5.1 Creater compresses sound effectively while maintaining high quality sound.
...played back with DVD recorders/DVD players compatible with your discs. To record in dark places (NightShot (DCR-DVD403/DVD803)/ NightShot plus (Except for DCRDVD403/DVD803 Set the NIGHTSHOT or NIGHTSHOT PLUS switch to... The flash charge lamp flickers when charging the flash, and remains lit when the battery charge is complete. • If you use infrared light. No indicator displayed: Automatically flashes when ... the infrared port with your camcorder. * Dolby Digital 5.1 Creater compresses sound effectively while maintaining high quality sound.
Operating Guide
Page 37
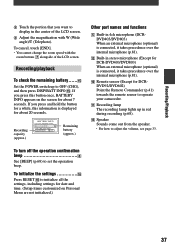
...Remote Commander (p.41) towards the remote sensor to operate your camcorder. Recording lamp The recording lamp lights up to OFF (CHG), and then press DISP/BATT INFO . Recording capacity (approx.) Remaining battery (approx.) Other part names and functions Built-in ... precedence over the internal microphone (p.81). Built-in stereo microphone (Except for DCR-DVD403/DVD803) When an external microphone (optional) is displayed for a while, this button once, BATTERY INFO appears on Personal Menu are not initialized.) 37 If you press and hold the button...
...Remote Commander (p.41) towards the remote sensor to operate your camcorder. Recording lamp The recording lamp lights up to OFF (CHG), and then press DISP/BATT INFO . Recording capacity (approx.) Remaining battery (approx.) Other part names and functions Built-in ... precedence over the internal microphone (p.81). Built-in stereo microphone (Except for DCR-DVD403/DVD803) When an external microphone (optional) is displayed for a while, this button once, BATTERY INFO appears on Personal Menu are not initialized.) 37 If you press and hold the button...
Operating Guide
Page 39
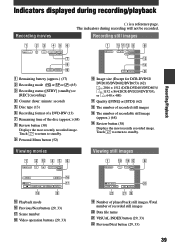
Recording still images Recording/Playback Remaining battery (approx.) (37) Recording mode ( or or ) (65) Recording status ([STBY] (standby) or [REC] (recording) Counter (... a reference page. Touch to return to standby. Personal Menu button (52) Viewing movies Image size (Except for DCR-DVD92/ DVD103/DVD602/DVD653) (62) 2016 × 1512 (DCR-DVD403/DVD803)/ 1152 × 864(DCR-DVD203/DVD703), or 640 × 480) Quality ([FINE] or [STD]) (62) The number of recorded still...
Recording still images Recording/Playback Remaining battery (approx.) (37) Recording mode ( or or ) (65) Recording status ([STBY] (standby) or [REC] (recording) Counter (... a reference page. Touch to return to standby. Personal Menu button (52) Viewing movies Image size (Except for DCR-DVD92/ DVD103/DVD602/DVD653) (62) 2016 × 1512 (DCR-DVD403/DVD803)/ 1152 × 864(DCR-DVD203/DVD703), or 640 × 480) Quality ([FINE] or [STD]) (62) The number of recorded still...
Operating Guide
Page 41
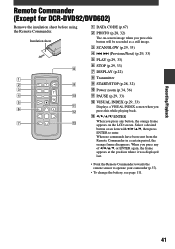
... press this while playing back. Select a desired button or an item with then press ENTER to operate your camcorder (p.37). • To change the battery, see page 111. 41 Recording/Playback Remote Commander (Except for DCR-DVD92/DVD602) Remove the insulation sheet before using the Remote Commander. When you press any button, the...
... press this while playing back. Select a desired button or an item with then press ENTER to operate your camcorder (p.37). • To change the battery, see page 111. 41 Recording/Playback Remote Commander (Except for DCR-DVD92/DVD602) Remove the insulation sheet before using the Remote Commander. When you press any button, the...
Operating Guide
Page 57
... have the power source disconnected from your camcorder for more than 5 minutes. 57 Using the Setup items INDOOR () The white balance is set to [AUTO] when you have changed the battery pack while [AUTO] is selected, or you bring your camcorder outdoors from inside the house while using... fixed exposure, select [AUTO] and aim your camcorder at a nearby white object for about 10 seconds for more than 5...
... have the power source disconnected from your camcorder for more than 5 minutes. 57 Using the Setup items INDOOR () The white balance is set to [AUTO] when you have changed the battery pack while [AUTO] is selected, or you bring your camcorder outdoors from inside the house while using... fixed exposure, select [AUTO] and aim your camcorder at a nearby white object for about 10 seconds for more than 5...
Operating Guide
Page 66
...Records normal stereo sound. • The setting returns to [WIDE STEREO] when you have the power source disconnected from your camcorder for details. 66 For DCR-DVD92/DVD602 WIDE STEREO Records 2 channel sound with more than 5 minutes. BRIGHT Brightens the LCD screen. &#...automatically selected for the setting. • When you select [BRIGHT], battery life is not suitable for recording conversations. • The setting returns to [STEREO] when you have the power source disconnected from your camcorder for more than 5 minutes. STANDARD SET (continued) STEREO ...
...Records normal stereo sound. • The setting returns to [WIDE STEREO] when you have the power source disconnected from your camcorder for details. 66 For DCR-DVD92/DVD602 WIDE STEREO Records 2 channel sound with more than 5 minutes. BRIGHT Brightens the LCD screen. &#...automatically selected for the setting. • When you select [BRIGHT], battery life is not suitable for recording conversations. • The setting returns to [STEREO] when you have the power source disconnected from your camcorder for more than 5 minutes. STANDARD SET (continued) STEREO ...


