Operating Instructions
Page 6
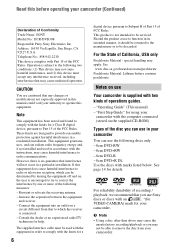
...However, there is no guarantee that interference will not occur in your camcorder You can be serviced. Reorient or relocate the receiving antenna. - For the State of Conformity Trade Name: SONY Model No.: DCR-DVD308 Responsible Party:Sony Electronics Inc. "First Step Guide" for a Class B digital ...pursuant to the following measures: - Connect the equipment into an outlet on use the following discs only. - 8cm DVD-RW - 8cm DVD+RW - 8cm DVD-R - 8cm DVD+R DL Use the discs with marks listed below. special handling may cause undesired operation. Consult the dealer or an ...
...However, there is no guarantee that interference will not occur in your camcorder You can be serviced. Reorient or relocate the receiving antenna. - For the State of Conformity Trade Name: SONY Model No.: DCR-DVD308 Responsible Party:Sony Electronics Inc. "First Step Guide" for a Class B digital ...pursuant to the following measures: - Connect the equipment into an outlet on use the following discs only. - 8cm DVD-RW - 8cm DVD+RW - 8cm DVD-R - 8cm DVD+R DL Use the discs with marks listed below. special handling may cause undesired operation. Consult the dealer or an ...
Operating Instructions
Page 8
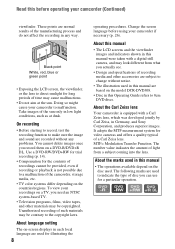
... green point • Exposing the LCD screen, the viewfinder, or the lens to 8cm DVD discs. It adopts the MTF measurement system for illustrating the 8 operating procedures. Doing so might cause your camcorder if necessary (p. 26). On recording • Before starting to record, test the recording... illustration used in Germany, and Sony Corporation, and produces superior images. About the Carl Zeiss lens Your camcorder is not possible due to a malfunction of disc you can use for long periods of light from what you record them on the model DCR-DVD308. • Disc in this ...
... green point • Exposing the LCD screen, the viewfinder, or the lens to 8cm DVD discs. It adopts the MTF measurement system for illustrating the 8 operating procedures. Doing so might cause your camcorder if necessary (p. 26). On recording • Before starting to record, test the recording... illustration used in Germany, and Sony Corporation, and produces superior images. About the Carl Zeiss lens Your camcorder is not possible due to a malfunction of disc you can use for long periods of light from what you record them on the model DCR-DVD308. • Disc in this ...
Operating Instructions
Page 9
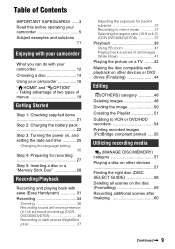
...Handycam 31 Recording 34 Zooming 36 Recording sound with more presence (5.1ch surround recording) (DCRDVD308/DVD708 36 Recording in dark places (NightShot plus 37 Adjusting the exposure for backlit subjects 37 Recording in mirror mode 37 Selecting the aspect ratio (16:9 or 4:3) (DCR-DVD308.../DVD708 37 Playback 39 Using PB zoom 41 Playing back a series of Contents IMPORTANT SAFEGUARDS ......3 Read this before operating your camcorder 5 Subject examples and solutions 11 Enjoying with your camcorder What you can do with playback on other devices or DVD drives (...
...Handycam 31 Recording 34 Zooming 36 Recording sound with more presence (5.1ch surround recording) (DCRDVD308/DVD708 36 Recording in dark places (NightShot plus 37 Adjusting the exposure for backlit subjects 37 Recording in mirror mode 37 Selecting the aspect ratio (16:9 or 4:3) (DCR-DVD308.../DVD708 37 Playback 39 Using PB zoom 41 Playing back a series of Contents IMPORTANT SAFEGUARDS ......3 Read this before operating your camcorder 5 Subject examples and solutions 11 Enjoying with your camcorder What you can do with playback on other devices or DVD drives (...
Operating Instructions
Page 12
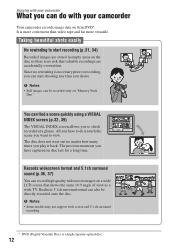
... camcorder records image data on disc last for a long time. b Notes • Some models may not support wide screen and 5.1 ch surround recording. * DVD (Digital Versatile Disc) is more convenient than video tape and far more versatile. It is a high-capacity optical disc. 12 Taking beautiful shots ...is no risk that shows the same 16:9 angle of view as a wide TV. Enjoying with your camcorder What you can be directly recorded onto the disc. All you have captured on 8cm DVD*. The precious moments you want to start shooting any time you desire. You can start recording (p.31,...
... camcorder records image data on disc last for a long time. b Notes • Some models may not support wide screen and 5.1 ch surround recording. * DVD (Digital Versatile Disc) is more convenient than video tape and far more versatile. It is a high-capacity optical disc. 12 Taking beautiful shots ...is no risk that shows the same 16:9 angle of view as a wide TV. Enjoying with your camcorder What you can be directly recorded onto the disc. All you have captured on 8cm DVD*. The precious moments you want to start shooting any time you desire. You can start recording (p.31,...
Operating Instructions
Page 13
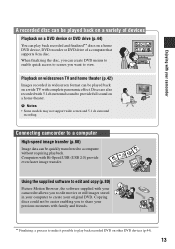
...be quickly transferred to play back recorded and finalized** discs on a home DVD device, DVD recorder or DVD drive of devices Playback on a DVD device or DVD drive (p.44) You can play back recorded DVD on other DVD devices (p.44). 13 Playback on widescreen TV and home theater (p.42) Images...5.1 ch surround recording. Using the supplied software to edit and copy (p.80) Picture Motion Browser, the software supplied with your camcorder allows you to share your precious moments with family and friends. ** Finalizing: a process to make it possible to a computer without requiring ...
...be quickly transferred to play back recorded and finalized** discs on a home DVD device, DVD recorder or DVD drive of devices Playback on a DVD device or DVD drive (p.44) You can play back recorded DVD on other DVD devices (p.44). 13 Playback on widescreen TV and home theater (p.42) Images...5.1 ch surround recording. Using the supplied software to edit and copy (p.80) Picture Motion Browser, the software supplied with your camcorder allows you to share your precious moments with family and friends. ** Finalizing: a process to make it possible to a computer without requiring ...
Operating Instructions
Page 14
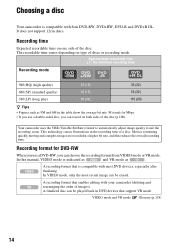
... recording format that enables editing with your camcorder (deleting and rearranging the order of images). A recording format that is compatible with 8cm DVD-RW, DVD+RW, DVD-R and DVD+R DL. VIDEO mode and VR mode Glossary (p.118) 14 Choosing a disc Your camcorder is compatible with most recent image can be... played back in DVD devices that support VR mode. In this reduces ...
... recording format that enables editing with your camcorder (deleting and rearranging the order of images). A recording format that is compatible with 8cm DVD-RW, DVD+RW, DVD-R and DVD+R DL. VIDEO mode and VR mode Glossary (p.118) 14 Choosing a disc Your camcorder is compatible with most recent image can be... played back in DVD devices that support VR mode. In this reduces ...

Operating Instructions
Page 15
... Figures in parentheses ( ) indicate page numbers. z z z Making longer recordings on your DVD device to see whether it with your camcorder (p.28). *3 Finalizing is not finalized may cause the computer to its original empty state (p.59). DVD-RW DVD+RW DVD-R DVD+R DL Symbols used in a DVD drive on a computer. Using a disc repeatedly even if the disc becomes...
... Figures in parentheses ( ) indicate page numbers. z z z Making longer recordings on your DVD device to see whether it with your camcorder (p.28). *3 Finalizing is not finalized may cause the computer to its original empty state (p.59). DVD-RW DVD+RW DVD-R DVD+R DL Symbols used in a DVD drive on a computer. Using a disc repeatedly even if the disc becomes...
Operating Instructions
Page 17
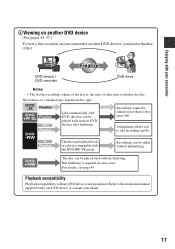
...The disc can be played back without unfinalizing. For details, see page 44. Refer to the instruction manual supplied with your DVD device or consult your camcorder on other DVD devices, you to finalize it takes time to finalize the disc. Unfinalizing allows you need to add recordings (p.60). But... finalizing is free space left. Enjoying with your camcorder 4Viewing on another DVD device (See pages 44, 57.) To view a disc recorded on your dealer. 17 The features of the disc is not guaranteed....
...The disc can be played back without unfinalizing. For details, see page 44. Refer to the instruction manual supplied with your DVD device or consult your camcorder on other DVD devices, you to finalize it takes time to finalize the disc. Unfinalizing allows you need to add recordings (p.60). But... finalizing is free space left. Enjoying with your camcorder 4Viewing on another DVD device (See pages 44, 57.) To view a disc recorded on your dealer. 17 The features of the disc is not guaranteed....
Operating Instructions
Page 28
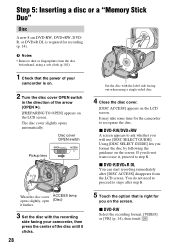
... It may take some time for recording (p. 14). x DVD-R/DVD+R DL You can start recording immediately after step 5. Step 5: Inserting a disc or a "Memory Stick Duo" Disc A new 8 cm DVD-RW, DVD+RW, DVDR, or DVD+R DL is required for the camcorder to recognize the disc. If you format the disc by ...following the guidance on the LCD screen. x DVD-RW Select the recording format, [VIDEO] or [VR] (p. 14), then touch...
... It may take some time for recording (p. 14). x DVD-R/DVD+R DL You can start recording immediately after step 5. Step 5: Inserting a disc or a "Memory Stick Duo" Disc A new 8 cm DVD-RW, DVD+RW, DVDR, or DVD+R DL is required for the camcorder to recognize the disc. If you format the disc by ...following the guidance on the LCD screen. x DVD-RW Select the recording format, [VIDEO] or [VR] (p. 14), then touch...
Operating Instructions
Page 29
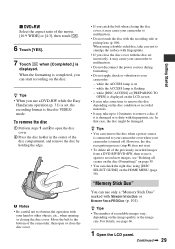
... page 59. • You can start . • To delete all of the previously recorded images from a DVD-RW/DVD+RW, then to use a DVD-RW while the Easy Handycam operation (p. 31) is set incorrectly, it may cause your camcorder to malfunction. • Do not disconnect the power sources during formatting. • Do not apply shock...
... page 59. • You can start . • To delete all of the previously recorded images from a DVD-RW/DVD+RW, then to use a DVD-RW while the Easy Handycam operation (p. 31) is set incorrectly, it may cause your camcorder to malfunction. • Do not disconnect the power sources during formatting. • Do not apply shock...
Operating Instructions
Page 46
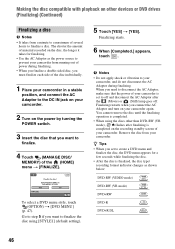
... by turning the POWER switch. 3 Insert the disc that the power of the disc individually. 1 Place your camcorder in a stable position, and connect the AC Adaptor to prevent your camcorder. To select a DVD menu style, touch (OPTION) t [DVD MENU] (p. 47). You cannot remove the disc until the finalizing operation is completed. • When using...
... by turning the POWER switch. 3 Insert the disc that the power of the disc individually. 1 Place your camcorder in a stable position, and connect the AC Adaptor to prevent your camcorder. To select a DVD menu style, touch (OPTION) t [DVD MENU] (p. 47). You cannot remove the disc until the finalizing operation is completed. • When using...
Operating Instructions
Page 48
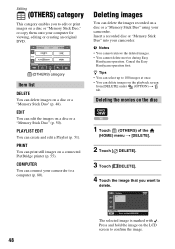
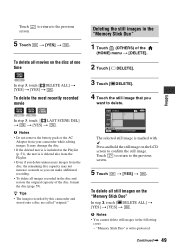
...EDIT You can edit the images on the playback screen from [DELETE] under (OPTION) t tab. Cancel the Easy Handycam operation first. Insert a recorded disc or "Memory Stick Duo" into your camcorder to a computer (p. 80). EDIT You can create and edit a Playlist (p. 51). Deleting images You can delete ... or a "Memory Stick Duo" using your computer for viewing, editing or creating an original DVD. (OTHERS) category Item list DELETE You can delete images on a disc or "Memory Stick Duo," or copy them onto your camcorder. Deleting the movies on the disc 1 Touch (OTHERS) of the (HOME) menu t ...
...EDIT You can edit the images on the playback screen from [DELETE] under (OPTION) t tab. Cancel the Easy Handycam operation first. Insert a recorded disc or "Memory Stick Duo" into your camcorder to a computer (p. 80). EDIT You can create and edit a Playlist (p. 51). Deleting images You can delete ... or a "Memory Stick Duo" using your computer for viewing, editing or creating an original DVD. (OTHERS) category Item list DELETE You can delete images on a disc or "Memory Stick Duo," or copy them onto your camcorder. Deleting the movies on the disc 1 Touch (OTHERS) of the (HOME) menu t ...
Operating Instructions
Page 49
... the Playlist. • Even if you want to confirm the still image. Continued , 49 z Tips • The images recorded by this camcorder and stored onto a disc are called "original." 3 Touch [ DELETE]. 4 Touch the still image that you delete unnecessary images from your... delete all still images on the LCD screen to delete. Editing In step 3, touch [ DELETE ALL] t [YES] t [YES] t . To delete the most recently recorded movie DVD +RW In step 3, touch [ LAST SCENE DEL] t t [YES] t . Touch to return to the previous screen. 5 Touch t [YES] t . The selected still image ...
... the Playlist. • Even if you want to confirm the still image. Continued , 49 z Tips • The images recorded by this camcorder and stored onto a disc are called "original." 3 Touch [ DELETE]. 4 Touch the still image that you delete unnecessary images from your... delete all still images on the LCD screen to delete. Editing In step 3, touch [ DELETE ALL] t [YES] t [YES] t . To delete the most recently recorded movie DVD +RW In step 3, touch [ LAST SCENE DEL] t t [YES] t . Touch to return to the previous screen. 5 Touch t [YES] t . The selected still image ...
Operating Instructions
Page 54
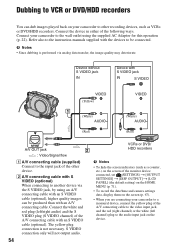
... S VIDEO jack, by using the supplied AC Adaptor for this operation (p. 22). b Notes • Since dubbing is not necessary. Connect your camcorder to be produced than with an A/V connecting cable. Connect the white and red plug (left channel) plug to the input jack of the other...with an S VIDEO cable (optional), higher quality images can dub images played back on your camcorder to another device via analog data transfer, the image quality may deteriorate. Dubbing to VCR or DVD/HDD recorders You can be connected. Connect the device in either of the A/V connecting cable with...
... S VIDEO jack, by using the supplied AC Adaptor for this operation (p. 22). b Notes • Since dubbing is not necessary. Connect your camcorder to be produced than with an A/V connecting cable. Connect the white and red plug (left channel) plug to the input jack of the other...with an S VIDEO cable (optional), higher quality images can dub images played back on your camcorder to another device via analog data transfer, the image quality may deteriorate. Dubbing to VCR or DVD/HDD recorders You can be connected. Connect the device in either of the A/V connecting cable with...
Operating Instructions
Page 55
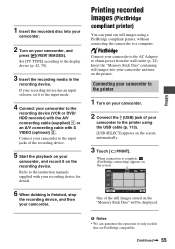
... the printer. Printing recorded images (PictBridge compliant printer) You can guarantee the operation of the recording device. 5 Start the playback on your camcorder to the recording device (VCR or DVD/ HDD recorder) with the A/V connecting cable (supplied) 1 or an A/V connecting cable with your recording device for details. 6 When dubbing is complete, (PictBridge...
... the printer. Printing recorded images (PictBridge compliant printer) You can guarantee the operation of the recording device. 5 Start the playback on your camcorder to the recording device (VCR or DVD/ HDD recorder) with the A/V connecting cable (supplied) 1 or an A/V connecting cable with your recording device for details. 6 When dubbing is complete, (PictBridge...
Operating Instructions
Page 57
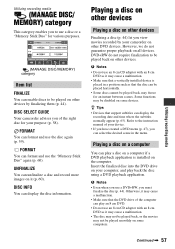
... normally appear (p. 65). Playing a disc on a computer You can format and use a DVD+RW, you must finalize the disc (p. 44). Insert the finalized disc into the DVD drive on your camcorder on a computer if a DVD playback application is placed in the menu. FORMAT You can play a disc on other devices ... b Notes • Do not use an 8 cm CD adaptor with an 8 cm DVD as it (p. 60). However, we do not require finalization to be disabled on some devices. DISC SELECT GUIDE Your camcorder advises you of the computer can unfinalize a disc and record more images on it may be...
... normally appear (p. 65). Playing a disc on a computer You can format and use a DVD+RW, you must finalize the disc (p. 44). Insert the finalized disc into the DVD drive on your camcorder on a computer if a DVD playback application is placed in the menu. FORMAT You can play a disc on other devices ... b Notes • Do not use an 8 cm CD adaptor with an 8 cm DVD as it (p. 60). However, we do not require finalization to be disabled on some devices. DISC SELECT GUIDE Your camcorder advises you of the computer can unfinalize a disc and record more images on it may be...
Operating Instructions
Page 59
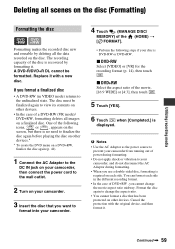
... running out of the (HOME) t [ FORMAT]. • Perform the following steps if your camcorder, and do not disconnect the AC Adaptor during formatting. • When you use a double-sided disc, formatting is DVD-RW or DVD+RW. x DVD-RW Select [VIDEO] or [VR] for the recording format (p. 14), then touch . b Notes •...no need to finalize the disc again before playing the disc on other devices.* * To create the DVD menu on a DVD+RW, finalize the disc again (p. 44). 1 Connect the AC Adaptor to the DC IN jack on your camcorder, then connect the power cord to the wall outlet. 2 Turn on your...
... running out of the (HOME) t [ FORMAT]. • Perform the following steps if your camcorder, and do not disconnect the AC Adaptor during formatting. • When you use a double-sided disc, formatting is DVD-RW or DVD+RW. x DVD-RW Select [VIDEO] or [VR] for the recording format (p. 14), then touch . b Notes •...no need to finalize the disc again before playing the disc on other devices.* * To create the DVD menu on a DVD+RW, finalize the disc again (p. 44). 1 Connect the AC Adaptor to the DC IN jack on your camcorder, then connect the power cord to the wall outlet. 2 Turn on your...
Operating Instructions
Page 60
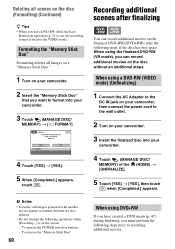
... Duo" Formatting deletes all scenes on the disc (Formatting) (Continued) z Tips • When you use a DVD-RW while the Easy Handycam operation (p. 31) is set, the recording format is on your camcorder. 3 Insert the finalized disc into your camcorder. 4 Touch (MANAGE DISC/ MEMORY) of the (HOME) t [UNFINALIZE]. 5 Touch [YES] t [YES], then touch when [Completed...
... Duo" Formatting deletes all scenes on the disc (Formatting) (Continued) z Tips • When you use a DVD-RW while the Easy Handycam operation (p. 31) is set, the recording format is on your camcorder. 3 Insert the finalized disc into your camcorder. 4 Touch (MANAGE DISC/ MEMORY) of the (HOME) t [UNFINALIZE]. 5 Touch [YES] t [YES], then touch when [Completed...
Operating Instructions
Page 61
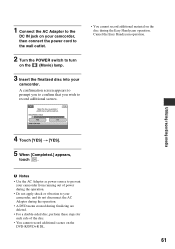
...power during the operation. • Do not apply shock or vibration to your camcorder, and do not disconnect the AC Adaptor during the operation. • A DVD menu created during the Easy Handycam operation. Cancel the Easy Handycam operation. 1 Connect the AC Adaptor to the DC IN jack on your... camcorder, then connect the power cord to the wall outlet. 2 Turn the POWER switch to turn on the DVD-R/DVD+R DL. 61
...power during the operation. • Do not apply shock or vibration to your camcorder, and do not disconnect the AC Adaptor during the operation. • A DVD menu created during the Easy Handycam operation. Cancel the Easy Handycam operation. 1 Connect the AC Adaptor to the DC IN jack on your... camcorder, then connect the power cord to the wall outlet. 2 Turn the POWER switch to turn on the DVD-R/DVD+R DL. 61
Operating Instructions
Page 80
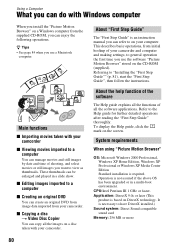
... first time you use a Macintosh computer. These thumbnails can refer to a computer x Creating an original DVD You can enjoy the following operations. This describes basic operations, from your camcorder. About "First Step Guide" The "First Step Guide" is based on the screen. System requirements When... Operation is required. x Copying a disc t Video Disc Copier You can manage movies and still images by date and time of your camcorder x Viewing movies imported to have DirectX installed.) Sound system: Direct Sound compatible sound card Memory: 256 MB or more 80 About the ...
... first time you use a Macintosh computer. These thumbnails can refer to a computer x Creating an original DVD You can enjoy the following operations. This describes basic operations, from your camcorder. About "First Step Guide" The "First Step Guide" is based on the screen. System requirements When... Operation is required. x Copying a disc t Video Disc Copier You can manage movies and still images by date and time of your camcorder x Viewing movies imported to have DirectX installed.) Sound system: Direct Sound compatible sound card Memory: 256 MB or more 80 About the ...


