Operating Instructions
Page 4
... safety checks (as specified by the manufacturer that the set does not operate normally when following conditions: - If the set is in the operating instructions. Replacement parts When replacement parts are specified in safe operating condition. 4 If the set exhibits a distinct change in damage and will prevent damage to lightning and power-line surges. Adjust only those controls that are required, be sure the service technician has used replacement parts...
... safety checks (as specified by the manufacturer that the set does not operate normally when following conditions: - If the set is in the operating instructions. Replacement parts When replacement parts are specified in safe operating condition. 4 If the set exhibits a distinct change in damage and will prevent damage to lightning and power-line surges. Adjust only those controls that are required, be sure the service technician has used replacement parts...
Operating Instructions
Page 6
...; Using a disc other than above may cause the unsatisfactory recording/playback or you may cause undesired operation. Reorient or relocate the receiving antenna. - See page 14 for help. "First Step Guide" for your camcorder (Continued) Declaration of the FCC Rules. Note This equipment has been tested and found to comply with Part 15 of Conformity Trade Name: SONY Model No.: DCR-DVD308 Responsible...
...; Using a disc other than above may cause the unsatisfactory recording/playback or you may cause undesired operation. Reorient or relocate the receiving antenna. - See page 14 for help. "First Step Guide" for your camcorder (Continued) Declaration of the FCC Rules. Note This equipment has been tested and found to comply with Part 15 of Conformity Trade Name: SONY Model No.: DCR-DVD308 Responsible...
Operating Instructions
Page 8
... operations available depend on the countries/regions. About language setting The on the model DCR-DVD308. • Disc in any problems. You cannot delete images once you need an NTSC system-based TV. • Television programs, films, video tapes, and other accessories are subject to change without notice. • The illustration used . The following marks are used to indicate the type of disc you actually see. • Design and specifications...
... operations available depend on the countries/regions. About language setting The on the model DCR-DVD308. • Disc in any problems. You cannot delete images once you need an NTSC system-based TV. • Television programs, films, video tapes, and other accessories are subject to change without notice. • The illustration used . The following marks are used to indicate the type of disc you actually see. • Design and specifications...
Operating Instructions
Page 10
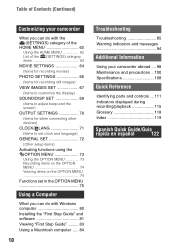
... (SETTINGS) category items 63 MOVIE SETTINGS 64 (Items for recording movies) PHOTO SETTINGS 66 (Items for recording still images) VIEW IMAGES SET 67 (Items to customize the display) SOUND/DISP SET 69 (Items to adjust beep and the screen) OUTPUT SETTINGS 70 (Items for when connecting other devices) CLOCK/ LANG 71 (Items to set clock and language) GENERAL SET 72 (Other setup items) Activating functions using the OPTION MENU 73 Using the OPTION MENU 73 Recording items on the OPTION MENU 74 Viewing...
... (SETTINGS) category items 63 MOVIE SETTINGS 64 (Items for recording movies) PHOTO SETTINGS 66 (Items for recording still images) VIEW IMAGES SET 67 (Items to customize the display) SOUND/DISP SET 69 (Items to adjust beep and the screen) OUTPUT SETTINGS 70 (Items for when connecting other devices) CLOCK/ LANG 71 (Items to set clock and language) GENERAL SET 72 (Other setup items) Activating functions using the OPTION MENU 73 Using the OPTION MENU 73 Recording items on the OPTION MENU 74 Viewing...
Operating Instructions
Page 24
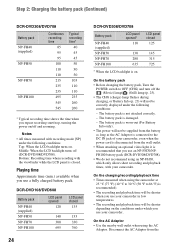
... use your camcorder in low temperatures. • The recording and playback time will not be shorter depending on . Middle: When the LCD backlight turns off and zooming. LCD panel closed 125 145 315 725 On the battery pack • Before changing the battery pack, Turn the POWER switch to 86 °F) is disconnected from the Playing time Approximate time (min.) available when you use an NP-FH70/NPFH100 battery pack (DCR-DVD308...
... use your camcorder in low temperatures. • The recording and playback time will not be shorter depending on . Middle: When the LCD backlight turns off and zooming. LCD panel closed 125 145 315 725 On the battery pack • Before changing the battery pack, Turn the POWER switch to 86 °F) is disconnected from the Playing time Approximate time (min.) available when you use an NP-FH70/NPFH100 battery pack (DCR-DVD308...
Operating Instructions
Page 26
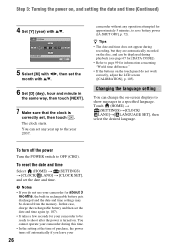
... buttons on the touch panel do not use your camcorder for about 3 months, the built-in rechargeable battery gets discharged and the date and time settings may be ready to shoot after the power is correctly set, then touch . You cannot operate your camcorder during recording, but they are automatically recorded on the disc, and can change the on-screen displays to show messages in a specified language. To reset the date and time...
... buttons on the touch panel do not use your camcorder for about 3 months, the built-in rechargeable battery gets discharged and the date and time settings may be ready to shoot after the power is correctly set, then touch . You cannot operate your camcorder during recording, but they are automatically recorded on the disc, and can change the on-screen displays to show messages in a specified language. To reset the date and time...
Operating Instructions
Page 27
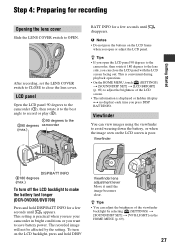
... to record or play (2). 190 degrees to save battery power. Viewfinder DISP/BATT INFO 2180 degrees (max.) To turn on the LCD screen is convenient during playback operations. • On the HOME MENU, touch (SETTINGS) t [SOUND/DISP SET] t [LCD BRIGHT] (p. 69) to adjust the brightness of the viewfinder backlight by the setting. Getting Started Step 4: Preparing for recording Opening the lens cover Slide the LENS COVER switch to make the battery last longer (DCR-DVD308...
... to record or play (2). 190 degrees to save battery power. Viewfinder DISP/BATT INFO 2180 degrees (max.) To turn on the LCD screen is convenient during playback operations. • On the HOME MENU, touch (SETTINGS) t [SOUND/DISP SET] t [LCD BRIGHT] (p. 69) to adjust the brightness of the viewfinder backlight by the setting. Getting Started Step 4: Preparing for recording Opening the lens cover Slide the LENS COVER switch to make the battery last longer (DCR-DVD308...
Operating Instructions
Page 31
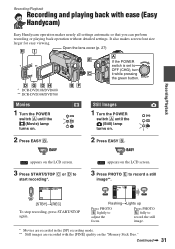
Open the lens cover (p. 27) * DCR-DVD108/DVD608 ** DCR-DVD308/DVD708 R Movies 1 Turn the POWER switch A until the (Still) lamp turns on. 2 Press EASY B. Recording/Playback Recording and playing back with the [FINE] quality on the "Memory Stick Duo." appears on the LCD screen. 3 Press PHOTO E to start recording*. Recording/Playback appears on . 2 Press EASY B. Still Images 1 Turn the POWER switch A until the (Movie) lamp turns on the LCD screen. 3 Press START/STOP C or D to record a still image**. 6 [STBY]t[REC] To stop recording, press START/STOP again. FlashingtLights...
Open the lens cover (p. 27) * DCR-DVD108/DVD608 ** DCR-DVD308/DVD708 R Movies 1 Turn the POWER switch A until the (Still) lamp turns on. 2 Press EASY B. Recording/Playback Recording and playing back with the [FINE] quality on the "Memory Stick Duo." appears on the LCD screen. 3 Press PHOTO E to start recording*. Recording/Playback appears on . 2 Press EASY B. Still Images 1 Turn the POWER switch A until the (Movie) lamp turns on the LCD screen. 3 Press START/STOP C or D to record a still image**. 6 [STBY]t[REC] To stop recording, press START/STOP again. FlashingtLights...

Operating Instructions
Page 42
...(Red) VIDEO (White) AUDIO (Red) A/V OUT jack 2 : Signal flow VCRs or TVs 1 A/V connecting cable (supplied) Connect to the input jack of the other device. 2 A/V connecting cable with an A/V connecting cable. Connect the white and red plug (left/right audio) and the S VIDEO plug (S VIDEO channel) of the A/V connecting cable with S VIDEO 2. S VIDEO connection only will view pictures on. 1 Turn the POWER switch to the wall outlet using an A/V connecting cable with an S VIDEO cable (optional), higher quality pictures can be connected. b Notes • When you connect your camcorder...
...(Red) VIDEO (White) AUDIO (Red) A/V OUT jack 2 : Signal flow VCRs or TVs 1 A/V connecting cable (supplied) Connect to the input jack of the other device. 2 A/V connecting cable with an A/V connecting cable. Connect the white and red plug (left/right audio) and the S VIDEO plug (S VIDEO channel) of the A/V connecting cable with S VIDEO 2. S VIDEO connection only will view pictures on. 1 Turn the POWER switch to the wall outlet using an A/V connecting cable with an S VIDEO cable (optional), higher quality pictures can be connected. b Notes • When you connect your camcorder...
Operating Instructions
Page 54
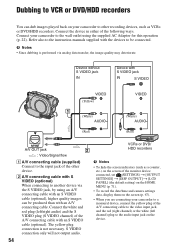
...[OUTPUT SETTINGS] t [DISP OUTPUT] t [LCD PANEL] (the default setting) on the HOME MENU (p. 71). • To record the date/time and camera settings data, display them on your camcorder to a monaural device, connect the yellow plug of the A/V connecting cable to the video input jack, and the red (right channel) or the white (left /right audio) and the S VIDEO plug (S VIDEO channel) of the A/V connecting cable with S VIDEO jack IN S VIDEO VIDEO (Yellow) 1 (White) AUDIO (Red) VIDEO (White) AUDIO (Red) A/V OUT jack 2 : Video/Signal flow VCRs or DVD/ HDD recorders A A/V connecting cable...
...[OUTPUT SETTINGS] t [DISP OUTPUT] t [LCD PANEL] (the default setting) on the HOME MENU (p. 71). • To record the date/time and camera settings data, display them on your camcorder to a monaural device, connect the yellow plug of the A/V connecting cable to the video input jack, and the red (right channel) or the white (left /right audio) and the S VIDEO plug (S VIDEO channel) of the A/V connecting cable with S VIDEO jack IN S VIDEO VIDEO (Yellow) 1 (White) AUDIO (Red) VIDEO (White) AUDIO (Red) A/V OUT jack 2 : Video/Signal flow VCRs or DVD/ HDD recorders A A/V connecting cable...
Operating Instructions
Page 56
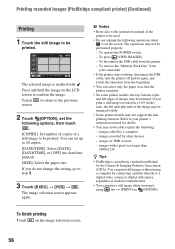
... by other devices - Press and hold the image on the image selection screen. 56 To operate the POWER switch. - images recorded by the Camera & Imaging Products Association (CIPA). Printing recorded images (PictBridge compliant printer) (Continued) Printing 1 Touch the still image to be performed properly. - You can print still images without using a computer by a computer - The image selection screen appears again. To remove the "Memory Stick Duo" from your printer's instruction manual for details...
... by other devices - Press and hold the image on the image selection screen. 56 To operate the POWER switch. - images recorded by the Camera & Imaging Products Association (CIPA). Printing recorded images (PictBridge compliant printer) (Continued) Printing 1 Touch the still image to be performed properly. - You can print still images without using a computer by a computer - The image selection screen appears again. To remove the "Memory Stick Duo" from your printer's instruction manual for details...
Operating Instructions
Page 65
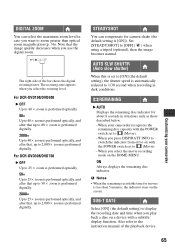
...× Up to 40 × zoom is set to the instruction manual of the bar shows the digital zooming factor. AUTO SLW SHUTTR (Auto slow shutter) When this is performed optically, and after that up to zoom greater than 5 minutes, the indicator stays on with a subtitle display function. When you select the movie recording mode on a device with the POWER switch set to on the screen. When you press DISP/BATT...
...× Up to 40 × zoom is set to the instruction manual of the bar shows the digital zooming factor. AUTO SLW SHUTTR (Auto slow shutter) When this is performed optically, and after that up to zoom greater than 5 minutes, the indicator stays on with a subtitle display function. When you select the movie recording mode on a device with the POWER switch set to on the screen. When you press DISP/BATT...
Operating Instructions
Page 85
... • Batteries/Power sources 86 • LCD screen/viewfinder 87 • Discs/"Memory Stick Duo 87 • Recording 88 • Playing back on the disc 91 • Dubbing/Editing/Connecting to other devices 91 • Editing movies on your camcorder and leave it after the power is not displayed. • The OPTION MENU cannot be ready to a computer 92 • Functions that cannot be used during Easy Handycam operation: - Playback zoom (p.41) - Movie recording mode: [SP...
... • Batteries/Power sources 86 • LCD screen/viewfinder 87 • Discs/"Memory Stick Duo 87 • Recording 88 • Playing back on the disc 91 • Dubbing/Editing/Connecting to other devices 91 • Editing movies on your camcorder and leave it after the power is not displayed. • The OPTION MENU cannot be ready to a computer 92 • Functions that cannot be used during Easy Handycam operation: - Playback zoom (p.41) - Movie recording mode: [SP...
Operating Instructions
Page 87
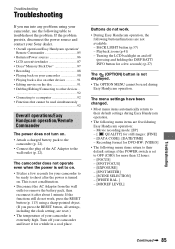
... disappeared. • Close the LCD panel. The battery pack may not be correct depending on the Remote Commander for a while in the current recording/playback status. • Some functions cannot be removed. • Make sure the power source (battery pack or AC Adaptor) is connected correctly (p. 22). • The disc is damaged or is 100. • Images cannot be damaged. Turn off your camcorder.
... disappeared. • Close the LCD panel. The battery pack may not be correct depending on the Remote Commander for a while in the current recording/playback status. • Some functions cannot be removed. • Make sure the power source (battery pack or AC Adaptor) is connected correctly (p. 22). • The disc is damaged or is 100. • Images cannot be damaged. Turn off your camcorder.
Operating Instructions
Page 102
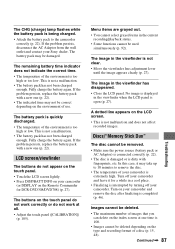
... position. x On a "Memory Stick PRO Duo" The maximum memory capacity of images when you use may cause a malfunction. On image data compatibility • Image data files recorded on a "Memory Stick Duo" by the JEITA (Japan Electronics and Information Technology Industries Association). • On your camcorder, you use Damaged or lost image data will not be used on your camcorder is reading or writing image files on the "Memory Stick Duo" (while the access lamp is recommended...
... position. x On a "Memory Stick PRO Duo" The maximum memory capacity of images when you use may cause a malfunction. On image data compatibility • Image data files recorded on a "Memory Stick Duo" by the JEITA (Japan Electronics and Information Technology Industries Association). • On your camcorder, you use Damaged or lost image data will not be used on your camcorder is reading or writing image files on the "Memory Stick Duo" (while the access lamp is recommended...
Operating Instructions
Page 114
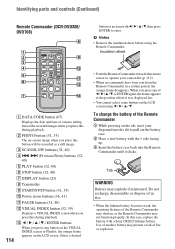
...; Remove the insulation sheet before using b / B / v / V. Insulation sheet A DATA CODE button (67) Displays the date and time or camera setting data of another battery may not function properly. Select a desired • Point the Remote Commander towards the remote sensor to operate your fingernail into the slit to enter. Use of the recorded images when you press this during playback. Tab WARNING Battery may explode if mistreated. Identifying parts and controls (Continued) Remote Commander (DCR-DVD308/ DVD708) button...
...; Remove the insulation sheet before using b / B / v / V. Insulation sheet A DATA CODE button (67) Displays the date and time or camera setting data of another battery may not function properly. Select a desired • Point the Remote Commander towards the remote sensor to operate your fingernail into the slit to enter. Use of the recorded images when you press this during playback. Tab WARNING Battery may explode if mistreated. Identifying parts and controls (Continued) Remote Commander (DCR-DVD308/ DVD708) button...
Operating Instructions
Page 119
... Button-type lithium battery 114 B&W 79 C CALIBRATION 105 CAMERA DATA 67 CANDLE 76 CD-ROM 80 Charging time 23 CLOCK SET 25 CLOCK/LANG 71 COLOR SLOW SHTR (Color Slow Shutter 78, 93 Computer 80 Copyright 8, 110 D DATA CODE 67, 117 DATE/TIME .......... 26, 67, 117 DC IN jack 22 DC plug 22 DELETE Disc 48 "Memory Stick Duo" .... 49 DEMO MODE 72 DIGITAL ZOOM 65 Disc 28, 100 Disc cover OPEN switch...... 28 DISC INFO 57 Disc remaining 65 DISC SELECT GUIDE ....... 58 DISP OUTPUT...
... Button-type lithium battery 114 B&W 79 C CALIBRATION 105 CAMERA DATA 67 CANDLE 76 CD-ROM 80 Charging time 23 CLOCK SET 25 CLOCK/LANG 71 COLOR SLOW SHTR (Color Slow Shutter 78, 93 Computer 80 Copyright 8, 110 D DATA CODE 67, 117 DATE/TIME .......... 26, 67, 117 DC IN jack 22 DC plug 22 DELETE Disc 48 "Memory Stick Duo" .... 49 DEMO MODE 72 DIGITAL ZOOM 65 Disc 28, 100 Disc cover OPEN switch...... 28 DISC INFO 57 Disc remaining 65 DISC SELECT GUIDE ....... 58 DISP OUTPUT...

First Step Guide
Page 12
... camcorder. 3 Connect your camcorder and a computer. Use the AC Adaptor as [My Pictures]. For operating the POWER switch, refer to a computer You can change the destination folder for the destination folder is set as the power source. The import of the selected videos starts. To import still images on a "Memory Stick Duo" to the Operating Guide supplied with connecting your camcorder. You can import the still images on the screen of your camcorder and a computer using a USB cable...
... camcorder. 3 Connect your camcorder and a computer. Use the AC Adaptor as [My Pictures]. For operating the POWER switch, refer to a computer You can change the destination folder for the destination folder is set as the power source. The import of the selected videos starts. To import still images on a "Memory Stick Duo" to the Operating Guide supplied with connecting your camcorder. You can import the still images on the screen of your camcorder and a computer using a USB cable...

First Step Guide
Page 29
... a disc in the menu settings of your camcorder firmly. For selecting the menu, refer to the operating instructions supplied with your computer for smooth playback. Finish camcorder operation before connecting the camcorder to the computer. Picture Motion Browser does not function correctly. Cannot write from the computer. z Use recommended discs. The file transferred from the computer. If the recorded disc is connect to a computer that does not support Hi-speed USB (USB2.0), the video, still image or sound...
... a disc in the menu settings of your camcorder firmly. For selecting the menu, refer to the operating instructions supplied with your computer for smooth playback. Finish camcorder operation before connecting the camcorder to the computer. Picture Motion Browser does not function correctly. Cannot write from the computer. z Use recommended discs. The file transferred from the computer. If the recorded disc is connect to a computer that does not support Hi-speed USB (USB2.0), the video, still image or sound...
First Step Guide
Page 33
A Automatic Correction B Brightness Correction C Calendar view Capturing still images Changing the date and time stamp D DirectX 9.0c E E-mail External program F Folders view H Hi-Speed USB (USB 2.0) I Inserting date Install M Macintosh P Picture Motion Browser Printing R Red-eye Reduction Resizing S Saturation Sharpness Slide show T Tone Curve Trimming U USB cable USB connection V Video Disc Copier W Windows
A Automatic Correction B Brightness Correction C Calendar view Capturing still images Changing the date and time stamp D DirectX 9.0c E E-mail External program F Folders view H Hi-Speed USB (USB 2.0) I Inserting date Install M Macintosh P Picture Motion Browser Printing R Red-eye Reduction Resizing S Saturation Sharpness Slide show T Tone Curve Trimming U USB cable USB connection V Video Disc Copier W Windows


