Operating Instructions
Page 11
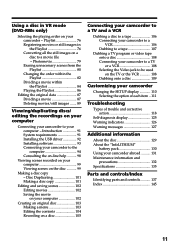
Playlist 76 Registering movies or still images in VR mode (DVD-RWs only) Selecting the playing order on your camcorder - Introduction 91 System requirements 91 Installing the USB driver 92 Installing software 93 Connecting your camcorder to the computer 94 Consulting the on-line help .......... 98 Viewing scenes recorded on your computer 99 Viewing scenes...
Playlist 76 Registering movies or still images in VR mode (DVD-RWs only) Selecting the playing order on your camcorder - Introduction 91 System requirements 91 Installing the USB driver 92 Installing software 93 Connecting your camcorder to the computer 94 Consulting the on-line help .......... 98 Viewing scenes recorded on your computer 99 Viewing scenes...
Operating Instructions
Page 14
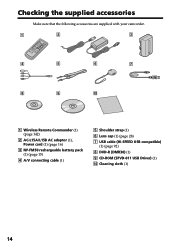
Checking the supplied accessories Make sure that the following accessories are supplied with your camcorder. 1 2 3 4 5 6 7 8 9 0 1 Wireless Remote Commander (1) (page 142) 2 AC-L15A/L15B AC adaptor (1), Power cord (1) (page 16) 3 NP-FM50 rechargeable battery pack (1) (page 15) 4 A/V connecting cable (1) 5 Shoulder strap (1) 6 Lens cap (1) (page 28) 7 USB cable (Hi-SPEED USB compatible) (1) (page 92) 8 DVD-R (DMR30) (1) 9 CD-ROM (SPVD-011 USB Driver) (1) q; Cleaning cloth (1) 14
Checking the supplied accessories Make sure that the following accessories are supplied with your camcorder. 1 2 3 4 5 6 7 8 9 0 1 Wireless Remote Commander (1) (page 142) 2 AC-L15A/L15B AC adaptor (1), Power cord (1) (page 16) 3 NP-FM50 rechargeable battery pack (1) (page 15) 4 A/V connecting cable (1) 5 Shoulder strap (1) 6 Lens cap (1) (page 28) 7 USB cable (Hi-SPEED USB compatible) (1) (page 92) 8 DVD-R (DMR30) (1) 9 CD-ROM (SPVD-011 USB Driver) (1) q; Cleaning cloth (1) 14
Operating Instructions
Page 91
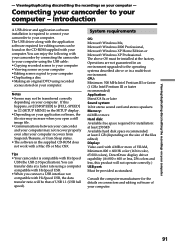
...USB, the data transfer ratio will not operate correctly.) USB port: Must be that of USB 1.1 (USB full speed). Introduction A USB driver and application software installation is compatible with Hi-Speed USB (the USB 2.0 Specification).You can enjoy the following with Hi-Speed USB. &#... your computer •Duplicating a disc •Making an original DVD using recorded scenes stored on your computer. The above or in the supplied CD-ROM does not work with your computer. 91 Connecting your camcorder to your computer - If this product will be provided as standard...
...USB, the data transfer ratio will not operate correctly.) USB port: Must be that of USB 1.1 (USB full speed). Introduction A USB driver and application software installation is compatible with Hi-Speed USB (the USB 2.0 Specification).You can enjoy the following with Hi-Speed USB. &#... your computer •Duplicating a disc •Making an original DVD using recorded scenes stored on your computer. The above or in the supplied CD-ROM does not work with your computer. 91 Connecting your camcorder to your computer - If this product will be provided as standard...
Operating Instructions
Page 92
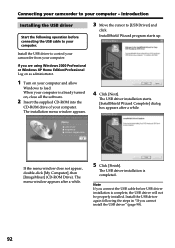
... administrator. 1 Turn on , close all the software. 2 Insert the supplied CD-ROM into the CD-ROM drive of your computer. The USB driver installation starts. [InstallShield Wizard Complete] dialog box appears after a while. 5 Click [Finish]. When your computer is completed. The menu window appears after... cable to your computer and allow Windows to load. InstallShield Wizard program starts up. 4 Click [Next]. Install the USB driver to control your camcorder from your computer - If the menu window does not appear, double-click [My Computer], then [ImageMixer] (CD-ROM Drive). ...
... administrator. 1 Turn on , close all the software. 2 Insert the supplied CD-ROM into the CD-ROM drive of your computer. The USB driver installation starts. [InstallShield Wizard Complete] dialog box appears after a while. 5 Click [Finish]. When your computer is completed. The menu window appears after... cable to your computer and allow Windows to load. InstallShield Wizard program starts up. 4 Click [Next]. Install the USB driver to control your camcorder from your computer - If the menu window does not appear, double-click [My Computer], then [ImageMixer] (CD-ROM Drive). ...
Operating Instructions
Page 93
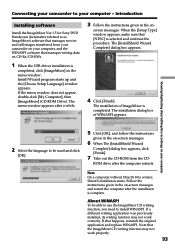
...messages. 6 When The [InstallShield Wizard Complete] dialog box appears, click [Finish]. 7 Take out the CD-ROM from your camcorder on your computer, and the WINASPI software that the ImageMixer CD writing function may not work properly. 93 The [InstallShield Wizard Complete...the USB driver installation is completed. About WINASPI To be used and click [OK]. 5 Click [OK], and follow the instructions given in the on the menu window. Connecting your camcorder to install WINASPI. Introduction Installing software Install the ImageMixer Ver.1.5 for Sony DVD Handycam (hereinafter ...
...messages. 6 When The [InstallShield Wizard Complete] dialog box appears, click [Finish]. 7 Take out the CD-ROM from your camcorder on your computer, and the WINASPI software that the ImageMixer CD writing function may not work properly. 93 The [InstallShield Wizard Complete...the USB driver installation is completed. About WINASPI To be used and click [OK]. 5 Click [OK], and follow the instructions given in the on the menu window. Connecting your camcorder to install WINASPI. Introduction Installing software Install the ImageMixer Ver.1.5 for Sony DVD Handycam (hereinafter ...
Operating Instructions
Page 94
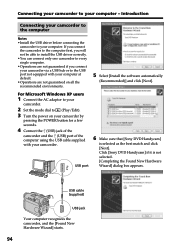
...) USB jack Your computer recognizes the camcorder, and the [Found New Hardware Wizard] starts. 94 Click [Sony DVD Handycam] if it is selected as the best match and click [Next]. Introduction Connecting your camcorder to the computer Notes •Install the USB driver before connecting the camcorder to your camcorder. Connecting your camcorder to your computer at default. •...
...) USB jack Your computer recognizes the camcorder, and the [Found New Hardware Wizard] starts. 94 Click [Sony DVD Handycam] if it is selected as the best match and click [Next]. Introduction Connecting your camcorder to the computer Notes •Install the USB driver before connecting the camcorder to your camcorder. Connecting your camcorder to your computer at default. •...
Operating Instructions
Page 95
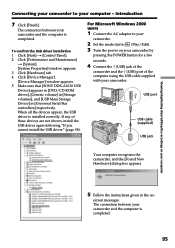
... [SONY DDX-A1010 USB Device] appears in [DVD/CD-ROM drives], [Generic volume] in [Storage volumes], and [USB Mass Storage Device] in the on your camcorder by pressing the POWER button for a few seconds. 4 Connect the (USB) jack of the camcorder and the (USB) port of these devices are not shown, install the USB driver...
... [SONY DDX-A1010 USB Device] appears in [DVD/CD-ROM drives], [Generic volume] in [Storage volumes], and [USB Mass Storage Device] in the on your camcorder by pressing the POWER button for a few seconds. 4 Connect the (USB) jack of the camcorder and the (USB) port of these devices are not shown, install the USB driver...
Operating Instructions
Page 96
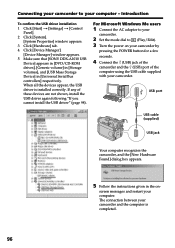
... [SONY DDX-A1010 USB Device] appears in [DVD/CD-ROM drives], [Generic volume] in [Storage volumes], and [USB Mass Storage Device] in the on your camcorder by pressing the POWER button for a few seconds. 4 Connect the (USB) jack of the camcorder and the (USB) port of these devices are not shown, install the USB driver...
... [SONY DDX-A1010 USB Device] appears in [DVD/CD-ROM drives], [Generic volume] in [Storage volumes], and [USB Mass Storage Device] in the on your camcorder by pressing the POWER button for a few seconds. 4 Connect the (USB) jack of the camcorder and the (USB) port of these devices are not shown, install the USB driver...
Operating Instructions
Page 97
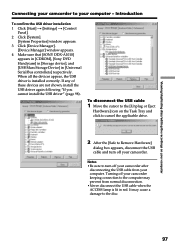
... Hardware] icon on your computer Connecting your camcorder to the disc. 97 Turning off your camcorder keeping connection to Remove Hardware] dialog box appears, disconnect the USB cable and turn off your camcorder. It may prevent from your computer. If... correctly. Introduction To confirm the USB driver installation 1 Click [Start] t [Settings] t [Control Panel]. 2 Click [System]. [System Properties] window appears. 3 Click [Device Manager]. [Device Manager] window appears. 4 Make sure that [SONY DDX-A1010] appears in [CDROM], [Sony DVD Handycam] in [Storage device], and [USB...
... Hardware] icon on your computer Connecting your camcorder to the disc. 97 Turning off your camcorder keeping connection to Remove Hardware] dialog box appears, disconnect the USB cable and turn off your camcorder. It may prevent from your computer. If... correctly. Introduction To confirm the USB driver installation 1 Click [Start] t [Settings] t [Control Panel]. 2 Click [System]. [System Properties] window appears. 3 Click [Device Manager]. [Device Manager] window appears. 4 Make sure that [SONY DDX-A1010] appears in [CDROM], [Sony DVD Handycam] in [Storage device], and [USB...
Operating Instructions
Page 98
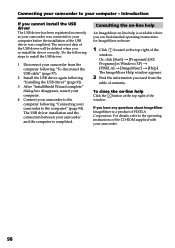
... operating instructions of the CD-ROM supplied with your computer - The USB driver installation and the connection between your camcorder and the computer is a product of the USB driver will be deleted when you cannot install the USB driver The USB driver has been registered incorrectly as your computer before the installation of contents. Introduction...
... operating instructions of the CD-ROM supplied with your computer - The USB driver installation and the connection between your camcorder and the computer is a product of the USB driver will be deleted when you cannot install the USB driver The USB driver has been registered incorrectly as your computer before the installation of contents. Introduction...
Operating Instructions
Page 99
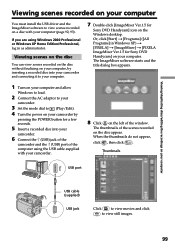
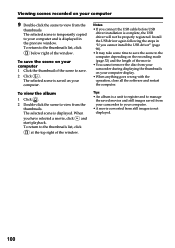
Viewing/duplicating discs/editing the recordings on your computer Viewing scenes recorded on your computer You must install the USB driver and the ImageMixer software to view scenes recorded on your computer. The ImageMixer software starts and the title dialog box appears. 1 Turn... scenes on the disc You can view scenes recorded on the disc without finalizing on your computer, by pressing the POWER button for Sony DVD Handycam] on a disc with your camcorder. 8 Click on the left of the scenes recorded on the Windows desktop. When the thumbnails do not appear, click , then ...
Viewing/duplicating discs/editing the recordings on your computer Viewing scenes recorded on your computer You must install the USB driver and the ImageMixer software to view scenes recorded on your computer. The ImageMixer software starts and the title dialog box appears. 1 Turn... scenes on the disc You can view scenes recorded on the disc without finalizing on your computer, by pressing the POWER button for Sony DVD Handycam] on a disc with your camcorder. 8 Click on the left of the scenes recorded on the Windows desktop. When the thumbnails do not appear, click , then ...
Operating Instructions
Page 100
... the preview window. The selected scene is displayed in "If you cannot install the USB driver" (page 98). •It may take some time to save the scene to view from your camcorder during displaying the thumbnails on your computer display. •When anything goes wrong with the operation..., close all the software and restart the computer. Tips •An album is not displayed. 100 The selected scene is complete, the USB driver will not be ...
... the preview window. The selected scene is displayed in "If you cannot install the USB driver" (page 98). •It may take some time to save the scene to view from your camcorder during displaying the thumbnails on your computer display. •When anything goes wrong with the operation..., close all the software and restart the computer. Tips •An album is not displayed. 100 The selected scene is complete, the USB driver will not be ...
Operating Instructions
Page 124
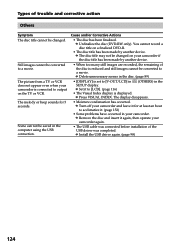
...camcorder and leave it for 5 seconds. c Unfinalize the disc (DVD-RW only). The display disappears. • Moisture condensation has occurred. c Set it . (page 132) • Some problems have occurred in the disc. (page 89) • [DISPLAY] is displayed. You cannot record a disc title on the TV or VCR. c Install the USB driver... c Press VISUAL INDEX. c Remove the disc and insert it again, then operate your camcorder is reduced and still images cannot be converted to output on a finalized DVD-R. • The disc title has been made by another device. • When too...
...camcorder and leave it for 5 seconds. c Unfinalize the disc (DVD-RW only). The display disappears. • Moisture condensation has occurred. c Set it . (page 132) • Some problems have occurred in the disc. (page 89) • [DISPLAY] is displayed. You cannot record a disc title on the TV or VCR. c Install the USB driver... c Press VISUAL INDEX. c Remove the disc and insert it again, then operate your camcorder is reduced and still images cannot be converted to output on a finalized DVD-R. • The disc title has been made by another device. • When too...


