Operating Instructions
Page 2
...SONY Model No.: DCR-DVD301 Responsible Party:Sony Electronics Inc. If you have any interference received, including interference that you may not cause harmful interference, and (2) this Sony Handycam. Telephone No.: 858-942-2230 This device complies with this product, you can enjoy for the FCC related matters only. and CANADA RECYCLING LITHIUM-ION BATTERIES Lithium-Ion batteries...customers in the U.S.A. For more information regarding recycling of rechargeable batteries, call : Sony Customer Information Center 1-800-222-SONY (7669) The number below is intended to alert the ...
...SONY Model No.: DCR-DVD301 Responsible Party:Sony Electronics Inc. If you have any interference received, including interference that you may not cause harmful interference, and (2) this Sony Handycam. Telephone No.: 858-942-2230 This device complies with this product, you can enjoy for the FCC related matters only. and CANADA RECYCLING LITHIUM-ION BATTERIES Lithium-Ion batteries...customers in the U.S.A. For more information regarding recycling of rechargeable batteries, call : Sony Customer Information Center 1-800-222-SONY (7669) The number below is intended to alert the ...
Operating Instructions
Page 3
... not occur in a residential installation. Connect the equipment into an outlet on , the user is encouraged to try to Subpart B of Part 15 of the battery used with the equipment in order to comply with your authority to Part 15 of the following measures: - These limits are cautioned that any changes...
... not occur in a residential installation. Connect the equipment into an outlet on , the user is encouraged to try to Subpart B of Part 15 of the battery used with the equipment in order to comply with your authority to Part 15 of the following measures: - These limits are cautioned that any changes...
Operating Instructions
Page 10
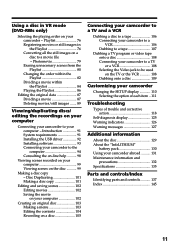
... 12 Checking the supplied accessories ..... 14 Step 1 Preparing the power source ... 15 Installing/removing the battery pack 15 Charging the installed battery pack 16 Showing the remaining battery time - BACK LIGHT ......... 43 Adjusting the exposure manually 43 Shooting in the dark - Picture effect...disc 64 Changing the disc title 67 Playing back a disc on a DVD player, etc 69 Playing back a disc on a computer with your DVD Handycam 4 What is the difference between DVD-R and DVD-RW 6 How to match your camcorder ...... 56 Choosing and viewing a recording - Mirror mode ........ 34 ...
... 12 Checking the supplied accessories ..... 14 Step 1 Preparing the power source ... 15 Installing/removing the battery pack 15 Charging the installed battery pack 16 Showing the remaining battery time - BACK LIGHT ......... 43 Adjusting the exposure manually 43 Shooting in the dark - Picture effect...disc 64 Changing the disc title 67 Playing back a disc on a DVD player, etc 69 Playing back a disc on a computer with your DVD Handycam 4 What is the difference between DVD-R and DVD-RW 6 How to match your camcorder ...... 56 Choosing and viewing a recording - Mirror mode ........ 34 ...
Operating Instructions
Page 11
...92 Installing software 93 Connecting your camcorder to the computer 94 Consulting the on... on your computer Connecting your camcorder to your camcorder abroad .......... 131 Maintenance information ...images in VR mode (DVD-RWs only) Selecting the playing order on your camcorder to a TV or...or video tape onto a disc 108 Connecting your camcorder - Disc Duplicating 101 Making a disc copy ...105 Connecting your camcorder to a TV and a VCR Dubbing a disc to a tape 106 Connecting your camcorder to a ...Dubbing onto a disc 109 Customizing your camcorder Changing the SETUP display 110 Selecting ...
...92 Installing software 93 Connecting your camcorder to the computer 94 Consulting the on... on your computer Connecting your camcorder to your camcorder abroad .......... 131 Maintenance information ...images in VR mode (DVD-RWs only) Selecting the playing order on your camcorder to a TV or...or video tape onto a disc 108 Connecting your camcorder - Disc Duplicating 101 Making a disc copy ...105 Connecting your camcorder to a TV and a VCR Dubbing a disc to a tape 106 Connecting your camcorder to a ...Dubbing onto a disc 109 Customizing your camcorder Changing the SETUP display 110 Selecting ...
Operating Instructions
Page 14
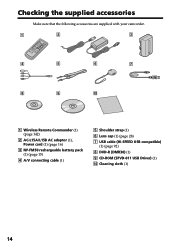
Checking the supplied accessories Make sure that the following accessories are supplied with your camcorder. 1 2 3 4 5 6 7 8 9 0 1 Wireless Remote Commander (1) (page 142) 2 AC-L15A/L15B AC adaptor (1), Power cord (1) (page 16) 3 NP-FM50 rechargeable battery pack (1) (page 15) 4 A/V connecting cable (1) 5 Shoulder strap (1) 6 Lens cap (1) (page 28) 7 USB cable (Hi-SPEED USB compatible) (1) (page 92) 8 DVD-R (DMR30) (1) 9 CD-ROM (SPVD-011 USB Driver) (1) q; Cleaning cloth (1) 14
Checking the supplied accessories Make sure that the following accessories are supplied with your camcorder. 1 2 3 4 5 6 7 8 9 0 1 Wireless Remote Commander (1) (page 142) 2 AC-L15A/L15B AC adaptor (1), Power cord (1) (page 16) 3 NP-FM50 rechargeable battery pack (1) (page 15) 4 A/V connecting cable (1) 5 Shoulder strap (1) 6 Lens cap (1) (page 28) 7 USB cable (Hi-SPEED USB compatible) (1) (page 92) 8 DVD-R (DMR30) (1) 9 CD-ROM (SPVD-011 USB Driver) (1) q; Cleaning cloth (1) 14

Operating Instructions
Page 15
Getting Started Step 1 Preparing the power source Installing/removing the battery pack To install the battery pack, slide it in and up in the direction of the arrow until it clicks. To remove the battery pack 1 Slide the battery pack in the direction of arrow while pressing the battery release button. 2 Slide the battery pack down. 1 2 BATT release button 15
Getting Started Step 1 Preparing the power source Installing/removing the battery pack To install the battery pack, slide it in and up in the direction of the arrow until it clicks. To remove the battery pack 1 Slide the battery pack in the direction of arrow while pressing the battery release button. 2 Slide the battery pack down. 1 2 BATT release button 15
Operating Instructions
Page 16
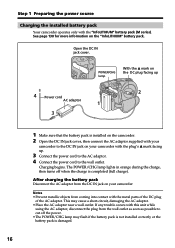
... objects from coming into contact with the plug's v mark facing up 2 1 1 Make sure that the battery pack is installed on the camcorder. 2 Open the DC IN jack cover, then connect the AC adaptor supplied with your camcorder with the metal parts of the DC plug of the AC adaptor. Step 1 Preparing the power... source Charging the installed battery pack Your camcorder operates only with this unit while using the AC adaptor, disconnect the plug from the wall outlet as soon as possible to cut off when ...
... objects from coming into contact with the plug's v mark facing up 2 1 1 Make sure that the battery pack is installed on the camcorder. 2 Open the DC IN jack cover, then connect the AC adaptor supplied with your camcorder with the metal parts of the DC plug of the AC adaptor. Step 1 Preparing the power... source Charging the installed battery pack Your camcorder operates only with this unit while using the AC adaptor, disconnect the plug from the wall outlet as soon as possible to cut off when ...
Operating Instructions
Page 17
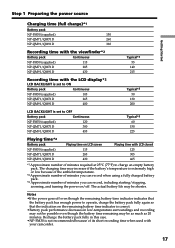
...NP-QM71/QM71D 285 NP-QM91/QM91D 430 Typical*3 55 140 215 Recording time with the LCD display*2 LCD BACKLIGHT is set to ON Battery pack Continuous NP-FM50 (supplied) 105 NP-QM71/QM71D 265 NP-QM91/QM91D 400 Typical*3 50 130 200 LCD BACKLIGHT is set to OFF... on /off even though the remaining battery time indicator indicates that the indication on the remaining battery time indicator is correct. •Battery pack performance decreases in this case. •NP-FM30 is not recommended because of its short recording time when used with your camcorder. 17 Notes •If the power...
...NP-QM71/QM71D 285 NP-QM91/QM91D 430 Typical*3 55 140 215 Recording time with the LCD display*2 LCD BACKLIGHT is set to ON Battery pack Continuous NP-FM50 (supplied) 105 NP-QM71/QM71D 265 NP-QM91/QM91D 400 Typical*3 50 130 200 LCD BACKLIGHT is set to OFF... on /off even though the remaining battery time indicator indicates that the indication on the remaining battery time indicator is correct. •Battery pack performance decreases in this case. •NP-FM30 is not recommended because of its short recording time when used with your camcorder. 17 Notes •If the power...
Operating Instructions
Page 18
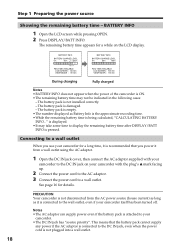
... source (house current) as long as Battery Info is the approximate recording time. •While the remaining battery time is damaged. - See page 16 for a while on your camcorder itself has been turned off. BATTERY INFO BATTERY CHARGE LEVEL 0% 50% 100% BATTERY INFO BATTERY CHARGE LEVEL 0% 50% 100% REC...wall outlet. is displayed. •It may not be indicated in the following cases: - PRECAUTION Your camcorder is not plugged into a wall outlet. 18 The remaining battery time appears for details. This means that you power it is attached to the DC IN jack on ...
... source (house current) as long as Battery Info is the approximate recording time. •While the remaining battery time is damaged. - See page 16 for a while on your camcorder itself has been turned off. BATTERY INFO BATTERY CHARGE LEVEL 0% 50% 100% BATTERY INFO BATTERY CHARGE LEVEL 0% 50% 100% REC...wall outlet. is displayed. •It may not be indicated in the following cases: - PRECAUTION Your camcorder is not plugged into a wall outlet. 18 The remaining battery time appears for details. This means that you power it is attached to the DC IN jack on ...

Operating Instructions
Page 21
Select (LCD/VF SET) then [LCD B.L.] in the SETUP display when using the battery pack (page 113). •The [LCD BRIGHT], [LCD B.L.] and [LCD COLOR] ... image when you are recording. •The backlight of the LCD screen is set it to OFF so that the battery pack lasts longer. •When you close the LCD screen facing out. LCD / VF SET LCD BRIGHT [ SETUP...multi-selector to select [LCD BRIGHT]. Tips •You can change the brightness of the backlight. When you use the camcorder outdoors, set to [BRT NORMAL] when you turn off the LCD back light, the icon appears on the LCD display....
Select (LCD/VF SET) then [LCD B.L.] in the SETUP display when using the battery pack (page 113). •The [LCD BRIGHT], [LCD B.L.] and [LCD COLOR] ... image when you are recording. •The backlight of the LCD screen is set it to OFF so that the battery pack lasts longer. •When you close the LCD screen facing out. LCD / VF SET LCD BRIGHT [ SETUP...multi-selector to select [LCD BRIGHT]. Tips •You can change the brightness of the backlight. When you use the camcorder outdoors, set to [BRT NORMAL] when you turn off the LCD back light, the icon appears on the LCD display....

Operating Instructions
Page 22
Select [VF B.L.] in the SETUP display when using the battery pack (page 113). •The [VF B.L.] setting does not affect the brightness of the ...change the brightness of the image when you are hard to accommodate your camcorder, extend the viewfinder and adjust the angle. •You can see . - When the pictures on battery consumption. 22 Adjust the viewfinder lens to see the characters in your... adjustment dial 1 Extend the viewfinder. 2 Turn the viewfinder lens adjustment dial until you install a large capacity battery pack such as the NP-QM91/QM91D in the viewfinder clearly.
Select [VF B.L.] in the SETUP display when using the battery pack (page 113). •The [VF B.L.] setting does not affect the brightness of the ...change the brightness of the image when you are hard to accommodate your camcorder, extend the viewfinder and adjust the angle. •You can see . - When the pictures on battery consumption. 22 Adjust the viewfinder lens to see the characters in your... adjustment dial 1 Extend the viewfinder. 2 Turn the viewfinder lens adjustment dial until you install a large capacity battery pack such as the NP-QM91/QM91D in the viewfinder clearly.
Operating Instructions
Page 23
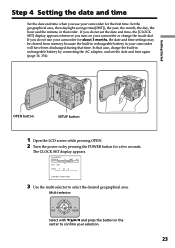
... the date and time Set the date and time when you use your camcorder for a few seconds. If you do not set the date and time again (page 16, 134). In that case, charge the built-in rechargeable battery by pressing the POWER button for about 3 months, the date and time settings... may be cleared from memory because the built-in rechargeable battery in that time. Set the geographical area, then daylight savings time([DST]), the year, the month, the day, the hour and the minute, in your camcorder or change the mode dial. If you turn on by connecting the...
... the date and time Set the date and time when you use your camcorder for a few seconds. If you do not set the date and time again (page 16, 134). In that case, charge the built-in rechargeable battery by pressing the POWER button for about 3 months, the date and time settings... may be cleared from memory because the built-in rechargeable battery in that time. Set the geographical area, then daylight savings time([DST]), the year, the month, the day, the hour and the minute, in your camcorder or change the mode dial. If you turn on by connecting the...
Operating Instructions
Page 27
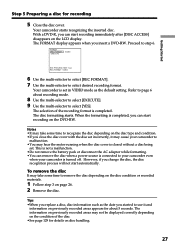
... handling. 27 When the formatting is completed, you can start automatically. This is not a malfunction. •Do not remove the battery pack or disconnect the AC adaptor while formatting. •You can start recording immediately after [DISC ACCESS] disappears on previously recorded areas...to remove the disc depending on the disc condition or recorded materials. 1 Follow step 3 on the DVD-RW. Proceed to select desired recording format. FORMAT REC FORMAT EXECUTE VIDEO EST. Your camcorder is turned off. PROCESS TIME : 7sec REC FORMAT : VIDEO 6 Use the multi-selector to ...
... handling. 27 When the formatting is completed, you can start automatically. This is not a malfunction. •Do not remove the battery pack or disconnect the AC adaptor while formatting. •You can start recording immediately after [DISC ACCESS] disappears on previously recorded areas...to remove the disc depending on the disc condition or recorded materials. 1 Follow step 3 on the DVD-RW. Proceed to select desired recording format. FORMAT REC FORMAT EXECUTE VIDEO EST. Your camcorder is turned off. PROCESS TIME : 7sec REC FORMAT : VIDEO 6 Use the multi-selector to ...
Operating Instructions
Page 28
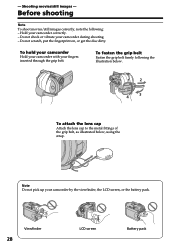
... vibrate your fingers inserted through the grip belt. Note Do not pick up your camcorder correctly. - To fasten the grip belt Fasten the grip belt firmly following : - Hold your camcorder by the viewfinder, the LCD screen, or the battery pack. Before shooting Note To shoot movies/still images correctly, note the following the... the grip belt, as illustrated below, using the strap. Do not scratch, put the fingerprint on, or get the disc dirty. Viewfinder 28 LCD screen Battery pack -
... vibrate your fingers inserted through the grip belt. Note Do not pick up your camcorder correctly. - To fasten the grip belt Fasten the grip belt firmly following : - Hold your camcorder by the viewfinder, the LCD screen, or the battery pack. Before shooting Note To shoot movies/still images correctly, note the following the... the grip belt, as illustrated below, using the strap. Do not scratch, put the fingerprint on, or get the disc dirty. Viewfinder 28 LCD screen Battery pack -
Operating Instructions
Page 29
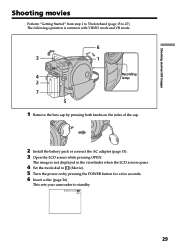
... cap by pressing the POWER button for a few seconds. 6 Insert a disc (page 26). This sets your camcorder to (Movie). 5 Turn the power on by pressing both knobs on the sides of the cap. 2 Install the battery pack or connect the AC adaptor (page 15). 3 Open the LCD screen while pressing OPEN. STBY0...
... cap by pressing the POWER button for a few seconds. 6 Insert a disc (page 26). This sets your camcorder to (Movie). 5 Turn the power on by pressing both knobs on the sides of the cap. 2 Install the battery pack or connect the AC adaptor (page 15). 3 Open the LCD screen while pressing OPEN. STBY0...

Operating Instructions
Page 30
...that the lens cap strap is not caught into the disc cover when you leave your camcorder powered by setting the (SETUP MENU) - [A. Do not turn the power off . SHUT OFF] menu item to prevent battery wear. This is useful when you remove the power source. REC 0:00:01 -R VIDEO...lamp lights on again by pressing the POWER button for five minutes, your camcorder lights up. Do not remove the battery pack or disconnect the AC adaptor. - You can operate start/stop recording, press START/STOP again. Your camcorder starts recording. [REC] appears on the LCD screen. Take note of your...
...that the lens cap strap is not caught into the disc cover when you leave your camcorder powered by setting the (SETUP MENU) - [A. Do not turn the power off . SHUT OFF] menu item to prevent battery wear. This is useful when you remove the power source. REC 0:00:01 -R VIDEO...lamp lights on again by pressing the POWER button for five minutes, your camcorder lights up. Do not remove the battery pack or disconnect the AC adaptor. - You can operate start/stop recording, press START/STOP again. Your camcorder starts recording. [REC] appears on the LCD screen. Take note of your...
Operating Instructions
Page 31
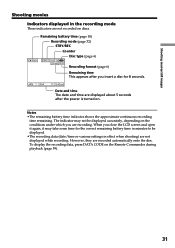
... 8 seconds. JAN 1 2004 11:23:45AM Date and time The date and time are displayed about 5 seconds after you are not displayed while recording. Remaining battery time (page 18) Recording mode (page 32) STBY/REC Counter Disc type (page 6) 40min REC 0:00:01 -R [30min] VIDEO Recording format (page 6) Remaining ...images Shooting movies Indicators displayed in minutes to be displayed accurately, depending on the conditions under which you insert a disc for the correct remaining battery time in the recording mode These indicators are recorded automatically onto the disc.
... 8 seconds. JAN 1 2004 11:23:45AM Date and time The date and time are displayed about 5 seconds after you are not displayed while recording. Remaining battery time (page 18) Recording mode (page 32) STBY/REC Counter Disc type (page 6) 40min REC 0:00:01 -R [30min] VIDEO Recording format (page 6) Remaining ...images Shooting movies Indicators displayed in minutes to be displayed accurately, depending on the conditions under which you insert a disc for the correct remaining battery time in the recording mode These indicators are recorded automatically onto the disc.
Operating Instructions
Page 35
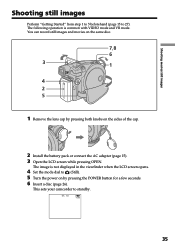
This sets your camcorder to 27). The image is common with VIDEO mode and VR mode. Shooting movies/still images Shooting still images Perform "Getting Started" from step 1 to 5 ... for a few seconds. 6 Insert a disc (page 26). FINE 0 -R VIDEO 35 You can record still images and movies on the sides of the cap. 2 Install the battery pack or connect the AC adaptor (page 15). 3 Open the LCD screen while pressing OPEN.
This sets your camcorder to 27). The image is common with VIDEO mode and VR mode. Shooting movies/still images Shooting still images Perform "Getting Started" from step 1 to 5 ... for a few seconds. 6 Insert a disc (page 26). FINE 0 -R VIDEO 35 You can record still images and movies on the sides of the cap. 2 Install the battery pack or connect the AC adaptor (page 15). 3 Open the LCD screen while pressing OPEN.
Operating Instructions
Page 37
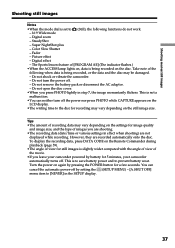
...shock or vibrate the camcorder. - Do not remove the battery pack or disconnect the AC adaptor. - To display the recording data, press DATA CODE on the Remote Commander during playback (page 59). •The angle of view for still images is set to prevent battery wear. Tips •...•When the mode dial is slightly wider compared with the angle of view of the movie. •If you leave your camcorder powered by battery for 5 minutes, your camcorder automatically turns off. Fader - The Sports lesson feature of the following functions do not work. - 16:9 Wide mode - Digital...
...shock or vibrate the camcorder. - Do not remove the battery pack or disconnect the AC adaptor. - To display the recording data, press DATA CODE on the Remote Commander during playback (page 59). •The angle of view for still images is set to prevent battery wear. Tips •...•When the mode dial is slightly wider compared with the angle of view of the movie. •If you leave your camcorder powered by battery for 5 minutes, your camcorder automatically turns off. Fader - The Sports lesson feature of the following functions do not work. - 16:9 Wide mode - Digital...
Operating Instructions
Page 50
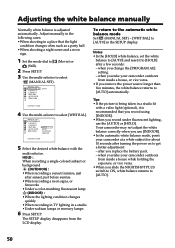
... PLUS switch to ON, white balance returns to [AUTO]. 50 when you take your camcorder at a white subject for about 10 seconds after a few seconds: - when you take your camcorder outdoors from inside a house while holding the exposure, or vice versa. •When ...record under fluorescent lighting, use [INDOOR]. •In the automatic white balance mode, point your camcorder outdoors from the LCD display. Your camcorder may not adjust the white balance correctly when you replace the battery pack. - after sunset, just before sunrise •When recording a neon signs, or fireworks ...
... PLUS switch to ON, white balance returns to [AUTO]. 50 when you take your camcorder at a white subject for about 10 seconds after a few seconds: - when you take your camcorder outdoors from inside a house while holding the exposure, or vice versa. •When ...record under fluorescent lighting, use [INDOOR]. •In the automatic white balance mode, point your camcorder outdoors from the LCD display. Your camcorder may not adjust the white balance correctly when you replace the battery pack. - after sunset, just before sunrise •When recording a neon signs, or fireworks ...


