Operating Instructions
Page 14
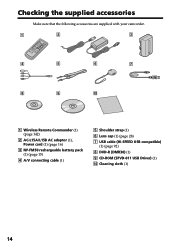
Cleaning cloth (1) 14 Checking the supplied accessories Make sure that the following accessories are supplied with your camcorder. 1 2 3 4 5 6 7 8 9 0 1 Wireless Remote Commander (1) (page 142) 2 AC-L15A/L15B AC adaptor (1), Power cord (1) (page 16) 3 NP-FM50 rechargeable battery pack (1) (page 15) 4 A/V connecting cable (1) 5 Shoulder strap (1) 6 Lens cap (1) (page 28) 7 USB cable (Hi-SPEED USB compatible) (1) (page 92) 8 DVD-R (DMR30) (1) 9 CD-ROM (SPVD-011 USB Driver) (1) q;
Cleaning cloth (1) 14 Checking the supplied accessories Make sure that the following accessories are supplied with your camcorder. 1 2 3 4 5 6 7 8 9 0 1 Wireless Remote Commander (1) (page 142) 2 AC-L15A/L15B AC adaptor (1), Power cord (1) (page 16) 3 NP-FM50 rechargeable battery pack (1) (page 15) 4 A/V connecting cable (1) 5 Shoulder strap (1) 6 Lens cap (1) (page 28) 7 USB cable (Hi-SPEED USB compatible) (1) (page 92) 8 DVD-R (DMR30) (1) 9 CD-ROM (SPVD-011 USB Driver) (1) q;
Operating Instructions
Page 16
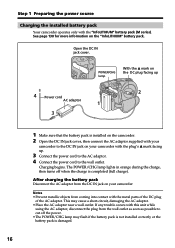
... the AC adaptor from the DC IN jack on the "InfoLITHIUM" battery pack. Open the DC IN jack cover. 4 Power cord AC adaptor 3 POWER/CHG lamp With the v mark on your camcorder with this unit while using the AC adaptor, disconnect the plug from coming into contact with the "InfoLITHIUM" battery pack... from the wall outlet as soon as possible to the wall outlet. See page 130 for more information on your camcorder to the DC IN jack on the DC plug facing up . 3 Connect the power cord to the AC adaptor. 4 Connect the power cord to cut off when the charge is damaged. 16
... the AC adaptor from the DC IN jack on the "InfoLITHIUM" battery pack. Open the DC IN jack cover. 4 Power cord AC adaptor 3 POWER/CHG lamp With the v mark on your camcorder with this unit while using the AC adaptor, disconnect the plug from coming into contact with the "InfoLITHIUM" battery pack... from the wall outlet as soon as possible to the wall outlet. See page 130 for more information on your camcorder to the DC IN jack on the DC plug facing up . 3 Connect the power cord to the AC adaptor. 4 Connect the power cord to cut off when the charge is damaged. 16
Operating Instructions
Page 18
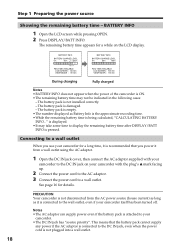
...details. PRECAUTION Your camcorder is not disconnected from a wall outlet using the AC adaptor. 1 Open the DC IN jack cover, then connect the AC adaptor supplied with the plug's v mark facing up. 2 Connect the power cord to the AC adaptor. 3 Connect the power cord to display the ...remaining battery time after DISPLAY/BATT INFO is being calculated, "CALCULATING BATTERY INFO..." Step 1 Preparing the power source Showing the remaining battery time - The battery pack is connected to the wall outlet, even if your camcorder itself has been turned...
...details. PRECAUTION Your camcorder is not disconnected from a wall outlet using the AC adaptor. 1 Open the DC IN jack cover, then connect the AC adaptor supplied with the plug's v mark facing up. 2 Connect the power cord to the AC adaptor. 3 Connect the power cord to display the ...remaining battery time after DISPLAY/BATT INFO is being calculated, "CALCULATING BATTERY INFO..." Step 1 Preparing the power source Showing the remaining battery time - The battery pack is connected to the wall outlet, even if your camcorder itself has been turned...
Operating Instructions
Page 64
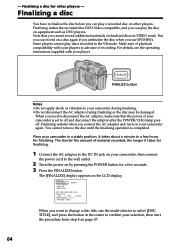
- Finalizing a disc for other players. Note that the power of your camcorder, then connect the power cord to select [DISC TITLE], and press the button in VIDEO mode. Make sure of playback compatibility with your camcorder in the VR mode. PROCESS TIME : 3min DISC TITLE : JAN 1 2004 8 : 48AM PHOTOMOVIE... : [ FINALIZE ] : END When you want to change a disc title, use DVD-...
- Finalizing a disc for other players. Note that the power of your camcorder, then connect the power cord to select [DISC TITLE], and press the button in VIDEO mode. Make sure of playback compatibility with your camcorder in the VR mode. PROCESS TIME : 3min DISC TITLE : JAN 1 2004 8 : 48AM PHOTOMOVIE... : [ FINALIZE ] : END When you want to change a disc title, use DVD-...
Operating Instructions
Page 125
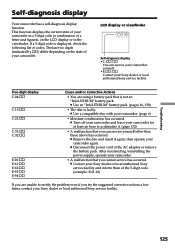
...:ss Cause and/or Corrective Actions • You are unable to acclimatize it again, then operate your camcorder. After reconnecting/reinstalling the power supply, operate your Sony dealer or local authorized Sony service facility. Troubleshooting 125 c Remove the disc and insert it . (page 132) • A ... at least an hour to rectify the problem even if you cannot service has occurred. c Disconnect the power cord of codes. Self-diagnosis display Your camcorder has a self-diagnosis display function. LCD display or viewfinder C:21:00 Self-diagnosis display • C:ss:ss ...
...:ss Cause and/or Corrective Actions • You are unable to acclimatize it again, then operate your camcorder. After reconnecting/reinstalling the power supply, operate your Sony dealer or local authorized Sony service facility. Troubleshooting 125 c Remove the disc and insert it . (page 132) • A ... at least an hour to rectify the problem even if you cannot service has occurred. c Disconnect the power cord of codes. Self-diagnosis display Your camcorder has a self-diagnosis display function. LCD display or viewfinder C:21:00 Self-diagnosis display • C:ss:ss ...
Operating Instructions
Page 134
... if the unit has been dropped or damaged. •Do not bend the power cord forcibly, or place a heavy object on it is in about three months if you do not use your camcorder to retain the date and time, etc., regardless of the setting of the connecting section. This ... completely discharged in use . dusty or dirty. - To disconnect the power cord, pull it will become discharged gradually if you do not allow metal objects to a wall outlet using the AC adaptor supplied with your camcorder, and leave your camcorder with the metal parts of the POWER button. This is not charged...
... if the unit has been dropped or damaged. •Do not bend the power cord forcibly, or place a heavy object on it is in about three months if you do not use your camcorder to retain the date and time, etc., regardless of the setting of the connecting section. This ... completely discharged in use . dusty or dirty. - To disconnect the power cord, pull it will become discharged gradually if you do not allow metal objects to a wall outlet using the AC adaptor supplied with your camcorder, and leave your camcorder with the metal parts of the POWER button. This is not charged...
Operating Instructions
Page 136
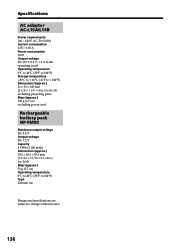
...°C (-4°F to + 140°F) Dimensions (approx.) 56 × 31 × 100 mm (2 1/4 × 1 1/4 × 4 in.) (w/h/d) excluding projecting parts Mass (approx.) 190 g (6.7 oz) excluding power cord Rechargeable battery pack NP-FM50 Maximum output voltage DC 8.4 V Output voltage DC 7.2 V Capacity 8.5 Wh (1 180 mAh) Dimensions (approx.) 38.2 × 20.5 × 55.6 mm (1 9/16...
...°C (-4°F to + 140°F) Dimensions (approx.) 56 × 31 × 100 mm (2 1/4 × 1 1/4 × 4 in.) (w/h/d) excluding projecting parts Mass (approx.) 190 g (6.7 oz) excluding power cord Rechargeable battery pack NP-FM50 Maximum output voltage DC 8.4 V Output voltage DC 7.2 V Capacity 8.5 Wh (1 180 mAh) Dimensions (approx.) 38.2 × 20.5 × 55.6 mm (1 9/16...


