Operating Instructions
Page 14
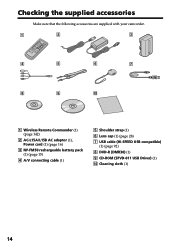
Checking the supplied accessories Make sure that the following accessories are supplied with your camcorder. 1 2 3 4 5 6 7 8 9 0 1 Wireless Remote Commander (1) (page 142) 2 AC-L15A/L15B AC adaptor (1), Power cord (1) (page 16) 3 NP-FM50 rechargeable battery pack (1) (page 15) 4 A/V connecting cable (1) 5 Shoulder strap (1) 6 Lens cap (1) (page 28) 7 USB cable (Hi-SPEED USB compatible) (1) (page 92) 8 DVD-R (DMR30) (1) 9 CD-ROM (SPVD-011 USB Driver) (1) q; Cleaning cloth (1) 14
Checking the supplied accessories Make sure that the following accessories are supplied with your camcorder. 1 2 3 4 5 6 7 8 9 0 1 Wireless Remote Commander (1) (page 142) 2 AC-L15A/L15B AC adaptor (1), Power cord (1) (page 16) 3 NP-FM50 rechargeable battery pack (1) (page 15) 4 A/V connecting cable (1) 5 Shoulder strap (1) 6 Lens cap (1) (page 28) 7 USB cable (Hi-SPEED USB compatible) (1) (page 92) 8 DVD-R (DMR30) (1) 9 CD-ROM (SPVD-011 USB Driver) (1) q; Cleaning cloth (1) 14
Operating Instructions
Page 16
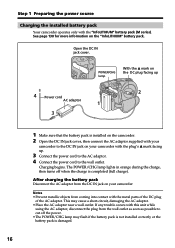
... as possible to the DC IN jack on the DC plug facing up . 3 Connect the power cord to the AC adaptor. 4 Connect the power cord to the wall outlet. See page 130 for more information on your camcorder with the "InfoLITHIUM" battery pack (M series). Charging begins. If any trouble occurs with the... metal parts of the DC plug of the AC adaptor. Open the DC IN jack cover. 4 Power cord AC adaptor 3 POWER/CHG lamp With the v mark on your camcorder. Notes • Prevent metallic objects from coming into contact with this unit while using the AC adaptor, disconnect the...
... as possible to the DC IN jack on the DC plug facing up . 3 Connect the power cord to the AC adaptor. 4 Connect the power cord to the wall outlet. See page 130 for more information on your camcorder with the "InfoLITHIUM" battery pack (M series). Charging begins. If any trouble occurs with the... metal parts of the DC plug of the AC adaptor. Open the DC IN jack cover. 4 Power cord AC adaptor 3 POWER/CHG lamp With the v mark on your camcorder. Notes • Prevent metallic objects from coming into contact with this unit while using the AC adaptor, disconnect the...
Operating Instructions
Page 18
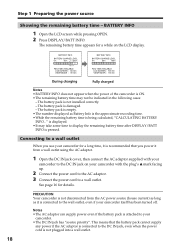
... installed correctly. - See page 16 for a while on your camcorder with the plug's v mark facing up. 2 Connect the power cord to the AC adaptor. 3 Connect the power cord to the wall outlet, even if your camcorder to the DC IN jack on the LCD display. PRECAUTION Your camcorder is not disconnected from a wall outlet using the AC...
... installed correctly. - See page 16 for a while on your camcorder with the plug's v mark facing up. 2 Connect the power cord to the AC adaptor. 3 Connect the power cord to the wall outlet, even if your camcorder to the DC IN jack on the LCD display. PRECAUTION Your camcorder is not disconnected from a wall outlet using the AC...
Operating Instructions
Page 64
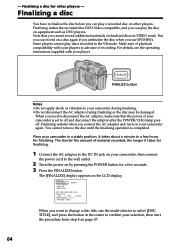
... to confirm your selection, then start the procedure from step 4 on your camcorder again. The shorter the amount of recording. Make sure of playback compatibility with your camcorder, then connect the power cord to your camcorder in the VR mode. FINALIZE FINALIZE button Notes •Do not apply shock...button in the center to the DC IN jack on your player. Finalizing makes the recorded disc DVD-Video compatible, and you need to off and disconnect the adaptor after the POWER/CHG lamp goes off. When you can play discs recorded in a stable position. The [FINALIZE...
... to confirm your selection, then start the procedure from step 4 on your camcorder again. The shorter the amount of recording. Make sure of playback compatibility with your camcorder, then connect the power cord to your camcorder in the VR mode. FINALIZE FINALIZE button Notes •Do not apply shock...button in the center to the DC IN jack on your player. Finalizing makes the recorded disc DVD-Video compatible, and you need to off and disconnect the adaptor after the POWER/CHG lamp goes off. When you can play discs recorded in a stable position. The [FINALIZE...
Operating Instructions
Page 125
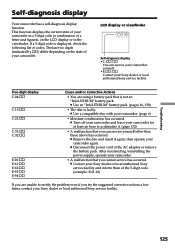
... the following list of your Sony dealer or local authorized Sony service facility. This function displays the current state of your camcorder. (page 6) • Moisture condensation has occurred. c Use a compatible disc with your camcorder as a 5-digit code (a combination of the AC adaptor or remove the battery pack. c Disconnect the power cord of a letter and figures), on...
... the following list of your Sony dealer or local authorized Sony service facility. This function displays the current state of your camcorder. (page 6) • Moisture condensation has occurred. c Use a compatible disc with your camcorder as a 5-digit code (a combination of the AC adaptor or remove the battery pack. c Disconnect the power cord of a letter and figures), on...
Operating Instructions
Page 134
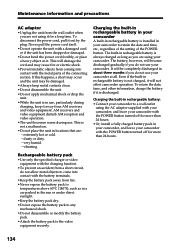
...-in rechargeable battery is always charged as long as in a car parked in your camcorder with the POWER button turned off for a long time. very humid. - To disconnect the power cord, pull it . vibrating. Maintenance information and precautions AC adaptor •Unplug the unit from the wall outlet ...battery pack to a wall outlet using the AC adaptor supplied with your camcorder, and leave your camcorder to come into contact with a damaged cord or if the unit has been dropped or damaged. •Do not bend the power cord forcibly, or place a heavy object on it out by the plug....
...-in rechargeable battery is always charged as long as in a car parked in your camcorder with the POWER button turned off for a long time. very humid. - To disconnect the power cord, pull it . vibrating. Maintenance information and precautions AC adaptor •Unplug the unit from the wall outlet ...battery pack to a wall outlet using the AC adaptor supplied with your camcorder, and leave your camcorder to come into contact with a damaged cord or if the unit has been dropped or damaged. •Do not bend the power cord forcibly, or place a heavy object on it out by the plug....
Operating Instructions
Page 136
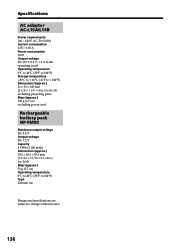
... 100 - 240 V AC, 50/60 Hz Current consumption 0.35 - 0.18 A Power consumption 18 W Output voltage DC OUT: 8.4 V, 1.5 A in the operating mode Operating temperature 0°C to 40°C (32°F to 104°F) Storage ... (-4°F to + 140°F) Dimensions (approx.) 56 × 31 × 100 mm (2 1/4 × 1 1/4 × 4 in.) (w/h/d) excluding projecting parts Mass (approx.) 190 g (6.7 oz) excluding power cord Rechargeable battery pack NP-FM50 Maximum output voltage DC 8.4 V Output voltage DC 7.2 V Capacity 8.5 Wh (1 180 mAh) Dimensions (approx.) 38.2 × 20.5 × 55.6 mm (1 9/16...
... 100 - 240 V AC, 50/60 Hz Current consumption 0.35 - 0.18 A Power consumption 18 W Output voltage DC OUT: 8.4 V, 1.5 A in the operating mode Operating temperature 0°C to 40°C (32°F to 104°F) Storage ... (-4°F to + 140°F) Dimensions (approx.) 56 × 31 × 100 mm (2 1/4 × 1 1/4 × 4 in.) (w/h/d) excluding projecting parts Mass (approx.) 190 g (6.7 oz) excluding power cord Rechargeable battery pack NP-FM50 Maximum output voltage DC 8.4 V Output voltage DC 7.2 V Capacity 8.5 Wh (1 180 mAh) Dimensions (approx.) 38.2 × 20.5 × 55.6 mm (1 9/16...


