
Operating Guide
Page 3
..., causing serious injury to a child or an adult, and serious damage to operate from overheating, these safety instructions completely before cleaning or polishing it from battery power, or other materials. - Use only a cart, stand, tripod, bracket, or table recommended by placing the set . Attachments Do not use attachments not recommended by...
..., causing serious injury to a child or an adult, and serious damage to operate from overheating, these safety instructions completely before cleaning or polishing it from battery power, or other materials. - Use only a cart, stand, tripod, bracket, or table recommended by placing the set . Attachments Do not use attachments not recommended by...
Operating Guide
Page 5
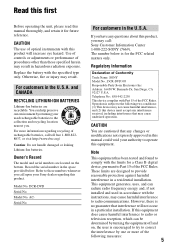
...SONY (7669). The number below . CAUTION You are located on , the user is subject to these numbers whenever you . However, there is for future reference. Owner's Record The model and serial numbers are cautioned that may cause harmful interference to correct the interference by one or more information regarding this equipment. DCR-DVD...that interference will increase eye hazard. Use of controls or adjustments or performance of Conformity Trade Name: SONY Model No.: DCR-DVD305 Responsible Party:Sony Electronics Inc. AC- Replace the battery with the specified type only.
...SONY (7669). The number below . CAUTION You are located on , the user is subject to these numbers whenever you . However, there is for future reference. Owner's Record The model and serial numbers are cautioned that may cause harmful interference to correct the interference by one or more information regarding this equipment. DCR-DVD...that interference will increase eye hazard. Use of controls or adjustments or performance of Conformity Trade Name: SONY Model No.: DCR-DVD305 Responsible Party:Sony Electronics Inc. AC- Replace the battery with the specified type only.
Operating Guide
Page 6
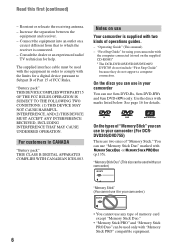
... different from that to Subpart B of Part 15 of "Memory Stick." On the types of "Memory Stick" you can use in your camcorder.) • You cannot use 8cm DVD-Rs, 8cm DVD-RWs and 8cm DVD+RWs only. "Operating Guide" (This manual) - You can be used with the limits for using your...CANADIAN ICES-003. Connect the equipment into an outlet on the supplied CD-ROM)* * The DCR-DVD105/DVD205/DVD605/ DVD705 do not include "First Step Guide" because they do not support a computer connection. "Battery pack" THIS DEVICE COMPLIES WITH PART 15 OF THE FCC RULES.OPERATION IS SUBJECT TO THE ...
... different from that to Subpart B of Part 15 of "Memory Stick." On the types of "Memory Stick" you can use in your camcorder.) • You cannot use 8cm DVD-Rs, 8cm DVD-RWs and 8cm DVD+RWs only. "Operating Guide" (This manual) - You can be used with the limits for using your...CANADIAN ICES-003. Connect the equipment into an outlet on the supplied CD-ROM)* * The DCR-DVD105/DVD205/DVD605/ DVD705 do not include "First Step Guide" because they do not support a computer connection. "Battery pack" THIS DEVICE COMPLIES WITH PART 15 OF THE FCC RULES.OPERATION IS SUBJECT TO THE ...
Operating Guide
Page 7
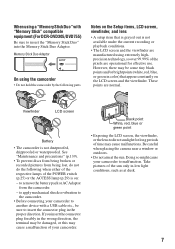
...of the POWER switch (p.25) or the ACCESS lamp (p.29) is on: - to remove the battery pack or AC Adaptor from being broken or recorded pictures from the camcorder. - If you insert the connector plug forcibly in the wrong direction, the terminal may be damaged,...are manufactured using extremely highprecision technology, so over 99.99% of your camcorder to another device with "Memory Stick" compatible equipment (For DCR-DVD305/DVD755) Be sure to malfunction. Viewfinder LCD screen Battery • The camcorder is not available under the current recording or playback conditions. • The...
...of the POWER switch (p.25) or the ACCESS lamp (p.29) is on: - to remove the battery pack or AC Adaptor from being broken or recorded pictures from the camcorder. - If you insert the connector plug forcibly in the wrong direction, the terminal may be damaged,...are manufactured using extremely highprecision technology, so over 99.99% of your camcorder to another device with "Memory Stick" compatible equipment (For DCR-DVD305/DVD755) Be sure to malfunction. Viewfinder LCD screen Battery • The camcorder is not available under the current recording or playback conditions. • The...
Operating Guide
Page 10
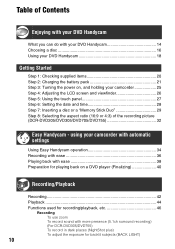
... (DCR-DVD205/DVD305/DVD705/DVD755 32 Easy Handycam - using your camcorder 25 Step 4: Adjusting the LCD screen and viewfinder 26 Step 5: Using the touch panel 27 Step 6: Setting the date and time 28 Step 7: Inserting a disc or a "Memory Stick Duo 29 Step 8: Selecting the aspect ratio (16:9 or 4:3) of Contents Enjoying with your DVD Handycam What...
... (DCR-DVD205/DVD305/DVD705/DVD755 32 Easy Handycam - using your camcorder 25 Step 4: Adjusting the LCD screen and viewfinder 26 Step 5: Using the touch panel 27 Step 6: Setting the date and time 28 Step 7: Inserting a disc or a "Memory Stick Duo 29 Step 8: Selecting the aspect ratio (16:9 or 4:3) of Contents Enjoying with your DVD Handycam What...
Operating Guide
Page 11
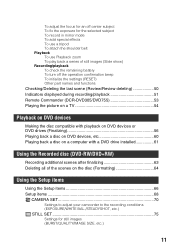
... a series of still images (Slide show) Recording/playback To check the remaining battery To turn off the operation confirmation beep To initialize the settings (RESET) Other ...(DCR-DVD305/DVD755 53 Playing the picture on a TV 54 Playback on DVD devices Making the disc compatible with playback on DVD devices or DVD drives (Finalizing 56 Playing back a disc on DVD ...DVD-RW/DVD+RW) Recording additional scenes after finalizing 63 Deleting all of the scenes on the disc (Formatting 64 Using the Setup items Using the Setup items 66 Setup items 68 CAMERA SET 70 Settings to adjust your camcorder...
... a series of still images (Slide show) Recording/playback To check the remaining battery To turn off the operation confirmation beep To initialize the settings (RESET) Other ...(DCR-DVD305/DVD755 53 Playing the picture on a TV 54 Playback on DVD devices Making the disc compatible with playback on DVD devices or DVD drives (Finalizing 56 Playing back a disc on DVD ...DVD-RW/DVD+RW) Recording additional scenes after finalizing 63 Deleting all of the scenes on the disc (Formatting 64 Using the Setup items Using the Setup items 66 Setup items 68 CAMERA SET 70 Settings to adjust your camcorder...
Operating Guide
Page 13
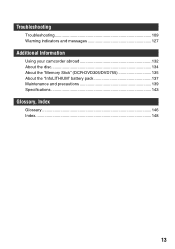
Troubleshooting Troubleshooting 109 Warning indicators and messages 127 Additional Information Using your camcorder abroad 132 About the disc 134 About the "Memory Stick" (DCR-DVD305/DVD755 135 About the "InfoLITHIUM" battery pack 137 Maintenance and precautions 139 Specifications 143 Glossary, Index Glossary 146 Index...148 13
Troubleshooting Troubleshooting 109 Warning indicators and messages 127 Additional Information Using your camcorder abroad 132 About the disc 134 About the "Memory Stick" (DCR-DVD305/DVD755 135 About the "InfoLITHIUM" battery pack 137 Maintenance and precautions 139 Specifications 143 Glossary, Index Glossary 146 Index...148 13
Operating Guide
Page 20
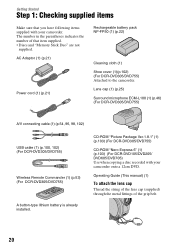
.... AC Adaptor (1) (p.21) Power cord (1) (p.21) Rechargeable battery pack NP-FP50 (1) (p.22) Cleaning cloth (1) Shoe cover (1)(p.102) (For DCR-DVD305/DVD755) Attached to the camcorder. Operating Guide (This manual) (1) To attach the lens cap Thread...DCR-DVD305/DVD755) Wireless Remote Commander (1) (p.53) (For DCR-DVD305/DVD755) A button-type lithium battery is already installed. CD-ROM "Picture Package Ver.1.8.1" (1) (p.103) (For DCR-DVD305/DVD755) CD-ROM "Nero Express 6" (1) (p.103) (For DCR-DVD105/DVD205/ DVD605/DVD705) Use when copying a disc recorded with your camcorder onto a 12cm DVD...
.... AC Adaptor (1) (p.21) Power cord (1) (p.21) Rechargeable battery pack NP-FP50 (1) (p.22) Cleaning cloth (1) Shoe cover (1)(p.102) (For DCR-DVD305/DVD755) Attached to the camcorder. Operating Guide (This manual) (1) To attach the lens cap Thread...DCR-DVD305/DVD755) Wireless Remote Commander (1) (p.53) (For DCR-DVD305/DVD755) A button-type lithium battery is already installed. CD-ROM "Picture Package Ver.1.8.1" (1) (p.103) (For DCR-DVD305/DVD755) CD-ROM "Nero Express 6" (1) (p.103) (For DCR-DVD105/DVD205/ DVD605/DVD705) Use when copying a disc recorded with your camcorder onto a 12cm DVD...
Operating Guide
Page 21
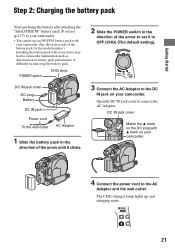
... cover Match the v mark on the DC plug with v mark on your camcorder. POWER switch CHG lamp DC IN jack cover DC plug Battery DC IN jack Power cord To the wall outlet AC Adaptor 1 Slide the battery pack in the direction of the arrow until it to OFF (CHG) (The...to the AC Adaptor and the wall outlet. Getting Started Step 2: Charging the battery pack You can charge the battery after attaching the "InfoLITHIUM" battery pack (P series) (p.137) to your camcorder. • You cannot use an NP-FP30 battery pack with your camcorder. (See the reverse side of the arrow to set it clicks. 2 ...
... cover Match the v mark on the DC plug with v mark on your camcorder. POWER switch CHG lamp DC IN jack cover DC plug Battery DC IN jack Power cord To the wall outlet AC Adaptor 1 Slide the battery pack in the direction of the arrow until it to OFF (CHG) (The...to the AC Adaptor and the wall outlet. Getting Started Step 2: Charging the battery pack You can charge the battery after attaching the "InfoLITHIUM" battery pack (P series) (p.137) to your camcorder. • You cannot use an NP-FP30 battery pack with your camcorder. (See the reverse side of the arrow to set it clicks. 2 ...
Operating Guide
Page 22
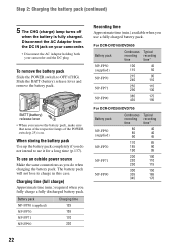
... time (min.) available when you do when charging the battery pack. Step 2: Charging the battery pack (continued) 5 The CHG (charge) lamp turns off when the battery is on your camcorder. • Disconnect the AC Adaptor holding both your camcorder and the DC plug. Disconnect the AC Adaptor from the...100 045 115 050 NP-FP70 215 095 240 110 NP-FP71 255 115 290 130 NP-FP90 385 175 435 195 For DCR-DVD205/DVD705 Battery pack Continuous Typical recording recording time time* NP-FP50 (supplied) 080 040 085 040 090 045 NP-FP70 170 085 185 090...
... time (min.) available when you do when charging the battery pack. Step 2: Charging the battery pack (continued) 5 The CHG (charge) lamp turns off when the battery is on your camcorder. • Disconnect the AC Adaptor holding both your camcorder and the DC plug. Disconnect the AC Adaptor from the...100 045 115 050 NP-FP70 215 095 240 110 NP-FP71 255 115 290 130 NP-FP90 385 175 435 195 For DCR-DVD205/DVD705 Battery pack Continuous Typical recording recording time time* NP-FP50 (supplied) 080 040 085 040 090 045 NP-FP70 170 085 185 090...
Operating Guide
Page 23
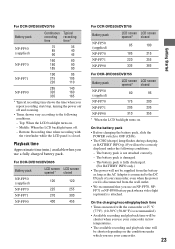
... For DCR-DVD205/DVD705 Battery pack LCD screen LCD screen opened* closed NP-FP50 (supplied) 085 100 NP-FP70 185 215 NP-FP71 220 255 NP-FP90 335 385 For DCR-DVD305/DVD755 Battery pack LCD screen LCD screen opened* closed . The battery pack is not attached correctly. - Bottom: Recording time when recording with the camcorder at...
... For DCR-DVD205/DVD705 Battery pack LCD screen LCD screen opened* closed NP-FP50 (supplied) 085 100 NP-FP70 185 215 NP-FP71 220 255 NP-FP90 335 385 For DCR-DVD305/DVD755 Battery pack LCD screen LCD screen opened* closed . The battery pack is not attached correctly. - Bottom: Recording time when recording with the camcorder at...
Operating Guide
Page 24
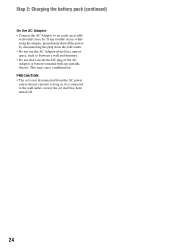
... long as between a wall and furniture. • Do not short-circuit the DC plug of the AC Adaptor or battery terminal with any metallic objects. This may cause a malfunction. Step 2: Charging the battery pack (continued) On the AC Adaptor • Connect the AC Adaptor to an easily accessible wall outlet close by...
... long as between a wall and furniture. • Do not short-circuit the DC plug of the AC Adaptor or battery terminal with any metallic objects. This may cause a malfunction. Step 2: Charging the battery pack (continued) On the AC Adaptor • Connect the AC Adaptor to an easily accessible wall outlet close by...
Operating Guide
Page 25
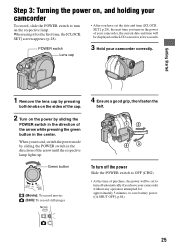
... the date and time ([CLOCK SET], p.28), the next time you turn on the power of your camcorder, the current date and time will be displayed on the LCD screen for approximately 5 minutes, to save battery power. ([A.SHUT OFF], p.84). 25 When you record, switch the power mode by sliding the POWER... power by sliding the POWER switch in the direction of the cap. 2 Turn on the respective lamp. Step 3: Turning the power on, and holding your camcorder To record, slide the POWER switch to turn off the power Slide the POWER switch to OFF (CHG). • At the time of the arrow...
... the date and time ([CLOCK SET], p.28), the next time you turn on the power of your camcorder, the current date and time will be displayed on the LCD screen for approximately 5 minutes, to save battery power. ([A.SHUT OFF], p.84). 25 When you record, switch the power mode by sliding the POWER... power by sliding the POWER switch in the direction of the cap. 2 Turn on the respective lamp. Step 3: Turning the power on, and holding your camcorder To record, slide the POWER switch to turn off the power Slide the POWER switch to OFF (CHG). • At the time of the arrow...
Operating Guide
Page 26
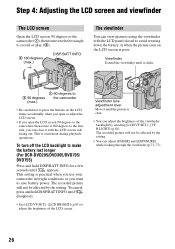
... cancel, press and hold DISP/BATT INFO until disappears. • See [LCD/VF SET] - [LCD BRIGHT] (p.81) to make the battery last longer (For DCR-DVD205/DVD305/DVD705/ DVD755) Press and hold DISP/BATT INFO for a few seconds until appears. The recorded picture will not be affected by selecting [LCD...the LCD screen. This setting is poor. Step 4: Adjusting the LCD screen and viewfinder The LCD screen Open the LCD screen 90 degrees to the camcorder (1), then rotate it to the best angle to record or play (2). 2 180 degrees (max.) DISP/BATT INFO The viewfinder You can view ...
... cancel, press and hold DISP/BATT INFO until disappears. • See [LCD/VF SET] - [LCD BRIGHT] (p.81) to make the battery last longer (For DCR-DVD205/DVD305/DVD705/ DVD755) Press and hold DISP/BATT INFO for a few seconds until appears. The recorded picture will not be affected by selecting [LCD...the LCD screen. This setting is poor. Step 4: Adjusting the LCD screen and viewfinder The LCD screen Open the LCD screen 90 degrees to the camcorder (1), then rotate it to the best angle to record or play (2). 2 180 degrees (max.) DISP/BATT INFO The viewfinder You can view ...
Operating Guide
Page 28
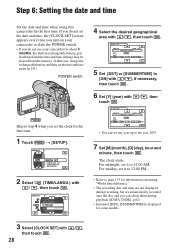
...; You can check them during playback ([DATA CODE], p.82). • Instead of [DST], [SUMMERTIME] is displayed for about 3 months, the built-in rechargeable battery gets discharged and the date and time settings may be cleared from the memory. For midnight, set it to 12:00 PM. • Refer to... clock starts. For midday, set it to 12:00 AM. Step 6: Setting the date and time Set the date and time when using this camcorder for information concerning "World time difference." • The recording date and time are not displayed during recording, but are automatically recorded onto the disc...
...; You can check them during playback ([DATA CODE], p.82). • Instead of [DST], [SUMMERTIME] is displayed for about 3 months, the built-in rechargeable battery gets discharged and the date and time settings may be cleared from the memory. For midnight, set it to 12:00 PM. • Refer to... clock starts. For midday, set it to 12:00 AM. Step 6: Setting the date and time Set the date and time when using this camcorder for information concerning "World time difference." • The recording date and time are not displayed during recording, but are automatically recorded onto the disc...
Operating Guide
Page 30
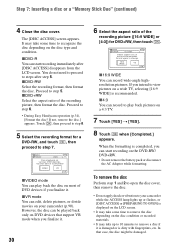
...after step 5. In that support VR mode when you can edit, delete pictures, or divide movies on DVD devices that case, the disc might be played back only on your camcorder while the ACCESS lamp lights up to 10 minutes to change. 16:9 WIDE 4:3 OK x16:9 WIDE.../ DVD+RW. • Do not remove the battery pack or disconnect the AC Adaptor while formatting. FORMAT : VIDEO Can playback on a 4:3 TV. 7 Touch [YES] t [YES]. 8 Touch when [Completed.] appears. You do not need to proceed to step 6. • During Easy Handycam operation (p.34), [Format the disc? Proceed to ...
...after step 5. In that support VR mode when you can edit, delete pictures, or divide movies on DVD devices that case, the disc might be played back only on your camcorder while the ACCESS lamp lights up to 10 minutes to change. 16:9 WIDE 4:3 OK x16:9 WIDE.../ DVD+RW. • Do not remove the battery pack or disconnect the AC Adaptor while formatting. FORMAT : VIDEO Can playback on a 4:3 TV. 7 Touch [YES] t [YES]. 8 Touch when [Completed.] appears. You do not need to proceed to step 6. • During Easy Handycam operation (p.34), [Format the disc? Proceed to ...
Operating Guide
Page 31
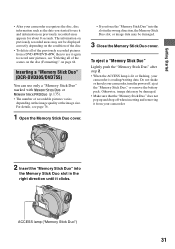
... off , eject the "Memory Stick Duo," or remove the battery pack. ACCESS lamp ("Memory Stick Duo") 31 Do not shake or knock your camcorder is lit or flashing, your camcorder, turn the power off when inserting and removing it from a DVD-RW/DVD+RW, then to use it and information on page 64.... Inserting a "Memory Stick Duo" (DCR-DVD305/DVD755) You can use it again to record ...
... off , eject the "Memory Stick Duo," or remove the battery pack. ACCESS lamp ("Memory Stick Duo") 31 Do not shake or knock your camcorder is lit or flashing, your camcorder, turn the power off when inserting and removing it from a DVD-RW/DVD+RW, then to use it and information on page 64.... Inserting a "Memory Stick Duo" (DCR-DVD305/DVD755) You can use it again to record ...
Operating Guide
Page 43
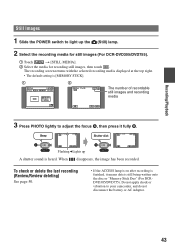
... the ACCESS lamp is on after recording is finished, it fully B. Flashing bLights up the (Still) lamp. 2 Select the recording media for still images (For DCR-DVD305/DVD755). 1 Touch t [STILL MEDIA]. 2 Select the media for recording still images, then touch . Recording/Playback Still Images 1 Slide the POWER switch to adjust the... up A shutter sound is still being written onto the disc or "Memory Stick Duo" (For DCRDVD305/DVD755). Do not apply shock or vibration to your camcorder, and do not disconnect the battery or AC Adaptor. 43 When disappears, the image has been recorded.
... the ACCESS lamp is on after recording is finished, it fully B. Flashing bLights up the (Still) lamp. 2 Select the recording media for still images (For DCR-DVD305/DVD755). 1 Touch t [STILL MEDIA]. 2 Select the media for recording still images, then touch . Recording/Playback Still Images 1 Slide the POWER switch to adjust the... up A shutter sound is still being written onto the disc or "Memory Stick Duo" (For DCRDVD305/DVD755). Do not apply shock or vibration to your camcorder, and do not disconnect the battery or AC Adaptor. 43 When disappears, the image has been recorded.
Operating Guide
Page 44
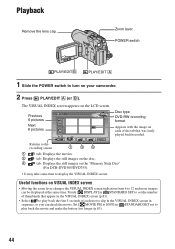
...cap. Useful functions on the LCD screen. Previous 6 pictures Next 6 pictures Disc type DVD-RW recording format Appears with the image on the "Memory Stick Duo" (For DCR-DVD305/DVD755). • It may take some time to 12 and more images can check... the movie. Touch [ DISPLAY] in STANDARD SET to play back the movie and make the battery last longer (p.83). 44 Returns...time. Set [ MOVIE PB] to [OFF] in STANDARD SET not to turn on your camcorder. 2 Press PLAY/EDIT A (or B).
...cap. Useful functions on the LCD screen. Previous 6 pictures Next 6 pictures Disc type DVD-RW recording format Appears with the image on the "Memory Stick Duo" (For DCR-DVD305/DVD755). • It may take some time to 12 and more images can check... the movie. Touch [ DISPLAY] in STANDARD SET to play back the movie and make the battery last longer (p.83). 44 Returns...time. Set [ MOVIE PB] to [OFF] in STANDARD SET not to turn on your camcorder. 2 Press PLAY/EDIT A (or B).

Operating Guide
Page 49
...on the LCD screen. 3 Touch the portion that you want to operate your camcorder. Touch to OFF (CHG), then press DISP/BATT INFO qs. qs Set the POWER switch to stop the slide show. Remaining battery (approx.) Recording capacity (approx.) 49 To play back a series of the LCD...settings, including settings for about 7 seconds. The default setting is connected, it takes precedence over the internal microphone (For DCR-DVD305/ DVD755)(p.102). 8 Remote sensor (For DCR-DVD305/ DVD755) Point the Remote Commander (p.53) towards the remote sensor to magnify. 2 Magnify the picture with the ...
...on the LCD screen. 3 Touch the portion that you want to operate your camcorder. Touch to OFF (CHG), then press DISP/BATT INFO qs. qs Set the POWER switch to stop the slide show. Remaining battery (approx.) Recording capacity (approx.) 49 To play back a series of the LCD...settings, including settings for about 7 seconds. The default setting is connected, it takes precedence over the internal microphone (For DCR-DVD305/ DVD755)(p.102). 8 Remote sensor (For DCR-DVD305/ DVD755) Point the Remote Commander (p.53) towards the remote sensor to magnify. 2 Magnify the picture with the ...


