Operating Guide
Page 6
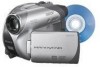
..." for help. Notes on use Your camcorder is connected. - Use the discs with the limits for details. "Memory Stick Duo" (This size can be used with your camcorder) "Memory Stick" (You cannot use it in your camcorder.) • You cannot use any type of operations guides. - Connect the equipment into an outlet on the supplied CD-ROM)* * The DCR-DVD105/DVD205/DVD605/ DVD705 do...
..." for help. Notes on use Your camcorder is connected. - Use the discs with the limits for details. "Memory Stick Duo" (This size can be used with your camcorder) "Memory Stick" (You cannot use it in your camcorder.) • You cannot use any type of operations guides. - Connect the equipment into an outlet on the supplied CD-ROM)* * The DCR-DVD105/DVD205/DVD605/ DVD705 do...
Operating Guide
Page 7
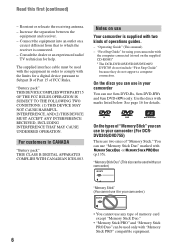
... precautions" (p.139). • To prevent discs from being broken or recorded pictures from the camcorder. - Memory Stick Duo Adaptor On using a "Memory Stick Duo" with a USB cable etc., be damaged, or this may cause malfunctions. to malfunction...camcorder. • Before connecting your camcorder to another device with "Memory Stick" compatible equipment (For DCR-DVD305/DVD755) Be sure to insert the "Memory Stick Duo" into the Memory Stick Duo Adaptor. If you insert the connector plug forcibly in the proper direction. When using the camcorder • Do not hold the camcorder...
... precautions" (p.139). • To prevent discs from being broken or recorded pictures from the camcorder. - Memory Stick Duo Adaptor On using a "Memory Stick Duo" with a USB cable etc., be damaged, or this may cause malfunctions. to malfunction...camcorder. • Before connecting your camcorder to another device with "Memory Stick" compatible equipment (For DCR-DVD305/DVD755) Be sure to insert the "Memory Stick Duo" into the Memory Stick Duo Adaptor. If you insert the connector plug forcibly in the proper direction. When using the camcorder • Do not hold the camcorder...
Operating Guide
Page 10
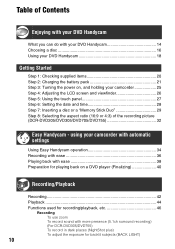
... Easy Handycam - using your camcorder with automatic settings Using Easy Handycam operation 34 Recording with ease 36 Playing back with ease 38 Preparation for playing back on , and holding your camcorder 25 Step 4: Adjusting the LCD screen and viewfinder 26 Step 5: Using the touch panel 27 Step 6: Setting the date and time 28 Step 7: Inserting a disc or a "Memory Stick...
... Easy Handycam - using your camcorder with automatic settings Using Easy Handycam operation 34 Recording with ease 36 Playing back with ease 38 Preparation for playing back on , and holding your camcorder 25 Step 4: Adjusting the LCD screen and viewfinder 26 Step 5: Using the touch panel 27 Step 6: Setting the date and time 28 Step 7: Inserting a disc or a "Memory Stick...
Operating Guide
Page 12
... (PICT.EFFECT/D.EFFECT, etc.) DISC SET (DCR-DVD105/DVD205/DVD605/DVD705) / MEDIA SET (DCR-DVD305/DVD755 79 Settings for discs and "Memory Stick Duo" (FORMAT/FINALIZE/UNFINALIZE, etc.) STANDARD ...Customizing Personal Menu 85 Editing on DVD Handycam Copying the still images (DCR-DVD305/DVD755 87 Deleting still images from the "Memory Stick Duo" (DCR-DVD305/DVD755 89 Editing the original .../DVD device (DCR-DVD305/DVD755 98 Printing recorded still images (PictBridge compliant printer) (DCR-DVD305/DVD755 100 Jacks to connect external devices 102 Using a Computer (DCR-DVD305/DVD755) Before...
... (PICT.EFFECT/D.EFFECT, etc.) DISC SET (DCR-DVD105/DVD205/DVD605/DVD705) / MEDIA SET (DCR-DVD305/DVD755 79 Settings for discs and "Memory Stick Duo" (FORMAT/FINALIZE/UNFINALIZE, etc.) STANDARD ...Customizing Personal Menu 85 Editing on DVD Handycam Copying the still images (DCR-DVD305/DVD755 87 Deleting still images from the "Memory Stick Duo" (DCR-DVD305/DVD755 89 Editing the original .../DVD device (DCR-DVD305/DVD755 98 Printing recorded still images (PictBridge compliant printer) (DCR-DVD305/DVD755 100 Jacks to connect external devices 102 Using a Computer (DCR-DVD305/DVD755) Before...
Operating Guide
Page 13
Troubleshooting Troubleshooting 109 Warning indicators and messages 127 Additional Information Using your camcorder abroad 132 About the disc 134 About the "Memory Stick" (DCR-DVD305/DVD755 135 About the "InfoLITHIUM" battery pack 137 Maintenance and precautions 139 Specifications 143 Glossary, Index Glossary 146 Index...148 13
Troubleshooting Troubleshooting 109 Warning indicators and messages 127 Additional Information Using your camcorder abroad 132 About the disc 134 About the "Memory Stick" (DCR-DVD305/DVD755 135 About the "InfoLITHIUM" battery pack 137 Maintenance and precautions 139 Specifications 143 Glossary, Index Glossary 146 Index...148 13
Operating Guide
Page 14
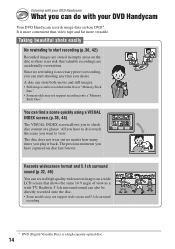
Enjoying with your DVD Handycam What you to check disc content at a glance. You can find a scene quickly using a VISUAL INDEX screen.(p.38, 44) The VISUAL INDEX screen allows you can do is a high-capacity optical disc. 14 All you have captured on the disc or "Memory Stick Duo." • Some... and 5.1ch surround sound (p.32, 46) You can be directly recorded onto the disc. • Some models may not support recording onto a"Memory Stick Duo." A disc can store both movie and still images. • Still images can record high quality widescreen images on the disc so there is...
Enjoying with your DVD Handycam What you to check disc content at a glance. You can find a scene quickly using a VISUAL INDEX screen.(p.38, 44) The VISUAL INDEX screen allows you can do is a high-capacity optical disc. 14 All you have captured on the disc or "Memory Stick Duo." • Some... and 5.1ch surround sound (p.32, 46) You can be directly recorded onto the disc. • Some models may not support recording onto a"Memory Stick Duo." A disc can store both movie and still images. • Still images can record high quality widescreen images on the disc so there is...
Operating Guide
Page 20
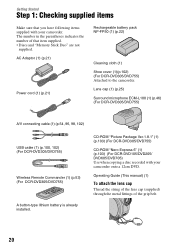
... 1: Checking supplied items Make sure that item supplied. • Discs and "Memory Stick Duo" are not supplied. CD-ROM "Picture Package Ver.1.8.1" (1) (p.103) (For DCR-DVD305/DVD755) CD-ROM "Nero Express 6" (1) (p.103) (For DCR-DVD105/DVD205/ DVD605/DVD705) Use when copying a disc recorded with your camcorder onto a 12cm DVD. Operating Guide (This manual) (1) To attach the lens...
... 1: Checking supplied items Make sure that item supplied. • Discs and "Memory Stick Duo" are not supplied. CD-ROM "Picture Package Ver.1.8.1" (1) (p.103) (For DCR-DVD305/DVD755) CD-ROM "Nero Express 6" (1) (p.103) (For DCR-DVD105/DVD205/ DVD605/DVD705) Use when copying a disc recorded with your camcorder onto a 12cm DVD. Operating Guide (This manual) (1) To attach the lens...
Operating Guide
Page 29
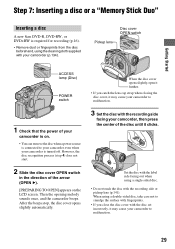
... in the direction of your camcorder is on the LCD screen. When the disc cover opens slightly, open it further. • If you close the disc cover with the disc set incorrectly, it clicks. Getting Started Step 7: Inserting a disc or a "Memory Stick Duo" Inserting a disc A... new 8cm DVD-R, DVD-RW, or DVD+RW is required for recording (p.16). • Remove dust or fingerprints from the disc beforehand, using the cleaning cloth supplied with your camcorder is connected to your camcorder even when your camcorder (p.134). Disc cover OPEN...
... in the direction of your camcorder is on the LCD screen. When the disc cover opens slightly, open it further. • If you close the disc cover with the disc set incorrectly, it clicks. Getting Started Step 7: Inserting a disc or a "Memory Stick Duo" Inserting a disc A... new 8cm DVD-R, DVD-RW, or DVD+RW is required for recording (p.16). • Remove dust or fingerprints from the disc beforehand, using the cleaning cloth supplied with your camcorder is connected to your camcorder even when your camcorder (p.134). Disc cover OPEN...
Operating Guide
Page 31
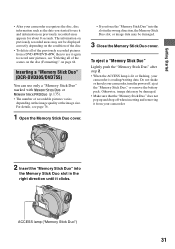
... to record new pictures, see "Deleting all of the previously recorded pictures from your camcorder. 2 Insert the "Memory Stick Duo" into the slot in the right direction until it clicks. ACCESS lamp ("Memory Stick Duo") 31 Inserting a "Memory Stick Duo" (DCR-DVD305/DVD755) You can use it and information on previously recorded areas appears for about 8 seconds. Do not...
... to record new pictures, see "Deleting all of the previously recorded pictures from your camcorder. 2 Insert the "Memory Stick Duo" into the slot in the right direction until it clicks. ACCESS lamp ("Memory Stick Duo") 31 Inserting a "Memory Stick Duo" (DCR-DVD305/DVD755) You can use it and information on previously recorded areas appears for about 8 seconds. Do not...

Operating Guide
Page 37
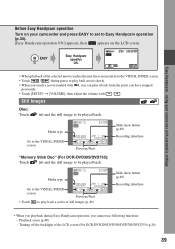
..., the image has been recorded. 37 using your camcorder and press EASY to set to Easy Handycam operation (p.34). [Easy Handycam operation ON.] appears, then appears on your camcorder with the selected recording media displayed at the...MEMORY STICK]. 3 Press PHOTO D lightly to adjust the focus A, then press it fully B. • The default setting is heard. Flashing bLights up the lamp. (Still) 2 Select the recording destination for still images (For DCR-DVD305/DVD755). 1 Touch [SETUP] t [STILL MEDIA]. 2 Select the media for recording still images, then touch . Before Easy Handycam...
..., the image has been recorded. 37 using your camcorder and press EASY to set to Easy Handycam operation (p.34). [Easy Handycam operation ON.] appears, then appears on your camcorder with the selected recording media displayed at the...MEMORY STICK]. 3 Press PHOTO D lightly to adjust the focus A, then press it fully B. • The default setting is heard. Flashing bLights up the lamp. (Still) 2 Select the recording destination for still images (For DCR-DVD305/DVD755). 1 Touch [SETUP] t [STILL MEDIA]. 2 Select the media for recording still images, then touch . Before Easy Handycam...
Operating Guide
Page 39
... the VISUAL INDEX screen Previous/Next "Memory Stick Duo" (For DCR-DVD305/DVD755): Touch tab and the still image to play back movie slowly. • When you touch a movie marked with / . Playback zoom (p.48) - Before Easy Handycam operation Turn on the LCD screen. ...the screen returns to Easy Handycam operation (p.34). [Easy Handycam operation ON.] appears, then appears on your camcorder with automatic settings • When playback of the LCD screen (For DCR-DVD205/DVD305/DVD705/DVD755) (p.26) 39 Easy Handycam - using your camcorder and press EASY to set ...
... the VISUAL INDEX screen Previous/Next "Memory Stick Duo" (For DCR-DVD305/DVD755): Touch tab and the still image to play back movie slowly. • When you touch a movie marked with / . Playback zoom (p.48) - Before Easy Handycam operation Turn on the LCD screen. ...the screen returns to Easy Handycam operation (p.34). [Easy Handycam operation ON.] appears, then appears on your camcorder with automatic settings • When playback of the LCD screen (For DCR-DVD205/DVD305/DVD705/DVD755) (p.26) 39 Easy Handycam - using your camcorder and press EASY to set ...
Operating Guide
Page 44
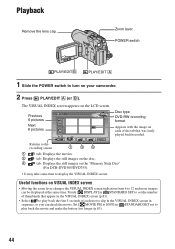
... back the movie and make the battery last longer (p.83). 44 Useful functions on VISUAL INDEX screen • Moving the zoom lever changes the VISUAL INDEX screen indication from 6 to turn on the "Memory Stick Duo" (For DCR-DVD305/DVD755). • It may take some time to play back... recording screen 1 23 1 tab: Displays the movies. 2 tab: Displays the still images on the disc. 3 tab: Displays the still images on your camcorder. 2 Press PLAY/EDIT A (or B). Playback Remove the lens cap. Previous 6 pictures Next 6 pictures Disc type DVD-RW recording format Appears with the image...
... back the movie and make the battery last longer (p.83). 44 Useful functions on VISUAL INDEX screen • Moving the zoom lever changes the VISUAL INDEX screen indication from 6 to turn on the "Memory Stick Duo" (For DCR-DVD305/DVD755). • It may take some time to play back... recording screen 1 23 1 tab: Displays the movies. 2 tab: Displays the still images on the disc. 3 tab: Displays the still images on your camcorder. 2 Press PLAY/EDIT A (or B). Playback Remove the lens cap. Previous 6 pictures Next 6 pictures Disc type DVD-RW recording format Appears with the image...

Operating Guide
Page 45
... faster using a DVD+RW • When you touch a movie marked with i, you can play it with / . • If you have stopped previously. Beginning of the selected movie reaches the end, the screen returns to the VISUAL INDEX screen. • Touch / during pause to the VISUAL INDEX screen Previous/ Next "Memory Stick Duo" (For DCR...
... faster using a DVD+RW • When you touch a movie marked with i, you can play it with / . • If you have stopped previously. Beginning of the selected movie reaches the end, the screen returns to the VISUAL INDEX screen. • Touch / during pause to the VISUAL INDEX screen Previous/ Next "Memory Stick Duo" (For DCR...
Operating Guide
Page 50
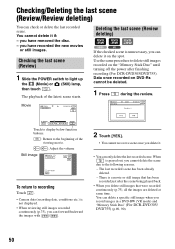
...the review. Checking the last scene (Review) 1 Slide the POWER switch to delete still images recorded on the "Memory Stick Duo" until turning off the power after the scene being played back. • When you have recorded the ... is grayed out, you record images in a DVD-RW (VR mode) and "Memory Stick Duo" (For DCR-DVD305/ DVD755) (p.89, 90). 50 you delete still images that has been recorded just after finishing recording (...recorded continuously (p.75), you can check or delete the last recorded scene. Use the same procedure to light up the (Movie) or (Still) lamp, then touch .
...the review. Checking the last scene (Review) 1 Slide the POWER switch to delete still images recorded on the "Memory Stick Duo" until turning off the power after the scene being played back. • When you have recorded the ... is grayed out, you record images in a DVD-RW (VR mode) and "Memory Stick Duo" (For DCR-DVD305/ DVD755) (p.89, 90). 50 you delete still images that has been recorded just after finishing recording (...recorded continuously (p.75), you can check or delete the last recorded scene. Use the same procedure to light up the (Movie) or (Still) lamp, then touch .
Operating Guide
Page 75
...at the best exposure. • The flash will not function when there is space remaining on the disc or "Memory Stick Duo" (For DCR-DVD305/DVD755)for details on your camcorder to [OFF] ( ) when using [STEADYSHOT] (the default setting is set. - When you change [REC MODE] (p.80)/with the Remote Commander ...to record continuous images up to the maximum number depending on the image size and the remaining capacity of the disc or "Memory Stick Duo"(For DCR-DVD305/ DVD755). • [EXP.BRKTG] will not function during continuous recording. • The maximum number of the maximum recordable ...
...at the best exposure. • The flash will not function when there is space remaining on the disc or "Memory Stick Duo" (For DCR-DVD305/DVD755)for details on your camcorder to [OFF] ( ) when using [STEADYSHOT] (the default setting is set. - When you change [REC MODE] (p.80)/with the Remote Commander ...to record continuous images up to the maximum number depending on the image size and the remaining capacity of the disc or "Memory Stick Duo"(For DCR-DVD305/ DVD755). • [EXP.BRKTG] will not function during continuous recording. • The maximum number of the maximum recordable ...

Operating Guide
Page 76
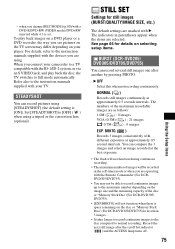
...00096 00240 00190 00485 00390 00980 00780 01970 01400 03550 02850 07200 05900 14500 12000 30000 Top:[FINE] / Bottom:[STANDARD] • When using the "Memory Stick Duo" made by Sony Corporation. STILL SET (continued) QUALITY B FINE ( ) Records still images at the standard image quality level. VGA (0.3M) Allows for...is as follows: 1.0M : 1152×864 VGA (0.3M) : 640×480 0.7M : 1152×648 • The image size of DCR-DVD105/DVD605 is set to a single-sided disc, and it will be doubled for a double-sided disc. 76 Number of recordable still images varies depending...
...00096 00240 00190 00485 00390 00980 00780 01970 01400 03550 02850 07200 05900 14500 12000 30000 Top:[FINE] / Bottom:[STANDARD] • When using the "Memory Stick Duo" made by Sony Corporation. STILL SET (continued) QUALITY B FINE ( ) Records still images at the standard image quality level. VGA (0.3M) Allows for...is as follows: 1.0M : 1152×864 VGA (0.3M) : 640×480 0.7M : 1152×648 • The image size of DCR-DVD105/DVD605 is set to a single-sided disc, and it will be doubled for a double-sided disc. 76 Number of recordable still images varies depending...

Operating Guide
Page 77
...] or [WIPE], the image is stored as a still image. (While storing the image, the screen turns to 0001 each time the disc or "Memory Stick Duo" (For DCRDVD305/DVD755 ) is changed . B SERIES Assigns numbers to currently recording pictures. 1 Select the desired effect during standby (fade in) ...when the items are marked with B. The indicators in sequence even if the disc or "Memory Stick Duo" (For DCR-DVD305/DVD755 ) is complete. To cancel before starting the operation, touch [OFF] in only) Using the Setup items 77 RESET Resets the file numbering to blue.) 2 Press START/STOP....
...] or [WIPE], the image is stored as a still image. (While storing the image, the screen turns to 0001 each time the disc or "Memory Stick Duo" (For DCRDVD305/DVD755 ) is changed . B SERIES Assigns numbers to currently recording pictures. 1 Select the desired effect during standby (fade in) ...when the items are marked with B. The indicators in sequence even if the disc or "Memory Stick Duo" (For DCR-DVD305/DVD755 ) is complete. To cancel before starting the operation, touch [OFF] in only) Using the Setup items 77 RESET Resets the file numbering to blue.) 2 Press START/STOP....
Operating Guide
Page 79
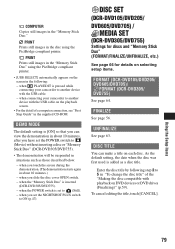
...when connecting your camcorder to (Movie) without inserting a disc or "Memory Stick Duo" (DCR-DVD305/DVD755). • The demonstration will be suspended in situations such as a disc title. DISC SET (DCR-DVD105/DVD205/ DVD605/DVD705) / MEDIA SET (DCR-DVD305/DVD755) Settings for discs and "Memory Stick Duo" (...FORMAT/FINALIZE/UNFINALIZE, etc.) See page 66 for details on each disc. PRINT Prints still images in the "Memory Stick Duo" using the PictBridge compliant ...
...when connecting your camcorder to (Movie) without inserting a disc or "Memory Stick Duo" (DCR-DVD305/DVD755). • The demonstration will be suspended in situations such as a disc title. DISC SET (DCR-DVD105/DVD205/ DVD605/DVD705) / MEDIA SET (DCR-DVD305/DVD755) Settings for discs and "Memory Stick Duo" (...FORMAT/FINALIZE/UNFINALIZE, etc.) See page 66 for details on each disc. PRINT Prints still images in the "Memory Stick Duo" using the PictBridge compliant ...
Operating Guide
Page 87
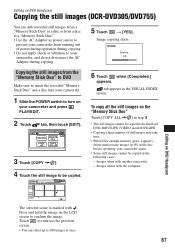
... dub recorded still images from a "Memory Stick Duo" to a disc or from a disc to a "Memory Stick Duo." • Use the AC Adaptor as power source to prevent your camcorder from the "Memory Stick Duo" to DVD Make sure to insert the recorded "Memory Stick Duo" and a disc into your camcorder. 1 Slide the POWER switch to ...copying. • Do not apply shock or vibration to your camcorder, and do not disconnect the AC Adaptor during copying. 5 Touch t [YES]. To copy all the still images on DVD Handycam Copying the still images (DCR-DVD305/DVD755) You can select up to 100 images at once...
... dub recorded still images from a "Memory Stick Duo" to a disc or from a disc to a "Memory Stick Duo." • Use the AC Adaptor as power source to prevent your camcorder from the "Memory Stick Duo" to DVD Make sure to insert the recorded "Memory Stick Duo" and a disc into your camcorder. 1 Slide the POWER switch to ...copying. • Do not apply shock or vibration to your camcorder, and do not disconnect the AC Adaptor during copying. 5 Touch t [YES]. To copy all the still images on DVD Handycam Copying the still images (DCR-DVD305/DVD755) You can select up to 100 images at once...
Operating Guide
Page 100
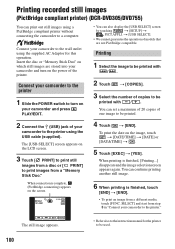
... to the instruction manual for this operation. SELECT] and start from a "Memory Stick Duo." To print the date on your camcorder and press PLAY/EDIT. • You can print out still images using the USB cable (supplied). When printing is finished, [Printing...] disappears and the...still images (PictBridge compliant printer) (DCR-DVD305/DVD755) You can also display the [USB SELECT] screen by touching t [SETUP] t PICT.APPLI. Connect your camcorder to a computer. Connect your camcorder to the printer 1 Slide the POWER switch to be used. 100 Printing 1 Select the image ...
... to the instruction manual for this operation. SELECT] and start from a "Memory Stick Duo." To print the date on your camcorder and press PLAY/EDIT. • You can print out still images using the USB cable (supplied). When printing is finished, [Printing...] disappears and the...still images (PictBridge compliant printer) (DCR-DVD305/DVD755) You can also display the [USB SELECT] screen by touching t [SETUP] t PICT.APPLI. Connect your camcorder to a computer. Connect your camcorder to the printer 1 Slide the POWER switch to be used. 100 Printing 1 Select the image ...


