
Operating Instructions
Page 6
... Files/JPEG Image Files... 53 Adjusting the Delay Between the Picture and Sound 57 Restricting Playback of the Disc........... 58 Changing the System Settings by Using the Setup Display 60 Tuner Presetting Radio Stations 67 Listening to the Radio 68 Control for HDMI/External Audio Device... Using the Control for HDMI Function for "BRAVIA" Sync 70 Using the DIGITAL MEDIA PORT Adapter 72 Using an S-AIR Product 73 Other Operations Getting Optimal Surround Sound for a Room 79 Calibrating the Appropriate Settings Automatically 80 Controlling the TV with the Supplied...
... Files/JPEG Image Files... 53 Adjusting the Delay Between the Picture and Sound 57 Restricting Playback of the Disc........... 58 Changing the System Settings by Using the Setup Display 60 Tuner Presetting Radio Stations 67 Listening to the Radio 68 Control for HDMI/External Audio Device... Using the Control for HDMI Function for "BRAVIA" Sync 70 Using the DIGITAL MEDIA PORT Adapter 72 Using an S-AIR Product 73 Other Operations Getting Optimal Surround Sound for a Room 79 Calibrating the Appropriate Settings Automatically 80 Controlling the TV with the Supplied...
Operating Instructions
Page 10
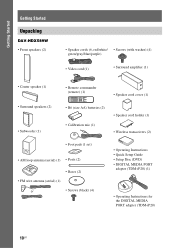
... Getting Started Unpacking DAV-HDX589W • Front speakers (2) • Speaker cords (6, red/white/ • Screws (with washer) (4) green/gray/blue/purple) • Video cord (1) • Surround amplifier (1) • Center speaker (1) • Remote commander (remote) (1) • Speaker cord cover (1) • Surround speakers (2) • Subwoofer (1) • R6 (size AA) batteries (2) • Calibration mic (1) • Speaker...
... Getting Started Unpacking DAV-HDX589W • Front speakers (2) • Speaker cords (6, red/white/ • Screws (with washer) (4) green/gray/blue/purple) • Video cord (1) • Surround amplifier (1) • Center speaker (1) • Remote commander (remote) (1) • Speaker cord cover (1) • Surround speakers (2) • Subwoofer (1) • R6 (size AA) batteries (2) • Calibration mic (1) • Speaker...
Operating Instructions
Page 11
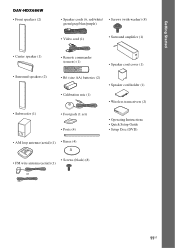
Getting Started DAV-HDX686W • Front speakers (2) • Speaker cords (6, red/white/ • Screws (with washer) (8) green/gray/blue/purple) • Video cord (1) • Surround amplifier (1) • Center speaker (1) • Remote commander (remote) (1) • Speaker cord cover (1) • Surround speakers (2) • R6 (size AA) batteries (2) • Calibration mic (1) • Speaker cord holder (1) •...
Getting Started DAV-HDX686W • Front speakers (2) • Speaker cords (6, red/white/ • Screws (with washer) (8) green/gray/blue/purple) • Video cord (1) • Surround amplifier (1) • Center speaker (1) • Remote commander (remote) (1) • Speaker cord cover (1) • Surround speakers (2) • R6 (size AA) batteries (2) • Calibration mic (1) • Speaker cord holder (1) •...

Operating Instructions
Page 36
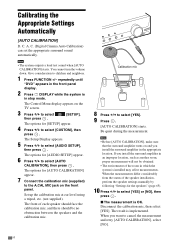
... the speakers are actually positioned, then press . The front of the TV to off. The Setup Display for a Room" (page 79). 9 Connect the calibration mic (supplied) to the A.CAL MIC jack on . • [OFF]: The Control for HDMI function is set to on the front panel. The Setup... Setup Display for the Control for selecting the aspect ratio of each speaker should face the calibration mic, and there should be connected appears. Set up the calibration mic at ear level using a tripod, etc. (not supplied). Calibration mic 7 Press X/x to select the setting, then press . • [ON]: The ...
... the speakers are actually positioned, then press . The front of the TV to off. The Setup Display for a Room" (page 79). 9 Connect the calibration mic (supplied) to the A.CAL MIC jack on . • [OFF]: The Control for HDMI function is set to on the front panel. The Setup... Setup Display for the Control for selecting the aspect ratio of each speaker should face the calibration mic, and there should be connected appears. Set up the calibration mic at ear level using a tripod, etc. (not supplied). Calibration mic 7 Press X/x to select the setting, then press . • [ON]: The ...

Operating Instructions
Page 37
... the TV screen. 3 Press X/x to select [QUICK], then press . All connections and setup operations are output when [AUTO CALIBRATION] starts. repeatedly until "DVD" appears in the front panel display. 2 Press DISPLAY while the system is finished. The Control Menu display appears on the TV screen. 3 Press X/x to the operating instructions supplied with...
... the TV screen. 3 Press X/x to select [QUICK], then press . All connections and setup operations are output when [AUTO CALIBRATION] starts. repeatedly until "DVD" appears in the front panel display. 2 Press DISPLAY while the system is finished. The Control Menu display appears on the TV screen. 3 Press X/x to the operating instructions supplied with...
Operating Instructions
Page 64
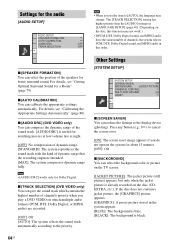
... the sound track with the kind of channels priority when you do not operate the system for Dolby Digital. x [AUDIO DRC] (DVD VIDEO only) You can calibrate the appropriate settings automatically. Note • [AUDIO DRC] works only for about 15 minutes. [OFF]: Off. x... stored in OFF this order. For details, see "Calibrating the Appropriate Settings Automatically" (page 80). x [AUTO CALIBRATION] You can compress the dynamic range of channels, the system selects OFF PCM, DTS, Dolby Digital sound, and MPEG audio in the system appears. [BLUE]: The background is blue. [BLACK]:...
... the sound track with the kind of channels priority when you do not operate the system for Dolby Digital. x [AUDIO DRC] (DVD VIDEO only) You can calibrate the appropriate settings automatically. Note • [AUDIO DRC] works only for about 15 minutes. [OFF]: Off. x... stored in OFF this order. For details, see "Calibrating the Appropriate Settings Automatically" (page 80). x [AUTO CALIBRATION] You can compress the dynamic range of channels, the system selects OFF PCM, DTS, Dolby Digital sound, and MPEG audio in the system appears. [BLUE]: The background is blue. [BLACK]:...
Operating Instructions
Page 79
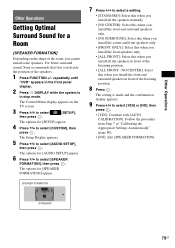
For better surround sound, Sony recommends that first you cannot install some .... 8 Press . STANDARD 79US repeatedly until "DVD" appears in the front panel display. 2 Press DISPLAY while the system is made and the confirmation display appears. 9 Press C/c to select a setting. • [STANDARD]: Select this ...when you install the front and surround speakers in front of "Calibrating the Appropriate Settings Automatically" (page 80). • [NO]: Exit [SPEAKER FORMATION]. Follow the procedure from Step 7 of the...
For better surround sound, Sony recommends that first you cannot install some .... 8 Press . STANDARD 79US repeatedly until "DVD" appears in the front panel display. 2 Press DISPLAY while the system is made and the confirmation display appears. 9 Press C/c to select a setting. • [STANDARD]: Select this ...when you install the front and surround speakers in front of "Calibrating the Appropriate Settings Automatically" (page 80). • [NO]: Exit [SPEAKER FORMATION]. Follow the procedure from Step 7 of the...
Operating Instructions
Page 80
...installation, perform the speaker settings manually by following "Settings for [AUTO CALIBRATION] appear. 7 Connect the calibration mic (supplied) to select [CUSTOM], then press . When you install the surround amplifier in which the system is in the appropriate location. If you want to select [SETUP...repeatedly until "DVD" appears in the front panel display. 2 Press DISPLAY while the system is installed may affect measurements. Be quiet during the measurement. Note • Before [AUTO CALIBRATION], make sure that the surround amplifier turns on the TV screen. 3 Press X/x to...
...installation, perform the speaker settings manually by following "Settings for [AUTO CALIBRATION] appear. 7 Connect the calibration mic (supplied) to select [CUSTOM], then press . When you install the surround amplifier in which the system is in the appropriate location. If you want to select [SETUP...repeatedly until "DVD" appears in the front panel display. 2 Press DISPLAY while the system is installed may affect measurements. Be quiet during the measurement. Note • Before [AUTO CALIBRATION], make sure that the surround amplifier turns on the TV screen. 3 Press X/x to...
Operating Instructions
Page 81
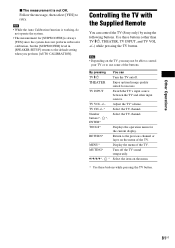
...layer on the menu. * Use these buttons (other input sources. THEATER Enjoy optimal image quality suited for the current display. TV VOL +/- Other Operations x The measurement is always [YES] since the system does not perform subwoofer calibration, but the [SUBWOOFER] level in [SPEAKER SETUP] returns to ...not operate the system. • The measurement for [SUBWOOFER] is not OK. RETURN* Return to retry. Controlling the TV with the Supplied Remote You can TV [/1 Turn the TV on the TV, you perform [AUTO CALIBRATION]. By pressing You can control the TV (Sony only) by using...
...layer on the menu. * Use these buttons (other input sources. THEATER Enjoy optimal image quality suited for the current display. TV VOL +/- Other Operations x The measurement is always [YES] since the system does not perform subwoofer calibration, but the [SUBWOOFER] level in [SPEAKER SETUP] returns to ...not operate the system. • The measurement for [SUBWOOFER] is not OK. RETURN* Return to retry. Controlling the TV with the Supplied Remote You can TV [/1 Turn the TV on the TV, you perform [AUTO CALIBRATION]. By pressing You can control the TV (Sony only) by using...
Operating Instructions
Page 101
...digitally, less signal degradation occurs. Glossary Digital Cinema Auto Calibration Digital Cinema Auto Calibration was developed by Sony to automatically measure and adjust the speaker settings to your ... creates five full-bandwidth output channels from 2 channel sources. This is needed). RT10A) Communication system S-AIR Specification version 1.0 Frequency band 2.4000 GHz - 2.4835 GHz Modulation method DSSS Power... holder 1.7 kg (3 lb 12 oz) incl. Dolby Digital This movie theater sound format is enhanced sound field directionality that provide dedicated power to a ...
...digitally, less signal degradation occurs. Glossary Digital Cinema Auto Calibration Digital Cinema Auto Calibration was developed by Sony to automatically measure and adjust the speaker settings to your ... creates five full-bandwidth output channels from 2 channel sources. This is needed). RT10A) Communication system S-AIR Specification version 1.0 Frequency band 2.4000 GHz - 2.4835 GHz Modulation method DSSS Power... holder 1.7 kg (3 lb 12 oz) incl. Dolby Digital This movie theater sound format is enhanced sound field directionality that provide dedicated power to a ...

Operating Instructions
Page 113
... can display the DVD's menu. [BROWSING] (page 57) You can display the list of the TV, and select yes or no to start the Auto Calibration. [CUSTOM] In addition to the Quick Setup setting, you can adjust various other settings. [FOLDER] (page 52) You can select the folder to be played...
... can display the DVD's menu. [BROWSING] (page 57) You can display the list of the TV, and select yes or no to start the Auto Calibration. [CUSTOM] In addition to the Quick Setup setting, you can adjust various other settings. [FOLDER] (page 52) You can select the folder to be played...
Operating Instructions
Page 114
C. (Digital Cinema Auto Calibration) 80, 101 DEMO 32 Digital Direct Twin Drive Subwoofer 101 DIGITAL MEDIA PORT 72 DIMMER ...66 LEVEL 66 SUBTITLE 45, 61 Super Audio CD 46, 102 Surround amplifier 73, 109 SYSTEM MENU 32, 40, 45, 68, 74, 75, 77, 78, 84, 85 SYSTEM SETUP 64 T TEST TONE 66 TIME 52 TRACK SELECTION 64 TV TYPE 61 V VIDEO ...SETUP 61 VOLUME LIMIT 63 A. Index Numerics 4:3 OUTPUT 62 5.1 Channel Surround 46 A A/V SYNC 57 ANGLE 45 ATTENUATE 84 AUDIO 61 AUDIO (HDMI) 63 AUDIO DRC 64 AUDIO SETUP 64 AUTO CALIBRATION...
C. (Digital Cinema Auto Calibration) 80, 101 DEMO 32 Digital Direct Twin Drive Subwoofer 101 DIGITAL MEDIA PORT 72 DIMMER ...66 LEVEL 66 SUBTITLE 45, 61 Super Audio CD 46, 102 Surround amplifier 73, 109 SYSTEM MENU 32, 40, 45, 68, 74, 75, 77, 78, 84, 85 SYSTEM SETUP 64 T TEST TONE 66 TIME 52 TRACK SELECTION 64 TV TYPE 61 V VIDEO ...SETUP 61 VOLUME LIMIT 63 A. Index Numerics 4:3 OUTPUT 62 5.1 Channel Surround 46 A A/V SYNC 57 ANGLE 45 ATTENUATE 84 AUDIO 61 AUDIO (HDMI) 63 AUDIO DRC 64 AUDIO SETUP 64 AUTO CALIBRATION...


