

Operating Instructions
Page 27
... coaxial out jack of the TV. 27US Method 2: Digital optical cord (E) or digital coaxial cord (F) connection When the TV has a digital optical or coaxial output jack, you can accept both digital and analog signals. Note • The system can improve sound quality by connecting with a ...digital optical or coaxial cord in addition to the TV/VIDEO (AUDIO IN R/L) jacks or...
... coaxial out jack of the TV. 27US Method 2: Digital optical cord (E) or digital coaxial cord (F) connection When the TV has a digital optical or coaxial output jack, you can accept both digital and analog signals. Note • The system can improve sound quality by connecting with a ...digital optical or coaxial cord in addition to the TV/VIDEO (AUDIO IN R/L) jacks or...

Operating Instructions
Page 36
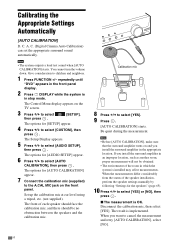
...) to on the front panel. For details, see "Getting Optimal Surround Sound for selecting the speaker formation appears. 36US Set up the calibration mic at ear level using a tripod, etc. (not supplied). The front of the TV to off. Calibration mic 7 Press X/x to select the setting, then ... 70) is set to the A.CAL MIC jack on . • [OFF]: The Control for HDMI function appears. VIDEO SETUP TV TYPE: 16:9 PROGRESSIVE (COMPONENT OUT): 16:9 4:3 OUTPUT: 4:3 LETTER BOX BLACK LEVEL: 4:3 PAN SCAN BLACK LEVEL (COMPONENT OUT): OFF PAUSE MODE: AUTO 6 Press X/x to select the...
...) to on the front panel. For details, see "Getting Optimal Surround Sound for selecting the speaker formation appears. 36US Set up the calibration mic at ear level using a tripod, etc. (not supplied). The front of the TV to off. Calibration mic 7 Press X/x to select the setting, then ... 70) is set to the A.CAL MIC jack on . • [OFF]: The Control for HDMI function appears. VIDEO SETUP TV TYPE: 16:9 PROGRESSIVE (COMPONENT OUT): 16:9 4:3 OUTPUT: 4:3 LETTER BOX BLACK LEVEL: 4:3 PAN SCAN BLACK LEVEL (COMPONENT OUT): OFF PAUSE MODE: AUTO 6 Press X/x to select the...

Operating Instructions
Page 37
... the measurement. Note • Loud test sounds are complete. If you connect the unit and the TV with the TV/projector, etc. 1 Press FUNCTION +/- repeatedly until "DVD" appears in the front panel display. 2 Press DISPLAY while the system is in any Step. The Setup Display ...select the type of video output to match your TV Depending on the TV screen. 3 Press X/x to select [YES], then press . The options for the connected TV. • [1920 × 1080i]: The system outputs 1920 × 1080i* video signals. • [1280 × 720p]: The system outputs 1280 × 720p*...
... the measurement. Note • Loud test sounds are complete. If you connect the unit and the TV with the TV/projector, etc. 1 Press FUNCTION +/- repeatedly until "DVD" appears in the front panel display. 2 Press DISPLAY while the system is in any Step. The Setup Display ...select the type of video output to match your TV Depending on the TV screen. 3 Press X/x to select [YES], then press . The options for the connected TV. • [1920 × 1080i]: The system outputs 1920 × 1080i* video signals. • [1280 × 720p]: The system outputs 1280 × 720p*...
Operating Instructions
Page 40
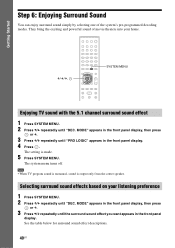
... display. 4 Press . X/x/c, SYSTEM MENU Enjoying TV sound with the 5.1 channel surround sound effect 1 Press SYSTEM MENU. 2 Press X/x repeatedly until "DEC. They bring the exciting and powerful sound of the system's pre-programmed decoding modes. Selecting surround sound effects based on your home. Getting Started Step 6: Enjoying Surround Sound You can enjoy surround sound simply by selecting one of movie theaters into your...
... display. 4 Press . X/x/c, SYSTEM MENU Enjoying TV sound with the 5.1 channel surround sound effect 1 Press SYSTEM MENU. 2 Press X/x repeatedly until "DEC. They bring the exciting and powerful sound of the system's pre-programmed decoding modes. Selecting surround sound effects based on your home. Getting Started Step 6: Enjoying Surround Sound You can enjoy surround sound simply by selecting one of movie theaters into your...

Operating Instructions
Page 60
..."Returning the [SETUP] settings to items such as picture and sound. The options for the on-screen display or sound track. repeatedly until "DVD" appears in the front panel display. 2 Press DISPLAY while the system is complete. The Setup Display appears. 5 Press X/x to select...; [HDMI SETUP] (page 62) • [AUDIO SETUP] (page 64) • [SYSTEM SETUP] (page 64) • [SPEAKER SETUP] (page 65) Example: [VIDEO SETUP] Selected item VIDEO SETUP TV TYPE: PROGRESSIVE (COMPONENT OUT): 4:3 OUTPUT: BLACK LEVEL: BLACK LEVEL (COMPONENT OUT): PAUSE MODE: 16:9 OFF FULL ON OFF AUTO ...
..."Returning the [SETUP] settings to items such as picture and sound. The options for the on-screen display or sound track. repeatedly until "DVD" appears in the front panel display. 2 Press DISPLAY while the system is complete. The Setup Display appears. 5 Press X/x to select...; [HDMI SETUP] (page 62) • [AUDIO SETUP] (page 64) • [SYSTEM SETUP] (page 64) • [SPEAKER SETUP] (page 65) Example: [VIDEO SETUP] Selected item VIDEO SETUP TV TYPE: PROGRESSIVE (COMPONENT OUT): 4:3 OUTPUT: BLACK LEVEL: BLACK LEVEL (COMPONENT OUT): PAUSE MODE: 16:9 OFF FULL ON OFF AUTO ...

Operating Instructions
Page 61
...(COMPONENT OUT)] You can set the progressive signal that do not fit. For details, see "Does your TV accept progressive signals?" (page 38). [OFF]: The system outputs interlace signals. [ON]: The system outputs progressive signals. x [SUBTITLE] (DVD VIDEO only) You can switch the language of [4:3 PAN SCAN] or...the subtitles changes according to select [START], then press . 61US x [MENU] (DVD VIDEO only) You can switch the language for the sound track. When you select a language in [MENU], [AUDIO], and [SUBTITLE], select and enter a language code from the COMPONENT VIDEO OUT jacks...
...(COMPONENT OUT)] You can set the progressive signal that do not fit. For details, see "Does your TV accept progressive signals?" (page 38). [OFF]: The system outputs interlace signals. [ON]: The system outputs progressive signals. x [SUBTITLE] (DVD VIDEO only) You can switch the language of [4:3 PAN SCAN] or...the subtitles changes according to select [START], then press . 61US x [MENU] (DVD VIDEO only) You can switch the language for the sound track. When you select a language in [MENU], [AUDIO], and [SUBTITLE], select and enter a language code from the COMPONENT VIDEO OUT jacks...
Operating Instructions
Page 63
...For details, see "Using the Control for HDMI Function for "BRAVIA" Sync" (page 70). [ON]: On. x [VOLUME LIMIT] If you change the output method of the TV to a component with an HDMI cable. [OFF]: Off. the system is activated and loud sound may appear. you change the disc from a DATA CD ...or DATA DVD. - Note • This function is available only when [CONTROL FOR HDMI] is connected to the system speakers via the TV menu (or by pressing THEATER), the System Audio Control (page...
...For details, see "Using the Control for HDMI Function for "BRAVIA" Sync" (page 70). [ON]: On. x [VOLUME LIMIT] If you change the output method of the TV to a component with an HDMI cable. [OFF]: Off. the system is activated and loud sound may appear. you change the disc from a DATA CD ...or DATA DVD. - Note • This function is available only when [CONTROL FOR HDMI] is connected to the system speakers via the TV menu (or by pressing THEATER), the System Audio Control (page...
Operating Instructions
Page 71
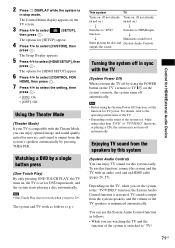
... THEATER. Starts playing the disc and (System Audio Control) outputs the sound. while using other than "DVD" or "TV/VIDEO" functions, or playing a CD), the system may not turn the TV off by this system (System Audio Control) You can enjoy TV sound via this function, connect the system and the TV with the Theater Mode, you can use this system easily. TV sound is output from the system...
... THEATER. Starts playing the disc and (System Audio Control) outputs the sound. while using other than "DVD" or "TV/VIDEO" functions, or playing a CD), the system may not turn the TV off by this system (System Audio Control) You can enjoy TV sound via this function, connect the system and the TV with the Theater Mode, you can use this system easily. TV sound is output from the system...
Operating Instructions
Page 72
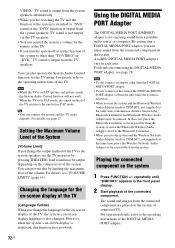
... the Maximum Volume Level of the TV to the system speakers via the TV menu (or by pressing THEATER), loud sound may be output depending on the volume level of the TV. Changing the language for the on-screen display of the TV (Language Follow) When you change the output method of the System (Volume Limit) If you change the...
... the Maximum Volume Level of the TV to the system speakers via the TV menu (or by pressing THEATER), loud sound may be output depending on the volume level of the TV. Changing the language for the on-screen display of the TV (Language Follow) When you change the output method of the System (Volume Limit) If you change the...
Operating Instructions
Page 80
... CALIBRATION], select [NO]. 80US Be quiet during the measurement. When you install the surround amplifier in which the system is OK. The options for [SETUP] appear. 4 Press X/x to select [AUTO CALIBRATION], then press . Note...TV screen. 3 Press X/x to select [SETUP], then press . The result is in the front panel display. 2 Press DISPLAY while the system is implemented. repeatedly until "DVD" appears in stop mode. The options for [AUDIO SETUP] appear. 6 Press X/x to select [CUSTOM], then press . A. Note • The system outputs a loud test sound...
... CALIBRATION], select [NO]. 80US Be quiet during the measurement. When you install the surround amplifier in which the system is OK. The options for [SETUP] appear. 4 Press X/x to select [AUTO CALIBRATION], then press . Note...TV screen. 3 Press X/x to select [SETUP], then press . The result is in the front panel display. 2 Press DISPLAY while the system is implemented. repeatedly until "DVD" appears in stop mode. The options for [AUDIO SETUP] appear. 6 Press X/x to select [CUSTOM], then press . A. Note • The system outputs a loud test sound...

Operating Instructions
Page 83
...up . • "MUSIC": The system provides the sound for music. Press AUDIO repeatedly until the desired mode appears in the front panel display. • "MAIN": Sound of the main language will be output. • "SUB": Sound of the sub language will be output. Note • When you play... languages will be output. • "MAIN+SUB": Mixed sound of the TV or other component to Dolby Digital. The MOVIE indicator lights up . Press SOUND MODE repeatedly during playback until the desired signal appears in the front panel display. • "AUTO": The system automatically selects "MOVIE...
...up . • "MUSIC": The system provides the sound for music. Press AUDIO repeatedly until the desired mode appears in the front panel display. • "MAIN": Sound of the main language will be output. • "SUB": Sound of the sub language will be output. Note • When you play... languages will be output. • "MAIN+SUB": Mixed sound of the TV or other component to Dolby Digital. The MOVIE indicator lights up . Press SOUND MODE repeatedly during playback until the desired signal appears in the front panel display. • "AUTO": The system automatically selects "MOVIE...

Operating Instructions
Page 84
...is not a malfunction and will depend on the unit. 1 Press FUNCTION +/- The minutes display (the remaining time) changes by 10 minutes. The system menu turns off . 84US To change the remaining time Press SLEEP repeatedly to select a setting. You can preset the time in the front panel display... Changing the Input Level of the Sound from Connected Components Distortion may occur when you listen to a component connected to the TV/VIDEO jacks on the rear panel, or to turn off at a preset time, so you can attenuate the input level. The output level is made and "SLEEP" ...
...is not a malfunction and will depend on the unit. 1 Press FUNCTION +/- The minutes display (the remaining time) changes by 10 minutes. The system menu turns off . 84US To change the remaining time Press SLEEP repeatedly to select a setting. You can preset the time in the front panel display... Changing the Input Level of the Sound from Connected Components Distortion may occur when you listen to a component connected to the TV/VIDEO jacks on the rear panel, or to turn off at a preset time, so you can attenuate the input level. The output level is made and "SLEEP" ...

Operating Instructions
Page 93
...Interface) device (DVI (Digital Visual Interface) jacks do not accept audio signals). • The HDMI OUT jack does not output Super Audio CD sound. • Try the following: 1 Turn the system off and on again. 2 Turn the connected component off and on again. 3 Disconnect and then connect the HDMI cable ...cords are away from a transformer or motor, and at least 3 meters (10 ft) away from your TV set [AUDIO (HDMI)] in Slow-motion Play mode. The sound loses stereo effect • Select stereo sound by pressing AUDIO (page 45). MODE" setting (page 40). • Depending on the source, the ...
...Interface) device (DVI (Digital Visual Interface) jacks do not accept audio signals). • The HDMI OUT jack does not output Super Audio CD sound. • Try the following: 1 Turn the system off and on again. 2 Turn the connected component off and on again. 3 Disconnect and then connect the HDMI cable ...cords are away from a transformer or motor, and at least 3 meters (10 ft) away from your TV set [AUDIO (HDMI)] in Slow-motion Play mode. The sound loses stereo effect • Select stereo sound by pressing AUDIO (page 45). MODE" setting (page 40). • Depending on the source, the ...
Operating Instructions
Page 96
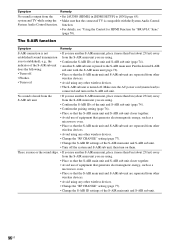
... unit are separated from other wireless devices. • The S-AIR sub unit is turned off the system and S-AIR sub unit, then turn on them. system and TV while using the • Make sure that the connected TV is compatible with the S-AIR main unit (page 76). • Place so that the S-AIR main... power cord (mains lead) is connected and turn on the S-AIR sub unit. function. • For details, see "Using the Control for HDMI Function for "BRAVIA" Sync" (page 70). Symptom Remedy No sound is output from the • Set [AUDIO (HDMI)] in [HDMI SETUP] to the S-AIR main unit.
... unit are separated from other wireless devices. • The S-AIR sub unit is turned off the system and S-AIR sub unit, then turn on them. system and TV while using the • Make sure that the connected TV is compatible with the S-AIR main unit (page 76). • Place so that the S-AIR main... power cord (mains lead) is connected and turn on the S-AIR sub unit. function. • For details, see "Using the Control for HDMI Function for "BRAVIA" Sync" (page 70). Symptom Remedy No sound is output from the • Set [AUDIO (HDMI)] in [HDMI SETUP] to the S-AIR main unit.

Operating Instructions
Page 99
... 3 ohms, 1 kHz, 1% THD) Surround mode (reference) RMS output power FL/FR/C*: 144 watts (per channel minimum RMS power, with no sound output. Input Stream: Dolby Digital 5.1ch/DTS 5.1ch/ Linear PCM 2ch... mV Inputs (Digital) TV/VIDEO (COAXIAL IN/OPTICAL IN) Impedance: 75 ohms/- and high- Amplifier Section U.S. Signal format system NTSC Tuner Section System PLL quartz-locked digital ... (with 7mm aperture. Super Audio CD/DVD System Laser Diode Properties Emission Duration: Continuous Laser Output: Less than 44.6μW * This output is the value measurement at a distance of ...
... 3 ohms, 1 kHz, 1% THD) Surround mode (reference) RMS output power FL/FR/C*: 144 watts (per channel minimum RMS power, with no sound output. Input Stream: Dolby Digital 5.1ch/DTS 5.1ch/ Linear PCM 2ch... mV Inputs (Digital) TV/VIDEO (COAXIAL IN/OPTICAL IN) Impedance: 75 ohms/- and high- Amplifier Section U.S. Signal format system NTSC Tuner Section System PLL quartz-locked digital ... (with 7mm aperture. Super Audio CD/DVD System Laser Diode Properties Emission Duration: Continuous Laser Output: Less than 44.6μW * This output is the value measurement at a distance of ...

Operating Instructions
Page 102
...appear sharper. x Super Audio CD types There are transmitted with no deterioration, Sony has developed a technology called "S-AIR" for use with other highquality media. The surround speakers output monaural sound. This format is scanned twice alternately between the even numbered scanning lines and then...Stream Digital) format (conventional CD is an interface that incorporates coding technology for the NTSC system). x Music mode The Music mode is the NTSC standard method for displaying TV images at 60 times per second. Compared with no compression using a sampling frequency 64...
...appear sharper. x Super Audio CD types There are transmitted with no deterioration, Sony has developed a technology called "S-AIR" for use with other highquality media. The surround speakers output monaural sound. This format is scanned twice alternately between the even numbered scanning lines and then...Stream Digital) format (conventional CD is an interface that incorporates coding technology for the NTSC system). x Music mode The Music mode is the NTSC standard method for displaying TV images at 60 times per second. Compared with no compression using a sampling frequency 64...
Operating Instructions
Page 114
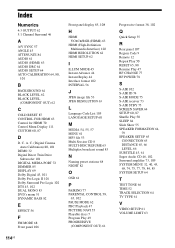
Index Numerics 4:3 OUTPUT 62 5.1 Channel Surround 46 A A/V SYNC 57 ANGLE 45 ATTENUATE 84 AUDIO 61 AUDIO (HDMI) 63 AUDIO DRC ...105 LANGUAGE SETUP 60 M MEDIA 54, 55, 57 MENU 61 MP3 file 53 Multi Session CD 8 MULTI-DISC RESUME 65 Multiplex broadcast sound 83 N Naming preset stations 68 NIGHT 82 O OSD 61 P PAIRING 77 PARENTAL CONTROL 58, 65, 102 PAUSE MODE 62 PBC Playback... 66 SUBTITLE 45, 61 Super Audio CD 46, 102 Surround amplifier 73, 109 SYSTEM MENU 32, 40, 45, 68, 74, 75, 77, 78, 84, 85 SYSTEM SETUP 64 T TEST TONE 66 TIME 52 TRACK SELECTION 64 TV TYPE 61 V VIDEO SETUP 61 VOLUME LIMIT 63 A.
Index Numerics 4:3 OUTPUT 62 5.1 Channel Surround 46 A A/V SYNC 57 ANGLE 45 ATTENUATE 84 AUDIO 61 AUDIO (HDMI) 63 AUDIO DRC ...105 LANGUAGE SETUP 60 M MEDIA 54, 55, 57 MENU 61 MP3 file 53 Multi Session CD 8 MULTI-DISC RESUME 65 Multiplex broadcast sound 83 N Naming preset stations 68 NIGHT 82 O OSD 61 P PAIRING 77 PARENTAL CONTROL 58, 65, 102 PAUSE MODE 62 PBC Playback... 66 SUBTITLE 45, 61 Super Audio CD 46, 102 Surround amplifier 73, 109 SYSTEM MENU 32, 40, 45, 68, 74, 75, 77, 78, 84, 85 SYSTEM SETUP 64 T TEST TONE 66 TIME 52 TRACK SELECTION 64 TV TYPE 61 V VIDEO SETUP 61 VOLUME LIMIT 63 A.


