
Operating Instructions
Page 10
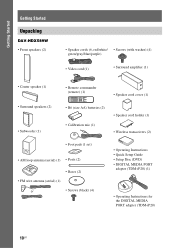
Getting Started Getting Started Unpacking DAV-HDX589W • Front speakers (2) • Speaker cords (6, red/white/ • Screws (with washer) (4) green/gray/blue/purple) • Video cord (1) • Surround amplifier (1) • Center speaker (1) • Remote commander (remote) (1) • Speaker cord cover (1) • Surround speakers (2) • Subwoofer (1) • R6 (size AA) batteries (2) • Calibration mic (1) • Speaker cord holder (1) • Wireless transceivers...
Getting Started Getting Started Unpacking DAV-HDX589W • Front speakers (2) • Speaker cords (6, red/white/ • Screws (with washer) (4) green/gray/blue/purple) • Video cord (1) • Surround amplifier (1) • Center speaker (1) • Remote commander (remote) (1) • Speaker cord cover (1) • Surround speakers (2) • Subwoofer (1) • R6 (size AA) batteries (2) • Calibration mic (1) • Speaker cord holder (1) • Wireless transceivers...
Operating Instructions
Page 11
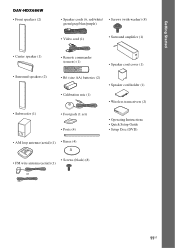
Getting Started DAV-HDX686W • Front speakers (2) • Speaker cords (6, red/white/ • Screws (with washer) (8) green/gray/blue/purple) • Video cord (1) • Surround amplifier (1) • Center speaker (1) • Remote commander (remote) (1) • Speaker cord cover (1) • Surround speakers (2) • R6 (size AA) batteries (2) • Calibration mic (1) • Speaker cord holder (1) • Wireless transceivers (2) • Subwoofer (1) • Foot...
Getting Started DAV-HDX686W • Front speakers (2) • Speaker cords (6, red/white/ • Screws (with washer) (8) green/gray/blue/purple) • Video cord (1) • Surround amplifier (1) • Center speaker (1) • Remote commander (remote) (1) • Speaker cord cover (1) • Surround speakers (2) • R6 (size AA) batteries (2) • Calibration mic (1) • Speaker cord holder (1) • Wireless transceivers (2) • Subwoofer (1) • Foot...

Operating Instructions
Page 13
... the System Positioning the system For the best possible surround sound, place all speakers at the same distance as it may result. • Do not lean or hang on a specially treated (waxed, oiled, polished, etc.) floor, as staining or discoloration may fall down. 13US Subwoofer Front left speaker (L) Center speaker B Front right speaker (R) A A A A C A C Surround left speaker (L) Surround right speaker...
... the System Positioning the system For the best possible surround sound, place all speakers at the same distance as it may result. • Do not lean or hang on a specially treated (waxed, oiled, polished, etc.) floor, as staining or discoloration may fall down. 13US Subwoofer Front left speaker (L) Center speaker B Front right speaker (R) A A A A C A C Surround left speaker (L) Surround right speaker...
Operating Instructions
Page 21
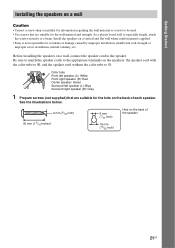
...speaker cord to the speaker. Be sure to match the speaker cords to the appropriate terminals on the speakers: the speaker cord with the color tube to 3, and the speaker cord without the color tube to #. Install the speakers on a vertical and flat wall where reinforcement is applied. • Sony...Use screws that are suitable for the wall material and strength. Color tube Front left speaker (L): White Front right speaker (R): Red Center speaker: Green Surround left speaker (L): Blue Surround right speaker (R): Gray 1 Prepare screws (not supplied) that are suitable for accidents or damage...
...speaker cord to the speaker. Be sure to match the speaker cords to the appropriate terminals on the speakers: the speaker cord with the color tube to 3, and the speaker cord without the color tube to #. Install the speakers on a vertical and flat wall where reinforcement is applied. • Sony...Use screws that are suitable for the wall material and strength. Color tube Front left speaker (L): White Front right speaker (R): Red Center speaker: Green Surround left speaker (L): Blue Surround right speaker (R): Gray 1 Prepare screws (not supplied) that are suitable for accidents or damage...
Operating Instructions
Page 22
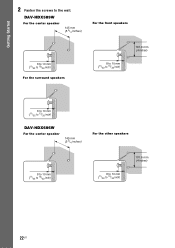
Getting Started 2 Fasten the screws to 13/32 inch) 101.6 mm (4 inches) 22US DAV-HDX589W For the center speaker 145 mm (5 3/4 inches) For the front speakers 8 to 10 mm (11/32 to 13/32 inch) For the surround speakers 8 to 10 mm (11/32 to 13/32 inch) 101.6 mm (4 inches) 8 to 10 mm (11/32 to 13/32 inch) DAV-HDX686W For the center speaker 145 mm (5 3/4 inches) For the other speakers 8 to 10 mm (11/32 to 13/32 inch) 8 to 10 mm (11/32 to the wall.
Getting Started 2 Fasten the screws to 13/32 inch) 101.6 mm (4 inches) 22US DAV-HDX589W For the center speaker 145 mm (5 3/4 inches) For the front speakers 8 to 10 mm (11/32 to 13/32 inch) For the surround speakers 8 to 10 mm (11/32 to 13/32 inch) 101.6 mm (4 inches) 8 to 10 mm (11/32 to 13/32 inch) DAV-HDX686W For the center speaker 145 mm (5 3/4 inches) For the other speakers 8 to 10 mm (11/32 to 13/32 inch) 8 to 10 mm (11/32 to the wall.

Operating Instructions
Page 24
...VOIDUETO PR/CR PB/CB Y TV/VIDEO R AUDIO IN L White (Front left speaker (L)) Red (Front right speaker (R)) Green (Center speaker) Rear panel of speaker. Connect the speaker cords to the unit, insert the connector until all the other components to #. To ... on the type of the surround amplifier EZW-RT10 S-AIR ID A B C SPEAKER L PAIRING R SURROUND SESSUULRRBERRACOOCKUUTNNODDR Blue (Surround left speaker (L)) Gray (Surround right speaker (R)) 24US Getting Started Step 2: Connecting the System For connecting the system, read the information on the following pages.
...VOIDUETO PR/CR PB/CB Y TV/VIDEO R AUDIO IN L White (Front left speaker (L)) Red (Front right speaker (R)) Green (Center speaker) Rear panel of speaker. Connect the speaker cords to the unit, insert the connector until all the other components to #. To ... on the type of the surround amplifier EZW-RT10 S-AIR ID A B C SPEAKER L PAIRING R SURROUND SESSUULRRBERRACOOCKUUTNNODDR Blue (Surround left speaker (L)) Gray (Surround right speaker (R)) 24US Getting Started Step 2: Connecting the System For connecting the system, read the information on the following pages.

Operating Instructions
Page 26
... an HDMI jack, but has component video input jacks, connect to using only the video cord connection. SPEAKER CENTER SUBWOOFER TV DIGITAL IN OPTICAL COAXIAL C Component video cable (not supplied) ANTENNA AM FM COAXIAL 75 SPEAKER FRONT R HDMI FRONT OUT L DMPORT 0D.C7A5VMAX EZW-RT10 COMPONENT VIDEO OUT VOIDUETO PR/CR PB/CB...
... an HDMI jack, but has component video input jacks, connect to using only the video cord connection. SPEAKER CENTER SUBWOOFER TV DIGITAL IN OPTICAL COAXIAL C Component video cable (not supplied) ANTENNA AM FM COAXIAL 75 SPEAKER FRONT R HDMI FRONT OUT L DMPORT 0D.C7A5VMAX EZW-RT10 COMPONENT VIDEO OUT VOIDUETO PR/CR PB/CB...

Operating Instructions
Page 27
To listen to the unit from the TV. SPEAKER CENTER SUBWOOFER TV DIGITAL IN OPTICAL COAXIAL E Digital optical cord (not supplied) SPEAKER FRONT R HDMI FRONT OUT L DMPORT 0D.C7A5VMAX EZW-RT10 ANTENNA AM FM COAXIAL 75 COMPONENT VIDEO OUT VOIDUETO PR/CR PB/CB Y TV/VIDEO R... both digital and analog signals. Getting Started Connecting the TV (Audio connection) This connection sends an audio signal to TV sound via the system, perform this connection. Method 1: Audio cord (D) connection This is the basic connection and sends an analog audio signal. Note • The...
To listen to the unit from the TV. SPEAKER CENTER SUBWOOFER TV DIGITAL IN OPTICAL COAXIAL E Digital optical cord (not supplied) SPEAKER FRONT R HDMI FRONT OUT L DMPORT 0D.C7A5VMAX EZW-RT10 ANTENNA AM FM COAXIAL 75 COMPONENT VIDEO OUT VOIDUETO PR/CR PB/CB Y TV/VIDEO R... both digital and analog signals. Getting Started Connecting the TV (Audio connection) This connection sends an audio signal to TV sound via the system, perform this connection. Method 1: Audio cord (D) connection This is the basic connection and sends an analog audio signal. Note • The...

Operating Instructions
Page 28
... Started Connecting the other DIGITAL MEDIA PORT adapters.) G Stereo mini-plug cord (not supplied) SPEAKER CENTER SUBWOOFER To a portable audio source TV DIGITAL IN OPTICAL COAXIAL SPEAKER FRONT R HDMI FRONT OUT L DMPORT 0D.C7A5VMAX EZW-RT10 ANTENNA AM FM COAXIAL 75 COMPONENT...-iP20 is supplied with U.S. models. When disconnecting, pull out while pressing . Tip • You can enjoy connected components via the system's speakers. You can also use other components You can connect another component, such as a VCR, digital satellite receiver, or PlayStation, to the...
... Started Connecting the other DIGITAL MEDIA PORT adapters.) G Stereo mini-plug cord (not supplied) SPEAKER CENTER SUBWOOFER To a portable audio source TV DIGITAL IN OPTICAL COAXIAL SPEAKER FRONT R HDMI FRONT OUT L DMPORT 0D.C7A5VMAX EZW-RT10 ANTENNA AM FM COAXIAL 75 COMPONENT...-iP20 is supplied with U.S. models. When disconnecting, pull out while pressing . Tip • You can enjoy connected components via the system's speakers. You can also use other components You can connect another component, such as a VCR, digital satellite receiver, or PlayStation, to the...

Operating Instructions
Page 32
... outlet (mains): The shape of the unit and the surround amplifier to a wall outlet (mains), connect the front, center speakers and subwoofer to the unit and surround speakers to the surround amplifier. The system turns on. 2 Press SYSTEM MENU. 3 Press X/x repeatedly until "DEMO" appears in the front panel display. Setting the demonstration mode to select...
... outlet (mains): The shape of the unit and the surround amplifier to a wall outlet (mains), connect the front, center speakers and subwoofer to the unit and surround speakers to the surround amplifier. The system turns on. 2 Press SYSTEM MENU. 3 Press X/x repeatedly until "DEMO" appears in the front panel display. Setting the demonstration mode to select...
Operating Instructions
Page 40
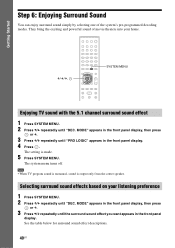
...display. The setting is output only from the center speaker. MODE" appears in the front panel display, then press or c. 3 Press X/x repeatedly until the surround sound effect you want appears in the front panel display. 4 Press . The system menu turns off. Note • When TV... sound effect descriptions. 40US Selecting surround sound effects based on your home. Getting Started Step 6: Enjoying Surround Sound You can enjoy surround sound simply by selecting one of movie theaters into your listening preference 1 Press SYSTEM MENU. 2 Press X/x repeatedly until "DEC. They bring the...
...display. The setting is output only from the center speaker. MODE" appears in the front panel display, then press or c. 3 Press X/x repeatedly until the surround sound effect you want appears in the front panel display. 4 Press . The system menu turns off. Note • When TV... sound effect descriptions. 40US Selecting surround sound effects based on your home. Getting Started Step 6: Enjoying Surround Sound You can enjoy surround sound simply by selecting one of movie theaters into your listening preference 1 Press SYSTEM MENU. 2 Press X/x repeatedly until "DEC. They bring the...
Operating Instructions
Page 65
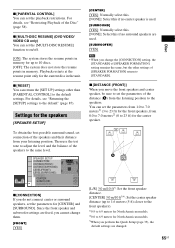
.... 65US Disc x [DISTANCE (FRONT)] When you move the front speakers and center speaker, be sure to set connection of the distance (A) from the listening position to the speakers. A [L/R] 3.0 m/10 ft3): Set the front speaker distance. [CENTER] 3.0 m/10 ft3)4): Set the center speaker distance (up to 10 discs. [OFF]: The system does not store the resume points in memory. Playback...
.... 65US Disc x [DISTANCE (FRONT)] When you move the front speakers and center speaker, be sure to set connection of the distance (A) from the listening position to the speakers. A [L/R] 3.0 m/10 ft3): Set the front speaker distance. [CENTER] 3.0 m/10 ft3)4): Set the center speaker distance (up to 10 discs. [OFF]: The system does not store the resume points in memory. Playback...

Operating Instructions
Page 66
...then press CLEAR. B [L/R] 3.0 m/10 ft2)3): Set the surround speaker distance (up to 5.0 meters (16 ft) closer to the front speakers). 1)0.0 to 6.9 meters for easy adjustment. [L/R] 0.0 dB: Set the front speaker level. 66US [CENTER] 0.0 dB*: Set the center speaker level. [SUBWOOFER] +2.0 dB: Set the subwoofer level. * This... at one of the distance (B) from each speaker in the [CONNECTION] setting. 4)This item appears when you set [CENTER] to [YES] in sequence. You can adjust the sound level of the front speakers, center speaker, and subwoofer. You can adjust the sound level...
...then press CLEAR. B [L/R] 3.0 m/10 ft2)3): Set the surround speaker distance (up to 5.0 meters (16 ft) closer to the front speakers). 1)0.0 to 6.9 meters for easy adjustment. [L/R] 0.0 dB: Set the front speaker level. 66US [CENTER] 0.0 dB*: Set the center speaker level. [SUBWOOFER] +2.0 dB: Set the subwoofer level. * This... at one of the distance (B) from each speaker in the [CONNECTION] setting. 4)This item appears when you set [CENTER] to [YES] in sequence. You can adjust the sound level of the front speakers, center speaker, and subwoofer. You can adjust the sound level...
Operating Instructions
Page 79
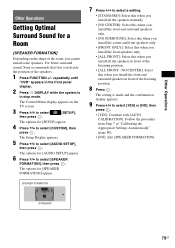
...6 Press X/x to select [AUDIO SETUP], then press . NO CENTER]: Select this when you cannot install some speakers. The setting is in stop mode. Other Operations Other Operations Getting Optimal Surround Sound for a Room [SPEAKER FORMATION] Depending on the TV screen. 3 Press X/x to select...sound, Sony recommends that first you install the front and surround speakers in front of "Calibrating the Appropriate Settings Automatically" (page 80). • [NO]: Exit [SPEAKER FORMATION]. repeatedly until "DVD" appears in the front panel display. 2 Press DISPLAY while the system is ...
...6 Press X/x to select [AUDIO SETUP], then press . NO CENTER]: Select this when you cannot install some speakers. The setting is in stop mode. Other Operations Other Operations Getting Optimal Surround Sound for a Room [SPEAKER FORMATION] Depending on the TV screen. 3 Press X/x to select...sound, Sony recommends that first you install the front and surround speakers in front of "Calibrating the Appropriate Settings Automatically" (page 80). • [NO]: Exit [SPEAKER FORMATION]. repeatedly until "DVD" appears in the front panel display. 2 Press DISPLAY while the system is ...

Operating Instructions
Page 82
...82US "DEC. It is activated. To turn off . BASS ON" appears in a movie theater, even at low volume You can enhance compressed sound such as you are using the headphones, the system optimally adjusts the volume. MODE" is easy to hear. When all the following conditions are ...sound is activated automatically when all the conditions above are satisfied: - To turn off automatically. • When sound is output from the center speaker, or you would in the front panel display and bass frequencies are not connected. Enjoying the sound at low volume. This effect is...
...82US "DEC. It is activated. To turn off . BASS ON" appears in a movie theater, even at low volume You can enhance compressed sound such as you are using the headphones, the system optimally adjusts the volume. MODE" is easy to hear. When all the following conditions are ...sound is activated automatically when all the conditions above are satisfied: - To turn off automatically. • When sound is output from the center speaker, or you would in the front panel display and bass frequencies are not connected. Enjoying the sound at low volume. This effect is...

Operating Instructions
Page 93
... stereo even if the sound track is recorded in Dolby Digital or MPEG audio format. No sound is heard from the center speaker only. There is no sound. • The speaker cord is not connected securely. • Press MUTING on the source, the effect of Dolby Digital, DTS, or MPEG...not output Super Audio CD sound. • Try the following: 1 Turn the system off and on again. 2 Turn the connected component off and on the DVD, the output signal may come from the center speaker. • Check the speaker connections and settings (pages 24, 65). • Check the "DEC. Severe ...
... stereo even if the sound track is recorded in Dolby Digital or MPEG audio format. No sound is heard from the center speaker only. There is no sound. • The speaker cord is not connected securely. • Press MUTING on the source, the effect of Dolby Digital, DTS, or MPEG...not output Super Audio CD sound. • Try the following: 1 Turn the system off and on again. 2 Turn the connected component off and on the DVD, the output signal may come from the center speaker. • Check the speaker connections and settings (pages 24, 65). • Check the "DEC. Severe ...

Operating Instructions
Page 100
... (5 lb 2 oz) Center (SS-CT91) Speaker system Speaker unit Rated impedance Dimensions (approx.) Mass (approx.) Full range Bass reflex, Magnetically Shielded 65 mm (2 5/8 in) cone type 3 ohms 265 mm × 94 mm × 77 mm (10 1/2 in × 3 3/4 in × 3 1/8 in) (w/h/d) 0.7 kg (1 lb 9 oz) Surround DAV-HDX589W (SS-TS92) Speaker system Full range Bass reflex Speaker unit 65 mm...
... (5 lb 2 oz) Center (SS-CT91) Speaker system Speaker unit Rated impedance Dimensions (approx.) Mass (approx.) Full range Bass reflex, Magnetically Shielded 65 mm (2 5/8 in) cone type 3 ohms 265 mm × 94 mm × 77 mm (10 1/2 in × 3 3/4 in × 3 1/8 in) (w/h/d) 0.7 kg (1 lb 9 oz) Surround DAV-HDX589W (SS-TS92) Speaker system Full range Bass reflex Speaker unit 65 mm...

Operating Instructions
Page 102
...DVD media, Digital Broadcasting, and other scenes and so on the Super Audio CD layer and CD layer combination. The surround speakers output monaural sound. The HDMI specification supports HDCP (High-bandwidth Digital Content Protection), a copy protection technology that supports both a..., Sony has developed a technology called "S-AIR" for the NTSC system). Super Audio CD Super Audio CD is a new high-quality audio disc standard where music is recorded in each country. when it is activated, 102US playback is comprised of surround speakers and a center speaker. ...
...DVD media, Digital Broadcasting, and other scenes and so on the Super Audio CD layer and CD layer combination. The surround speakers output monaural sound. The HDMI specification supports HDCP (High-bandwidth Digital Content Protection), a copy protection technology that supports both a..., Sony has developed a technology called "S-AIR" for the NTSC system). Super Audio CD Super Audio CD is a new high-quality audio disc standard where music is recorded in each country. when it is activated, 102US playback is comprised of surround speakers and a center speaker. ...


