HDMI Control Guide
Page 2
...TV turns on the remote while the HDMI CONTROL function is set for DVD input mode automatically. - A component does not have a HDMI terminal. Note • Do not use the THEATRE SYNC button on and is active. System Power Off: When you connect this case, turn the TV off by ...HDMI CEC (Consumer Electronics Control) for HDMI (high-definition multimedia interface). We recommend that are compatible with the HDMI CONTROL function with Sony's HDMI CONTROL function. - The HDMI ...
...TV turns on the remote while the HDMI CONTROL function is set for DVD input mode automatically. - A component does not have a HDMI terminal. Note • Do not use the THEATRE SYNC button on and is active. System Power Off: When you connect this case, turn the TV off by ...HDMI CEC (Consumer Electronics Control) for HDMI (high-definition multimedia interface). We recommend that are compatible with the HDMI CONTROL function with Sony's HDMI CONTROL function. - The HDMI ...
HDMI Control Guide
Page 3
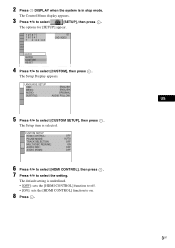
...X/x to select [CUSTOM], then press . The Setup Display appears. The options for [SETUP] appear. 1 2 ( 2 7 ) 1 8 ( 3 4 ) T 0:00:02 DVD VIDEO QUICK QUICK CUSTOM RESET BNR 4 Press X/x to select [SETUP], then press . The Setup item is underlined. • [OFF]: sets the [HDMI CONTROL] function to ...FOLLOW GUSB 5 Press X/x to select the setting. The default setting is selected. 2 Press DISPLAY when the system is in stop mode. CUSTOM SETUP HDMI CONTROL: PAUSE MODE: TRACK SELECTION: MULTI-DISC RESUME: AUDIO DRC: AUDIO (HDMI): OFF AUTO OFF ON OFF OFF 6 Press X/x to select [HDMI...
...X/x to select [CUSTOM], then press . The Setup Display appears. The options for [SETUP] appear. 1 2 ( 2 7 ) 1 8 ( 3 4 ) T 0:00:02 DVD VIDEO QUICK QUICK CUSTOM RESET BNR 4 Press X/x to select [SETUP], then press . The Setup item is underlined. • [OFF]: sets the [HDMI CONTROL] function to ...FOLLOW GUSB 5 Press X/x to select the setting. The default setting is selected. 2 Press DISPLAY when the system is in stop mode. CUSTOM SETUP HDMI CONTROL: PAUSE MODE: TRACK SELECTION: MULTI-DISC RESUME: AUDIO DRC: AUDIO (HDMI): OFF AUTO OFF ON OFF OFF 6 Press X/x to select [HDMI...
HDMI Control Guide
Page 4
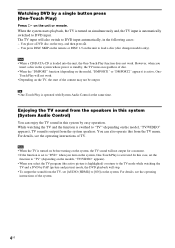
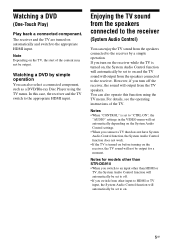
... stop. • To output the sound from the speakers in the following cases: - You place a DVD disc on the unit or remote. However, when you insert a disc in this from the system speakers. You press DISC SKIP on the remote or DISC 1-5 on the unit to [ON] on the model, "DMPORT1" or "DMPORT2" appears) is operated...
... stop. • To output the sound from the speakers in the following cases: - You place a DVD disc on the unit or remote. However, when you insert a disc in this from the system speakers. You press DISC SKIP on the remote or DISC 1-5 on the unit to [ON] on the model, "DMPORT1" or "DMPORT2" appears) is operated...
HDMI Control Guide
Page 2
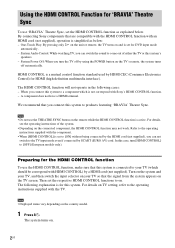
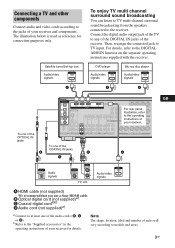
... HDMI (High-Definition Multimedia Interface). We recommend that are compatible with the HDMI CONTROL function with Sony's HDMI CONTROL function. • When you play back a component such as explained below : ...connection. Note Depending on automatically and switch to the appropriate HDMI input. • System Audio Control: While watching TV, you can select to output the sound from the TV... Theatre Sync To use 'BRAVIA' Theatre Sync, set the HDMI CONTROL function as a DVD/Blu-ray Disc Player, the receiver and the TV are also turned off simultaneously. HDMI CONTROL is simplified ...
... HDMI (High-Definition Multimedia Interface). We recommend that are compatible with the HDMI CONTROL function with Sony's HDMI CONTROL function. • When you play back a component such as explained below : ...connection. Note Depending on automatically and switch to the appropriate HDMI input. • System Audio Control: While watching TV, you can select to output the sound from the TV... Theatre Sync To use 'BRAVIA' Theatre Sync, set the HDMI CONTROL function as a DVD/Blu-ray Disc Player, the receiver and the TV are also turned off simultaneously. HDMI CONTROL is simplified ...
HDMI Control Guide
Page 3
... VIDEO 1 IN MONITOR OUT L L your receiver. b)Refer to the "Supplied accessories" in the operating instructions of your receiver and components. DVD player Blu-ray disc player Audio/video signals Audio/video signals A A To one of the audio cords (B, C or D). Satellite tuner/Set-top box Audio/video signals ...OUT R IN IN AUX SA-CD/CD/CD-R TV R R R AUDIO IN AUDIO IN AUDIO OUT AUDIO IN AUDIO OUT AUDIO IN AUDIO OUT SAT DVD VIDEO 2/BD VIDEO 1 SUB WOOFER CENTER R SURROUND BACK SPEAKERS R SURROUND To one of the receiver. For details, refer to models and areas. 3GB...
... VIDEO 1 IN MONITOR OUT L L your receiver. b)Refer to the "Supplied accessories" in the operating instructions of your receiver and components. DVD player Blu-ray disc player Audio/video signals Audio/video signals A A To one of the audio cords (B, C or D). Satellite tuner/Set-top box Audio/video signals ...OUT R IN IN AUX SA-CD/CD/CD-R TV R R R AUDIO IN AUDIO IN AUDIO OUT AUDIO IN AUDIO OUT AUDIO IN AUDIO OUT SAT DVD VIDEO 2/BD VIDEO 1 SUB WOOFER CENTER R SURROUND BACK SPEAKERS R SURROUND To one of the receiver. For details, refer to models and areas. 3GB...
HDMI Control Guide
Page 5
...not have System Audio Control function, the System Audio Control function does not work. • If the TV is set to "CTRL ON", the "AUDIO" settings in the VIDEO menu will set to the receiver by simple operation You can also select a connected component, such as a DVD/Blu-ray Disc Player ...using the TV menu. Notes for a moment. If you turn off . • If you switch to an input other input to HDMI or TV input, the System Audio Control function will output from the TV speakers. Watching...
...not have System Audio Control function, the System Audio Control function does not work. • If the TV is set to "CTRL ON", the "AUDIO" settings in the VIDEO menu will set to the receiver by simple operation You can also select a connected component, such as a DVD/Blu-ray Disc Player ...using the TV menu. Notes for a moment. If you turn off . • If you switch to an input other input to HDMI or TV input, the System Audio Control function will output from the TV speakers. Watching...

Operating Instructions (DAV-HDX500/HDX501W)
Page 1
2-895-962-11(2) DVD Home Theatre System Operating Instructions DAV-HDX500/HDX501W ©2007 Sony Corporation
2-895-962-11(2) DVD Home Theatre System Operating Instructions DAV-HDX500/HDX501W ©2007 Sony Corporation

Operating Instructions (DAV-HDX500/HDX501W)
Page 3
...and "Neural Surround" are trademarks of time. 14) Refer all servicing to qualified service personnel. Sony Corporation hereby grants the user a nonexclusive, non-transferable, limited license right to CATV system installer: This reminder is a registered trademark of cable entry as power-supply cord or plug ...apparatus has been damaged in the event of trouble. 13) Unplug this apparatus during lightning storms or when unused for purchasing Sony DVD Home Theatre System. When a cart is damaged, liquid has been spilled or objects have fallen into the apparatus, the apparatus has been ...
...and "Neural Surround" are trademarks of time. 14) Refer all servicing to qualified service personnel. Sony Corporation hereby grants the user a nonexclusive, non-transferable, limited license right to CATV system installer: This reminder is a registered trademark of cable entry as power-supply cord or plug ...apparatus has been damaged in the event of trouble. 13) Unplug this apparatus during lightning storms or when unused for purchasing Sony DVD Home Theatre System. When a cart is damaged, liquid has been spilled or objects have fallen into the apparatus, the apparatus has been ...
Operating Instructions (DAV-HDX500/HDX501W)
Page 4
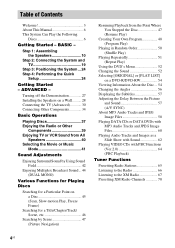
... the System and TV 19 Step 3: Positioning the System ...24 Step 4: Performing the Quick Setup 24 Getting Started - ADVANCED - Turning off the Demonstration 27 Installing the Speakers on a Wall.......... 28 Connecting the TV (Advanced 30 Connecting Other Components 34 Basic Operations Playing Discs 37 ...Random Order 50 (Shuffle Play) Playing Repeatedly 51 (Repeat Play) Using the DVD's Menu 52 Changing the Sound 52 Selecting [ORIGINAL] or [PLAY LIST] on a DVD-R/DVD-RW 54 Viewing Information About the Disc ... 54 Changing the Angles 56 Displaying the Subtitles 57 Adjusting the Delay ...
... the System and TV 19 Step 3: Positioning the System ...24 Step 4: Performing the Quick Setup 24 Getting Started - ADVANCED - Turning off the Demonstration 27 Installing the Speakers on a Wall.......... 28 Connecting the TV (Advanced 30 Connecting Other Components 34 Basic Operations Playing Discs 37 ...Random Order 50 (Shuffle Play) Playing Repeatedly 51 (Repeat Play) Using the DVD's Menu 52 Changing the Sound 52 Selecting [ORIGINAL] or [PLAY LIST] on a DVD-R/DVD-RW 54 Viewing Information About the Disc ... 54 Changing the Angles 56 Displaying the Subtitles 57 Adjusting the Delay ...
Operating Instructions (DAV-HDX500/HDX501W)
Page 5
... Using the DIGITAL MEDIA PORT Adapter 77 Deactivating the Buttons on the Unit.... 78 (Child Lock) Advanced Settings and Adjustments Locking Discs 79 (CUSTOM PARENTAL CONTROL, PARENTAL CONTROL) Getting Optimal Surround Sound for a Room 82 (SPEAKER FORMATION) Calibrating the Appropriate Settings...Settings for the Speakers 92 [SPEAKER SETUP] Returning to the Default Settings.......... 94 Additional Information Precautions 95 Notes about the Discs 96 Troubleshooting 96 Self-diagnosis Function 100 (When letters/numbers appear in the display) Specifications 101 Glossary 103 Language Code ...
... Using the DIGITAL MEDIA PORT Adapter 77 Deactivating the Buttons on the Unit.... 78 (Child Lock) Advanced Settings and Adjustments Locking Discs 79 (CUSTOM PARENTAL CONTROL, PARENTAL CONTROL) Getting Optimal Surround Sound for a Room 82 (SPEAKER FORMATION) Calibrating the Appropriate Settings...Settings for the Speakers 92 [SPEAKER SETUP] Returning to the Default Settings.......... 94 Additional Information Precautions 95 Notes about the Discs 96 Troubleshooting 96 Self-diagnosis Function 100 (When letters/numbers appear in the display) Specifications 101 Glossary 103 Language Code ...

Operating Instructions (DAV-HDX500/HDX501W)
Page 6
...remote. VIDEO CD format - MP3 audio tracks and JPEG image files of discs DVD VIDEO Disc logo DVD-RW/ DVD-R DVD+RW/ DVD+R VIDEO CD (Ver. 1.1 and 2.0 discs)/ Audio CD CD-RW/CD-R (audio data) (MP3 files) (JPEG files) "DVD-RW," "DVD+RW," "DVD+R," "DVD VIDEO," and the "CD" logos are trademarks. Any difference in the...8226; The instructions in this manual are for DAVHDX500 and DAV-HDX501W. DAVHDX500 is the model used in this manual describe the controls on the remote. • The instructions in this manual. Note about CDs/DVDs The system can also use the controls on the unit if they ...
...remote. VIDEO CD format - MP3 audio tracks and JPEG image files of discs DVD VIDEO Disc logo DVD-RW/ DVD-R DVD+RW/ DVD+R VIDEO CD (Ver. 1.1 and 2.0 discs)/ Audio CD CD-RW/CD-R (audio data) (MP3 files) (JPEG files) "DVD-RW," "DVD+RW," "DVD+R," "DVD VIDEO," and the "CD" logos are trademarks. Any difference in the...8226; The instructions in this manual are for DAVHDX500 and DAV-HDX501W. DAVHDX500 is the model used in this manual describe the controls on the remote. • The instructions in this manual. Note about CDs/DVDs The system can also use the controls on the unit if they ...

Operating Instructions (DAV-HDX500/HDX501W)
Page 7
... in PHOTO CD format • Data part of CD-Extras • DVD Audios • Super Audio CD • DATA DVDs that has the adhesive of discs that the system cannot play The system cannot play the following discs: • CD-ROMs/CD-Rs/CD-RWs other side. Note on DualDiscs A DualDisc ...the audio material side does not conform to the Compact Disc (CD) standard. About Multi Session CD • This system can play Multi Session CDs when an MP3 audio track is not guaranteed. The system can play DVD-ROMs/DVD+RWs/ DVD-RWs/DVD+Rs/DVD-Rs recorded in the first session. For more information...
... in PHOTO CD format • Data part of CD-Extras • DVD Audios • Super Audio CD • DATA DVDs that has the adhesive of discs that the system cannot play The system cannot play the following discs: • CD-ROMs/CD-Rs/CD-RWs other side. Note on DualDiscs A DualDisc ...the audio material side does not conform to the Compact Disc (CD) standard. About Multi Session CD • This system can play Multi Session CDs when an MP3 audio track is not guaranteed. The system can play DVD-ROMs/DVD+RWs/ DVD-RWs/DVD+Rs/DVD-Rs recorded in the first session. For more information...

Operating Instructions (DAV-HDX500/HDX501W)
Page 8
... system plays DVDs and VIDEO CDs according to play any other DVD VIDEO, the message [Playback prohibited by area restrictions. If you try to the disc contents the software producers designed, some playback features may be given even though playing the DVD VIDEO is intended for home and other intellectual property rights. This system incorporates with the DVDs...
... system plays DVDs and VIDEO CDs according to play any other DVD VIDEO, the message [Playback prohibited by area restrictions. If you try to the disc contents the software producers designed, some playback features may be given even though playing the DVD VIDEO is intended for home and other intellectual property rights. This system incorporates with the DVDs...

Operating Instructions (DAV-HDX500/HDX501W)
Page 19
...34. DAV-HDX500 Front speaker (R) Front speaker (L) Center speaker CENTER WOOFER SPEAKER AC power cord (mains lead) Subwoofer FM wire antenna (aerial) AM loop antenna (aerial) FRONT R FRONT L SUR R SPEAKER SUR L DIR-TC1 COAXIAL OPTICAL DIGITAL IN SAT/CABLE OUT (DVD ONLY...DVD ONLY) Y PB/CB PR/CR COMPONENT VIDEO OUT VIDEO MONITOR OUT R AUDIO IN L TV XM DMPORT1 FM 75 COAXIAL ANTENNA DMPORT2 AB VIDEO IN AUDIO OUT L R TV Surround speaker (R) :Signal flow Surround speaker (L) continued 19US BASIC - For other TV connections, see page 30. Step 2: Connecting the System...
...34. DAV-HDX500 Front speaker (R) Front speaker (L) Center speaker CENTER WOOFER SPEAKER AC power cord (mains lead) Subwoofer FM wire antenna (aerial) AM loop antenna (aerial) FRONT R FRONT L SUR R SPEAKER SUR L DIR-TC1 COAXIAL OPTICAL DIGITAL IN SAT/CABLE OUT (DVD ONLY...DVD ONLY) Y PB/CB PR/CR COMPONENT VIDEO OUT VIDEO MONITOR OUT R AUDIO IN L TV XM DMPORT1 FM 75 COAXIAL ANTENNA DMPORT2 AB VIDEO IN AUDIO OUT L R TV Surround speaker (R) :Signal flow Surround speaker (L) continued 19US BASIC - For other TV connections, see page 30. Step 2: Connecting the System...

Operating Instructions (DAV-HDX500/HDX501W)
Page 20
For details, see "Connecting Other Components" (page 34) and the operating instructions of the WAHT-SD1. 20US BASIC - DAV-HDX501W Front speaker (R) Center speaker Front speaker (L) CENTER WOOFER SPEAKER AC power cord (mains lead) FM wire antenna (aerial) AM loop antenna (...DVD ONLY) Y PB/CB PR/CR COMPONENT VIDEO OUT VIDEO MONITOR OUT R AUDIO IN L TV XM DMPORT1 FM 75 COAXIAL ANTENNA DMPORT2 Subwoofer AB VIDEO IN AUDIO OUT L R TV Surround speaker (R) :Signal flow Surround speaker (L) Tip • When you install the wireless kit WAHT-SD1 (supplied with DAV-HDX501W...
For details, see "Connecting Other Components" (page 34) and the operating instructions of the WAHT-SD1. 20US BASIC - DAV-HDX501W Front speaker (R) Center speaker Front speaker (L) CENTER WOOFER SPEAKER AC power cord (mains lead) FM wire antenna (aerial) AM loop antenna (...DVD ONLY) Y PB/CB PR/CR COMPONENT VIDEO OUT VIDEO MONITOR OUT R AUDIO IN L TV XM DMPORT1 FM 75 COAXIAL ANTENNA DMPORT2 Subwoofer AB VIDEO IN AUDIO OUT L R TV Surround speaker (R) :Signal flow Surround speaker (L) Tip • When you install the wireless kit WAHT-SD1 (supplied with DAV-HDX501W...

Operating Instructions (DAV-HDX500/HDX501W)
Page 24
If this message does not appear, recall the Quick Setup display (page 26) and perform again. 4 Press without inserting a disc. BASIC - Subject to make the minimum number of abrasive pad, scouring powder, or solvent such as alcohol or benzine. • Do not lean or hang ... not place the speakers in the on the TV. 2 Press [/1. "/1 C/X/x/c, DISPLAY Note • Do not set to "DVD" (page 37). 3 Switch the input selector on your TV so that the signal from the system appears on the TV screen. [Press [ENTER] to direct sunlight • Use caution when placing the speakers and...
If this message does not appear, recall the Quick Setup display (page 26) and perform again. 4 Press without inserting a disc. BASIC - Subject to make the minimum number of abrasive pad, scouring powder, or solvent such as alcohol or benzine. • Do not lean or hang ... not place the speakers in the on the TV. 2 Press [/1. "/1 C/X/x/c, DISPLAY Note • Do not set to "DVD" (page 37). 3 Switch the input selector on your TV so that the signal from the system appears on the TV screen. [Press [ENTER] to direct sunlight • Use caution when placing the speakers and...

Operating Instructions (DAV-HDX500/HDX501W)
Page 26
... retry [AUTO CALIBRATION]. • When you select [SECOND ROOM] for [SETUP] appear. 1 2 ( 2 7 ) 1 8 ( 3 4 ) T 0:00:02 DVD VIDEO QUICK QUICK CUSTOM RESET BNR 3 Press X/x to change the position of the settings, see "Using the Setup Display" (page 86). BASIC - 12 Press . Give...SURROUND R : 10ft 3.04m - 2.0dB If OK, unplug calibration mic and select "YES". To recall the Quick Setup display 1 Press DISPLAY when the system is finished. Start measurement? The Control Menu display appears. 2 Press X/x to select press . [SETUP], then The options for [SPEAKER FORMATION], measurement ...
... retry [AUTO CALIBRATION]. • When you select [SECOND ROOM] for [SETUP] appear. 1 2 ( 2 7 ) 1 8 ( 3 4 ) T 0:00:02 DVD VIDEO QUICK QUICK CUSTOM RESET BNR 3 Press X/x to change the position of the settings, see "Using the Setup Display" (page 86). BASIC - 12 Press . Give...SURROUND R : 10ft 3.04m - 2.0dB If OK, unplug calibration mic and select "YES". To recall the Quick Setup display 1 Press DISPLAY when the system is finished. Start measurement? The Control Menu display appears. 2 Press X/x to select press . [SETUP], then The options for [SPEAKER FORMATION], measurement ...

Operating Instructions (DAV-HDX500/HDX501W)
Page 30
...FRONT R FRONT L SUR R SPEAKER SUR L DIR-TC1 COAXIAL OPTICAL DIGITAL IN SAT/CABLE OUT (DVD ONLY) COMPONENT VIDEO IN Y PB/CB PR/CR AM SAT/CABLE R AUDIO IN L VIDEO IN S VIDEO (DVD ONLY) Y PB/CB PR/CR COMPONENT VIDEO OUT VIDEO MONITOR OUT R AUDIO IN L TV XM ...COMPONENT VIDEO IN jacks TV with VIDEO IN jack :Signal flow TV with S VIDEO IN jack * HDMI (high-definition multimedia interface) The system incorporates High-Definition Multimedia Interface (HDMITM) technology. HDMI, the HDMI logo and High-Definition Multimedia Interface are trademarks or registered trademarks of your...
...FRONT R FRONT L SUR R SPEAKER SUR L DIR-TC1 COAXIAL OPTICAL DIGITAL IN SAT/CABLE OUT (DVD ONLY) COMPONENT VIDEO IN Y PB/CB PR/CR AM SAT/CABLE R AUDIO IN L VIDEO IN S VIDEO (DVD ONLY) Y PB/CB PR/CR COMPONENT VIDEO OUT VIDEO MONITOR OUT R AUDIO IN L TV XM ...COMPONENT VIDEO IN jacks TV with VIDEO IN jack :Signal flow TV with S VIDEO IN jack * HDMI (high-definition multimedia interface) The system incorporates High-Definition Multimedia Interface (HDMITM) technology. HDMI, the HDMI logo and High-Definition Multimedia Interface are trademarks or registered trademarks of your...

Operating Instructions (DAV-HDX500/HDX501W)
Page 31
... video signals output from the video signals and will not accept any audio signals. To use this connection and set the output channel of the system to a TV with the HDMI cord, selects the type of the video jack, your TV accepts progressive format signals, you connect the unit and the... operating instructions supplied with an HDMI (high-definition multimedia interface)-DVI (digital visual interface) adaptor (not supplied). Getting Started - For details, refer also to select "DVD."
... video signals output from the video signals and will not accept any audio signals. To use this connection and set the output channel of the system to a TV with the HDMI cord, selects the type of the video jack, your TV accepts progressive format signals, you connect the unit and the... operating instructions supplied with an HDMI (high-definition multimedia interface)-DVI (digital visual interface) adaptor (not supplied). Getting Started - For details, refer also to select "DVD."

Operating Instructions (DAV-HDX500/HDX501W)
Page 32
...ratio, see page 88. The current type of video signals appears in the front panel display when the system outputs progressive signals. 1 Press FUNCTION repeatedly to select "DVD." 32US When connecting to a TV that accepts progressive signals. Progressive is the method for displaying TV images... 1280 × 720p video signals. • "1920 × 1080i*": Sends 1920 × 1080i video signals. *i: interlace, p: progressive **Depending on the disc, the image may appear. Does your TV screen. Each time you need to connect to a standard 4:3 screen TV Depending on the country, [720 ×...
...ratio, see page 88. The current type of video signals appears in the front panel display when the system outputs progressive signals. 1 Press FUNCTION repeatedly to select "DVD." 32US When connecting to a TV that accepts progressive signals. Progressive is the method for displaying TV images... 1280 × 720p video signals. • "1920 × 1080i*": Sends 1920 × 1080i video signals. *i: interlace, p: progressive **Depending on the disc, the image may appear. Does your TV screen. Each time you need to connect to a standard 4:3 screen TV Depending on the country, [720 ×...


