
Limited Warranty (US Only)
Page 1
...for product information or operation, call : 1-800-488-SONY (7669) Printed in exchange for defective parts for all labor charges. 2. This warranty does not cover damage due to improper operation or maintenance, connection to improper voltage supply, or attempted repair by anyone other... removed from state to state. 4-557-172-02 General Stereo/Hifi Components/Tape Decks ® CD Players/Mini Disc Players/Audio Systems Hifi Audio LIMITED WARRANTY Sony Electronics Inc. ("Sony") warrants this Product is determined to be presented to obtain warranty service. ACCESSORIES: Parts and labor...
...for product information or operation, call : 1-800-488-SONY (7669) Printed in exchange for defective parts for all labor charges. 2. This warranty does not cover damage due to improper operation or maintenance, connection to improper voltage supply, or attempted repair by anyone other... removed from state to state. 4-557-172-02 General Stereo/Hifi Components/Tape Decks ® CD Players/Mini Disc Players/Audio Systems Hifi Audio LIMITED WARRANTY Sony Electronics Inc. ("Sony") warrants this Product is determined to be presented to obtain warranty service. ACCESSORIES: Parts and labor...
HDMI Control Guide
Page 2
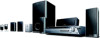
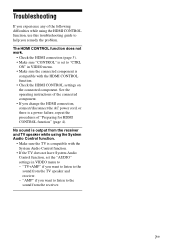
One-Touch Play: By pressing only H on the unit or remote, the TV turns on and is set for this system is for DVD input mode automatically. - System Power Off: When you turn [HDMI CONTROL] to [OFF] (European models only). The following cases: - The HDMI ... HDMI CONTROL Function for 'BRAVIA' Theatre Sync To use 'BRAVIA' Theatre Sync, set the HDMI CONTROL function as below . By connecting Sony components that you connect this system to the operating instructions supplied with the component. • When [HDMI CONTROL] is a mutual control function standard used by HDMI ...
One-Touch Play: By pressing only H on the unit or remote, the TV turns on and is set for this system is for DVD input mode automatically. - System Power Off: When you turn [HDMI CONTROL] to [OFF] (European models only). The following cases: - The HDMI ... HDMI CONTROL Function for 'BRAVIA' Theatre Sync To use 'BRAVIA' Theatre Sync, set the HDMI CONTROL function as below . By connecting Sony components that you connect this system to the operating instructions supplied with the component. • When [HDMI CONTROL] is a mutual control function standard used by HDMI ...
HDMI Control Guide
Page 5
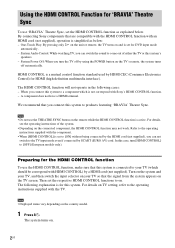
... on . 8 Press . Digital Sound (Coaxial/Optical cord) 1 Press "/1. 2 Press DISPLAY when the system is not correspond with the HDMI IN jacks by performing to connect from the speakers of the system. The setting is underlined. • [OFF]: sets the [STB SYNCHRO] function to off. •... press . 7 Press X/x to the STB or digital satellite tuner. By connecting as the following illustration are examples. Connect to [ON]. Video signal Sound signal TV to HDMI 2 (HDMI cord) to HDMI 1 (HDMI cord) GUSB DAV STB Sets the [STB SYNCHRO] to a TV with HDMI CONTROL. 5US...
... on . 8 Press . Digital Sound (Coaxial/Optical cord) 1 Press "/1. 2 Press DISPLAY when the system is not correspond with the HDMI IN jacks by performing to connect from the speakers of the system. The setting is underlined. • [OFF]: sets the [STB SYNCHRO] function to off. •... press . 7 Press X/x to the STB or digital satellite tuner. By connecting as the following illustration are examples. Connect to [ON]. Video signal Sound signal TV to HDMI 2 (HDMI cord) to HDMI 1 (HDMI cord) GUSB DAV STB Sets the [STB SYNCHRO] to a TV with HDMI CONTROL. 5US...

HDMI Control Guide
Page 6
Note • In order to set the [STB SYNCHRO] function, first set [HDMI CONTROL] to [ON] (see page 2). • Depending on the TV, this function may not work when STB or a digital satellite tuner is connected to the HDMI 1 jack of the TV. 6US
Note • In order to set the [STB SYNCHRO] function, first set [HDMI CONTROL] to [ON] (see page 2). • Depending on the TV, this function may not work when STB or a digital satellite tuner is connected to the HDMI 1 jack of the TV. 6US
HDMI Control Guide
Page 2
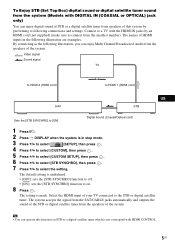
...The HDMI CONTROL function does not work . By connecting Sony components that you connect the receiver and components using other than HDMI connection. HDMI CONTROL is simplified as a DVD/Blu-ray Disc Player, the receiver and the TV are turned on the connected component, the HDMI CONTROL function may not work ... on automatically and switch to the appropriate HDMI input. • System Audio Control: While watching TV, you can select to output the sound from the TV speaker or the speakers connected to the receiver. • System Power Off: When you turn off the TV, the receiver and...
...The HDMI CONTROL function does not work . By connecting Sony components that you connect the receiver and components using other than HDMI connection. HDMI CONTROL is simplified as a DVD/Blu-ray Disc Player, the receiver and the TV are turned on the connected component, the HDMI CONTROL function may not work ... on automatically and switch to the appropriate HDMI input. • System Audio Control: While watching TV, you can select to output the sound from the TV speaker or the speakers connected to the receiver. • System Power Off: When you turn off the TV, the receiver and...
HDMI Control Guide
Page 3
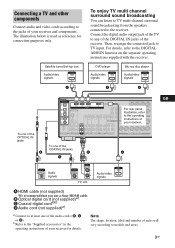
... supplied with the receiver. DVD player Blu-ray disc player Audio/video signals Audio/video signals A A To one of the audio cords (B, C or D). C Coaxial digital corda)b) D Audio cord (not supplied)a) a)Connect to at least one of the OPTICAL IN jacks B DIGITAL (ASSIGNABLE) SAT IN VIDEO 2/ BD IN VIDEO 1 IN OPTICAL SA-CD/ CD/CD-R IN DVD IN COAXIAL L L SAT...
... supplied with the receiver. DVD player Blu-ray disc player Audio/video signals Audio/video signals A A To one of the audio cords (B, C or D). C Coaxial digital corda)b) D Audio cord (not supplied)a) a)Connect to at least one of the OPTICAL IN jacks B DIGITAL (ASSIGNABLE) SAT IN VIDEO 2/ BD IN VIDEO 1 IN OPTICAL SA-CD/ CD/CD-R IN DVD IN COAXIAL L L SAT...
HDMI Control Guide
Page 4
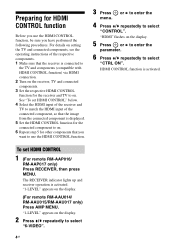
... HDMI CONTROL function, be sure you use the HDMI CONTROL function. 3 Press menu. "1-LEVEL" appears on the receiver, TV and connected components. 3 Set the respective HDMI CONTROL function for HDMI CONTROL function Before you have performed the following procedures. See "To set HDMI...function is activated. For details on setting the TV and connected components, see the operating instructions of the connected component, so that the image from the connected component is displayed. 5 Set the HDMI CONTROL function for the connected component to on. 6 Repeat step 5 for other ...
... HDMI CONTROL function, be sure you use the HDMI CONTROL function. 3 Press menu. "1-LEVEL" appears on the receiver, TV and connected components. 3 Set the respective HDMI CONTROL function for HDMI CONTROL function Before you have performed the following procedures. See "To set HDMI...function is activated. For details on setting the TV and connected components, see the operating instructions of the connected component, so that the image from the connected component is displayed. 5 Set the HDMI CONTROL function for the connected component to on. 6 Repeat step 5 for other ...
HDMI Control Guide
Page 5
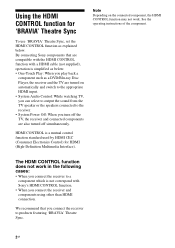
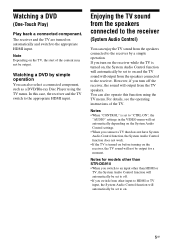
... Control function will automatically be set to the receiver. Enjoying the TV sound from the speakers connected to the receiver (System Audio Control) You can also select a connected component, such as a DVD/Blu-ray Disc Player using the TV menu. Notes • When "CONTROL" is set to "CTRL ON", the "AUDIO" settings in the VIDEO menu...
... Control function will automatically be set to the receiver. Enjoying the TV sound from the speakers connected to the receiver (System Audio Control) You can also select a connected component, such as a DVD/Blu-ray Disc Player using the TV menu. Notes • When "CONTROL" is set to "CTRL ON", the "AUDIO" settings in the VIDEO menu...
HDMI Control Guide
Page 6
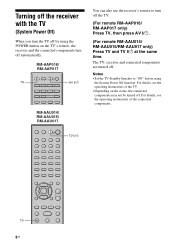
... The TV, receiver and connected components are turned off . For details, see the operating instructions of the TV. • Depending on the TV's remote, the receiver and the connected components turn off automatically. TV ?/1 TV 6GB Turning off the receiver with the TV (System Power Off) When you ...turn the TV off by using the System Power Off function. RM-AAP016/ RM-AAP017 TV AV ?/1 RM-AAU014...
... The TV, receiver and connected components are turned off . For details, see the operating instructions of the TV. • Depending on the TV's remote, the receiver and the connected components turn off automatically. TV ?/1 TV 6GB Turning off the receiver with the TV (System Power Off) When you ...turn the TV off by using the System Power Off function. RM-AAP016/ RM-AAP017 TV AV ?/1 RM-AAU014...
HDMI Control Guide
Page 7
...HDMI CONTROL function, use this troubleshooting guide to help you remedy the problem. See the operating instructions of the connected component. • If you change the HDMI connection, connect/disconnect the AC power cord, or there is compatible with the HDMI CONTROL function. • Check the ...- Troubleshooting If you experience any of the following difficulties while using the System Audio Control function. • Make sure the TV is compatible with the System Audio Control function. • If the TV does not have System Audio Control function, set to "CTRL ON" in VIDEO menu to ...
...HDMI CONTROL function, use this troubleshooting guide to help you remedy the problem. See the operating instructions of the connected component. • If you change the HDMI connection, connect/disconnect the AC power cord, or there is compatible with the HDMI CONTROL function. • Check the ...- Troubleshooting If you experience any of the following difficulties while using the System Audio Control function. • Make sure the TV is compatible with the System Audio Control function. • If the TV does not have System Audio Control function, set to "CTRL ON" in VIDEO menu to ...
Operating Instructions
Page 2
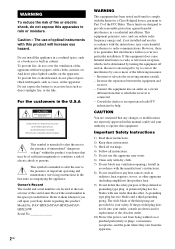
...them whenever you call upon your outlet, consult an electrician for a Class B digital device, pursuant to radio communications. Connect the equipment into your Sony dealer regarding this apparatus to persons. A polarized plug has two blades with the instructions, may be determined by turning... and serial numbers are cautioned that interference will increase eye hazard. Record the serial number in a residential installation. DAV-HDX265/DAV-HDX266/DAVHDX267W Serial No 2GB WARNING This equipment has been tested and found to which can radiate radio frequency energy and...
...them whenever you call upon your outlet, consult an electrician for a Class B digital device, pursuant to radio communications. Connect the equipment into your Sony dealer regarding this apparatus to persons. A polarized plug has two blades with the instructions, may be determined by turning... and serial numbers are cautioned that interference will increase eye hazard. Record the serial number in a residential installation. DAV-HDX265/DAV-HDX266/DAVHDX267W Serial No 2GB WARNING This equipment has been tested and found to which can radiate radio frequency energy and...
Operating Instructions
Page 3
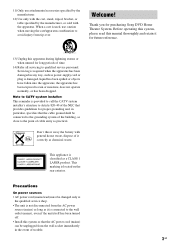
...throw away the battery with the apparatus. Before operating this system, please read this manual thoroughly and retain it for future reference. 13) Unplug this system so that the cable ground shall be connected to the grounding system of the building, as close to qualified service personnel. ... the qualified service shop. • The unit is connected to the wall outlet (mains), even if the unit itself has been turned off. • Install this apparatus during lightning storms or when unused for purchasing Sony DVD Home Theatre System. Precautions On power sources • AC power cord...
...throw away the battery with the apparatus. Before operating this system, please read this manual thoroughly and retain it for future reference. 13) Unplug this system so that the cable ground shall be connected to the grounding system of the building, as close to qualified service personnel. ... the qualified service shop. • The unit is connected to the wall outlet (mains), even if the unit itself has been turned off. • Install this apparatus during lightning storms or when unused for purchasing Sony DVD Home Theatre System. Precautions On power sources • AC power cord...
Operating Instructions
Page 4
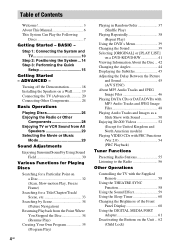
... 46 Playing DATA CDs or DATA DVDs with MP3 Audio Tracks and JPEG Image Files 48 Playing Audio Tracks and Images as a Slide Show with Sound 50 Enjoying DivX® Videos 52 (Except for United Kingdom and North American models) Playing VIDEO CDs with PBC Functions ...Using the Sleep Timer 60 Changing the Brightness of Contents Welcome 3 About This Manual 6 This System Can Play the Following Discs 7 Getting Started - ADVANCED - Step 1: Connecting the System and TV 10 Step 2: Positioning the System ...14 Step 3: Performing the Quick Setup 15 Getting Started - BASIC - Turning off the...
... 46 Playing DATA CDs or DATA DVDs with MP3 Audio Tracks and JPEG Image Files 48 Playing Audio Tracks and Images as a Slide Show with Sound 50 Enjoying DivX® Videos 52 (Except for United Kingdom and North American models) Playing VIDEO CDs with PBC Functions ...Using the Sleep Timer 60 Changing the Brightness of Contents Welcome 3 About This Manual 6 This System Can Play the Following Discs 7 Getting Started - ADVANCED - Step 1: Connecting the System and TV 10 Step 2: Positioning the System ...14 Step 3: Performing the Quick Setup 15 Getting Started - BASIC - Turning off the...
Operating Instructions
Page 10
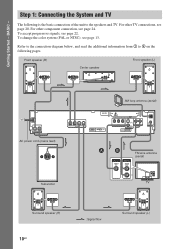
...) Y PB/CB PR/CR R AUDIO IN L (DVD ONLY) COMPONENT VIDEO OUT S VIDEO (DVD ONLY) VIDEO MONITOR OUT DMPORT TV/VIDEO AM FM 75 COAXIAL ANTENNA A B FM wire antenna (aerial) VIDEO IN AUDIO OUT L R TV Surround speaker (R) 10GB :Signal flow Surround speaker (L) Step 1: Connecting the System and TV The following pages. To accept progressive signals...
...) Y PB/CB PR/CR R AUDIO IN L (DVD ONLY) COMPONENT VIDEO OUT S VIDEO (DVD ONLY) VIDEO MONITOR OUT DMPORT TV/VIDEO AM FM 75 COAXIAL ANTENNA A B FM wire antenna (aerial) VIDEO IN AUDIO OUT L R TV Surround speaker (R) 10GB :Signal flow Surround speaker (L) Step 1: Connecting the System and TV The following pages. To accept progressive signals...
Operating Instructions
Page 11
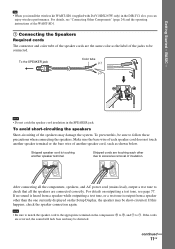
... catch the speaker cord insulation in the DIR-TC1 slot, you install the wireless kit WAHT-SD1 (supplied with DAV-HDX267W only) in the SPEAKER jack. To prevent this happens, check the speaker connection again. Note • Be sure to match the speaker cord to follow these precautions when...than the one currently displayed on the Setup Display, the speaker may damage the system. BASIC - Getting Started - After connecting all the speakers are reversed, the sound will lack bass and may be connected. If no sound is heard from a speaker other due to be distorted. continued...
... catch the speaker cord insulation in the DIR-TC1 slot, you install the wireless kit WAHT-SD1 (supplied with DAV-HDX267W only) in the SPEAKER jack. To prevent this happens, check the speaker connection again. Note • Be sure to match the speaker cord to follow these precautions when...than the one currently displayed on the Setup Display, the speaker may damage the system. BASIC - Getting Started - After connecting all the speakers are reversed, the sound will lack bass and may be connected. If no sound is heard from a speaker other due to be distorted. continued...
Operating Instructions
Page 12
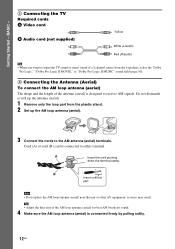
...to the AM antenna (aerial) terminals. Tip • Adjust the direction of the antenna (aerial) is connected firmly by pulling softly. 12GB Cord (A) or cord (B) can be connected to receive AM signals. BASIC - 2 Connecting the TV Required cords A Video cord . B Audio cord (not supplied) Yellow White (L/audio) Red ...select the "Dolby Pro Logic," "Dolby Pro Logic II MOVIE," or "Dolby Pro Logic II MUSIC" sound field (page 30). 3 Connecting the Antenna (Aerial) To connect the AM loop antenna (aerial) The shape and the length of the AM loop antenna (aerial) for best AM broadcast sound. 4 ...
...to the AM antenna (aerial) terminals. Tip • Adjust the direction of the antenna (aerial) is connected firmly by pulling softly. 12GB Cord (A) or cord (B) can be connected to receive AM signals. BASIC - 2 Connecting the TV Required cords A Video cord . B Audio cord (not supplied) Yellow White (L/audio) Red ...select the "Dolby Pro Logic," "Dolby Pro Logic II MOVIE," or "Dolby Pro Logic II MUSIC" sound field (page 30). 3 Connecting the Antenna (Aerial) To connect the AM loop antenna (aerial) The shape and the length of the AM loop antenna (aerial) for best AM broadcast sound. 4 ...
Operating Instructions
Page 13
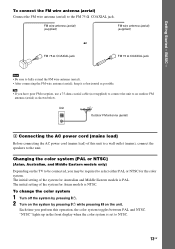
...) to NTSC. 13GB Unit Outdoor FM antenna (aerial) 4 Connecting the AC power cord (mains lead) Before connecting the AC power cord (mains lead) of this operation, the color system toggles between PAL and NTSC. The initial setting of the system for Australian and Middle Eastern models is PAL. "NTSC" lights...as horizontal as shown below. To change the color system 1 Turn off the system by pressing "/1. 2 Turn on the system by pressing "/1 while pressing X on the TV to be connected, you may be required to the unit. The initial setting of the system for Asian models is set to the FM 75 ...
...) to NTSC. 13GB Unit Outdoor FM antenna (aerial) 4 Connecting the AC power cord (mains lead) Before connecting the AC power cord (mains lead) of this operation, the color system toggles between PAL and NTSC. The initial setting of the system for Australian and Middle Eastern models is PAL. "NTSC" lights...as horizontal as shown below. To change the color system 1 Turn off the system by pressing "/1. 2 Turn on the system by pressing "/1 while pressing X on the TV to be connected, you may be required to the unit. The initial setting of the system for Asian models is set to the FM 75 ...
Operating Instructions
Page 15
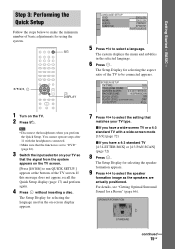
...recall the Quick Setup display (page 17) and perform again. 4 Press without inserting a disc. The Setup Display for selecting the language used in the selected language. 6 Press . For details, see ...the Quick Setup Follow the steps below to "DVD" (page 26). 3 Switch the input selector on your TV so that matches your TV type. The system displays the menu and subtitles in the on... appears. 7 Press X/x to select the setting that the signal from the system appears on the TV screen. [Press [ENTER] to be connected appears. The Setup Display for selecting the speaker formation appears. 9 Press ...
...recall the Quick Setup display (page 17) and perform again. 4 Press without inserting a disc. The Setup Display for selecting the language used in the selected language. 6 Press . For details, see ...the Quick Setup Follow the steps below to "DVD" (page 26). 3 Switch the input selector on your TV so that matches your TV type. The system displays the menu and subtitles in the on... appears. 7 Press X/x to select the setting that the signal from the system appears on the TV screen. [Press [ENTER] to be connected appears. The Setup Display for selecting the speaker formation appears. 9 Press ...

Operating Instructions
Page 16
...test sound is finished. Set up the calibration mic at the ear level using a tripod, etc. (not supplied). All connections and setup operations are complete. To quit the Quick Setup Press DISPLAY in the measurement area and making noise during the ... between the speakers and the calibration mic. BASIC - Be quiet during the measurement (which the system is installed may interfere with DAV-HDX267W only) is not displayed. 14 Press . Getting Started - AUTO CALIBRATION Connect calibration mic. FRONT L : YES FRONT R : YES CENTER : NONE SUBWOOFER : YES SURROUND...
...test sound is finished. Set up the calibration mic at the ear level using a tripod, etc. (not supplied). All connections and setup operations are complete. To quit the Quick Setup Press DISPLAY in the measurement area and making noise during the ... between the speakers and the calibration mic. BASIC - Be quiet during the measurement (which the system is installed may interfere with DAV-HDX267W only) is not displayed. 14 Press . Getting Started - AUTO CALIBRATION Connect calibration mic. FRONT L : YES FRONT R : YES CENTER : NONE SUBWOOFER : YES SURROUND...

Operating Instructions
Page 18
After connecting the AC power cord (mains lead), the demonstration appears in standby mode. • If the system is set "DEMO" to off the demonstration simply by pressing "/1 on /off 1 Press SYSTEM MENU. 2 Press X/x repeatedly until "DEMO" appears in the front panel display, then press or c. 3 ... (page 78)), you can turn off. • When you set the demonstration mode to "DEMO OFF." 18GB Turning off the Demonstration "/1 X/x/c, SYSTEM MENU Setting the demonstration mode to on the remote. The setting is underlined. • "DEMO ON": sets the demonstration mode to on. •...
After connecting the AC power cord (mains lead), the demonstration appears in standby mode. • If the system is set "DEMO" to off the demonstration simply by pressing "/1 on /off 1 Press SYSTEM MENU. 2 Press X/x repeatedly until "DEMO" appears in the front panel display, then press or c. 3 ... (page 78)), you can turn off. • When you set the demonstration mode to "DEMO OFF." 18GB Turning off the Demonstration "/1 X/x/c, SYSTEM MENU Setting the demonstration mode to on the remote. The setting is underlined. • "DEMO ON": sets the demonstration mode to on. •...


