
Operating Instructions
Page 11
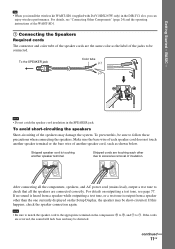
... the SPEAKER jack Color tube (+) (-) Note • Do not catch the speaker cord insulation in the DIR-TC1 slot, you can enjoy wireless performance. Make sure the bare wire of each other than the one currently displayed on the Setup Display, the speaker may be distorted. Note ... sound will lack bass and may damage the system. For details, see page 77. After connecting all the components, speakers, and AC power cord (mains lead), output a test tone to #. Tip • When you install the wireless kit WAHT-SD1 (supplied with DAV-HDX267W only) in the SPEAKER jack. To avoid ...
... the SPEAKER jack Color tube (+) (-) Note • Do not catch the speaker cord insulation in the DIR-TC1 slot, you can enjoy wireless performance. Make sure the bare wire of each other than the one currently displayed on the Setup Display, the speaker may be distorted. Note ... sound will lack bass and may damage the system. For details, see page 77. After connecting all the components, speakers, and AC power cord (mains lead), output a test tone to #. Tip • When you install the wireless kit WAHT-SD1 (supplied with DAV-HDX267W only) in the SPEAKER jack. To avoid ...

Operating Instructions
Page 16
...the measurement. YES NO Auto Calibration starts. You cannot turn the volume down. Be quiet during the measurement (which the system is installed may interfere with DAV-HDX267W only) is not displayed. 14 Press . Give consideration to children and neighbor. • Avoid being in which takes ... connections and setup operations are complete. Note • Loud test sound is finished. AUTO CALIBRATION Connect calibration mic. Note • When the wireless kit WAHT-SD1 (supplied with measurement. 13 Unplug the calibration mic and press C/ c to select [YES]. AUDIO IN / A.CAL MIC ...
...the measurement. YES NO Auto Calibration starts. You cannot turn the volume down. Be quiet during the measurement (which the system is installed may interfere with DAV-HDX267W only) is not displayed. 14 Press . Give consideration to children and neighbor. • Avoid being in which takes ... connections and setup operations are complete. Note • Loud test sound is finished. AUTO CALIBRATION Connect calibration mic. Note • When the wireless kit WAHT-SD1 (supplied with measurement. 13 Unplug the calibration mic and press C/ c to select [YES]. AUDIO IN / A.CAL MIC ...
Operating Instructions
Page 25
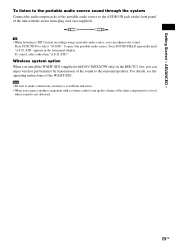
... MP3 format recordings using a portable audio source, you install the WAHT-SD1 (supplied with DAV-HDX267W only) in the front panel display. Connect the portable audio source. Press SOUND FIELD repeatedly until "A.F.D. Wireless system option When you can enjoy wireless performance by transmission of the unit with a volume control, turn up the volume of the...
... MP3 format recordings using a portable audio source, you install the WAHT-SD1 (supplied with DAV-HDX267W only) in the front panel display. Connect the portable audio source. Press SOUND FIELD repeatedly until "A.F.D. Wireless system option When you can enjoy wireless performance by transmission of the unit with a volume control, turn up the volume of the...
Operating Instructions
Page 67
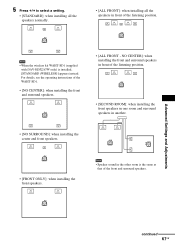
Note • When the wireless kit WAHT-SD1 (supplied with DAV-HDX267W only) is the same as that of the listening position. • [SECOND ROOM]: when installing the front speakers in one room and surround speakers in the other room is installed, [STANDARD (WIRELESS)] appears instead. Note • Speaker sound in another. • [NO SURROUND...
Note • When the wireless kit WAHT-SD1 (supplied with DAV-HDX267W only) is the same as that of the listening position. • [SECOND ROOM]: when installing the front speakers in one room and surround speakers in the other room is installed, [STANDARD (WIRELESS)] appears instead. Note • Speaker sound in another. • [NO SURROUND...

Operating Instructions
Page 68
...sound is installed, [STANDARD (WIRED)] appears. Tip • When the wireless kit WAHT-SD1 (supplied with DAV-HDX267W only) is output when [AUTO CALIBRATION] starts. The Control Menu display appears.... 3 Press X/x to select [SPEAKER FORMATION], then press . 1 ( 4 4 ) 3 ( 2 8 ) T 0:03:04 SPEAKER FORMATION SPEAKER FORMATION AUTO CALIBRATION DVD VIDEO 4 Press X/x to children and neighbor. 1 Press FUNCTION repeatedly until "DVD" appears in the front panel display. 2 Press DISPLAY when the system...
...sound is installed, [STANDARD (WIRED)] appears. Tip • When the wireless kit WAHT-SD1 (supplied with DAV-HDX267W only) is output when [AUTO CALIBRATION] starts. The Control Menu display appears.... 3 Press X/x to select [SPEAKER FORMATION], then press . 1 ( 4 4 ) 3 ( 2 8 ) T 0:03:04 SPEAKER FORMATION SPEAKER FORMATION AUTO CALIBRATION DVD VIDEO 4 Press X/x to children and neighbor. 1 Press FUNCTION repeatedly until "DVD" appears in the front panel display. 2 Press DISPLAY when the system...
Operating Instructions
Page 99
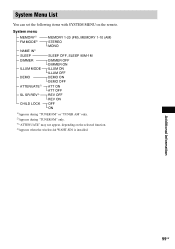
Additional Information 99GB System menu MEMORY1) FM MODE2) NAME IN1) SLEEP DIMMER ILLUM MODE DEMO ATTENUATE3) SL SR REV4) CHILD LOCK MEMORY 1-20 (FM), MEMORY 1-10 (AM) STEREO MONO SLEEP OFF, SLEEP 90M-1M DIMMER OFF DIMMER ON ILLUM ON ILLUM OFF DEMO ON DEMO OFF ATT ON ATT OFF REV OFF REV ON OFF ON 1)Appears during "TUNER FM" or "TUNER AM" only. 2)Appears during "TUNER FM" only. 3)"ATTENUATE" may not appear, depending on the remote. System Menu List You can set the following items with SYSTEM MENU on the selected function. 4)Appears when the wireless kit WAHT-SD1 is installed.
Additional Information 99GB System menu MEMORY1) FM MODE2) NAME IN1) SLEEP DIMMER ILLUM MODE DEMO ATTENUATE3) SL SR REV4) CHILD LOCK MEMORY 1-20 (FM), MEMORY 1-10 (AM) STEREO MONO SLEEP OFF, SLEEP 90M-1M DIMMER OFF DIMMER ON ILLUM ON ILLUM OFF DEMO ON DEMO OFF ATT ON ATT OFF REV OFF REV ON OFF ON 1)Appears during "TUNER FM" or "TUNER AM" only. 2)Appears during "TUNER FM" only. 3)"ATTENUATE" may not appear, depending on the remote. System Menu List You can set the following items with SYSTEM MENU on the selected function. 4)Appears when the wireless kit WAHT-SD1 is installed.
Marketing Specifications
Page 1
DAV-HDX267W Sony® BRAVIA® Theater System Key Features BRAVIA® Theatre Sync™ technology DIGITAL MEDIA PORT5 DIAT™ Wireless Rear Speaker Kit Included 5 Disc DVD/CD Player1 1000 Watts-143WattsX5 (1kHz,
DAV-HDX267W Sony® BRAVIA® Theater System Key Features BRAVIA® Theatre Sync™ technology DIGITAL MEDIA PORT5 DIAT™ Wireless Rear Speaker Kit Included 5 Disc DVD/CD Player1 1000 Watts-143WattsX5 (1kHz,
Marketing Specifications
Page 2
... CA 92127 • 1.800.222.7669 • www.sony.com DAV-HDX267W Sony® BRAVIA® Theater System Audio Impedance: 3 ohm Weights and Measurements Cord Length (Approx.): 3.5m x 1 Dimensions Weight: Main Unit:12lbs. (5.4kg); Wireless Receiver/Amp (TA-SB500W 1. Not all Bluetooth® enabled...2007 Sony Electronics Inc. All other . 4. Features and specifications are property of HDMI Licensing LLC. Specifications General Inputs and Outputs HDMI™ Connection Input(s): Yes DVD, VCD, CD Player Video Digital-to-Analog Converter: 108MHz/12bit Amplifier General Function: CD, DVD, ...
... CA 92127 • 1.800.222.7669 • www.sony.com DAV-HDX267W Sony® BRAVIA® Theater System Audio Impedance: 3 ohm Weights and Measurements Cord Length (Approx.): 3.5m x 1 Dimensions Weight: Main Unit:12lbs. (5.4kg); Wireless Receiver/Amp (TA-SB500W 1. Not all Bluetooth® enabled...2007 Sony Electronics Inc. All other . 4. Features and specifications are property of HDMI Licensing LLC. Specifications General Inputs and Outputs HDMI™ Connection Input(s): Yes DVD, VCD, CD Player Video Digital-to-Analog Converter: 108MHz/12bit Amplifier General Function: CD, DVD, ...


