HDMI Control Guide
Page 2
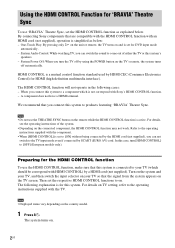
...) cord. HDMI CONTROL is set for DVD input mode automatically. - Preparing for the HDMI CONTROL function To use the HDMI CONTROL function, make sure that the signal from the system appears on the TV's remote, the system turns off by HDMI CEC (Consumer Electronics Control) for HDMI (high-definition multimedia interface). The following cases: - By connecting Sony components that...
...) cord. HDMI CONTROL is set for DVD input mode automatically. - Preparing for the HDMI CONTROL function To use the HDMI CONTROL function, make sure that the signal from the system appears on the TV's remote, the system turns off by HDMI CEC (Consumer Electronics Control) for HDMI (high-definition multimedia interface). The following cases: - By connecting Sony components that...
HDMI Control Guide
Page 4
...However, when you insert a disc in this system (System Audio Control) You can also operate this system by PAP (picture and picture) mode, the DVD playback will not work . In this case, set the function to "TV" (depending on the system. You place a DVD disc on the unit or remote. Enjoying the TV sound from ... of TV. You press DISC SKIP on the remote or DISC 1-5 on simultaneously and, the TV input is operated with System Audio Control at the same time. Note • When a CD/DATA-CD is highlighted) or return to the TV mode while watching the TV and a DVD by easy operation. While...
...However, when you insert a disc in this system (System Audio Control) You can also operate this system by PAP (picture and picture) mode, the DVD playback will not work . In this case, set the function to "TV" (depending on the system. You place a DVD disc on the unit or remote. Enjoying the TV sound from ... of TV. You press DISC SKIP on the remote or DISC 1-5 on simultaneously and, the TV input is operated with System Audio Control at the same time. Note • When a CD/DATA-CD is highlighted) or return to the TV mode while watching the TV and a DVD by easy operation. While...
Operating Instructions
Page 4
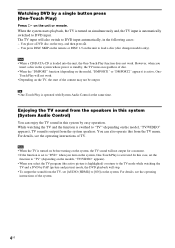
...the Buttons on a DVD-R/DVD-RW 41 Viewing Information About the Disc ... 42 Changing the Angles 44 Displaying the Subtitles 45 Adjusting the Delay Between the Picture and Sound 45 (A/V SYNC) About MP3 Audio Tracks and JPEG Image Files 46 Playing DATA CDs or DATA DVDs with MP3 Audio ... to the Radio 56 Other Operations Controlling the TV with the Supplied Remote 58 Using the THEATRE SYNC Function 58 Using the Sound Effect 59 Using the Sleep Timer 60 Changing the Brightness of Contents Welcome 3 About This Manual 6 This System Can Play the Following Discs 7 Getting Started -
...the Buttons on a DVD-R/DVD-RW 41 Viewing Information About the Disc ... 42 Changing the Angles 44 Displaying the Subtitles 45 Adjusting the Delay Between the Picture and Sound 45 (A/V SYNC) About MP3 Audio Tracks and JPEG Image Files 46 Playing DATA CDs or DATA DVDs with MP3 Audio ... to the Radio 56 Other Operations Controlling the TV with the Supplied Remote 58 Using the THEATRE SYNC Function 58 Using the Sound Effect 59 Using the Sleep Timer 60 Changing the Brightness of Contents Welcome 3 About This Manual 6 This System Can Play the Following Discs 7 Getting Started -
Operating Instructions
Page 6
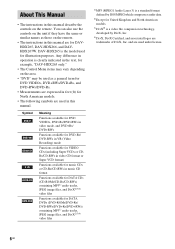
... text, for example, "DAV-HDX265 only." • The Control Menu items may be used in this manual describe the controls on the area. • "DVD" may vary depending on the remote. and are used for illustration purposes. About This Manual • The instructions in music CD format Functions available for DATA CDs (CD-ROMs/CD-Rs/CD-RWs) containing MP31...
... text, for example, "DAV-HDX265 only." • The Control Menu items may be used in this manual describe the controls on the area. • "DVD" may vary depending on the remote. and are used for illustration purposes. About This Manual • The instructions in music CD format Functions available for DATA CDs (CD-ROMs/CD-Rs/CD-RWs) containing MP31...
Operating Instructions
Page 9
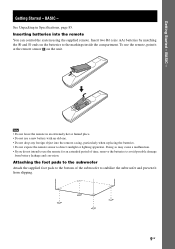
...may cause a malfunction. • If you do not intend to direct sunlight or lighting apparatus. Getting Started - Note • Do not leave the remote in Specifications, page 85. Attaching the foot pads to the subwoofer Attach the supplied foot pads to the bottom of time, remove the batteries to... or humid place. • Do not use a new battery with an old one. • Do not drop any foreign object into the remote You can control the system using the supplied remote. To use the remote for an extended period of the subwoofer to stabilize the subwoofer and prevent it at the...
...may cause a malfunction. • If you do not intend to direct sunlight or lighting apparatus. Getting Started - Note • Do not leave the remote in Specifications, page 85. Attaching the foot pads to the subwoofer Attach the supplied foot pads to the bottom of time, remove the batteries to... or humid place. • Do not use a new battery with an old one. • Do not drop any foreign object into the remote You can control the system using the supplied remote. To use the remote for an extended period of the subwoofer to stabilize the subwoofer and prevent it at the...
Operating Instructions
Page 26
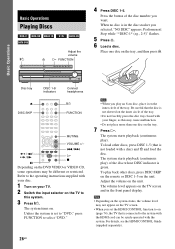
... the remote or DISC 1-5 on the tray, and then press A. Press the button of the disc whose DISC indicator is set the HDMI CONTROL function to the system with the HDMI cord can be synch-operated with your TV. 2 Switch the input selector on the TV to this may be different or restricted. Refer to select "DVD...
... the remote or DISC 1-5 on the tray, and then press A. Press the button of the disc whose DISC indicator is set the HDMI CONTROL function to the system with the HDMI cord can be synch-operated with your TV. 2 Switch the input selector on the TV to this may be different or restricted. Refer to select "DVD...
Operating Instructions
Page 27
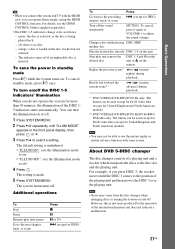
...may not be able to off . The system menu turns off . 4 Press . For details, see the HDMI CONTROL Guide (supplied separately). • The DISC 1-5 indicators change color as follows: - green: the disc is selected, or the disc is made. 5 Press SYSTEM MENU. You can be used except for ... Kingdom and North American models). ** DVD VIDEOs/DVD-RWs/DVD-Rs/DVD+RWs/ DVD+Rs only. About DVD 5-DISC changer The disc changer consists of the playing unit and then moves the DISC 3 over the playing unit. Tip • When you connect the system and TV with some scenes. To save...
...may not be able to off . The system menu turns off . 4 Press . For details, see the HDMI CONTROL Guide (supplied separately). • The DISC 1-5 indicators change color as follows: - green: the disc is selected, or the disc is made. 5 Press SYSTEM MENU. You can be used except for ... Kingdom and North American models). ** DVD VIDEOs/DVD-RWs/DVD-Rs/DVD+RWs/ DVD+Rs only. About DVD 5-DISC changer The disc changer consists of the playing unit and then moves the DISC 3 over the playing unit. Tip • When you connect the system and TV with some scenes. To save...
Operating Instructions
Page 58
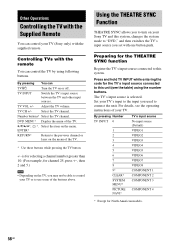
...Select the item on or off. is selected. Preparing for North American models. 58GB By pressing Number TV INPUT 0 1 2 3 4 5 6 7 8 9* CLEAR* SYSTEM MENU* PICTURE NAVI* TV's input source No input source (Default) VIDEO1 VIDEO2 VIDEO3 VIDEO4 VIDEO5 VIDEO6 VIDEO7 VIDEO8 COMPONENT 1 COMPONENT 2 COMPONENT 3 COMPONENT 4 * Except for... you to turn on the TV, you used to use some of your TV (Sony only) with the supplied remote. Controlling TVs with the remote You can control the TV by using the number buttons. DVD MENU* Display the menu of the TV. * Use these buttons while pressing the ...
...Select the item on or off. is selected. Preparing for North American models. 58GB By pressing Number TV INPUT 0 1 2 3 4 5 6 7 8 9* CLEAR* SYSTEM MENU* PICTURE NAVI* TV's input source No input source (Default) VIDEO1 VIDEO2 VIDEO3 VIDEO4 VIDEO5 VIDEO6 VIDEO7 VIDEO8 COMPONENT 1 COMPONENT 2 COMPONENT 3 COMPONENT 4 * Except for... you to turn on the TV, you used to use some of your TV (Sony only) with the supplied remote. Controlling TVs with the remote You can control the TV by using the number buttons. DVD MENU* Display the menu of the TV. * Use these buttons while pressing the ...
Operating Instructions
Page 77
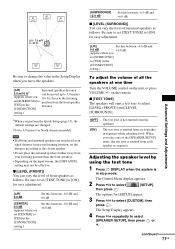
... press . x [TEST TONE] The speakers will emit a test tone to select [SETUP], then press . When you select one time Turn the VOLUME control on the remote. The Control Menu display appears. 2 Press X/x to adjust [LEVEL (FRONT)] and [LEVEL (SURROUND)]. [OFF] [ON] The test tone is emitted from each speaker...test tone is not emitted from the speakers. Advanced Settings and Adjustments Adjusting the speaker level by using the test tone 1 Press DISPLAY when the system is emitted from each speaker in stop mode. 0.0 - 7.0 m2)/ 0 - 23 ft Be sure to change the value in the Setup...
... press . x [TEST TONE] The speakers will emit a test tone to select [SETUP], then press . When you select one time Turn the VOLUME control on the remote. The Control Menu display appears. 2 Press X/x to adjust [LEVEL (FRONT)] and [LEVEL (SURROUND)]. [OFF] [ON] The test tone is emitted from each speaker...test tone is not emitted from the speakers. Advanced Settings and Adjustments Adjusting the speaker level by using the test tone 1 Press DISPLAY when the system is emitted from each speaker in stop mode. 0.0 - 7.0 m2)/ 0 - 23 ft Be sure to change the value in the Setup...
Operating Instructions
Page 86
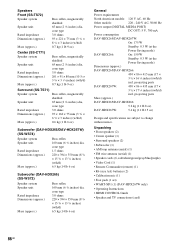
...Remote Commander (remote) (1) • R6 (size AA) batteries (2) • Calibration mic (1) • Foot pads (1 set) • WAHT-SD1 (1) (DAV-HDX267W only) • Operating Instructions • HDMI CONTROL Guide • Speaker and TV connections (card) 86GB Speakers Front (SS-TS72) Speaker system...(DIGITAL MEDIA PORT) DC OUT: 5 V, 700 mA Power consumption DAV-HDX265/DAV-HDX267W: On: 175 W Standby: 0.3 W (at the Power Saving mode) DAV-HDX266: On: 150 W Standby: 0.3 W (at the Power Saving mode) Dimensions (approx.) DAV-HDX265/DAV-HDX266: 430 × 86 × 415 mm (17 ×...
...Remote Commander (remote) (1) • R6 (size AA) batteries (2) • Calibration mic (1) • Foot pads (1 set) • WAHT-SD1 (1) (DAV-HDX267W only) • Operating Instructions • HDMI CONTROL Guide • Speaker and TV connections (card) 86GB Speakers Front (SS-TS72) Speaker system...(DIGITAL MEDIA PORT) DC OUT: 5 V, 700 mA Power consumption DAV-HDX265/DAV-HDX267W: On: 175 W Standby: 0.3 W (at the Power Saving mode) DAV-HDX266: On: 150 W Standby: 0.3 W (at the Power Saving mode) Dimensions (approx.) DAV-HDX265/DAV-HDX266: 430 × 86 × 415 mm (17 ×...
Operating Instructions
Page 92
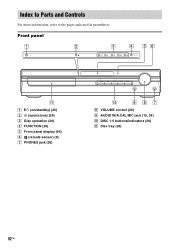
Front panel A "/1 (on/standby) (26) B A (open/close) (26) C Disc operation (26) D FUNCTION (26) E Front panel display (94) F (remote sensor) (9) G PHONES jack (26) H VOLUME control (26) I AUDIO IN/A.CAL MIC jack (15, 24) J DISC 1-5 buttons/indicators (26) K Disc tray (26) 92GB Index to Parts and Controls For more information, refer to the pages indicated in parentheses.
Front panel A "/1 (on/standby) (26) B A (open/close) (26) C Disc operation (26) D FUNCTION (26) E Front panel display (94) F (remote sensor) (9) G PHONES jack (26) H VOLUME control (26) I AUDIO IN/A.CAL MIC jack (15, 24) J DISC 1-5 buttons/indicators (26) K Disc tray (26) 92GB Index to Parts and Controls For more information, refer to the pages indicated in parentheses.
Operating Instructions
Page 103
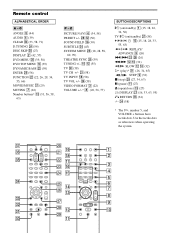
Remote control ALPHABETICAL ORDER A - eh (58) VIDEO FORMAT 3 (22) VOLUME +/-* 8 (26, 56, 77) BUTTON DESCRIPTIONS [/1 (on/...) O RETURN ed (34) -/-- Use the tactile dots as references when operating the system. Z PICTURE NAVI 6 (34, 58) PRESET +/- wk es (56) SOUND FIELD qh (30) SUBTITLE wf (45) SYSTEM MENU wg (18, 28, 58, 60, 99) THEATRE SYNC w; (59) TUNING... +/- 0 qs (55) TV e; (58) TV CH +/- O ANGLE 5 (44) AUDIO 4 (39) CLEAR ef (33, 58, 71) D.TUNING wf (56) DISC SKIP eg (27) DISPLAY 2 (42, 57) DVD MENU wh (39, 58) DVD...
Remote control ALPHABETICAL ORDER A - eh (58) VIDEO FORMAT 3 (22) VOLUME +/-* 8 (26, 56, 77) BUTTON DESCRIPTIONS [/1 (on/...) O RETURN ed (34) -/-- Use the tactile dots as references when operating the system. Z PICTURE NAVI 6 (34, 58) PRESET +/- wk es (56) SOUND FIELD qh (30) SUBTITLE wf (45) SYSTEM MENU wg (18, 28, 58, 60, 99) THEATRE SYNC w; (59) TUNING... +/- 0 qs (55) TV e; (58) TV CH +/- O ANGLE 5 (44) AUDIO 4 (39) CLEAR ef (33, 58, 71) D.TUNING wf (56) DISC SKIP eg (27) DISPLAY 2 (42, 57) DVD MENU wh (39, 58) DVD...


