Operating Instructions
Page 4
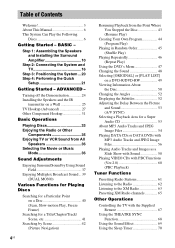
... the Speakers and Installing the Surround Amplifier 10 Step 2: Connecting the System and TV 16 Step 3: Positioning the System ...20 Step 4: Performing the Quick Setup 21 Getting Started - BASIC - Table of Contents Welcome 3 About This Manual 6 This System Can Play the Following Discs 6 Getting Started - Turning off the Demonstration...Selecting a Playback Area for a Super Audio CD 53 About MP3 Audio Tracks and JPEG Image Files 54 Playing DATA CDs or DATA DVDs with MP3 Audio Tracks and JPEG Image Files 56 Playing Audio Tracks and Images as a Slide Show with Sound 58 Playing VIDEO CDs...
... the Speakers and Installing the Surround Amplifier 10 Step 2: Connecting the System and TV 16 Step 3: Positioning the System ...20 Step 4: Performing the Quick Setup 21 Getting Started - BASIC - Table of Contents Welcome 3 About This Manual 6 This System Can Play the Following Discs 6 Getting Started - Turning off the Demonstration...Selecting a Playback Area for a Super Audio CD 53 About MP3 Audio Tracks and JPEG Image Files 54 Playing DATA CDs or DATA DVDs with MP3 Audio Tracks and JPEG Image Files 56 Playing Audio Tracks and Images as a Slide Show with Sound 58 Playing VIDEO CDs...
Operating Instructions
Page 5
...FORMATION) Calibrating the Appropriate Settings Automatically 76 (AUTO CALIBRATION) Using the Setup Display 78 Setting the Display or Sound Track Language 79 [LANGUAGE SETUP] Settings for the Display 80 [SCREEN SETUP] Custom Settings 82 [CUSTOM SETUP] Settings for the Speakers 83 [SPEAKER SETUP] Returning to the Default Settings.......... 85 Additional Information Precautions 86 Notes...in the display) Specifications 92 Glossary 94 Language Code List 98 Index to Parts and Controls 99 Guide to the Control Menu Display.... 102 DVD Setup Display List 105 AMP Menu List 106 Index 107 5US
...FORMATION) Calibrating the Appropriate Settings Automatically 76 (AUTO CALIBRATION) Using the Setup Display 78 Setting the Display or Sound Track Language 79 [LANGUAGE SETUP] Settings for the Display 80 [SCREEN SETUP] Custom Settings 82 [CUSTOM SETUP] Settings for the Speakers 83 [SPEAKER SETUP] Returning to the Default Settings.......... 85 Additional Information Precautions 86 Notes...in the display) Specifications 92 Glossary 94 Language Code List 98 Index to Parts and Controls 99 Guide to the Control Menu Display.... 102 DVD Setup Display List 105 AMP Menu List 106 Index 107 5US
Operating Instructions
Page 17
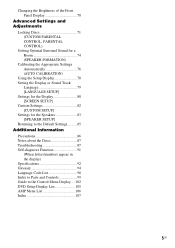
.... Make sure the bare wire of each other than the one currently displayed on outputting a test tone, see page 84. For details on the Setup Display, the speaker may be sure to follow these precautions when connecting the speakers. Note • Be sure to match the speaker cord to the...speaker cords are the same color as shown below. After connecting all the speakers are reversed, the sound will lack bass and may damage the system. If the cords are connected correctly. Stripped cords are touching each speaker cord does not touch another speaker terminal or the bare wire of ...
.... Make sure the bare wire of each other than the one currently displayed on outputting a test tone, see page 84. For details on the Setup Display, the speaker may be sure to follow these precautions when connecting the speakers. Note • Be sure to match the speaker cord to the...speaker cords are the same color as shown below. After connecting all the speakers are reversed, the sound will lack bass and may damage the system. If the cords are connected correctly. Stripped cords are touching each speaker cord does not touch another speaker terminal or the bare wire of ...
Operating Instructions
Page 21
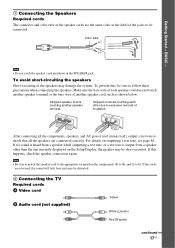
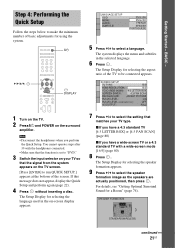
...Make sure that the function is set to "DVD." 3 Switch the input selector on your TV so that matches your TV type. If this message does not appear, display the Quick Setup and perform again (page 22). 4 Press without inserting a disc. The Setup Display for selecting the speaker formation appears. ...a wide-screen mode [16:9] (page 80) 8 Press . Step 4: Performing the Quick Setup Follow the steps below to run QUICK SETUP.] appears at the bottom of basic adjustments for a Room" (page 74). The system displays the menu and subtitles in the on the surround amplifier. x If you have a 4:3...
...Make sure that the function is set to "DVD." 3 Switch the input selector on your TV so that matches your TV type. If this message does not appear, display the Quick Setup and perform again (page 22). 4 Press without inserting a disc. The Setup Display for selecting the speaker formation appears. ...a wide-screen mode [16:9] (page 80) 8 Press . Step 4: Performing the Quick Setup Follow the steps below to run QUICK SETUP.] appears at the bottom of basic adjustments for a Room" (page 74). The system displays the menu and subtitles in the on the surround amplifier. x If you have a 4:3...
Operating Instructions
Page 22
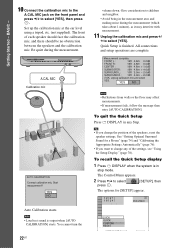
... - 2.0dB If OK, unplug calibration mic and select YES. To recall the Quick Setup display 1 Press DISPLAY when the system is output when [AUTO CALIBRATION] starts. All connections and setup operations are complete. Note • Loud test sound is in any of each speaker ... to select [YES], then press . The front of the settings, see "Using the Setup Display" (page 78). Quick Setup is finished. See "Getting Optimal Surround Sound for [SETUP] appear. 1 2 ( 2 7 ) 1 8 ( 3 4 ) : : DVD VIDEO QUICK QUICK CUSTOM RESET BNR Set up the calibration mic at the ear level using ...
... - 2.0dB If OK, unplug calibration mic and select YES. To recall the Quick Setup display 1 Press DISPLAY when the system is output when [AUTO CALIBRATION] starts. All connections and setup operations are complete. Note • Loud test sound is in any of each speaker ... to select [YES], then press . The front of the settings, see "Using the Setup Display" (page 78). Quick Setup is finished. See "Getting Optimal Surround Sound for [SETUP] appear. 1 2 ( 2 7 ) 1 8 ( 3 4 ) : : DVD VIDEO QUICK QUICK CUSTOM RESET BNR Set up the calibration mic at the ear level using ...
Operating Instructions
Page 23
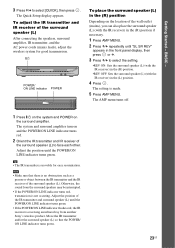
... [QUICK], then press . Adjust the position of the surround speaker (L). The Quick Setup display appears. Otherwise, the sound from another Sony's wireless product. Getting Started - The AMP menu turns off. 1 Press "/1 on the system and POWER on and the POWER/ON LINE indicator turns red. 2 Orient the IR... surround speaker (L) After connecting the speakers, surround amplifier, IR transmitter, and the AC power cords (mains leads), adjust the wireless system for easy reorientation. Note • Make sure that the POWER/ ON LINE indicator turns green. 23US To adjust the IR transmitter ...
... [QUICK], then press . Adjust the position of the surround speaker (L). The Quick Setup display appears. Otherwise, the sound from another Sony's wireless product. Getting Started - The AMP menu turns off. 1 Press "/1 on the system and POWER on and the POWER/ON LINE indicator turns red. 2 Orient the IR... surround speaker (L) After connecting the speakers, surround amplifier, IR transmitter, and the AC power cords (mains leads), adjust the wireless system for easy reorientation. Note • Make sure that the POWER/ ON LINE indicator turns green. 23US To adjust the IR transmitter ...
Operating Instructions
Page 43
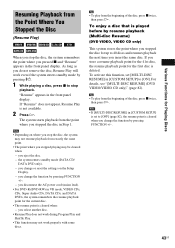
Note • Depending on the Setup Display. - you change the function by resume playback (Multi-disc Resume) (DVD VIDEO, VIDEO CD only) This system stores the point where you insert the same disc. To activate this function, set to 40 discs and resumes playback the next time..., then press H. Note • If [MULTI-DISC RESUME] in [CUSTOM SETUP] is set [MULTI-DISC RESUME] in [CUSTOM SETUP] to stop the disc, the system may be cleared when: - you disconnect the AC power cord (mains lead). • For DVD-Rs/DVD-RWs in the front panel display. you change the function by pressing...
Note • Depending on the Setup Display. - you change the function by resume playback (Multi-disc Resume) (DVD VIDEO, VIDEO CD only) This system stores the point where you insert the same disc. To activate this function, set to 40 discs and resumes playback the next time..., then press H. Note • If [MULTI-DISC RESUME] in [CUSTOM SETUP] is set [MULTI-DISC RESUME] in [CUSTOM SETUP] to stop the disc, the system may be cleared when: - you disconnect the AC power cord (mains lead). • For DVD-Rs/DVD-RWs in the front panel display. you change the function by pressing...

Operating Instructions
Page 78
... functions described may work. 1 Press DISPLAY when the system is selected. The options for [SETUP] appear. 1 2 ( 2 7 ) 1 8 ( 3 4 ) : : DVD VIDEO QUICK QUICK CUSTOM RESET BNR 3 Press X/x to select the setup item from the displayed list: [LANGUAGE SETUP], [SCREEN SETUP], [CUSTOM SETUP], or [SPEAKER SETUP]. Displayed items differ depending on the country model. SCREEN SETUP TV TYPE: SCREEN SAVER: BACKGROUND: 4:3 OUTPUT: 4:3 LETTER...
... functions described may work. 1 Press DISPLAY when the system is selected. The options for [SETUP] appear. 1 2 ( 2 7 ) 1 8 ( 3 4 ) : : DVD VIDEO QUICK QUICK CUSTOM RESET BNR 3 Press X/x to select the setup item from the displayed list: [LANGUAGE SETUP], [SCREEN SETUP], [CUSTOM SETUP], or [SPEAKER SETUP]. Displayed items differ depending on the country model. SCREEN SETUP TV TYPE: SCREEN SAVER: BACKGROUND: 4:3 OUTPUT: 4:3 LETTER...

Operating Instructions
Page 79
... Adjustments x [OSD] (On-Screen Display) Switches the display language on the DVD VIDEO. x [SUBTITLE] (DVD VIDEO only) Switches the language of the subtitle recorded on the screen. Select [LANGUAGE SETUP] in the Setup Display. All the settings explained on the disc, the language may not be ...here. 3 Press . x [AUDIO] (DVD VIDEO only) Switches the language of the sound track. To perform the Quick Setup (page 21), press , to return to complete. To use the display, see "Using the Setup Display" (page 78). When you turn the system on -screen display or sound track. Note ...
... Adjustments x [OSD] (On-Screen Display) Switches the display language on the DVD VIDEO. x [SUBTITLE] (DVD VIDEO only) Switches the language of the subtitle recorded on the screen. Select [LANGUAGE SETUP] in the Setup Display. All the settings explained on the disc, the language may not be ...here. 3 Press . x [AUDIO] (DVD VIDEO only) Switches the language of the sound track. To perform the Quick Setup (page 21), press , to return to complete. To use the display, see "Using the Setup Display" (page 78). When you turn the system on -screen display or sound track. Note ...

Operating Instructions
Page 80
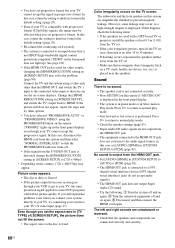
...LETTER BOX] Select this when you select [AUTO] (default), the system outputs video signals of the highest resolution acceptable for your TV/projector, etc. The default settings are suitable for the TV. • When the HDMI indicator on the DVD, [4:3 LETTER BOX] may appear. Displays a wide picture with a ...wide-screen TV or a TV with bands on the country, [720 × 480/576p] may be connected. Settings for the Display [SCREEN SETUP] Choose settings according to the TV to be selected automatically instead of [4:3 PAN SCAN] or vice versa. If the picture is selected and ...
...LETTER BOX] Select this when you select [AUTO] (default), the system outputs video signals of the highest resolution acceptable for your TV/projector, etc. The default settings are suitable for the TV. • When the HDMI indicator on the DVD, [4:3 LETTER BOX] may appear. Displays a wide picture with a ...wide-screen TV or a TV with bands on the country, [720 × 480/576p] may be connected. Settings for the Display [SCREEN SETUP] Choose settings according to the TV to be selected automatically instead of [4:3 PAN SCAN] or vice versa. If the picture is selected and ...

Operating Instructions
Page 81
...or stop mode or while playing a Super Audio CD, CD, DATA CD (MP3 audio), or DATA DVD. [JACKET PICTURE] [GRAPHICS] [BLUE] [BLACK] The jacket picture (still picture) appears, but only...other than 15 minutes. Select this when you cannot change the setting on your TV, not the system. Press any button (e.g., H button) to watch 4:3 aspect ratio progressive signals. Turns off the ... progressive format compatible TV, change the aspect ratio on your TV. A preset picture stored in [SCREEN SETUP] to the standard level. [OFF] Lowers the standard black level. Note • This setting is ...
...or stop mode or while playing a Super Audio CD, CD, DATA CD (MP3 audio), or DATA DVD. [JACKET PICTURE] [GRAPHICS] [BLUE] [BLACK] The jacket picture (still picture) appears, but only...other than 15 minutes. Select this when you cannot change the setting on your TV, not the system. Press any button (e.g., H button) to watch 4:3 aspect ratio progressive signals. Turns off the ... progressive format compatible TV, change the aspect ratio on your TV. A preset picture stored in [SCREEN SETUP] to the standard level. [OFF] Lowers the standard black level. Note • This setting is ...

Operating Instructions
Page 82
... for watching movies at low volume late at the resume point only for up playback related and other settings. x [TRACK SELECTION] (DVD VIDEO only) Gives the sound track which contains the highest number of channels priority when you set up to 48 kHz/ 16 bit ... Outputs audio signals that the recording engineer intended. Compresses dynamic range fully. To use the display, see "Using the Setup Display" (page 78). Converts Dolby Digital, DTS (digital theater system), or 96 kHz/24 bit PCM (pulse code modulation) signals to 40 discs. The default settings are recorded. [...
... for watching movies at low volume late at the resume point only for up playback related and other settings. x [TRACK SELECTION] (DVD VIDEO only) Gives the sound track which contains the highest number of channels priority when you set up to 48 kHz/ 16 bit ... Outputs audio signals that the recording engineer intended. Compresses dynamic range fully. To use the display, see "Using the Setup Display" (page 78). Converts Dolby Digital, DTS (digital theater system), or 96 kHz/24 bit PCM (pulse code modulation) signals to 40 discs. The default settings are recorded. [...
Operating Instructions
Page 83
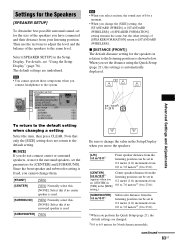
... (0 to 23 ft). [SUBWOOFER] 3.0 m/10 ft1) Subwoofer distance from 0.0 to 7.0 meters2) (0 to 23 ft). 1)When you connect headphones to the system. The default settings are changed. 2)0.0 to 6.9 meters for [CENTER] and [SURROUND]. Note that only the [SIZE] setting does not return to the same ...)] of [SPEAKER FORMATION] setting remains the same, but the other settings of [SPEAKER FORMATION] return to [STANDARD (WIRELESS)]. Select [SPEAKER SETUP] in the Setup Display. x [SIZE] If you do not connect center or surround speakers, or move the speakers. [L/R] 3.0 m/10 ft1) Front speaker...
... (0 to 23 ft). [SUBWOOFER] 3.0 m/10 ft1) Subwoofer distance from 0.0 to 7.0 meters2) (0 to 23 ft). 1)When you connect headphones to the system. The default settings are changed. 2)0.0 to 6.9 meters for [CENTER] and [SURROUND]. Note that only the [SIZE] setting does not return to the same ...)] of [SPEAKER FORMATION] setting remains the same, but the other settings of [SPEAKER FORMATION] return to [STANDARD (WIRELESS)]. Select [SPEAKER SETUP] in the Setup Display. x [SIZE] If you do not connect center or surround speakers, or move the speakers. [L/R] 3.0 m/10 ft1) Front speaker...
Operating Instructions
Page 84
...range, / ** m is displayed (** being the number). indicates over the recommended distance. on the system, or press VOLUME +/- The Control Menu appears. 2 Press X/x to select then press . [SETUP], The options for [SETUP] appear. 3 Press X/x to [ON] for easy adjustment. [L/R] Set this between -15.0 dB...(SURROUND)] The default distance setting for the speakers in relation to the listening position is automatically displayed. When you perform the Quick Setup (page 21), the default settings are changed. ** 0.0 to 6.9 meters for North American models. Be sure to set the ...
...range, / ** m is displayed (** being the number). indicates over the recommended distance. on the system, or press VOLUME +/- The Control Menu appears. 2 Press X/x to select then press . [SETUP], The options for [SETUP] appear. 3 Press X/x to [ON] for easy adjustment. [L/R] Set this between -15.0 dB...(SURROUND)] The default distance setting for the speakers in relation to the listening position is automatically displayed. When you perform the Quick Setup (page 21), the default settings are changed. ** 0.0 to 6.9 meters for North American models. Be sure to set the ...

Operating Instructions
Page 85
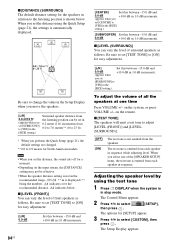
.... "/1 A x 1 Press "/1 to the default settings. Returning to the Default Settings You can return the system parameters, such as preset stations, to turn on the system. 2 Press x, A, and "/1 on the system at the same time. 4 Press X/x repeatedly to select [SPEAKER SETUP], then press or c. 5 Press X/x repeatedly to select [TEST TONE], then press or c. 6 Press X/x repeatedly...
.... "/1 A x 1 Press "/1 to the default settings. Returning to the Default Settings You can return the system parameters, such as preset stations, to turn on the system. 2 Press x, A, and "/1 on the system at the same time. 4 Press X/x repeatedly to select [SPEAKER SETUP], then press or c. 5 Press X/x repeatedly to select [TEST TONE], then press or c. 6 Press X/x repeatedly...
Operating Instructions
Page 88
...; The equipment connected to the HDMI OUT jack does not conform to the audio signal format, in this system are not output from the HDMI OUT jack. • Set [AUDIO (HDMI)] in [CUSTOM SETUP] to [AUTO] or [PCM] (page 82). • The HDMI OUT jack is distorted, change the [HDMI ...• Make sure that the speakers and components are used for video output, changing the [HDMI RESOLUTION] setting in Slow-motion Play mode. However, some DVD programs could affect picture quality. Press H to return to normal play mode. • Fast forward or fast reverse is dirty or flawed. • If...
...; The equipment connected to the HDMI OUT jack does not conform to the audio signal format, in this system are not output from the HDMI OUT jack. • Set [AUDIO (HDMI)] in [CUSTOM SETUP] to [AUTO] or [PCM] (page 82). • The HDMI OUT jack is distorted, change the [HDMI ...• Make sure that the speakers and components are used for video output, changing the [HDMI RESOLUTION] setting in Slow-motion Play mode. However, some DVD programs could affect picture quality. Press H to return to normal play mode. • Fast forward or fast reverse is dirty or flawed. • If...
Operating Instructions
Page 90
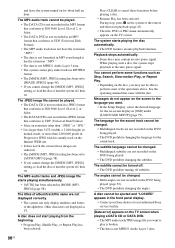
...2,000,000 pixels in MP3 even though it has the extension ".MP3." • The data is not MPEG1 Audio Layer 3 data. • The system cannot play is broken. • The data is not recorded in a JPEG format that conforms to cancel these functions before playing a disc. •... in the front panel display. • Contact your Sony dealer or local authorized Sony service facility. [Data error] appears on the disc, you want . • In the Setup Display, select the desired language for the on the DVD being played. • The DVD prohibits changing the language for the sound track. A ...
...2,000,000 pixels in MP3 even though it has the extension ".MP3." • The data is not MPEG1 Audio Layer 3 data. • The system cannot play is broken. • The data is not recorded in a JPEG format that conforms to cancel these functions before playing a disc. •... in the front panel display. • Contact your Sony dealer or local authorized Sony service facility. [Data error] appears on the disc, you want . • In the Setup Display, select the desired language for the on the DVD being played. • The DVD prohibits changing the language for the sound track. A ...

Operating Instructions
Page 104
...for changing slides during a slide show. [MODE (MP3, JPEG)] (page 58) Selects the data type; Displays the DVD/CD text or the MP3 track name. [SPEAKER FORMATION] (pages 74, 76) Sets the speaker formation./Adjust the level...page 44) Selects the track to play in the order you want. [SHUFFLE] (page 45) Plays the track in [SETUP] to the default setting. [ALBUM] (page 41) Selects the album to be played. [FILE] (page 41) ...sound. [PARENTAL CONTROL] (page 71) Sets to prohibit playback on this system. [SETUP] (page 78) [QUICK] Setup (page 21) Use Quick Setup to be played when playing a DATA CD/DATA...
...for changing slides during a slide show. [MODE (MP3, JPEG)] (page 58) Selects the data type; Displays the DVD/CD text or the MP3 track name. [SPEAKER FORMATION] (pages 74, 76) Sets the speaker formation./Adjust the level...page 44) Selects the track to play in the order you want. [SHUFFLE] (page 45) Plays the track in [SETUP] to the default setting. [ALBUM] (page 41) Selects the album to be played. [FILE] (page 41) ...sound. [PARENTAL CONTROL] (page 71) Sets to prohibit playback on this system. [SETUP] (page 78) [QUICK] Setup (page 21) Use Quick Setup to be played when playing a DATA CD/DATA...

Operating Instructions
Page 105
... MULTI-DISC ON RESUME OFF AUDIO DRC OFF STANDARD MAX AUDIO OFF (HDMI) AUTO PCM SCREEN SETUP TV TYPE HDMI RESOLUTION YCBCR/RGB (HDMI) SCREEN SAVER BACKGROUND BLACK LEVEL BLACK LEVEL (COMPONENT OUT) 4:3 OUTPUT SPEAKER SETUP 16:9 4:3 LETTER BOX SIZE FRONT CENTER 4:3 PAN SCAN SURROUND AUTO 1920 × 1080i 1280 × 720p... you want to use from the actual display. The order of the displayed items may be different from the displayed language list. 105US Additional Information DVD Setup Display List You can set the following items with the...
... MULTI-DISC ON RESUME OFF AUDIO DRC OFF STANDARD MAX AUDIO OFF (HDMI) AUTO PCM SCREEN SETUP TV TYPE HDMI RESOLUTION YCBCR/RGB (HDMI) SCREEN SAVER BACKGROUND BLACK LEVEL BLACK LEVEL (COMPONENT OUT) 4:3 OUTPUT SPEAKER SETUP 16:9 4:3 LETTER BOX SIZE FRONT CENTER 4:3 PAN SCAN SURROUND AUTO 1920 × 1080i 1280 × 720p... you want to use from the actual display. The order of the displayed items may be different from the displayed language list. 105US Additional Information DVD Setup Display List You can set the following items with the...

Operating Instructions
Page 107
... Pro Logic II 94 Dolby Surround Pro Logic 94 DTS 48, 95 DUAL MONO 39 DVD 95 DVD+RW 95 DVD's menu 47 DVD-RW 49, 95 DVI 28 DYNAMIC BASS 69 E EFFECT 59 F Fast forward 40 ... format 95 INTERVAL 58 IR transmitter 23, 25 J JPEG 54, 56 L Language Code List 98 LANGUAGE SETUP 79 Listening to other components 35 Listening to TV sound 36 Locating a specific point by watching the TV... Playback Control (PBC) 96 Program Play 44 PROGRESSIVE AUTO 29 Progressive format 29, 96 PROGRESSIVE VIDEO 29 Q Quick Setup 21 107US Index Numerics 16:9 80 4:3 LETTER BOX 80 4:3 OUTPUT 81 4:3 PAN SCAN 80 5.1 Channel Surround 48...
... Pro Logic II 94 Dolby Surround Pro Logic 94 DTS 48, 95 DUAL MONO 39 DVD 95 DVD+RW 95 DVD's menu 47 DVD-RW 49, 95 DVI 28 DYNAMIC BASS 69 E EFFECT 59 F Fast forward 40 ... format 95 INTERVAL 58 IR transmitter 23, 25 J JPEG 54, 56 L Language Code List 98 LANGUAGE SETUP 79 Listening to other components 35 Listening to TV sound 36 Locating a specific point by watching the TV... Playback Control (PBC) 96 Program Play 44 PROGRESSIVE AUTO 29 Progressive format 29, 96 PROGRESSIVE VIDEO 29 Q Quick Setup 21 107US Index Numerics 16:9 80 4:3 LETTER BOX 80 4:3 OUTPUT 81 4:3 PAN SCAN 80 5.1 Channel Surround 48...

