Operating Instructions
Page 4
...Program 34 (Program Play) Playing in Random Order 36 (Shuffle Play) Playing Repeatedly 37 (Repeat Play) Using the DVD's Menu 38 Changing the Sound 38 Selecting [ORIGINAL] or [PLAY LIST] on a DVD-R/DVD-RW 40 Viewing Information About the Disc 41 Changing the Angles 43 Displaying the ...Stations 53 Listening to the Radio 54 Other Operations Controlling the TV with the Supplied Remote 56 Using the THEATRE SYNC Function 56 Using the Sound Effect 57 Using the Sleep Timer 58 Changing the Brightness of Contents Welcome 3 About This Manual 6 This System Can Play the Following Discs...
...Program 34 (Program Play) Playing in Random Order 36 (Shuffle Play) Playing Repeatedly 37 (Repeat Play) Using the DVD's Menu 38 Changing the Sound 38 Selecting [ORIGINAL] or [PLAY LIST] on a DVD-R/DVD-RW 40 Viewing Information About the Disc 41 Changing the Angles 43 Displaying the ...Stations 53 Listening to the Radio 54 Other Operations Controlling the TV with the Supplied Remote 56 Using the THEATRE SYNC Function 56 Using the Sound Effect 57 Using the Sleep Timer 58 Changing the Brightness of Contents Welcome 3 About This Manual 6 This System Can Play the Following Discs...
Operating Instructions
Page 5
... a Room 62 (SPEAKER FORMATION) Calibrating the Appropriate Settings Automatically 64 (AUTO CALIBRATION) Using the Setup Display 66 Setting the Display or Sound Track Language 68 [LANGUAGE SETUP] Settings for the Display 68 [SCREEN SETUP] Custom Settings 70 [CUSTOM SETUP] Settings for the Speakers 71 [SPEAKER SETUP] Returning ...
... a Room 62 (SPEAKER FORMATION) Calibrating the Appropriate Settings Automatically 64 (AUTO CALIBRATION) Using the Setup Display 66 Setting the Display or Sound Track Language 68 [LANGUAGE SETUP] Settings for the Display 68 [SCREEN SETUP] Custom Settings 70 [CUSTOM SETUP] Settings for the Speakers 71 [SPEAKER SETUP] Returning ...
Operating Instructions
Page 11
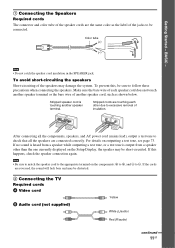
... - 1 Connecting the Speakers Required cords The connector and color tube of the speaker cords are connected correctly. Stripped cords are reversed, the sound will lack bass and may damage the system. Note • Be sure to match the speaker cord to the appropriate terminal on the components...To avoid short-circuiting the speakers Short-circuiting of each other than the one currently displayed on outputting a test tone, see page 73. If no sound is heard from a speaker other due to #. Stripped speaker cord is output from a speaker while outputting a test tone, or a test tone is...
... - 1 Connecting the Speakers Required cords The connector and color tube of the speaker cords are connected correctly. Stripped cords are reversed, the sound will lack bass and may damage the system. Note • Be sure to match the speaker cord to the appropriate terminal on the components...To avoid short-circuiting the speakers Short-circuiting of each other than the one currently displayed on outputting a test tone, see page 73. If no sound is heard from a speaker other due to #. Stripped speaker cord is output from a speaker while outputting a test tone, or a test tone is...

Operating Instructions
Page 12
... • Adjust the direction of the antenna (aerial) is connected firmly by pulling softly. 12GB Tip • When you want to output the TV sound or stereo sound of a 2 channel source from the plastic stand. 2 Set up the antenna (aerial). 1 Remove only the loop part from the 6 speakers, select... the "Dolby Pro Logic," "Dolby Pro Logic II MOVIE," or "Dolby Pro Logic II MUSIC" sound field (page 29). 3 Connecting the Antenna (Aerial) To connect the AM antenna (aerial) Plastic stand (supplied) Antenna (aerial) The shape and the length ...
... • Adjust the direction of the antenna (aerial) is connected firmly by pulling softly. 12GB Tip • When you want to output the TV sound or stereo sound of a 2 channel source from the plastic stand. 2 Set up the antenna (aerial). 1 Remove only the loop part from the 6 speakers, select... the "Dolby Pro Logic," "Dolby Pro Logic II MOVIE," or "Dolby Pro Logic II MUSIC" sound field (page 29). 3 Connecting the Antenna (Aerial) To connect the AM antenna (aerial) Plastic stand (supplied) Antenna (aerial) The shape and the length ...
Operating Instructions
Page 14
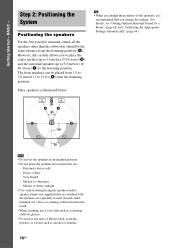
Step 2: Positioning the System Positioning the speakers For the best possible surround sound, all the speakers other than the subwoofer should be placed from 1.0 to 7.0 meters (3 to direct sunlight • Use caution when placing the speakers and/or ...speaker stands (not supplied) that are : - Dusty or dirty - For details, see "Getting Optimal Surround Sound for glasses. • Do not use any type of abrasive pad, scouring powder, or solvent such as illustrated below. Subject to 23 ft) (A) from the...
Step 2: Positioning the System Positioning the speakers For the best possible surround sound, all the speakers other than the subwoofer should be placed from 1.0 to 7.0 meters (3 to direct sunlight • Use caution when placing the speakers and/or ...speaker stands (not supplied) that are : - Dusty or dirty - For details, see "Getting Optimal Surround Sound for glasses. • Do not use any type of abrasive pad, scouring powder, or solvent such as illustrated below. Subject to 23 ft) (A) from the...
Operating Instructions
Page 15
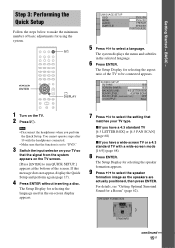
... this message does not appear, display the Quick Setup and perform again (page 17). 4 Press ENTER without inserting a disc. For details, see "Getting Optimal Surround Sound for selecting the speaker formation appears. 9 Press C/c to select the setting that the signal from the system appears on the TV screen. [Press [ENTER] to...
... this message does not appear, display the Quick Setup and perform again (page 17). 4 Press ENTER without inserting a disc. For details, see "Getting Optimal Surround Sound for selecting the speaker formation appears. 9 Press C/c to select the setting that the signal from the system appears on the TV screen. [Press [ENTER] to...
Operating Instructions
Page 16
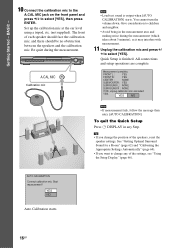
...operations are complete. To quit the Quick Setup Press DISPLAY in the measurement area and making noise during the measurement. See "Getting Optimal Surround Sound for a Room" (page 62) and "Calibrating the Appropriate Settings Automatically" (page 64). • If you change any Step. Tip...? Set up the calibration mic at the ear level using a tripod, etc. (not supplied). A.CAL MIC Calibration mic Note • Loud test sound is finished. Give consideration to change the position of the settings, see "Using the Setup Display" (page 66). Measurement complete. FRONT L : YES...
...operations are complete. To quit the Quick Setup Press DISPLAY in the measurement area and making noise during the measurement. See "Getting Optimal Surround Sound for a Room" (page 62) and "Calibrating the Appropriate Settings Automatically" (page 64). • If you change any Step. Tip...? Set up the calibration mic at the ear level using a tripod, etc. (not supplied). A.CAL MIC Calibration mic Note • Loud test sound is finished. Give consideration to change the position of the settings, see "Using the Setup Display" (page 66). Measurement complete. FRONT L : YES...
Operating Instructions
Page 23
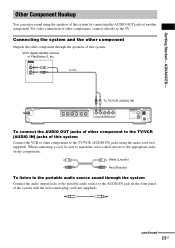
... system with the stereo mini-plug cord (not supplied). When connecting a cord, be sure to match the color-coded sleeves to the portable audio source sound through the speakers of this system by connecting the AUDIO OUT jacks of this system. Other Component Hookup You can enjoy...
... system with the stereo mini-plug cord (not supplied). When connecting a cord, be sure to match the color-coded sleeves to the portable audio source sound through the speakers of this system by connecting the AUDIO OUT jacks of this system. Other Component Hookup You can enjoy...
Operating Instructions
Page 24
Connect the portable audio source. STD" appears in the front panel display. To cancel, select other than "A.F.D. Press SOUND FIELD repeatedly until "A.F.D. Note • Be sure to make connections securely to MP3 format recordings using a portable audio source, you can enhance the sound. Tip • When listening to avoid hum and noise. 24GB STD." Press FUNCTION to select "AUDIO."
Connect the portable audio source. STD" appears in the front panel display. To cancel, select other than "A.F.D. Press SOUND FIELD repeatedly until "A.F.D. Note • Be sure to make connections securely to MP3 format recordings using a portable audio source, you can enhance the sound. Tip • When listening to avoid hum and noise. 24GB STD." Press FUNCTION to select "AUDIO."
Operating Instructions
Page 25
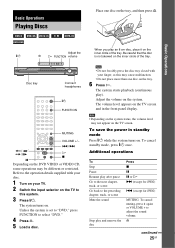
Basic Operations When you play an 8 cm disc, place it again or VOLUME + to adjust the sound volume. The system turns on the system. Note • Do not forcibly press the disc tray closed with your disc. 1 Turn on your finger, as ... on the TV screen and in standby mode Press "/1 while the system turns on the TV to the preceding chapter, track, or scene Mute the sound Stop play ). To save the power in the front panel display. Additional operations To Stop Pause Resume play after pause Go to the next chapter...
Basic Operations When you play an 8 cm disc, place it again or VOLUME + to adjust the sound volume. The system turns on the system. Note • Do not forcibly press the disc tray closed with your disc. 1 Turn on your finger, as ... on the TV screen and in standby mode Press "/1 while the system turns on the TV to the preceding chapter, track, or scene Mute the sound Stop play ). To save the power in the front panel display. Additional operations To Stop Pause Resume play after pause Go to the next chapter...
Operating Instructions
Page 26
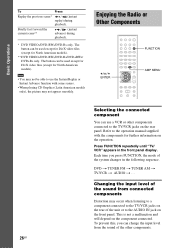
... Selecting the connected component You can change the input level from connected components Distortion may not appear smoothly. Changing the input level of the sound from the sound of the unit or to the AUDIO IN jack on the rear panel. Briefly fast forward the current scene** (instant advance) during playback. Basic...
... Selecting the connected component You can change the input level from connected components Distortion may not appear smoothly. Changing the input level of the sound from the sound of the unit or to the AUDIO IN jack on the rear panel. Briefly fast forward the current scene** (instant advance) during playback. Basic...

Operating Instructions
Page 27
... repeatedly until "ATTENUATE" appears in the front panel display, then press ENTER or c. 4 Press X/x to output the TV sound or stereo sound of sound field, see "TV Hookup (Advanced)" (page 20) and "Other Component Hookup" (page 23). The AMP menu turns off. Basic Operations 1 Press FUNCTION repeatedly... until "TV/ VCR" or "AUDIO" appears in the front panel display. 2 Press AMP MENU. 3 Press X/x repeatedly until the sound field you want appears in the front panel display. The setting is changed. • ATT OFF: normal input level. 5 Press ENTER.
... repeatedly until "ATTENUATE" appears in the front panel display, then press ENTER or c. 4 Press X/x to output the TV sound or stereo sound of sound field, see "TV Hookup (Advanced)" (page 20) and "Other Component Hookup" (page 23). The AMP menu turns off. Basic Operations 1 Press FUNCTION repeatedly... until "TV/ VCR" or "AUDIO" appears in the front panel display. 2 Press AMP MENU. 3 Press X/x repeatedly until the sound field you want appears in the front panel display. The setting is changed. • ATT OFF: normal input level. 5 Press ENTER.
Operating Instructions
Page 28
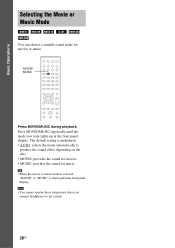
... these setup items when you want lights up in the front panel display. Basic Operations Selecting the Movie or Music Mode You can choose a suitable sound mode for music. Tip • When the movie or music mode is selected, "MOVIE" or "MUSIC" is underlined. • AUTO: selects the mode automatically to... in the front panel display. MOVIE/ MUSIC Press MOVIE/MUSIC during playback. Press MOVIE/MUSIC repeatedly until the mode you connect headphones to produce the sound effect depending on the disc. • MOVIE: provides the...
... these setup items when you want lights up in the front panel display. Basic Operations Selecting the Movie or Music Mode You can choose a suitable sound mode for music. Tip • When the movie or music mode is selected, "MOVIE" or "MUSIC" is underlined. • AUTO: selects the mode automatically to... in the front panel display. MOVIE/ MUSIC Press MOVIE/MUSIC during playback. Press MOVIE/MUSIC repeatedly until the mode you connect headphones to produce the sound effect depending on the disc. • MOVIE: provides the...
Operating Instructions
Page 29
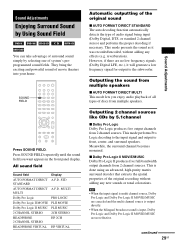
... HP 2CH HEADPHONE VIRTUAL HP VIRTUAL Outputting 2 channel sources like CDs by selecting one of the original recording without adding any new sounds or tonal colorations. continued 29GB Note • When the input signal is multi channel source, Dolby Pro Logic and Dolby Pro ...to front, center, and surround speakers. reverberation). However, if there are not effective. Meanwhile, the surround channel becomes monaural. Outputting the sound from multiple speakers. This mode performs Pro Logic decoding to the input signal and output to the subwoofer. x Dolby Pro Logic II ...
... HP 2CH HEADPHONE VIRTUAL HP VIRTUAL Outputting 2 channel sources like CDs by selecting one of the original recording without adding any new sounds or tonal colorations. continued 29GB Note • When the input signal is multi channel source, Dolby Pro Logic and Dolby Pro ...to front, center, and surround speakers. reverberation). However, if there are not effective. Meanwhile, the surround channel becomes monaural. Outputting the sound from multiple speakers. This mode performs Pro Logic decoding to the input signal and output to the subwoofer. x Dolby Pro Logic II ...
Operating Instructions
Page 30
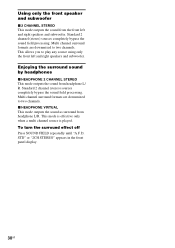
.... STD" or "2CH STEREO" appears in the front panel display. 30GB Enjoying the surround sound by headphones x HEADPHONE 2 CHANNEL STEREO This mode outputs the sound from headphone L/R. Multi channel surround formats are downmixed to two channels. To turn the surround ...subwoofer x 2 CHANNEL STEREO This mode outputs the sound from the front left and right speakers and subwoofer. x HEADPHONE VIRTUAL This mode outputs the sound as surround from headphone L/ R. Standard 2 channel (stereo) sources completely bypass the sound field processing. Standard 2 channel (stereo) sources ...
.... STD" or "2CH STEREO" appears in the front panel display. 30GB Enjoying the surround sound by headphones x HEADPHONE 2 CHANNEL STEREO This mode outputs the sound from headphone L/R. Multi channel surround formats are downmixed to two channels. To turn the surround ...subwoofer x 2 CHANNEL STEREO This mode outputs the sound from the front left and right speakers and subwoofer. x HEADPHONE VIRTUAL This mode outputs the sound as surround from headphone L/ R. Standard 2 channel (stereo) sources completely bypass the sound field processing. Standard 2 channel (stereo) sources ...

Operating Instructions
Page 37
...; When playing a DATA CD/DATA DVD which contains MP3 audio track and JPEG image files, and their playing time are not the same, the audio sound will not match the image. • When [MODE (MP3, JPEG)] is selected. The Control Menu appears. 2 Press X/x to be repeated. The default setting is turned...
...; When playing a DATA CD/DATA DVD which contains MP3 audio track and JPEG image files, and their playing time are not the same, the audio sound will not match the image. • When [MODE (MP3, JPEG)] is selected. The Control Menu appears. 2 Press X/x to be repeated. The default setting is turned...
Operating Instructions
Page 38
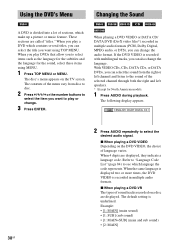
...DIGITAL 3/2.1 38GB 2 Press AUDIO repeatedly to see which language the code represents. Example: • [1: MAIN] (main sound) • [1: SUB] (sub sound) • [1: MAIN+SUB] (main and sub sound) • [2: MAIN] If the DVD VIDEO is divided into a lot of sections, which contains several titles, ...audio format. Refer to "Language Code List" (page 84) to select the desired audio signal. x When playing a DVD-VR The types of sound tracks recorded on a disc are displayed, they indicate a language code. These sections are called "titles." When you play or change. 3 Press ...
...DIGITAL 3/2.1 38GB 2 Press AUDIO repeatedly to see which language the code represents. Example: • [1: MAIN] (main sound) • [1: SUB] (sub sound) • [1: MAIN+SUB] (main and sub sound) • [2: MAIN] If the DVD VIDEO is divided into a lot of sections, which contains several titles, ...audio format. Refer to "Language Code List" (page 84) to select the desired audio signal. x When playing a DVD-VR The types of sound tracks recorded on a disc are displayed, they indicate a language code. These sections are called "titles." When you play or change. 3 Press ...
Operating Instructions
Page 39
... audio), or DATA DVD (MP3 audio) The default setting is underlined. • [STEREO]: the standard stereo sound • [1/L]: the sound of the left channel of the audio track 2 (monaural) • [2:2/R]: the sound of the right channel of the audio track 2 (monaural) Note • While playing a Super VCD on which... the audio track 2 is shown in the display. The format is not recorded, no sound will come out when you press AUDIO repeatedly during playback, the format of DATA CD or DATA DVD audio signal formats differ, depending on the...
... audio), or DATA DVD (MP3 audio) The default setting is underlined. • [STEREO]: the standard stereo sound • [1/L]: the sound of the left channel of the audio track 2 (monaural) • [2:2/R]: the sound of the right channel of the audio track 2 (monaural) Note • While playing a Super VCD on which... the audio track 2 is shown in the display. The format is not recorded, no sound will come out when you press AUDIO repeatedly during playback, the format of DATA CD or DATA DVD audio signal formats differ, depending on the...

Operating Instructions
Page 40
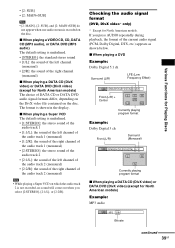
You can be played. 1 Press DISPLAY when the system is in a disc contain the sound elements (channels) shown below. The default setting is output from [ORIGINAL] for [ORIGINAL/PLAY LIST] appear. 1 (44) 3 ( 28) T 1:30:50 PLAY LIST ...8226; Front (L) • Front (R) • Center • Surround (L) • Surround (R) • Surround (Monaural): This signal can be either the Dolby Surround Sound processed signals or the Dolby Digital sound's monaural Surround audio signals. • LFE (Low Frequency Effect) signal Selecting [ORIGINAL] or [PLAY LIST] on a DVD-R/ DVD-RW Some DVD-Rs...
You can be played. 1 Press DISPLAY when the system is in a disc contain the sound elements (channels) shown below. The default setting is output from [ORIGINAL] for [ORIGINAL/PLAY LIST] appear. 1 (44) 3 ( 28) T 1:30:50 PLAY LIST ...8226; Front (L) • Front (R) • Center • Surround (L) • Surround (R) • Surround (Monaural): This signal can be either the Dolby Surround Sound processed signals or the Dolby Digital sound's monaural Surround audio signals. • LFE (Low Frequency Effect) signal Selecting [ORIGINAL] or [PLAY LIST] on a DVD-R/ DVD-RW Some DVD-Rs...
Operating Instructions
Page 44
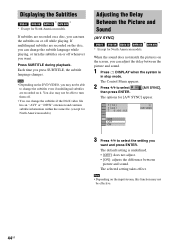
... on the DVD VIDEO, you may not be able to turn the subtitles on the screen, you can adjust the delay between the picture and sound. 1 Press DISPLAY when the system is underlined. • [OFF]: does not adjust. • [ON]: adjusts the difference between picture and... sound. You also may not be able to change the subtitles if the DivX video file has an ".AVI" or ".DIVX" extension and contains subtitle information ...
... on the DVD VIDEO, you may not be able to turn the subtitles on the screen, you can adjust the delay between the picture and sound. 1 Press DISPLAY when the system is underlined. • [OFF]: does not adjust. • [ON]: adjusts the difference between picture and... sound. You also may not be able to change the subtitles if the DivX video file has an ".AVI" or ".DIVX" extension and contains subtitle information ...


