
Limited Warranty (US Only)
Page 1
... Components/Tape Decks ® CD Players/Mini Disc Players/Audio Systems Hifi Audio LIMITED WARRANTY Sony Electronics Inc. ("Sony") warrants this Product is determined to be presented to any Sony authorized service facility. After the warranty period, you , or for all parts costs. 3. Some states do not allow the exclusion or limitation of a service problem, or for all labor charges. 2. PARTS: In addition, Sony will repair or replace...
... Components/Tape Decks ® CD Players/Mini Disc Players/Audio Systems Hifi Audio LIMITED WARRANTY Sony Electronics Inc. ("Sony") warrants this Product is determined to be presented to any Sony authorized service facility. After the warranty period, you , or for all parts costs. 3. Some states do not allow the exclusion or limitation of a service problem, or for all labor charges. 2. PARTS: In addition, Sony will repair or replace...
Operating Instructions
Page 2
... FCC Rules. Owner's Record The model and serial numbers are located at the rear of time. Connect the equipment into the cabinet, unplug the unit and have it checked by the cord. The use of cable entry as it is connected to the wall outlet (mains), even if the unit itself has been turned off and on, the user is provided to...
... FCC Rules. Owner's Record The model and serial numbers are located at the rear of time. Connect the equipment into the cabinet, unplug the unit and have it checked by the cord. The use of cable entry as it is connected to the wall outlet (mains), even if the unit itself has been turned off and on, the user is provided to...
Operating Instructions
Page 4
... 2: Connecting the System and TV 13 Step 3: Positioning the System ...18 Step 4: Performing the Quick Setup 19 Getting Started - ADVANCED - Turning off the Demonstration 22 Installing the Speakers on a Wall.......... 23 TV Hookup (Advanced 24 Other Component Hookup 28 Basic Operations Playing Discs 30 Enjoying the Radio or Other Components 32 Enjoying TV or VCR Sound from All Speakers 33 Selecting the Movie or Music Mode 33 Sound Adjustments Enjoying Surround Sound by Using Sound Field 34 Various Functions...
... 2: Connecting the System and TV 13 Step 3: Positioning the System ...18 Step 4: Performing the Quick Setup 19 Getting Started - ADVANCED - Turning off the Demonstration 22 Installing the Speakers on a Wall.......... 23 TV Hookup (Advanced 24 Other Component Hookup 28 Basic Operations Playing Discs 30 Enjoying the Radio or Other Components 32 Enjoying TV or VCR Sound from All Speakers 33 Selecting the Movie or Music Mode 33 Sound Adjustments Enjoying Surround Sound by Using Sound Field 34 Various Functions...
Operating Instructions
Page 5
... (AUTO CALIBRATION) Using the Setup Display 71 Setting the Display or Sound Track Language 73 [LANGUAGE SETUP] Settings for the Display 73 [SCREEN SETUP] Custom Settings 75 [CUSTOM SETUP] Settings for the Speakers 76 [SPEAKER SETUP] Returning to the Default Settings.......... 79 Additional Information Precautions 80 Notes about the Discs 81 Troubleshooting 81 Self-diagnosis Function 85 (When letters/numbers appear in the display) Specifications 85 Glossary 87 Language Code List 91 Index to Parts and Controls 92 Guide to the Control Menu Display...
... (AUTO CALIBRATION) Using the Setup Display 71 Setting the Display or Sound Track Language 73 [LANGUAGE SETUP] Settings for the Display 73 [SCREEN SETUP] Custom Settings 75 [CUSTOM SETUP] Settings for the Speakers 76 [SPEAKER SETUP] Returning to the Default Settings.......... 79 Additional Information Precautions 80 Notes about the Discs 81 Troubleshooting 81 Self-diagnosis Function 85 (When letters/numbers appear in the display) Specifications 85 Glossary 87 Language Code List 91 Index to Parts and Controls 92 Guide to the Control Menu Display...
Operating Instructions
Page 20
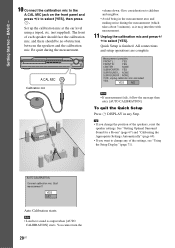
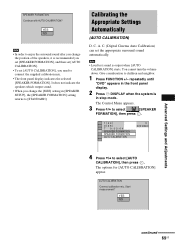
A.CAL MIC Calibration mic volume down. To quit the Quick Setup Press DISPLAY in the measurement area and making noise during the measurement. YES NO Auto Calibration starts. The front of the speakers, reset the speaker settings. All connections and setup operations are complete. AUTO CALIBRATION Connect calibration mic. You cannot turn the 20US Measurement complete. FRONT L : YES FRONT R : YES CENTER : NONE SUBWOOFER : YES SURROUND L : NONE SURROUND R : NONE If OK, unplug calibration mic and select YES. See "Getting Optimal Surround Sound for a Room...
A.CAL MIC Calibration mic volume down. To quit the Quick Setup Press DISPLAY in the measurement area and making noise during the measurement. YES NO Auto Calibration starts. The front of the speakers, reset the speaker settings. All connections and setup operations are complete. AUTO CALIBRATION Connect calibration mic. You cannot turn the 20US Measurement complete. FRONT L : YES FRONT R : YES CENTER : NONE SUBWOOFER : YES SURROUND L : NONE SURROUND R : NONE If OK, unplug calibration mic and select YES. See "Getting Optimal Surround Sound for a Room...
Operating Instructions
Page 34
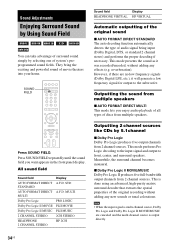
... types of audio signal being input (Dolby Digital, DTS, or standard 2 channel stereo) and performs the proper decoding if necessary. They bring the exciting and powerful sound of system's preprogrammed sound fields. This mode presents the sound as it will generate a low frequency signal for output to front, center, and surround speakers. Sound Adjustments Enjoying Surround Sound by Using Sound Field You can take advantage of surround sound simply by 5.1channel x Dolby Pro Logic Dolby Pro Logic produces five output channels from 2 channel sources.
... types of audio signal being input (Dolby Digital, DTS, or standard 2 channel stereo) and performs the proper decoding if necessary. They bring the exciting and powerful sound of system's preprogrammed sound fields. This mode presents the sound as it will generate a low frequency signal for output to front, center, and surround speakers. Sound Adjustments Enjoying Surround Sound by Using Sound Field You can take advantage of surround sound simply by 5.1channel x Dolby Pro Logic Dolby Pro Logic produces five output channels from 2 channel sources.
Operating Instructions
Page 39
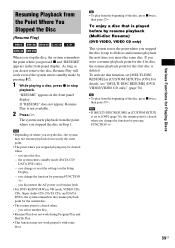
... not remove the disc, Resume Play will work even if the system enters standby mode by pressing FUNCTION +/-. - you stopped playing may not work during Program Play and Shuffle Play. • This function may be cleared when: - Tip • To play from exactly the same point. • The point where you select another disc. • Resume Play does not work properly with some discs. Note • If [MULTI-DISC RESUME] in [CUSTOM SETUP...
... not remove the disc, Resume Play will work even if the system enters standby mode by pressing FUNCTION +/-. - you stopped playing may not work during Program Play and Shuffle Play. • This function may be cleared when: - Tip • To play from exactly the same point. • The point where you select another disc. • Resume Play does not work properly with some discs. Note • If [MULTI-DISC RESUME] in [CUSTOM SETUP...
Operating Instructions
Page 57
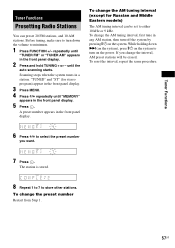
... stereo program) appear in the front panel display. 3 Press MENU. 4 Press X/x repeatedly until the auto scanning starts. To reset the interval, repeat the same procedure. 6 Press X/x to select the preset number you change the preset number Restart from Step 1. 57US until "MEMORY" appears in the front panel display. 2 Press and hold TUNING + or - Tuner Functions Tuner Functions Presetting Radio Stations You can be erased. "TUNED" and "ST" (for Russian and Middle Eastern models) The AM tuning...
... stereo program) appear in the front panel display. 3 Press MENU. 4 Press X/x repeatedly until the auto scanning starts. To reset the interval, repeat the same procedure. 6 Press X/x to select the preset number you change the preset number Restart from Step 1. 57US until "MEMORY" appears in the front panel display. 2 Press and hold TUNING + or - Tuner Functions Tuner Functions Presetting Radio Stations You can be erased. "TUNED" and "ST" (for Russian and Middle Eastern models) The AM tuning...
Operating Instructions
Page 61
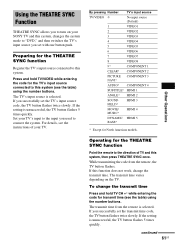
... TV button flashes. Preparing for the THEATRE SYNC function Point the remote to the direction of your TV's input to connect the system. If the setting is unsuccessful, the TV button flashes 5 times quickly. For details, see the table) using the number buttons. If the setting is unsuccessful, the TV button flashes 5 times quickly. If this function does not work, change the transmit time Press and hold TV/VIDEO while entering the code for the TV's input source connected...
... TV button flashes. Preparing for the THEATRE SYNC function Point the remote to the direction of your TV's input to connect the system. If the setting is unsuccessful, the TV button flashes 5 times quickly. For details, see the table) using the number buttons. If the setting is unsuccessful, the TV button flashes 5 times quickly. If this function does not work, change the transmit time Press and hold TV/VIDEO while entering the code for the TV's input source connected...
Operating Instructions
Page 69
... the system is output when [AUTO CALIBRATION] starts. AUTO CALIBRATION Connect calibration mic. Advanced Settings and Adjustments SPEAKER FORMATION Continue with AUTO CALIBRATION? It does not indicate the speakers which output sound. • When you need to enjoy the surround sound after you change the [SIZE] setting in stop mode. C. The Control Menu appears. 3 Press X/x to select [SPEAKER FORMATION], then press . 1 ( 4 4 ) 3 ( 2 8 ) T 0:03:04 SPEAKER FORMATION SPEAKER FORMATION AUTO CALIBRATION DVD VIDEO 4 Press X/x to children and neighbor. 1 Press FUNCTION...
... the system is output when [AUTO CALIBRATION] starts. AUTO CALIBRATION Connect calibration mic. Advanced Settings and Adjustments SPEAKER FORMATION Continue with AUTO CALIBRATION? It does not indicate the speakers which output sound. • When you need to enjoy the surround sound after you change the [SIZE] setting in stop mode. C. The Control Menu appears. 3 Press X/x to select [SPEAKER FORMATION], then press . 1 ( 4 4 ) 3 ( 2 8 ) T 0:03:04 SPEAKER FORMATION SPEAKER FORMATION AUTO CALIBRATION DVD VIDEO 4 Press X/x to children and neighbor. 1 Press FUNCTION...
Operating Instructions
Page 73
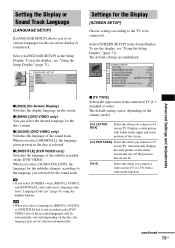
... LEVEL (COMPONENT OUT): OFF 4:3 OUTPUT: FULL Advanced Settings and Adjustments x [OSD] (On-Screen Display) Switches the display language on the DVD VIDEO. The default setting varies, depending on the country model. [4:3 LETTER BOX] Select this when you connect a wide-screen TV or a TV with bands on the disc, the language may not be connected. Displays a wide picture with a wide mode function. Setting the Display or Sound Track Language [LANGUAGE SETUP] [LANGUAGE SETUP] allows you selected for the sound track. Select [LANGUAGE SETUP] in [MENU], [AUDIO...
... LEVEL (COMPONENT OUT): OFF 4:3 OUTPUT: FULL Advanced Settings and Adjustments x [OSD] (On-Screen Display) Switches the display language on the DVD VIDEO. The default setting varies, depending on the country model. [4:3 LETTER BOX] Select this when you connect a wide-screen TV or a TV with bands on the disc, the language may not be connected. Displays a wide picture with a wide mode function. Setting the Display or Sound Track Language [LANGUAGE SETUP] [LANGUAGE SETUP] allows you selected for the sound track. Select [LANGUAGE SETUP] in [MENU], [AUDIO...

Operating Instructions
Page 75
... use the display, see "Using the Setup Display" (page 71). Priority given. Advanced Settings and Adjustments [AUTO] [FRAME] The picture, including subjects that this when you can change the aspect ratio on your progressive format compatible TV, change the aspect ratio on left and right sides of the output signal to the standard level. Normally select this to [AUTO], the language may not work.) • If PCM, DTS, Dolby Digital sound, and MPEG audio...
... use the display, see "Using the Setup Display" (page 71). Priority given. Advanced Settings and Adjustments [AUTO] [FRAME] The picture, including subjects that this when you can change the aspect ratio on your progressive format compatible TV, change the aspect ratio on left and right sides of the output signal to the standard level. Normally select this to [AUTO], the language may not work.) • If PCM, DTS, Dolby Digital sound, and MPEG audio...
Operating Instructions
Page 76
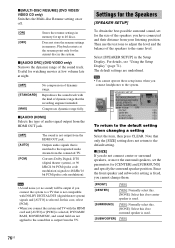
... to adjust the level and the balance of the sound track. x [AUDIO DRC] (DVD VIDEO only) Narrows the dynamic range of the speakers to the requested audio stream from the connected TV. Compresses dynamic range fully. Converts Dolby Digital, DTS (digital theater system), or 96 kHz/24 bit PCM (pulse code modulation) signals to the default setting when changing a setting Select the item, then press CLEAR. Outputs audio signals that is not compatible with DOLBY DIGITAL/DTS (digital theater system) signals and [AUTO...
... to adjust the level and the balance of the sound track. x [AUDIO DRC] (DVD VIDEO only) Narrows the dynamic range of the speakers to the requested audio stream from the connected TV. Compresses dynamic range fully. Converts Dolby Digital, DTS (digital theater system), or 96 kHz/24 bit PCM (pulse code modulation) signals to the default setting when changing a setting Select the item, then press CLEAR. Outputs audio signals that is not compatible with DOLBY DIGITAL/DTS (digital theater system) signals and [AUTO...
Operating Instructions
Page 81
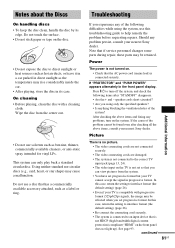
... not set progressive format but your nearest Sony dealer. Press "/1 to help remedy the problem before requesting repairs. If the cause of the problem cannot be retained. Power The power is connected securely. continued 81US Do not use this troubleshooting guide to turn on the TV is compatible with a cleaning cloth. Note that the AC power cord (mains lead) is not turned on the front panel does not light up). speaker cords...
... not set progressive format but your nearest Sony dealer. Press "/1 to help remedy the problem before requesting repairs. If the cause of the problem cannot be retained. Power The power is connected securely. continued 81US Do not use this troubleshooting guide to turn on the TV is compatible with a cleaning cloth. Note that the AC power cord (mains lead) is not turned on the front panel does not light up). speaker cords...
Operating Instructions
Page 82
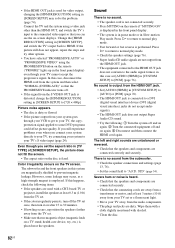
... (DVI (digital visual interface) jacks do not accept audio signals). • The HDMI OUT jack does not output Super Audio CD sound. • Try the following items: • If the speakers are used with alcohol. • Clean the disc. 82US Connect the TV and the system using a video jack other options. • You have selected "PROGRESSIVE AUTO" or "PROGRESSIVE VIDEO" using the PROGRESSIVE button on the remote ("PROGRE" lights up in the front panel display) even...
... (DVI (digital visual interface) jacks do not accept audio signals). • The HDMI OUT jack does not output Super Audio CD sound. • Try the following items: • If the speakers are used with alcohol. • Clean the disc. 82US Connect the TV and the system using a video jack other options. • You have selected "PROGRESSIVE AUTO" or "PROGRESSIVE VIDEO" using the PROGRESSIVE button on the remote ("PROGRE" lights up in the front panel display) even...
Operating Instructions
Page 83
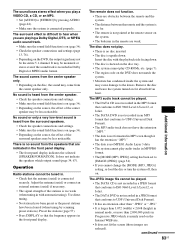
... the disc or turn the system off, then on the disc, the sound may be tuned in the front panel display. • The front panel display indicates the selected [SPEAKER FORMATION]. The surround effect is difficult to [STEREO] by scanning preset stations). No sound or only a very low-level sound is heard from the center speaker. • Check the speaker connections and settings. • Make sure the sound field function is on (page 34). • Depending on the DVD, the output signal...
... the disc or turn the system off, then on the disc, the sound may be tuned in the front panel display. • The front panel display indicates the selected [SPEAKER FORMATION]. The surround effect is difficult to [STEREO] by scanning preset stations). No sound or only a very low-level sound is heard from the center speaker. • Check the speaker connections and settings. • Make sure the sound field function is on (page 34). • Depending on the DVD, the output signal...
Operating Instructions
Page 88
... of stereo rear channel and there is the same size as television dramas or sit-coms, displays images at movie theaters. The surround speakers output monaural sound. Furthermore, various advanced functions such as HDMI equipped TVs, in digitally. Film based software, Video based software DVDs can be connected to enjoy more precisely. To take full advantage of Dolby Surround Pro Logic, you to DVI (digital visual interface) jacks by Digital Theater Systems, Inc. DVD-RW A DVD...
... of stereo rear channel and there is the same size as television dramas or sit-coms, displays images at movie theaters. The surround speakers output monaural sound. Furthermore, various advanced functions such as HDMI equipped TVs, in digitally. Film based software, Video based software DVDs can be connected to enjoy more precisely. To take full advantage of Dolby Surround Pro Logic, you to DVI (digital visual interface) jacks by Digital Theater Systems, Inc. DVD-RW A DVD...
Operating Instructions
Page 99
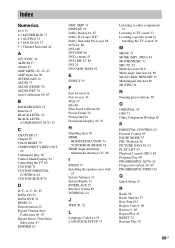
... 8 Multi-angle function 48, 89 MULTI-DISC RESUME 76 Multilingual function 89 MUTING 31 N Naming preset stations 58 O ORIGINAL 45 OSD 73 Other Component Hookup 28 P PARENTAL CONTROL 65 Parental Control 89 PAUSE MODE 75 PBC Playback 56 PICTURE NAVI 38, 52 PLAY LIST 45 Playback Control (PBC) 89 Program Play 40 PROGRESSIVE AUTO 26 Progressive format 26, 89 PROGRESSIVE VIDEO 26 Q Quick Setup 19 R Radio 58 Radio Stations 57 Rear Panel 92 Region Code 8, 89 Remote 9, 60 Repeat Play 42 RESET...
... 8 Multi-angle function 48, 89 MULTI-DISC RESUME 76 Multilingual function 89 MUTING 31 N Naming preset stations 58 O ORIGINAL 45 OSD 73 Other Component Hookup 28 P PARENTAL CONTROL 65 Parental Control 89 PAUSE MODE 75 PBC Playback 56 PICTURE NAVI 38, 52 PLAY LIST 45 Playback Control (PBC) 89 Program Play 40 PROGRESSIVE AUTO 26 Progressive format 26, 89 PROGRESSIVE VIDEO 26 Q Quick Setup 19 R Radio 58 Radio Stations 57 Rear Panel 92 Region Code 8, 89 Remote 9, 60 Repeat Play 42 RESET...

Marketing Specifications
Page 1
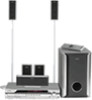
Key Features 5 Disc DVD/CD/SACD Player with HDMI™ Output 1000 Watts-143WattsX5 (1kHz,
Key Features 5 Disc DVD/CD/SACD Player with HDMI™ Output 1000 Watts-143WattsX5 (1kHz,
Marketing Specifications
Page 2
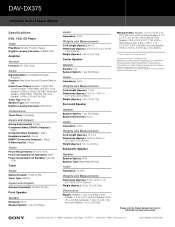
.... DAV-DX375 Integrated Home Theater System Specifications DVD, VCD, CD Player Video Play Mode: Shuffle, Program, Repeat Digital-to-Analog Converter: 108MHz/12bit Amplifier General Function: CD, DVD, Audio Audio Digital Amplifier: Yes (S-Master® Digital Amplifier) Equalizer: Bass Boost function (Dynamic Bass on RM) Audio Power Output: Amplifier: 1000W Total, Center Speaker: 143W (1KHz 10%THD), Front Speaker: 143W x 2 (1KHz 10%THD), Subwoofer Speaker: 285W (1KHz 10%THD), Surround Speaker: 143W x 2 (1KHz 10%THD) Tuner Type: AM, FM Speaker Type: DAV Connector Digital-to change without...
.... DAV-DX375 Integrated Home Theater System Specifications DVD, VCD, CD Player Video Play Mode: Shuffle, Program, Repeat Digital-to-Analog Converter: 108MHz/12bit Amplifier General Function: CD, DVD, Audio Audio Digital Amplifier: Yes (S-Master® Digital Amplifier) Equalizer: Bass Boost function (Dynamic Bass on RM) Audio Power Output: Amplifier: 1000W Total, Center Speaker: 143W (1KHz 10%THD), Front Speaker: 143W x 2 (1KHz 10%THD), Subwoofer Speaker: 285W (1KHz 10%THD), Surround Speaker: 143W x 2 (1KHz 10%THD) Tuner Type: AM, FM Speaker Type: DAV Connector Digital-to change without...


