
Child Safety: It Makes A Difference Where Your TV Stands
Page 1
.... Child Safety: It Makes A Difference Where Your TV Stands The Issue If you are improperly secured or inappropriately situated on dressers, bookcases, shelves, desks, audio speakers, chests or carts. As a result, TV sets may cause unnecessary injury. The industry is a Sector of the International CES® and is committed to advocate...
.... Child Safety: It Makes A Difference Where Your TV Stands The Issue If you are improperly secured or inappropriately situated on dressers, bookcases, shelves, desks, audio speakers, chests or carts. As a result, TV sets may cause unnecessary injury. The industry is a Sector of the International CES® and is committed to advocate...
Operating Instructions (Main Stereo System)
Page 4
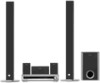
... Discs 6 Guide to the Control Menu Display........ 9 Getting Started Unpacking 12 Inserting Batteries into the Remote....... 12 Hookup Overview 13 Step 1: Speaker System Hookup........... 14 Step 2: Antenna (Aerial) Hookup ......... 20 Step 3: TV Hookup 21 Step 4: Other Component Hookup........ 25 Step 5: Connecting ...6: Turning off the Demonstration 27 Step 7: Performing the Quick Setup ..... 28 Speaker Setup 30 Playing Discs Playing Discs 31 Using the DVD's Menu 36 Selecting [ORIGINAL] or [PLAY LIST] on a DVD-RW 37 Playing VIDEO CDs with PBC Functions (Ver.2.0 37 (PBC Playback) ...
... Discs 6 Guide to the Control Menu Display........ 9 Getting Started Unpacking 12 Inserting Batteries into the Remote....... 12 Hookup Overview 13 Step 1: Speaker System Hookup........... 14 Step 2: Antenna (Aerial) Hookup ......... 20 Step 3: TV Hookup 21 Step 4: Other Component Hookup........ 25 Step 5: Connecting ...6: Turning off the Demonstration 27 Step 7: Performing the Quick Setup ..... 28 Speaker Setup 30 Playing Discs Playing Discs 31 Using the DVD's Menu 36 Selecting [ORIGINAL] or [PLAY LIST] on a DVD-RW 37 Playing VIDEO CDs with PBC Functions (Ver.2.0 37 (PBC Playback) ...

Operating Instructions (Main Stereo System)
Page 11
.../chapter/track/album repeatedly. [A/V SYNC] (page 44) Adjusts the delay between the picture and sound. [PARENTAL CONTROL] (page 59) Sets to prohibit playback on this system. [SETUP] (page 70) [QUICK] Setup (page 28) Use Quick Setup to choose the desired language of the on the screen. [EFFECT] (page 44) Selects ...the effects to be used for which the slides are displayed on -screen display, the aspect ratio of the TV, and the size of the speakers you are using. [CUSTOM] Setup In addition to the Quick Setup setting, you can adjust various other settings. [RESET] Returns the settings in green ...
.../chapter/track/album repeatedly. [A/V SYNC] (page 44) Adjusts the delay between the picture and sound. [PARENTAL CONTROL] (page 59) Sets to prohibit playback on this system. [SETUP] (page 70) [QUICK] Setup (page 28) Use Quick Setup to choose the desired language of the on the screen. [EFFECT] (page 44) Selects ...the effects to be used for which the slides are displayed on -screen display, the aspect ratio of the TV, and the size of the speakers you are using. [CUSTOM] Setup In addition to the Quick Setup setting, you can adjust various other settings. [RESET] Returns the settings in green ...
Operating Instructions (Main Stereo System)
Page 12
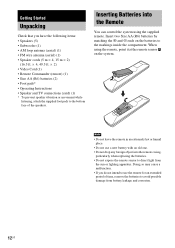
...8226; Remote Commander (remote) (1) • Size AA (R6) batteries (2) • Foot pads* • Operating Instructions • Speaker and TV connections (card) (1) * To prevent speaker vibration or movement while listening, attach the supplied foot pads to direct light from battery leakage and corrosion. 12US Insert two Size... AA (R6) batteries by matching the 3 and # ends on the system. Getting Started Unpacking Check ...
...8226; Remote Commander (remote) (1) • Size AA (R6) batteries (2) • Foot pads* • Operating Instructions • Speaker and TV connections (card) (1) * To prevent speaker vibration or movement while listening, attach the supplied foot pads to direct light from battery leakage and corrosion. 12US Insert two Size... AA (R6) batteries by matching the 3 and # ends on the system. Getting Started Unpacking Check ...
Operating Instructions (Main Stereo System)
Page 13
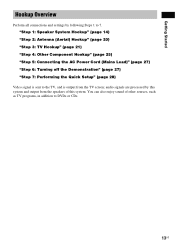
audio signals are processed by following Steps 1 to DVDs or CDs. 13US Getting Started Hookup Overview Perform all connections and settings by this system. "Step 1: Speaker System Hookup" (page 14) "Step 2: Antenna (Aerial) Hookup" (page 20) "Step 3: TV Hookup" (page 21) "Step 4: Other Component Hookup" (page 25) "Step 5: Connecting the AC ... Turning off the Demonstration" (page 27) "Step 7: Performing the Quick Setup" (page 28) Video signal is sent to the TV, and is output from the speakers of other sources, such as TV programs, in addition to 7. You can also enjoy sound of this...
audio signals are processed by following Steps 1 to DVDs or CDs. 13US Getting Started Hookup Overview Perform all connections and settings by this system. "Step 1: Speaker System Hookup" (page 14) "Step 2: Antenna (Aerial) Hookup" (page 20) "Step 3: TV Hookup" (page 21) "Step 4: Other Component Hookup" (page 25) "Step 5: Connecting the AC ... Turning off the Demonstration" (page 27) "Step 7: Performing the Quick Setup" (page 28) Video signal is sent to the TV, and is output from the speakers of other sources, such as TV programs, in addition to 7. You can also enjoy sound of this...

Operating Instructions (Main Stereo System)
Page 14
Step 1: Speaker System Hookup Connect the supplied speaker system using the supplied speaker cords by matching the colors of the jacks to be connected. Gray (+) (+) (-) Color tube (-) Black 14US Required cords Speaker cords The connector and the color tube of the speaker cords are the same color as the label of the cords. Do not connect any speakers other than those of the jacks to those supplied with this system. To obtain the best possible surround sound, specify the speaker parameters (distance, level, etc.) on page 75.
Step 1: Speaker System Hookup Connect the supplied speaker system using the supplied speaker cords by matching the colors of the jacks to be connected. Gray (+) (+) (-) Color tube (-) Black 14US Required cords Speaker cords The connector and the color tube of the speaker cords are the same color as the label of the cords. Do not connect any speakers other than those of the jacks to those supplied with this system. To obtain the best possible surround sound, specify the speaker parameters (distance, level, etc.) on page 75.
Operating Instructions (Main Stereo System)
Page 15
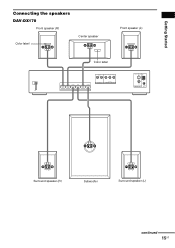
Getting Started Connecting the speakers DAV-DX170 Front speaker (R) Color label Center speaker Front speaker (L) Color label FRONT R FRONT L SURR R SURR L CENTER WOOFER SPEAKER AUDIO IN Y PB/CB PR/CR R L VIDEO/SAT DVD ONLY COMPONENT VIDEO OUT S VIDEO (DVD ONLY) AM VIDEO MONITOR OUT COAXIAL FM 75 Surround speaker (R) Subwoofer Surround speaker (L) continued 15US
Getting Started Connecting the speakers DAV-DX170 Front speaker (R) Color label Center speaker Front speaker (L) Color label FRONT R FRONT L SURR R SURR L CENTER WOOFER SPEAKER AUDIO IN Y PB/CB PR/CR R L VIDEO/SAT DVD ONLY COMPONENT VIDEO OUT S VIDEO (DVD ONLY) AM VIDEO MONITOR OUT COAXIAL FM 75 Surround speaker (R) Subwoofer Surround speaker (L) continued 15US
Operating Instructions (Main Stereo System)
Page 16
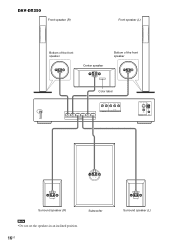
DAV-DX250 Front speaker (R) Front speaker (L) Bottom of the front speaker Center speaker Bottom of the front speaker Color label FRONT R FRONT L SURR R SURR L CENTER WOOFER SPEAKER AUDIO IN Y PB/CB PR/CR R L VIDEO/SAT DVD ONLY COMPONENT VIDEO OUT S VIDEO (DVD ONLY) AM VIDEO MONITOR OUT COAXIAL FM 75 Surround speaker (R) Note • Do not set the speakers in an inclined position. 16US Subwoofer Surround speaker (L)
DAV-DX250 Front speaker (R) Front speaker (L) Bottom of the front speaker Center speaker Bottom of the front speaker Color label FRONT R FRONT L SURR R SURR L CENTER WOOFER SPEAKER AUDIO IN Y PB/CB PR/CR R L VIDEO/SAT DVD ONLY COMPONENT VIDEO OUT S VIDEO (DVD ONLY) AM VIDEO MONITOR OUT COAXIAL FM 75 Surround speaker (R) Note • Do not set the speakers in an inclined position. 16US Subwoofer Surround speaker (L)

Operating Instructions (Main Stereo System)
Page 17
..., or solvent such as alcohol or benzine. • Do not lean or hang on the speaker, as the speaker may damage the system. continued 17US Avoiding short-circuiting the speakers Short-circuiting of the speakers may fall down. To connect the speaker cords Connect the speaker cords after bending the bare wire at the end of the...
..., or solvent such as alcohol or benzine. • Do not lean or hang on the speaker, as the speaker may damage the system. continued 17US Avoiding short-circuiting the speakers Short-circuiting of the speakers may fall down. To connect the speaker cords Connect the speaker cords after bending the bare wire at the end of the...

Operating Instructions (Main Stereo System)
Page 18
...mm (3/16 inch) 10 mm (13/32 inch) Hole on the back of the speaker 18US If this happens, check the speaker connection again. Installing the speakers on the wall 1 Prepare screws (not supplied) that all the components, speakers, and AC power cord (mains lead), output a test tone to check that are ...(3/16 inch) 10 mm (13/32 inch) Hole on the back of the speaker 2 Fasten the screws to the wall. If no sound is heard from a speaker while outputting a test tone, or a test tone is output from a speaker other than the one currently displayed on outputting a test tone, see page 76. ...
...mm (3/16 inch) 10 mm (13/32 inch) Hole on the back of the speaker 18US If this happens, check the speaker connection again. Installing the speakers on the wall 1 Prepare screws (not supplied) that all the components, speakers, and AC power cord (mains lead), output a test tone to check that are ...(3/16 inch) 10 mm (13/32 inch) Hole on the back of the speaker 2 Fasten the screws to the wall. If no sound is heard from a speaker while outputting a test tone, or a test tone is output from a speaker other than the one currently displayed on outputting a test tone, see page 76. ...

Operating Instructions (Main Stereo System)
Page 19
Install the speakers on a vertical and flat wall where reinforcement is applied. • Contact a screw shop or installer regarding the wall material or screws to be used. • Sony is especially fragile, attach the screws securely to a beam and fasten them to the wall. As a plaster board wall is not responsible for the wall material and strength. Getting Started Note • Use screws that are suitable for accident or damage caused by improper installation, insufficient wall strength or improper screw installation, natural calamity, etc. 19US
Install the speakers on a vertical and flat wall where reinforcement is applied. • Contact a screw shop or installer regarding the wall material or screws to be used. • Sony is especially fragile, attach the screws securely to a beam and fasten them to the wall. As a plaster board wall is not responsible for the wall material and strength. Getting Started Note • Use screws that are suitable for accident or damage caused by improper installation, insufficient wall strength or improper screw installation, natural calamity, etc. 19US
Operating Instructions (Main Stereo System)
Page 21
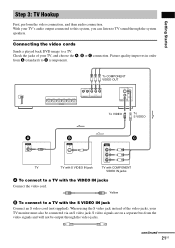
... (component). Connecting the video cords Sends a played back DVD image to a TV with the VIDEO IN jacks Connect the video cord. When using the S video jack instead of your TV monitor must also be output through the system speakers. Getting Started Step 3: TV Hookup First, perform the ...Yellow B To connect to a TV. continued 21US FRONT R FRONT L SURR R SURR L CENTER WOOFER SPEAKER To COMPONENT VIDEO OUT AUDIO IN Y PB/CB PR/CR R L VIDEO/SAT DVD ONLY COMPONENT VIDEO OUT S VIDEO (DVD ONLY) AM VIDEO MONITOR OUT COAXIAL FM 75 To VIDEO To S VIDEO A VIDEO IN B S VIDEO...
... (component). Connecting the video cords Sends a played back DVD image to a TV with the VIDEO IN jacks Connect the video cord. When using the S video jack instead of your TV monitor must also be output through the system speakers. Getting Started Step 3: TV Hookup First, perform the ...Yellow B To connect to a TV. continued 21US FRONT R FRONT L SURR R SURR L CENTER WOOFER SPEAKER To COMPONENT VIDEO OUT AUDIO IN Y PB/CB PR/CR R L VIDEO/SAT DVD ONLY COMPONENT VIDEO OUT S VIDEO (DVD ONLY) AM VIDEO MONITOR OUT COAXIAL FM 75 To VIDEO To S VIDEO A VIDEO IN B S VIDEO...

Operating Instructions (Main Stereo System)
Page 23
... not clear when you want to fix the conversion method to PROGRESSIVE VIDEO for these settings when either of this system. About DVD software types and the conversion method DVD software can be converted to match the type of images may appear unnatural due to jacks other than the COMPONENT ... the audio cords Outputs TV sound through the COMPONENT VIDEO OUT jacks. the TV is connected to the conversion process when output through the speakers of the above conditions is derived from film and displays images at 30 frames/60 fields per second. you select PROGRESSIVE AUTO. your TV...
... not clear when you want to fix the conversion method to PROGRESSIVE VIDEO for these settings when either of this system. About DVD software types and the conversion method DVD software can be converted to match the type of images may appear unnatural due to jacks other than the COMPONENT ... the audio cords Outputs TV sound through the COMPONENT VIDEO OUT jacks. the TV is connected to the conversion process when output through the speakers of the above conditions is derived from film and displays images at 30 frames/60 fields per second. you select PROGRESSIVE AUTO. your TV...
Operating Instructions (Main Stereo System)
Page 24
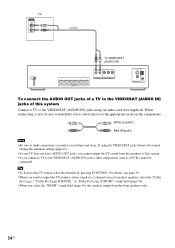
.... 24US TV AUDIO OUT L R To VIDEO/SAT (AUDIO IN) FRONT R FRONT L SURR R SURR L CENTER WOOFER SPEAKER AUDIO IN Y PB/CB PR/CR R L VIDEO/SAT DVD ONLY COMPONENT VIDEO OUT S VIDEO (DVD ONLY) AM VIDEO MONITOR OUT COAXIAL FM 75 To connect the AUDIO OUT jacks of a TV to the VIDEO/SAT (AUDIO IN...) jacks, other components, such as a VCR, cannot be sure to match the color-coded sleeves to output the TV sound or stereo sound of this system Connect a TV to avoid hum and noise. For details, see page 56. • When you select the "NIGHT" sound field (page 54), the sound is...
.... 24US TV AUDIO OUT L R To VIDEO/SAT (AUDIO IN) FRONT R FRONT L SURR R SURR L CENTER WOOFER SPEAKER AUDIO IN Y PB/CB PR/CR R L VIDEO/SAT DVD ONLY COMPONENT VIDEO OUT S VIDEO (DVD ONLY) AM VIDEO MONITOR OUT COAXIAL FM 75 To connect the AUDIO OUT jacks of a TV to the VIDEO/SAT (AUDIO IN...) jacks, other components, such as a VCR, cannot be sure to match the color-coded sleeves to output the TV sound or stereo sound of this system Connect a TV to avoid hum and noise. For details, see page 56. • When you select the "NIGHT" sound field (page 54), the sound is...

Operating Instructions (Main Stereo System)
Page 25
... component through the speakers of this system by connecting the AUDIO OUT jacks of this system. AUDIO OUT L R To VIDEO/SAT (AUDIO IN) FRONT R FRONT L SURR R SURR L CENTER WOOFER SPEAKER AUDIO IN Y PB/CB PR/CR R L VIDEO/SAT DVD ONLY COMPONENT VIDEO OUT S VIDEO (DVD ONLY) AM VIDEO... MONITOR OUT COAXIAL FM 75 To connect the AUDIO OUT jacks of other component to the system. Connecting the system and the other component Outputs the ...
... component through the speakers of this system by connecting the AUDIO OUT jacks of this system. AUDIO OUT L R To VIDEO/SAT (AUDIO IN) FRONT R FRONT L SURR R SURR L CENTER WOOFER SPEAKER AUDIO IN Y PB/CB PR/CR R L VIDEO/SAT DVD ONLY COMPONENT VIDEO OUT S VIDEO (DVD ONLY) AM VIDEO... MONITOR OUT COAXIAL FM 75 To connect the AUDIO OUT jacks of other component to the system. Connecting the system and the other component Outputs the ...

Operating Instructions (Main Stereo System)
Page 27
...mode on/off . • DEMO ON: sets the demonstration mode on. 4 Press ENTER or AMP MENU. Note • When you press "/1 on the system, the demonstration does not turn off , then press "/1 on the remote. To turn off the demonstration, set the demonstration mode to off even though you... set the demonstration mode in the AMP menu to the system (page 14). Getting Started Step 5: Connecting the AC Power Cord (Mains Lead) Before connecting the AC power cord (mains lead) of this system to a wall outlet (mains), connect the speakers to on, the demonstration does not turn off. •...
...mode on/off . • DEMO ON: sets the demonstration mode on. 4 Press ENTER or AMP MENU. Note • When you press "/1 on the system, the demonstration does not turn off , then press "/1 on the remote. To turn off the demonstration, set the demonstration mode to off even though you... set the demonstration mode in the AMP menu to the system (page 14). Getting Started Step 5: Connecting the AC Power Cord (Mains Lead) Before connecting the AC power cord (mains lead) of this system to a wall outlet (mains), connect the speakers to on, the demonstration does not turn off. •...
Operating Instructions (Main Stereo System)
Page 28
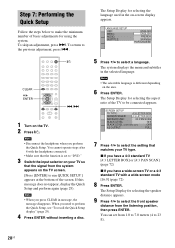
... • Disconnect the headphone when you press CLEAR in message, the message disappears. The system displays the menu and subtitles in the on-screen display appears. Note • The selectable...) 8 Press ENTER. The Setup Display for selecting the speaker distance appears. 9 Press X/x to select the front speaker distance from 1.0 to 7.0 meters (4 to 23 ft). 28US The Setup Display for using the system. "/1 CLEAR X/x ENTER ./> 1 Turn on the area...) x If you need to the previous adjustment, press .. You can set to "DVD." 3 Switch the input selector on your TV type.
... • Disconnect the headphone when you press CLEAR in message, the message disappears. The system displays the menu and subtitles in the on-screen display appears. Note • The selectable...) 8 Press ENTER. The Setup Display for selecting the speaker distance appears. 9 Press X/x to select the front speaker distance from 1.0 to 7.0 meters (4 to 23 ft). 28US The Setup Display for using the system. "/1 CLEAR X/x ENTER ./> 1 Turn on the area...) x If you need to the previous adjustment, press .. You can set to "DVD." 3 Switch the input selector on your TV type.

Operating Instructions (Main Stereo System)
Page 29
... ( 2 7 ) 1 8 ( 3 4 ) : : DVD VIDEO QUICK QUICK CUSTOM RESET BNR 3 Press X/x to change each setting, see "Using the Setup Display" (page 70). Note • The setting range changes depending on the front speaker setting. 11 Press X/x to select the surround speaker distance from the listening position, then press ENTER...23 ft). To recall the Quick Setup display 1 Press DISPLAY when the system is finished. To quit the Quick Setup Press DISPLAY in stop mode. You can set from 0.0 to 7.0 meters (0 to 23 ft). SPEAKER SETUP SIZE: DISTANCE: LEVEL(FRONT): LEVEL(SURROUND): TEST TONE: OFF ...
... ( 2 7 ) 1 8 ( 3 4 ) : : DVD VIDEO QUICK QUICK CUSTOM RESET BNR 3 Press X/x to change each setting, see "Using the Setup Display" (page 70). Note • The setting range changes depending on the front speaker setting. 11 Press X/x to select the surround speaker distance from the listening position, then press ENTER...23 ft). To recall the Quick Setup display 1 Press DISPLAY when the system is finished. To quit the Quick Setup Press DISPLAY in stop mode. You can set from 0.0 to 7.0 meters (0 to 23 ft). SPEAKER SETUP SIZE: DISTANCE: LEVEL(FRONT): LEVEL(SURROUND): TEST TONE: OFF ...

Operating Instructions (Main Stereo System)
Page 30
... magnetically shielded to allow it on again after 15 to 23 ft) (A) from TV set . The front speakers can be observed on the system. Place the speaker further away from the listening position (A). However, color irregularities may still be placed from 1.0 to 7.0 meters (4 to 30 minutes. 30US Turn off the TV set . ...
... magnetically shielded to allow it on again after 15 to 23 ft) (A) from TV set . The front speakers can be observed on the system. Place the speaker further away from the listening position (A). However, color irregularities may still be placed from 1.0 to 7.0 meters (4 to 30 minutes. 30US Turn off the TV set . ...

Operating Instructions (Main Stereo System)
Page 39
... DATA CD and press H, the numbered tracks (or files) are more than 200 albums and 300 files in each album. • The system can recognize up to 200 albums (the system will be played in that order. • Since a disc with the extension ".MP3," ".JPG," or ".JPEG" even if they are ... the DATA CD, the playback order may differ from the illustration. • The playback order above may generate a loud noise which could damage your speaker system. • The system does not conform to the front of JPEG files cannot be applicable if there are played sequentially, from 1 through 7.
... DATA CD and press H, the numbered tracks (or files) are more than 200 albums and 300 files in each album. • The system can recognize up to 200 albums (the system will be played in that order. • Since a disc with the extension ".MP3," ".JPG," or ".JPEG" even if they are ... the DATA CD, the playback order may differ from the illustration. • The playback order above may generate a loud noise which could damage your speaker system. • The system does not conform to the front of JPEG files cannot be applicable if there are played sequentially, from 1 through 7.


