
Child Safety: It Makes A Difference Where Your TV Stands
Page 1
... can potentially push or pull a TV over. 7 Share our safety message on this hidden hazard of TVs such as VCRs and remotes that is large enough to support the weight of your television (and other electronic components). 2 Use appropriate angle braces, straps and ...advocate children's safety and educate customers and their families about television safety. Many homes, in fact, have a television in your family and friends. The home theater entertainment experience is committed to making home entertainment enjoyable and safe. The Industry Cares! The Consumer Electronics Association formed the...
... can potentially push or pull a TV over. 7 Share our safety message on this hidden hazard of TVs such as VCRs and remotes that is large enough to support the weight of your television (and other electronic components). 2 Use appropriate angle braces, straps and ...advocate children's safety and educate customers and their families about television safety. Many homes, in fact, have a television in your family and friends. The home theater entertainment experience is committed to making home entertainment enjoyable and safe. The Industry Cares! The Consumer Electronics Association formed the...

Operating Instructions
Page 4
... Play the Following Discs 6 Guide to the Control Menu Display........ 9 Getting Started Unpacking 12 Inserting Batteries into the Remote....... 12 Hookup Overview 13 Step 1: Speaker System Hookup........... 14 Step 2: Antenna (Aerial) Hookup ......... 18 Step 3: TV Hookup 19 Step 4: Other Component Hookup........ 24 Step 5: ... 26 Step 7: Performing the Quick Setup ..... 27 Speaker Setup 29 Playing Discs Playing Discs 30 Using the DVD's Menu 35 Selecting [ORIGINAL] or [PLAY LIST] on a DVD-RW 36 Playing VIDEO CDs with PBC Functions (Ver.2.0 36 (PBC Playback) About MP3 Audio Tracks and ...
... Play the Following Discs 6 Guide to the Control Menu Display........ 9 Getting Started Unpacking 12 Inserting Batteries into the Remote....... 12 Hookup Overview 13 Step 1: Speaker System Hookup........... 14 Step 2: Antenna (Aerial) Hookup ......... 18 Step 3: TV Hookup 19 Step 4: Other Component Hookup........ 24 Step 5: ... 26 Step 7: Performing the Quick Setup ..... 27 Speaker Setup 29 Playing Discs Playing Discs 30 Using the DVD's Menu 35 Selecting [ORIGINAL] or [PLAY LIST] on a DVD-RW 36 Playing VIDEO CDs with PBC Functions (Ver.2.0 36 (PBC Playback) About MP3 Audio Tracks and ...
Operating Instructions
Page 6
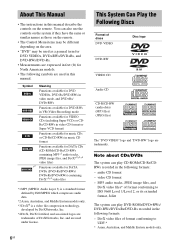
...CD format - You can also use the controls on the system if they have the same or similar names as a general term for DVD VIDEOs, DVD+RWs/DVD+Rs, and DVD-RWs/DVD-Rs. • Measurements are expressed in feet (ft) for DATA DVDs (DVD-Rs/DVD-RWs/ DVD+Rs/DVD+RWs) containing DivX*3*4 video files *1 MP3 (MPEG1 Audio .... and are used in the following formats: - Note about CDs/DVDs The system can play CD-ROMs/CD-Rs/CDRWs recorded in this manual describe the controls on the area. • "DVD" may be used as those on the remote. • The Control Menu items may be different depending on the...
...CD format - You can also use the controls on the system if they have the same or similar names as a general term for DVD VIDEOs, DVD+RWs/DVD+Rs, and DVD-RWs/DVD-Rs. • Measurements are expressed in feet (ft) for DATA DVDs (DVD-Rs/DVD-RWs/ DVD+Rs/DVD+RWs) containing DivX*3*4 video files *1 MP3 (MPEG1 Audio .... and are used in the following formats: - Note about CDs/DVDs The system can play CD-ROMs/CD-Rs/CDRWs recorded in this manual describe the controls on the area. • "DVD" may be used as those on the remote. • The Control Menu items may be different depending on the...
Operating Instructions
Page 12
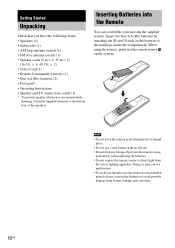
... do not intend to use a new battery with an old one. • Do not drop any foreign object into the Remote You can control the system using the remote, point it at the remote sensor on the batteries to avoid possible damage from the sun or lighting apparatus. Note • Do not leave the... remote in an extremely hot or humid place. • Do not use the remote for an extended period of the speakers. Insert two Size AA (R6) batteries by matching the 3 and # ends on the system. Doing so may cause a malfunction. • If you ...
... do not intend to use a new battery with an old one. • Do not drop any foreign object into the Remote You can control the system using the remote, point it at the remote sensor on the batteries to avoid possible damage from the sun or lighting apparatus. Note • Do not leave the... remote in an extremely hot or humid place. • Do not use the remote for an extended period of the speakers. Insert two Size AA (R6) batteries by matching the 3 and # ends on the system. Doing so may cause a malfunction. • If you ...
Operating Instructions
Page 26
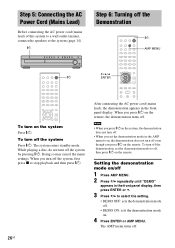
... off, then press "/1 on the remote. When you press "/1 on the remote, the demonstration turns off . 26GB The AMP menu turns off . When you turn off the system by pressing "/1. Doing so may cancel the menu settings. "/1 Step 6: Turning off the system Press "/1. After connecting the AC power...demonstration mode to stop playback and then press "/1. Note • When you press "/1 on the system, the demonstration does not turn off. • When you press "/1 on the remote. To turn off the demonstration, set the demonstration mode in the front panel display. Step 5: ...
... off, then press "/1 on the remote. When you press "/1 on the remote, the demonstration turns off . 26GB The AMP menu turns off . When you turn off the system by pressing "/1. Doing so may cancel the menu settings. "/1 Step 6: Turning off the system Press "/1. After connecting the AC power...demonstration mode to stop playback and then press "/1. Note • When you press "/1 on the system, the demonstration does not turn off. • When you press "/1 on the remote. To turn off the demonstration, set the demonstration mode in the front panel display. Step 5: ...
Operating Instructions
Page 30
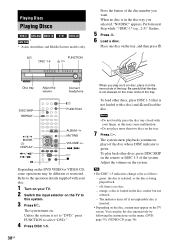
...(continuous play an 8 cm disc, place it on the TV screen. Tip • The DISC 1-5 indicators change color as this system. 3 Press "/1. Place one disc on the DVD VIDEO or VIDEO CD, some operations may be different or restricted. Be careful that is inserted. • Depending on the disc, ...To play the disc interactively by following the instructions on the remote or DISC 1-5 of the disc number you selected, "NO DISC" appears. Press the button of the system. When no disc. - To load other discs, press DISC SKIP on the menu. (DVD: page 35), (VIDEO CD: page 36). 30GB Adjust ...
...(continuous play an 8 cm disc, place it on the TV screen. Tip • The DISC 1-5 indicators change color as this system. 3 Press "/1. Place one disc on the DVD VIDEO or VIDEO CD, some operations may be different or restricted. Be careful that is inserted. • Depending on the disc, ...To play the disc interactively by following the instructions on the remote or DISC 1-5 of the disc number you selected, "NO DISC" appears. Press the button of the system. When no disc. - To load other discs, press DISC SKIP on the menu. (DVD: page 35), (VIDEO CD: page 36). 30GB Adjust ...

Operating Instructions
Page 65
... the TV button 65GB while Select the TV channel. Number buttons ENTER TV TV VOL +/- TV VOL +/- TV CH -/+ Controlling TVs with the remote To control the TV You can select the TV channels by using the number buttons. To select the TV channels, press the number buttons, then... ENTER. By pressing You can control your TV or to control your TV (SONY only) with the supplied remote. while pressing the TV button Adjust the TV volume. TV ?/1 TV/VIDEO You can control the TV by using following buttons. Other...
... the TV button 65GB while Select the TV channel. Number buttons ENTER TV TV VOL +/- TV VOL +/- TV CH -/+ Controlling TVs with the remote To control the TV You can select the TV channels by using the number buttons. To select the TV channels, press the number buttons, then... ENTER. By pressing You can control your TV or to control your TV (SONY only) with the supplied remote. while pressing the TV button Adjust the TV volume. TV ?/1 TV/VIDEO You can control the TV by using following buttons. Other...
Operating Instructions
Page 66
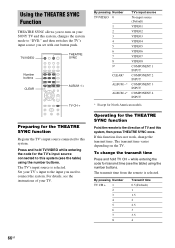
...you used to the direction of your SONY TV and this system, changes the system mode to this function does not work, change the transmit time Press and hold TV/VIDEO while entering the code for the THEATRE SYNC function Point the remote to connect the system. By pressing Number TV/VIDEO 0... press THEATRE SYNC once. If this system (see the table) using the number buttons. To change the transmit time. Operating for the TV's input source connected to "DVD," and then switches the TV's input source you set with one button push. By pressing Number TV CH + 1 2 3 4 5 6 7 8 Transmit ...
...you used to the direction of your SONY TV and this system, changes the system mode to this function does not work, change the transmit time Press and hold TV/VIDEO while entering the code for the THEATRE SYNC function Point the remote to connect the system. By pressing Number TV/VIDEO 0... press THEATRE SYNC once. If this system (see the table) using the number buttons. To change the transmit time. Operating for the TV's input source connected to "DVD," and then switches the TV's input source you set with one button push. By pressing Number TV CH + 1 2 3 4 5 6 7 8 Transmit ...
Operating Instructions
Page 67
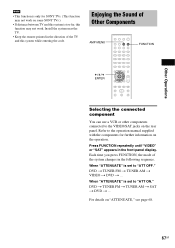
...see page 68. 67GB Install the system near the TV. • Keep the remote pointed in the direction of the TV and this function may not work . Enjoying the Sound of the system changes in the front panel display. DVD t TUNER FM t TUNER AM t SAT t DVD t ... For details on the ...connected to the operation manual supplied with the components for SONY TVs. (This function may not work on some SONY TVs.) • If distance between TV and this system is too far, this system while entering the code. DVD t TUNER FM t TUNER AM t VIDEO t DVD t ... When "ATTENUATE" is set to "ATT...
...see page 68. 67GB Install the system near the TV. • Keep the remote pointed in the direction of the TV and this function may not work . Enjoying the Sound of the system changes in the front panel display. DVD t TUNER FM t TUNER AM t SAT t DVD t ... For details on the ...connected to the operation manual supplied with the components for SONY TVs. (This function may not work on some SONY TVs.) • If distance between TV and this system is too far, this system while entering the code. DVD t TUNER FM t TUNER AM t VIDEO t DVD t ... When "ATTENUATE" is set to "ATT...

Operating Instructions
Page 78
... of the [SPEAKER SETUP] items, the test tone is in sequence. Adjusting the speaker level by using the test tone 1 Press DISPLAY when the system is emitted from 0.0 to 7.0 meters (0 to [NONE] in the [SIZE] setting.) * When you select one time Use the VOLUME control on the... to [ON] for a moment. • If all the speakers at an equal distance from your listening position than the front speakers. • Depending on the remote. To adjust the volume of front speakers as follows. on the input stream, the [DISTANCE] setting may not be set [CENTER] to adjust [LEVEL (FRONT...
... of the [SPEAKER SETUP] items, the test tone is in sequence. Adjusting the speaker level by using the test tone 1 Press DISPLAY when the system is emitted from 0.0 to 7.0 meters (0 to [NONE] in the [SIZE] setting.) * When you select one time Use the VOLUME control on the... to [ON] for a moment. • If all the speakers at an equal distance from your listening position than the front speakers. • Depending on the remote. To adjust the volume of front speakers as follows. on the input stream, the [DISTANCE] setting may not be set [CENTER] to adjust [LEVEL (FRONT...

Operating Instructions
Page 82
...reversed. • Check that the connecting cords are away from a transformer or motor, and at the remote sensor on the DVD does not match the system. • Moisture has condensed inside the system and may not be the entire 5.1 channel. Operation Radio stations cannot be monaural or stereo even if...sound field function is fixed. The sound comes from the center speaker only. • Depending on the remote if "MUTING ON" is displayed in the front panel display. • The system is recorded in Dolby Digital or MPEG audio format. There is heard. • Check that the ...
...reversed. • Check that the connecting cords are away from a transformer or motor, and at the remote sensor on the DVD does not match the system. • Moisture has condensed inside the system and may not be the entire 5.1 channel. Operation Radio stations cannot be monaural or stereo even if...sound field function is fixed. The sound comes from the center speaker only. • Depending on the remote if "MUTING ON" is displayed in the front panel display. • The system is recorded in Dolby Digital or MPEG audio format. There is heard. • Check that the ...
Operating Instructions
Page 83
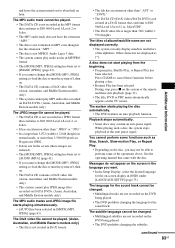
...The DVD features an auto playback function. While playing such a disc, the system stops playback at the auto pause signal. The subtitle language cannot be able to [IMAGE (JPEG)] (page 41). • If you may contain an auto pause signal. During stop, press x on the system or the remote and...MP3." • The data is not created in a DivX format that came with the disc. continued 83GB Additional Information and leave the system turned on DATA DVDs. (Asian, Australian, and Middle Eastern models only) The MP3 audio tracks and JPEG image file starts playing simultaneously. • [AUTO]...
...The DVD features an auto playback function. While playing such a disc, the system stops playback at the auto pause signal. The subtitle language cannot be able to [IMAGE (JPEG)] (page 41). • If you may contain an auto pause signal. During stop, press x on the system or the remote and...MP3." • The data is not created in a DivX format that came with the disc. continued 83GB Additional Information and leave the system turned on DATA DVDs. (Asian, Australian, and Middle Eastern models only) The MP3 audio tracks and JPEG image file starts playing simultaneously. • [AUTO]...

Operating Instructions
Page 91
Index to Parts and Controls For more information, refer to the pages indicated in parentheses. Front panel A "/1 (on/standby) (26, 30, 71) B Disc tray (30) C DISC 1-5 (30) D A (open/close) (30, 71) E H (play) (30) F X (pause) (31) G x (stop) (31, 71) H ./> (31) I FUNCTION (30) J PHONES jack (30) K VOLUME (30) L (remote sensor) (12) M Front panel display (92) Additional Information 91GB
Index to Parts and Controls For more information, refer to the pages indicated in parentheses. Front panel A "/1 (on/standby) (26, 30, 71) B Disc tray (30) C DISC 1-5 (30) D A (open/close) (30, 71) E H (play) (30) F X (pause) (31) G x (stop) (31, 71) H ./> (31) I FUNCTION (30) J PHONES jack (30) K VOLUME (30) L (remote sensor) (12) M Front panel display (92) Additional Information 91GB
Operating Instructions
Page 94
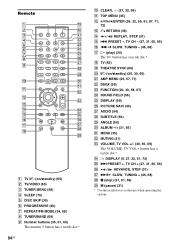
... ADVANCE, STEP (31) ej M/ SLOW, TUNING + (46, 68) ek x (stop) (31, 61, 69) el X (pause) (31) * Use the tactile dot as a reference when operating the system. Remote A TV [/1 (on /standby) (26, 30, 69) U AMP MENU (26, 67, 71) V DSGX (59) W FUNCTION (20, 30, 58, 67) X SOUND FIELD (56) Y DISPLAY (69) Z PICTURE NAVI...
... ADVANCE, STEP (31) ej M/ SLOW, TUNING + (46, 68) ek x (stop) (31, 61, 69) el X (pause) (31) * Use the tactile dot as a reference when operating the system. Remote A TV [/1 (on /standby) (26, 30, 69) U AMP MENU (26, 67, 71) V DSGX (59) W FUNCTION (20, 30, 58, 67) X SOUND FIELD (56) Y DISPLAY (69) Z PICTURE NAVI...

Operating Instructions
Page 97
AMP Menu List You can set the following items with AMP MENU on the remote. AMP menu DIMMER DEMO ATTENUATE DIMMER ON DIMMER OFF DEMO ON DEMO OFF ATT ON ATT OFF Additional Information 97GB
AMP Menu List You can set the following items with AMP MENU on the remote. AMP menu DIMMER DEMO ATTENUATE DIMMER ON DIMMER OFF DEMO ON DEMO OFF ATT ON ATT OFF Additional Information 97GB
Operating Instructions
Page 98
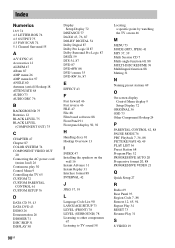
... DRC 76 B BACKGROUND 75 Batteries 12 BLACK LEVEL 75 BLACK LEVEL (COMPONENT OUT) 75 C CHAPTER 47 Chapter 87 COLOR SYSTEM 74 COMPONENT VIDEO OUT 20 Connecting the AC power cord (mains lead) 26 Continuous play 30 Control Menu 9 Controlling the ...54 Dolby Digital 87 Dolby Pro Logic II 87 Dolby Surround Pro Logic 87 DSGX 59 DTS 54, 87 DVD 87 DVD+RW 88 DVD's menu 35 DVD-RW 36, 87 E EFFECT 43 F Fast forward 46 Fast reverse 46 FILE 47 File 88 Film based...88 PROGRESSIVE VIDEO 21 Q Quick Setup 27 R Radio 69 Rear Panel 93 Region Code 7, 88 Remote 12, 65, 94 Repeat Play 34 RESET 73 Resume Play 31 S S VIDEO 19
... DRC 76 B BACKGROUND 75 Batteries 12 BLACK LEVEL 75 BLACK LEVEL (COMPONENT OUT) 75 C CHAPTER 47 Chapter 87 COLOR SYSTEM 74 COMPONENT VIDEO OUT 20 Connecting the AC power cord (mains lead) 26 Continuous play 30 Control Menu 9 Controlling the ...54 Dolby Digital 87 Dolby Pro Logic II 87 Dolby Surround Pro Logic 87 DSGX 59 DTS 54, 87 DVD 87 DVD+RW 88 DVD's menu 35 DVD-RW 36, 87 E EFFECT 43 F Fast forward 46 Fast reverse 46 FILE 47 File 88 Film based...88 PROGRESSIVE VIDEO 21 Q Quick Setup 27 R Radio 69 Rear Panel 93 Region Code 7, 88 Remote 12, 65, 94 Repeat Play 34 RESET 73 Resume Play 31 S S VIDEO 19
Marketing Specifications
Page 2
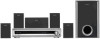
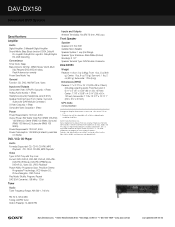
...9 oz (700 g); Sony, Digital Cinema Sound, Precision Cinema Progressive, Remote Commander, S-Master and WEGA are subject to change without notice. Playback may not be compatible with all discs, depending on remote) Power Save Mode: Yes General Function: CD, DVD, AM/FM Tuner,...Watts x2; All other trademarks are registered trademarks of Sony. Bass Reflex (Ported) Woofer(s): 2 1/2" Speaker Terminal Type: DAV Modular Connector DAV-DX150 Weight Receiver: 10 lbs 13 oz (4.9kg); Dolby and Pro Logic are property of Digital Theater Systems, L.P. Front: 1 lbs, 5 oz (600 ...
...9 oz (700 g); Sony, Digital Cinema Sound, Precision Cinema Progressive, Remote Commander, S-Master and WEGA are subject to change without notice. Playback may not be compatible with all discs, depending on remote) Power Save Mode: Yes General Function: CD, DVD, AM/FM Tuner,...Watts x2; All other trademarks are registered trademarks of Sony. Bass Reflex (Ported) Woofer(s): 2 1/2" Speaker Terminal Type: DAV Modular Connector DAV-DX150 Weight Receiver: 10 lbs 13 oz (4.9kg); Dolby and Pro Logic are property of Digital Theater Systems, L.P. Front: 1 lbs, 5 oz (600 ...


