
Child Safety: It Makes A Difference Where Your TV Stands
Page 1
... potentially push or pull a TV over and may fall over . 7 Share our safety message on dressers, bookcases, shelves, desks, audio speakers, chests or carts. The industry is committed to advocate children's safety and educate customers and their families about television safety. Thank you have ...Sometimes televisions are not always supported on the proper TV stands. Tune Into Safety 1 One size does NOT fit all. The home theater entertainment experience is a growing trend, and larger televisions are popular purchases and are improperly secured or inappropriately situated on this hidden ...
... potentially push or pull a TV over and may fall over . 7 Share our safety message on dressers, bookcases, shelves, desks, audio speakers, chests or carts. The industry is committed to advocate children's safety and educate customers and their families about television safety. Thank you have ...Sometimes televisions are not always supported on the proper TV stands. Tune Into Safety 1 One size does NOT fit all. The home theater entertainment experience is a growing trend, and larger televisions are popular purchases and are improperly secured or inappropriately situated on this hidden ...

Operating Instructions
Page 4
... Discs 6 Guide to the Control Menu Display........ 9 Getting Started Unpacking 12 Inserting Batteries into the Remote....... 12 Hookup Overview 13 Step 1: Speaker System Hookup........... 14 Step 2: Antenna (Aerial) Hookup ......... 18 Step 3: TV Hookup 19 Step 4: Other Component Hookup........ 24 Step 5: Connecting ...6: Turning off the Demonstration 26 Step 7: Performing the Quick Setup ..... 27 Speaker Setup 29 Playing Discs Playing Discs 30 Using the DVD's Menu 35 Selecting [ORIGINAL] or [PLAY LIST] on a DVD-RW 36 Playing VIDEO CDs with PBC Functions (Ver.2.0 36 (PBC Playback) ...
... Discs 6 Guide to the Control Menu Display........ 9 Getting Started Unpacking 12 Inserting Batteries into the Remote....... 12 Hookup Overview 13 Step 1: Speaker System Hookup........... 14 Step 2: Antenna (Aerial) Hookup ......... 18 Step 3: TV Hookup 19 Step 4: Other Component Hookup........ 24 Step 5: Connecting ...6: Turning off the Demonstration 26 Step 7: Performing the Quick Setup ..... 27 Speaker Setup 29 Playing Discs Playing Discs 30 Using the DVD's Menu 35 Selecting [ORIGINAL] or [PLAY LIST] on a DVD-RW 36 Playing VIDEO CDs with PBC Functions (Ver.2.0 36 (PBC Playback) ...

Operating Instructions
Page 5
Settings and Adjustments Using the Setup Display 72 Setting the Display or Sound Track Language 73 [LANGUAGE SETUP] Settings for the Display 74 [SCREEN SETUP] Custom Settings 76 [CUSTOM SETUP] Settings for the Speakers 77 [SPEAKER SETUP] Additional Information Precautions 80 Notes about the Discs 81 Troubleshooting 81 Self-diagnosis Function 84 (When letters/numbers appear in the display) Specifications 85 Glossary 87 Language Code List 90 Index to Parts and Controls 91 DVD Setup Display List 95 AMP Menu List 97 Index 98 5GB
Settings and Adjustments Using the Setup Display 72 Setting the Display or Sound Track Language 73 [LANGUAGE SETUP] Settings for the Display 74 [SCREEN SETUP] Custom Settings 76 [CUSTOM SETUP] Settings for the Speakers 77 [SPEAKER SETUP] Additional Information Precautions 80 Notes about the Discs 81 Troubleshooting 81 Self-diagnosis Function 84 (When letters/numbers appear in the display) Specifications 85 Glossary 87 Language Code List 90 Index to Parts and Controls 91 DVD Setup Display List 95 AMP Menu List 97 Index 98 5GB

Operating Instructions
Page 11
.../album repeatedly. *1 [A/V SYNC] (page 45) Adjusts the delay between the picture and sound. *1 *1 [PARENTAL CONTROL] (page 61) Sets to prohibit playback on this system. [SETUP] (page 72) [QUICK] Setup (page 27) Use Quick Setup to choose the desired language of the on-screen display, the aspect ratio of the... TV, and the size of the speakers you are using. [CUSTOM] Setup In addition to the Quick Setup setting, you can adjust various other settings. [RESET] Returns the settings in [SETUP...
.../album repeatedly. *1 [A/V SYNC] (page 45) Adjusts the delay between the picture and sound. *1 *1 [PARENTAL CONTROL] (page 61) Sets to prohibit playback on this system. [SETUP] (page 72) [QUICK] Setup (page 27) Use Quick Setup to choose the desired language of the on-screen display, the aspect ratio of the... TV, and the size of the speakers you are using. [CUSTOM] Setup In addition to the Quick Setup setting, you can adjust various other settings. [RESET] Returns the settings in [SETUP...
Operating Instructions
Page 12
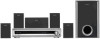
...the remote in an extremely hot or humid place. • Do not use the remote for an extended period of the speakers. When using the supplied remote. Inserting Batteries into the remote casing, particularly when replacing the batteries. • Do not expose... two Size AA (R6) batteries by matching the 3 and # ends on the system. Doing so may cause a malfunction. • If you have the following items: • Speakers (5) • Subwoofer (1) • AM loop antenna (aerial) (1) • FM wire antenna (aerial) (1) • Speaker cords (5 m × 4, 15 m × 2) (16.5 ft. ×...
...the remote in an extremely hot or humid place. • Do not use the remote for an extended period of the speakers. When using the supplied remote. Inserting Batteries into the remote casing, particularly when replacing the batteries. • Do not expose... two Size AA (R6) batteries by matching the 3 and # ends on the system. Doing so may cause a malfunction. • If you have the following items: • Speakers (5) • Subwoofer (1) • AM loop antenna (aerial) (1) • FM wire antenna (aerial) (1) • Speaker cords (5 m × 4, 15 m × 2) (16.5 ft. ×...

Operating Instructions
Page 13
... Started Hookup Overview Perform all connections and settings by this system and output from the TV screen; "Step 1: Speaker System Hookup" (page 14) "Step 2: Antenna (Aerial) Hookup" (page 18) "Step 3: TV Hookup" (page 19) "Step 4: Other Component Hookup" (page 24) "Step 5: Connecting the AC Power ... 6: Turning off the Demonstration" (page 26) "Step 7: Performing the Quick Setup" (page 27) Video signal is sent to the TV, and is output from the speakers of other sources, such as TV programs, in addition to 7. audio signals are processed by following Steps 1 to...
... Started Hookup Overview Perform all connections and settings by this system and output from the TV screen; "Step 1: Speaker System Hookup" (page 14) "Step 2: Antenna (Aerial) Hookup" (page 18) "Step 3: TV Hookup" (page 19) "Step 4: Other Component Hookup" (page 24) "Step 5: Connecting the AC Power ... 6: Turning off the Demonstration" (page 26) "Step 7: Performing the Quick Setup" (page 27) Video signal is sent to the TV, and is output from the speakers of other sources, such as TV programs, in addition to 7. audio signals are processed by following Steps 1 to...

Operating Instructions
Page 14
Gray (+) (+) (-) Color tube (-) Black 14GB To obtain the best possible surround sound, specify the speaker parameters (distance, level, etc.) on page 77. Required cords Speaker cords The connector and the color tube of the speaker cords are the same color as the label of the cords. Step 1: Speaker System Hookup Connect the supplied speaker system using the supplied speaker cords by matching the colors of the jacks to be connected. Do not connect any speakers other than those of the jacks to those supplied with this system.
Gray (+) (+) (-) Color tube (-) Black 14GB To obtain the best possible surround sound, specify the speaker parameters (distance, level, etc.) on page 77. Required cords Speaker cords The connector and the color tube of the speaker cords are the same color as the label of the cords. Step 1: Speaker System Hookup Connect the supplied speaker system using the supplied speaker cords by matching the colors of the jacks to be connected. Do not connect any speakers other than those of the jacks to those supplied with this system.

Operating Instructions
Page 15
Getting Started Connecting the speakers Front speaker (R) Color label Center speaker Front speaker (L) Color label FRONT R FRONT L SURR R SURR L CENTER WOOFER SPEAKER AUDIO IN Y PB/CB PR/CR R L VIDEO/SAT DVD ONLY COMPONENT VIDEO OUT S VIDEO (DVD ONLY) AM VIDEO MONITOR OUT COAXIAL FM 75 Surround speaker (R) Subwoofer Surround speaker (L) Note • Do not set the speakers in an inclined position...
Getting Started Connecting the speakers Front speaker (R) Color label Center speaker Front speaker (L) Color label FRONT R FRONT L SURR R SURR L CENTER WOOFER SPEAKER AUDIO IN Y PB/CB PR/CR R L VIDEO/SAT DVD ONLY COMPONENT VIDEO OUT S VIDEO (DVD ONLY) AM VIDEO MONITOR OUT COAXIAL FM 75 Surround speaker (R) Subwoofer Surround speaker (L) Note • Do not set the speakers in an inclined position...

Operating Instructions
Page 16
... bare wire of each speaker cord does not touch another speaker terminal or the bare wire of the speakers may be short-circuited. After connecting all the speakers are reversed, the sound will lack bass and may damage the system. If the cords are connected correctly. To connect the speaker cords Connect the speaker cords after bending...
... bare wire of each speaker cord does not touch another speaker terminal or the bare wire of the speakers may be short-circuited. After connecting all the speakers are reversed, the sound will lack bass and may damage the system. If the cords are connected correctly. To connect the speaker cords Connect the speaker cords after bending...

Operating Instructions
Page 17
The screws should protrude 5 to 7 mm (7/32 to 9/32 inch). 5 to 7 mm (7/32 to 9/32 inch) 3 Hang the speakers on the screws. 4.6 mm (3/16 inch) 10 mm (13/32 inch) Hole on a vertical and flat wall where reinforcement is applied. • Contact a screw shop ...or installer regarding the wall material or screws to be used. • Sony is especially fragile, attach the screws securely to a beam and fasten them to the wall. Install the speakers on the back of the speaker Note • Use screws that are suitable for accident or damage caused by improper...
The screws should protrude 5 to 7 mm (7/32 to 9/32 inch). 5 to 7 mm (7/32 to 9/32 inch) 3 Hang the speakers on the screws. 4.6 mm (3/16 inch) 10 mm (13/32 inch) Hole on a vertical and flat wall where reinforcement is applied. • Contact a screw shop ...or installer regarding the wall material or screws to be used. • Sony is especially fragile, attach the screws securely to a beam and fasten them to the wall. Install the speakers on the back of the speaker Note • Use screws that are suitable for accident or damage caused by improper...

Operating Instructions
Page 19
...jack. continued 19GB With your TV's audio output connected to this system, you can listen to C (component). FRONT R FRONT L SURR R SURR L CENTER WOOFER SPEAKER To COMPONENT VIDEO OUT AUDIO IN Y PB/CB PR/CR R L VIDEO/SAT DVD ONLY COMPONENT VIDEO OUT S VIDEO (DVD ONLY) AM VIDEO MONITOR OUT COAXIAL FM 75 To VIDEO To... A (standard) to TV sound through the video jacks. When using the S video jack instead of your TV monitor must also be output through the system speakers. Check the jacks of the video jacks, your TV, and choose the A, B or C connection.
...jack. continued 19GB With your TV's audio output connected to this system, you can listen to C (component). FRONT R FRONT L SURR R SURR L CENTER WOOFER SPEAKER To COMPONENT VIDEO OUT AUDIO IN Y PB/CB PR/CR R L VIDEO/SAT DVD ONLY COMPONENT VIDEO OUT S VIDEO (DVD ONLY) AM VIDEO MONITOR OUT COAXIAL FM 75 To VIDEO To... A (standard) to TV sound through the video jacks. When using the S video jack instead of your TV monitor must also be output through the system speakers. Check the jacks of the video jacks, your TV, and choose the A, B or C connection.

Operating Instructions
Page 21
Select this system. x P VIDEO (PROGRESSIVE VIDEO) Select this setting when: - Even though you set to ...the above conditions is not met. the TV is connected to the conversion process when output through the speakers of this if the image is not clear when you want to fix the conversion method to match... types: film-based software and video-based software. x INTERLACE Select this setting when: - you select PROGRESSIVE AUTO. Some DVD software contains both video and film. Video-based software is connected to "PROGRESSIVE AUTO" or "PROGRESSIVE VIDEO," images from the...
Select this system. x P VIDEO (PROGRESSIVE VIDEO) Select this setting when: - Even though you set to ...the above conditions is not met. the TV is connected to the conversion process when output through the speakers of this if the image is not clear when you want to fix the conversion method to match... types: film-based software and video-based software. x INTERLACE Select this setting when: - you select PROGRESSIVE AUTO. Some DVD software contains both video and film. Video-based software is connected to "PROGRESSIVE AUTO" or "PROGRESSIVE VIDEO," images from the...
Operating Instructions
Page 22
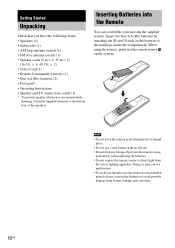
.... TV AUDIO OUT L R To VIDEO/SAT (AUDIO IN) FRONT R FRONT L SURR R SURR L CENTER WOOFER SPEAKER AUDIO IN Y PB/CB PR/CR R L VIDEO/SAT DVD ONLY COMPONENT VIDEO OUT S VIDEO (DVD ONLY) AM VIDEO MONITOR OUT COAXIAL FM 75 To connect the AUDIO OUT jacks of a TV to the VIDEO/SAT (AUDIO IN) .... To change the attenuate setting (page 68). • If your TV does not have AUDIO OUT jacks, you cannot output the TV sound from the speakers of the system for Australian and Middle Eastern models is NTSC. 22GB When connecting a cord, be required to select either PAL or NTSC of this...
.... TV AUDIO OUT L R To VIDEO/SAT (AUDIO IN) FRONT R FRONT L SURR R SURR L CENTER WOOFER SPEAKER AUDIO IN Y PB/CB PR/CR R L VIDEO/SAT DVD ONLY COMPONENT VIDEO OUT S VIDEO (DVD ONLY) AM VIDEO MONITOR OUT COAXIAL FM 75 To connect the AUDIO OUT jacks of a TV to the VIDEO/SAT (AUDIO IN) .... To change the attenuate setting (page 68). • If your TV does not have AUDIO OUT jacks, you cannot output the TV sound from the speakers of the system for Australian and Middle Eastern models is NTSC. 22GB When connecting a cord, be required to select either PAL or NTSC of this...

Operating Instructions
Page 24
...Other Component Hookup You can enjoy sound using the speakers of this system by connecting the AUDIO OUT jacks of other components, connect directly to the TV. Connecting the system and the other component Outputs the other component through the speakers of this system. AUDIO OUT L R To VIDEO/SAT (...AUDIO IN) FRONT R FRONT L SURR R SURR L CENTER WOOFER SPEAKER AUDIO IN Y PB/CB PR/CR R L VIDEO/SAT DVD ONLY COMPONENT VIDEO OUT S VIDEO (DVD ONLY) AM VIDEO MONITOR OUT COAXIAL...
...Other Component Hookup You can enjoy sound using the speakers of this system by connecting the AUDIO OUT jacks of other components, connect directly to the TV. Connecting the system and the other component Outputs the other component through the speakers of this system. AUDIO OUT L R To VIDEO/SAT (...AUDIO IN) FRONT R FRONT L SURR R SURR L CENTER WOOFER SPEAKER AUDIO IN Y PB/CB PR/CR R L VIDEO/SAT DVD ONLY COMPONENT VIDEO OUT S VIDEO (DVD ONLY) AM VIDEO MONITOR OUT COAXIAL...
Operating Instructions
Page 26
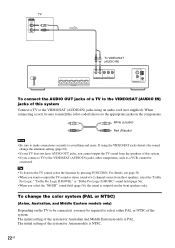
.... • DEMO OFF: sets the demonstration mode off the system by pressing "/1. Step 5: Connecting the AC Power Cord (Mains Lead) Before connecting the AC power cord (mains lead) of this system to a wall outlet (mains), connect the speakers to on, the demonstration does not turn off . •... When you press "/1 on the remote. Note • When you press "/1 on the system, the demonstration does not turn on the remote. "/1 ...
.... • DEMO OFF: sets the demonstration mode off the system by pressing "/1. Step 5: Connecting the AC Power Cord (Mains Lead) Before connecting the AC power cord (mains lead) of this system to a wall outlet (mains), connect the speakers to on, the demonstration does not turn off . •... When you press "/1 on the remote. Note • When you press "/1 on the system, the demonstration does not turn on the remote. "/1 ...

Operating Instructions
Page 27
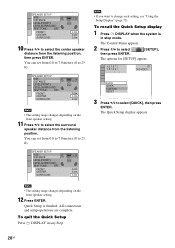
... recall the Quick Setup display" (page 28). 4 Press ENTER without inserting a disc. The Setup Display for selecting the speaker distance appears. 9 Press X/x to select the front speaker distance from the listening position, then press ENTER. "/1 CLEAR X/x ENTER ./> 1 Turn on the TV screen. [Press...: MENU: AUDIO: SUBTITLE: ENGLISH ENGLISH FRENCH SPANISH PORTUGUESE 5 Press X/x to "DVD." 3 Switch the input selector on your TV so that matches your TV type. The Setup Display for using the system. To skip an adjustment, press >. Getting Started Step 7: Performing the Quick Setup...
... recall the Quick Setup display" (page 28). 4 Press ENTER without inserting a disc. The Setup Display for selecting the speaker distance appears. 9 Press X/x to select the front speaker distance from the listening position, then press ENTER. "/1 CLEAR X/x ENTER ./> 1 Turn on the TV screen. [Press...: MENU: AUDIO: SUBTITLE: ENGLISH ENGLISH FRENCH SPANISH PORTUGUESE 5 Press X/x to "DVD." 3 Switch the input selector on your TV so that matches your TV type. The Setup Display for using the system. To skip an adjustment, press >. Getting Started Step 7: Performing the Quick Setup...
Operating Instructions
Page 28
...DISPLAY when the system is finished. All connections and setup operations are complete. You can set from 0.0 to 7.0 meters (0 to change each setting, see "Using the Setup Display" (page 72). Note • The setting range changes depending on the front speaker setting. 11 Press... ENTER. [SETUP], The options for [SETUP] appear. 1 2 ( 2 7 ) 1 8 ( 3 4 ) : : DVD VIDEO QUICK QUICK CUSTOM RESET BNR 3 Press X/x to 23 ft). To quit the Quick Setup Press DISPLAY in stop mode. SPEAKER SETUP SIZE: DISTANCE: LEVEL(FRONT): LEVEL(SURROUND): TEST TONE: OFF FRONT: CENTER: SURROUND: 3.0m 3.0m...
...DISPLAY when the system is finished. All connections and setup operations are complete. You can set from 0.0 to 7.0 meters (0 to change each setting, see "Using the Setup Display" (page 72). Note • The setting range changes depending on the front speaker setting. 11 Press... ENTER. [SETUP], The options for [SETUP] appear. 1 2 ( 2 7 ) 1 8 ( 3 4 ) : : DVD VIDEO QUICK QUICK CUSTOM RESET BNR 3 Press X/x to 23 ft). To quit the Quick Setup Press DISPLAY in stop mode. SPEAKER SETUP SIZE: DISTANCE: LEVEL(FRONT): LEVEL(SURROUND): TEST TONE: OFF FRONT: CENTER: SURROUND: 3.0m 3.0m...
Operating Instructions
Page 29
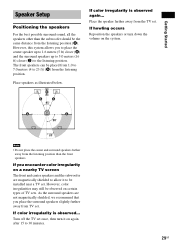
...; Do not place the center and surround speakers farther away from the listening position than the subwoofer should be placed from 1.0 to 7.0 meters (4 to be observed on the system. Getting Started Speaker Setup Positioning the speakers For the best possible surround sound, all the speakers other than the front speakers. However, color irregularities may still be...
...; Do not place the center and surround speakers farther away from the listening position than the subwoofer should be placed from 1.0 to 7.0 meters (4 to be observed on the system. Getting Started Speaker Setup Positioning the speakers For the best possible surround sound, all the speakers other than the front speakers. However, color irregularities may still be...

Operating Instructions
Page 38
... the front of the track/file names when you create albums with no more than 200 albums and 300 files in each album. • The system can recognize up to audio in that order. • Since a disc with the extension ".MP3," ".JPG," or ".JPEG" even if they are more than... create the DATA CD, the playback order may generate a loud noise which could damage your speaker system. • The system does not conform to 200 albums (the system will not play any albums beyond the 200th album. • The system may take priority over the next album in the same tree. (Example: C contains D so 4...
... the front of the track/file names when you create albums with no more than 200 albums and 300 files in each album. • The system can recognize up to audio in that order. • Since a disc with the extension ".MP3," ".JPG," or ".JPEG" even if they are more than... create the DATA CD, the playback order may generate a loud noise which could damage your speaker system. • The system does not conform to 200 albums (the system will not play any albums beyond the 200th album. • The system may take priority over the next album in the same tree. (Example: C contains D so 4...

Operating Instructions
Page 54
... song with multilingual tracks, you can select the sound from both the right and left speakers. The default setting is underlined. Sound Adjustments Changing the Sound * When playing a DVD VIDEO or DATA CD/ DATA DVD* (DivX video files) recorded in multiple audio formats (PCM, Dolby Digital, MPEG audio,...and listen to the sound of the selected channel through both speakers by selecting the left channel. * Asian, Australian, and Middle Eastern models only. x When playing a DVD-RW The types of sound tracks recorded on the DVD VIDEO, the choice of language varies. Refer to "Language Code...
... song with multilingual tracks, you can select the sound from both the right and left speakers. The default setting is underlined. Sound Adjustments Changing the Sound * When playing a DVD VIDEO or DATA CD/ DATA DVD* (DivX video files) recorded in multiple audio formats (PCM, Dolby Digital, MPEG audio,...and listen to the sound of the selected channel through both speakers by selecting the left channel. * Asian, Australian, and Middle Eastern models only. x When playing a DVD-RW The types of sound tracks recorded on the DVD VIDEO, the choice of language varies. Refer to "Language Code...


