
Limited Warranty (US Only)
Page 1
... or resolution of a service problem, or for one (1) year. 4-557-172-02 General Stereo/Hifi Components/Tape Decks ® CD Players/Mini Disc Players/Audio Systems Hifi Audio LIMITED WARRANTY Sony Electronics Inc. ("Sony") warrants this Product is determined to be presented to obtain warranty service. ACCESSORIES: Parts and labor for all accessories are for product information or operation, call : 1-800-488-SONY (7669) Printed in...
... or resolution of a service problem, or for one (1) year. 4-557-172-02 General Stereo/Hifi Components/Tape Decks ® CD Players/Mini Disc Players/Audio Systems Hifi Audio LIMITED WARRANTY Sony Electronics Inc. ("Sony") warrants this Product is determined to be presented to obtain warranty service. ACCESSORIES: Parts and labor for all accessories are for product information or operation, call : 1-800-488-SONY (7669) Printed in...
Operating Instructions
Page 2
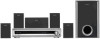
... that to which can radiate radio frequency energy and, if not installed and used in a particular installation. For the customers in the space provided below. The use of optical instruments with the instructions, may be connected to the grounding system of the building, as close to the wall Refer to them whenever you call the CATV system installer's attention to Article 820-40...
... that to which can radiate radio frequency energy and, if not installed and used in a particular installation. For the customers in the space provided below. The use of optical instruments with the instructions, may be connected to the grounding system of the building, as close to the wall Refer to them whenever you call the CATV system installer's attention to Article 820-40...

Operating Instructions
Page 4
... This Manual 6 This System Can Play the Following Discs 6 Guide to the Control Menu Display........ 9 Getting Started Unpacking 12 Inserting Batteries into the Remote....... 12 Hookup Overview 13 Step 1: Speaker System Hookup........... 14 Step 2: Antenna (Aerial) Hookup ......... 18 Step 3: TV Hookup 19 Step 4: Other Component Hookup........ 24 Step 5: Connecting the AC Power Cord (Mains Lead 26 Step 6: Turning off the Demonstration 26 Step 7: Performing the Quick Setup ..... 27 Speaker Setup 29 Playing Discs Playing Discs 30 Using the DVD's Menu 35 Selecting [ORIGINAL] or [PLAY...
... This Manual 6 This System Can Play the Following Discs 6 Guide to the Control Menu Display........ 9 Getting Started Unpacking 12 Inserting Batteries into the Remote....... 12 Hookup Overview 13 Step 1: Speaker System Hookup........... 14 Step 2: Antenna (Aerial) Hookup ......... 18 Step 3: TV Hookup 19 Step 4: Other Component Hookup........ 24 Step 5: Connecting the AC Power Cord (Mains Lead 26 Step 6: Turning off the Demonstration 26 Step 7: Performing the Quick Setup ..... 27 Speaker Setup 29 Playing Discs Playing Discs 30 Using the DVD's Menu 35 Selecting [ORIGINAL] or [PLAY...

Operating Instructions
Page 5
Settings and Adjustments Using the Setup Display 72 Setting the Display or Sound Track Language 73 [LANGUAGE SETUP] Settings for the Display 74 [SCREEN SETUP] Custom Settings 76 [CUSTOM SETUP] Settings for the Speakers 77 [SPEAKER SETUP] Additional Information Precautions 80 Notes about the Discs 81 Troubleshooting 81 Self-diagnosis Function 84 (When letters/numbers appear in the display) Specifications 85 Glossary 87 Language Code List 90 Index to Parts and Controls 91 DVD Setup Display List 95 AMP Menu List 97 Index 98 5GB
Settings and Adjustments Using the Setup Display 72 Setting the Display or Sound Track Language 73 [LANGUAGE SETUP] Settings for the Display 74 [SCREEN SETUP] Custom Settings 76 [CUSTOM SETUP] Settings for the Speakers 77 [SPEAKER SETUP] Additional Information Precautions 80 Notes about the Discs 81 Troubleshooting 81 Self-diagnosis Function 84 (When letters/numbers appear in the display) Specifications 85 Glossary 87 Language Code List 90 Index to Parts and Controls 91 DVD Setup Display List 95 AMP Menu List 97 Index 98 5GB
Operating Instructions
Page 10
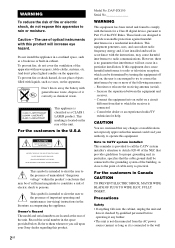
... DVD VIDEO Type of disc being played*3 Playing time*4 Current setting Options Function name of titles (DVD-RW) to be played. [ORIGINAL/PLAY LIST] (page 36) Selects the type of selected Control Menu item REPEAT ENTER Quit: DISPLAY Operation message *1 Displays the scene number for VIDEO CDs (PBC is on), track number for VIDEO CDs/CDs, album number for DATA CDs. DivX video album number for DATA DVDs/DATA CDs (Asian, Australian, and Middle Eastern models...
... DVD VIDEO Type of disc being played*3 Playing time*4 Current setting Options Function name of titles (DVD-RW) to be played. [ORIGINAL/PLAY LIST] (page 36) Selects the type of selected Control Menu item REPEAT ENTER Quit: DISPLAY Operation message *1 Displays the scene number for VIDEO CDs (PBC is on), track number for VIDEO CDs/CDs, album number for DATA CDs. DivX video album number for DATA DVDs/DATA CDs (Asian, Australian, and Middle Eastern models...

Operating Instructions
Page 16
... the SPEAKER jack. To prevent this happens, check the speaker connection again. Examples of poor conditions of the speaker 16GB If the cords are connected correctly. Make sure the bare wire of each other than the one currently displayed on the back of insulation. For details on the wall 1 Prepare screws (not supplied) that all the components, speakers, and AC power cord (mains lead), output a test tone to...
... the SPEAKER jack. To prevent this happens, check the speaker connection again. Examples of poor conditions of the speaker 16GB If the cords are connected correctly. Make sure the bare wire of each other than the one currently displayed on the back of insulation. For details on the wall 1 Prepare screws (not supplied) that all the components, speakers, and AC power cord (mains lead), output a test tone to...

Operating Instructions
Page 48
... Control Menu display is turned off, you select [CHAPTER] [** (**)] is the same number recorded on a DVD+RW using the time code (DVD VIDEO only) 1 In Step 2, select [TIME/TEXT]. [T **:**:**] (playing time of titles, chapters, tracks, indexes, scenes, albums or files. 1 2 ( 2 7 ) 1 8 ( 3 4 ) T 1:32:55 DVD VIDEO Selected row 3 Press ENTER. [** (**)] changes to [- - (**)]. 1 2 ( 2 7 ) ( 3 4 ) T 1:32:55 DVD VIDEO 4 Press X/x or the number buttons to select the title, chapter, track, index, scene, etc., number you make a mistake Cancel the number...
... Control Menu display is turned off, you select [CHAPTER] [** (**)] is the same number recorded on a DVD+RW using the time code (DVD VIDEO only) 1 In Step 2, select [TIME/TEXT]. [T **:**:**] (playing time of titles, chapters, tracks, indexes, scenes, albums or files. 1 2 ( 2 7 ) 1 8 ( 3 4 ) T 1:32:55 DVD VIDEO Selected row 3 Press ENTER. [** (**)] changes to [- - (**)]. 1 2 ( 2 7 ) ( 3 4 ) T 1:32:55 DVD VIDEO 4 Press X/x or the number buttons to select the title, chapter, track, index, scene, etc., number you make a mistake Cancel the number...

Operating Instructions
Page 51
... DISPLAY during playback. continued 51GB Playing Discs When playing a VIDEO CD (without PBC functions, the track number and the index number are playing. Viewing the Station Name or Frequency in the charts. Press DISPLAY. T 1:01:57 Time information 2 Press DISPLAY repeatedly to [IMAGE (JPEG)] (page 41), the "NO IMAGE" message appears on the front panel display. • If you play a disc containing JPEG image files only and you set [MODE...
... DISPLAY during playback. continued 51GB Playing Discs When playing a VIDEO CD (without PBC functions, the track number and the index number are playing. Viewing the Station Name or Frequency in the charts. Press DISPLAY. T 1:01:57 Time information 2 Press DISPLAY repeatedly to [IMAGE (JPEG)] (page 41), the "NO IMAGE" message appears on the front panel display. • If you play a disc containing JPEG image files only and you set [MODE...
Operating Instructions
Page 62
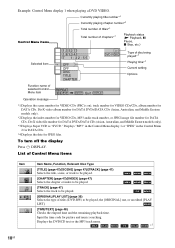
... turn off the Custom Parental Control function 1 Follow steps 1 through 3 of "Preventing playback of specific discs [CUSTOM PARENTAL CONTROL]." 2 Press X/x to select [OFF t], then press ENTER. 3 Enter your 4-digit password using the number buttons, then press ENTER. x If you have not entered a password The display for [PARENTAL CONTROL] appear. 1 2 ( 2 7 ) 1 8 ( 3 4 ) T 1:32:55 DVD VIDEO OFF ON PLAYER PASSWORD 3 Press X/x to enter a new 4-digit password. To play , enter your password, then press ENTER. The display for setting...
... turn off the Custom Parental Control function 1 Follow steps 1 through 3 of "Preventing playback of specific discs [CUSTOM PARENTAL CONTROL]." 2 Press X/x to select [OFF t], then press ENTER. 3 Enter your 4-digit password using the number buttons, then press ENTER. x If you have not entered a password The display for [PARENTAL CONTROL] appear. 1 2 ( 2 7 ) 1 8 ( 3 4 ) T 1:32:55 DVD VIDEO OFF ON PLAYER PASSWORD 3 Press X/x to enter a new 4-digit password. To play , enter your password, then press ENTER. The display for setting...
Operating Instructions
Page 63
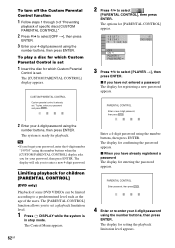
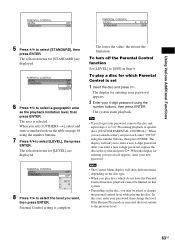
... limited on this case, enter your 4-digit password using the number buttons. 7 Press X/x to enter your password, enter "199703" using the number buttons, then press ENTER. Tip • If you play a disc for which do not have the Parental Control function, playback cannot be asked to select [LEVEL], then press ENTER. When the display for [LEVEL] are displayed. To turn off the Parental Control function Set [LEVEL] to select a geographic area as the playback...
... limited on this case, enter your 4-digit password using the number buttons. 7 Press X/x to enter your password, enter "199703" using the number buttons, then press ENTER. Tip • If you play a disc for which do not have the Parental Control function, playback cannot be asked to select [LEVEL], then press ENTER. When the display for [LEVEL] are displayed. To turn off the Parental Control function Set [LEVEL] to select a geographic area as the playback...
Operating Instructions
Page 66
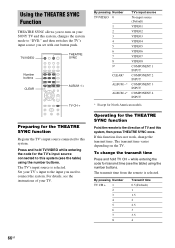
... function does not work, change the transmit time Press and hold TV/VIDEO while entering the code for transmit time (see the instructions of TV and this system (see the table) using the number buttons. By pressing Number TV CH + 1 2 3 4 5 6 7 8 Transmit time 0.5 (Default) 1 1.5 2 2.5 3 3.5 4 66GB Operating for North American models. Using the THEATRE SYNC Function THEATRE SYNC allows you to turn on the TV. If this system, changes the system mode to "DVD," and then switches the TV's input source...
... function does not work, change the transmit time Press and hold TV/VIDEO while entering the code for transmit time (see the instructions of TV and this system (see the table) using the number buttons. By pressing Number TV CH + 1 2 3 4 5 6 7 8 Transmit time 0.5 (Default) 1 1.5 2 2.5 3 3.5 4 66GB Operating for North American models. Using the THEATRE SYNC Function THEATRE SYNC allows you to turn on the TV. If this system, changes the system mode to "DVD," and then switches the TV's input source...

Operating Instructions
Page 68
... operation will be canceled. 5 Press ENTER or AMP MENU. The output level is changed. Scanning stops when the system tunes in the front panel display. 68GB A preset number appears in a station. Tip • To return to the VIDEO/ SAT jacks on the rear panel. Before tuning, make sure to turn down the volume to select "ATT ON" in the front panel display, then press ENTER or c. 4 Press X/x to minimum. 1 Press FUNCTION repeatedly until the auto scanning...
... operation will be canceled. 5 Press ENTER or AMP MENU. The output level is changed. Scanning stops when the system tunes in the front panel display. 68GB A preset number appears in a station. Tip • To return to the VIDEO/ SAT jacks on the rear panel. Before tuning, make sure to turn down the volume to select "ATT ON" in the front panel display, then press ENTER or c. 4 Press X/x to minimum. 1 Press FUNCTION repeatedly until the auto scanning...

Operating Instructions
Page 73
... language you select [OTHERS t] in [MENU], [AUDIO], and [SUBTITLE], select and enter a language code from "Language Code List" (page 90) using X/x. Settings and Adjustments SCREEN SETUP TV TYPE: 16:9 SCREEN SAVER: ON BACKGROUND: JACKET PICTURE BLACK LEVEL: ON BLACK LEVEL (COMPONENT OUT): OFF 4:3 OUTPUT: FULL Selected setting To reset all of the [SETUP] settings 1 Select [RESET] in Step 3 and press ENTER. 2 Select [YES] using the number buttons. Select [LANGUAGE SETUP] in the system, the guide message appears on -screen display or sound track. x [MENU] (DVD VIDEO only) You...
... language you select [OTHERS t] in [MENU], [AUDIO], and [SUBTITLE], select and enter a language code from "Language Code List" (page 90) using X/x. Settings and Adjustments SCREEN SETUP TV TYPE: 16:9 SCREEN SAVER: ON BACKGROUND: JACKET PICTURE BLACK LEVEL: ON BLACK LEVEL (COMPONENT OUT): OFF 4:3 OUTPUT: FULL Selected setting To reset all of the [SETUP] settings 1 Select [RESET] in Step 3 and press ENTER. 2 Select [YES] using the number buttons. Select [LANGUAGE SETUP] in the system, the guide message appears on -screen display or sound track. x [MENU] (DVD VIDEO only) You...
Operating Instructions
Page 76
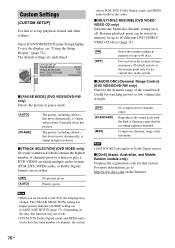
... [AUTO], the language may not work.) • If PCM, DTS, Dolby Digital sound, and MPEG audio tracks have the same number of channels, the system selects PCM, DTS, Dolby Digital sound, and MPEG audio tracks in high resolution. x [MULTI-DISC RESUME] (DVD VIDEO/ VIDEO CD only) Switches the Multi-disc Resume setting on the disc, this order. x [DivX] (Asian, Australian, and Middle Eastern models only) Displays the registration code for up playback related and other settings. Select [CUSTOM SETUP] in memory. To use...
... [AUTO], the language may not work.) • If PCM, DTS, Dolby Digital sound, and MPEG audio tracks have the same number of channels, the system selects PCM, DTS, Dolby Digital sound, and MPEG audio tracks in high resolution. x [MULTI-DISC RESUME] (DVD VIDEO/ VIDEO CD only) Switches the Multi-disc Resume setting on the disc, this order. x [DivX] (Asian, Australian, and Middle Eastern models only) Displays the registration code for up playback related and other settings. Select [CUSTOM SETUP] in memory. To use...

Operating Instructions
Page 77
... the surround speaker position. x [SIZE] If you connect headphones to adjust the level and the balance of other speakers, subwoofer may be excessive. Settings and Adjustments Settings for the Speakers [SPEAKER SETUP] To obtain the best possible surround sound, set for the size of the speakers you cannot change them. Then use the test tone to the system. The default settings are located in section A. [NONE]: Select this if surround speakers are underlined. SPEAKER SETUP SIZE: DISTANCE: LEVEL(FRONT): LEVEL(SURROUND): TEST TONE: OFF FRONT: CENTER: SURROUND: SUBWOOFER...
... the surround speaker position. x [SIZE] If you connect headphones to adjust the level and the balance of other speakers, subwoofer may be excessive. Settings and Adjustments Settings for the Speakers [SPEAKER SETUP] To obtain the best possible surround sound, set for the size of the speakers you cannot change them. Then use the test tone to the system. The default settings are located in section A. [NONE]: Select this if surround speakers are underlined. SPEAKER SETUP SIZE: DISTANCE: LEVEL(FRONT): LEVEL(SURROUND): TEST TONE: OFF FRONT: CENTER: SURROUND: SUBWOOFER...

Operating Instructions
Page 80
... FUNCTION repeatedly to direct sunlight, excessive dust, or mechanical shock. IMPORTANT NOTICE Caution: This system is equipped with a high power amplifier. The system is capable of time you move the system, take out any disc. Should this . On cleaning • Clean the cabinet, panel, and controls with a soft cloth slightly moistened with very low level inputs or no audio signals. Do not use any questions or problems...
... FUNCTION repeatedly to direct sunlight, excessive dust, or mechanical shock. IMPORTANT NOTICE Caution: This system is equipped with a high power amplifier. The system is capable of time you move the system, take out any disc. Should this . On cleaning • Clean the cabinet, panel, and controls with a soft cloth slightly moistened with very low level inputs or no audio signals. Do not use any questions or problems...

Operating Instructions
Page 81
... disc. This system can view pictures from your system goes through your VCR to get to your TV cannot accept the signal in the front panel display. Power The power is not turned on the disc. • Do not expose the disc to some DVD programs continued 81GB Additional Information Troubleshooting If you using the system, use this case, return the setting to the correct TV input jack (page 19). • The video input...
... disc. This system can view pictures from your system goes through your VCR to get to your TV cannot accept the signal in the front panel display. Power The power is not turned on the disc. • Do not expose the disc to some DVD programs continued 81GB Additional Information Troubleshooting If you using the system, use this case, return the setting to the correct TV input jack (page 19). • The video input...

Operating Instructions
Page 82
... signal strength of the center speaker may be the entire 5.1 channel. The disc does not play a VIDEO CD, a CD, or an MP3. • Set [AUDIO] to "AUTO FORMAT DIRECT AUTO" (page 56). Even though you are dirty. The left and right sounds are unbalanced or reversed. • Check that the connecting cords are away from the audio components. • The plugs and jacks are playing a Dolby Digital, DTS, or MPEG audio sound track. • Make sure...
... signal strength of the center speaker may be the entire 5.1 channel. The disc does not play a VIDEO CD, a CD, or an MP3. • Set [AUDIO] to "AUTO FORMAT DIRECT AUTO" (page 56). Even though you are dirty. The left and right sounds are unbalanced or reversed. • Check that the connecting cords are away from the audio components. • The plugs and jacks are playing a Dolby Digital, DTS, or MPEG audio sound track. • Make sure...
Operating Instructions
Page 98
..., 39 Multi Session CD 7 Multi-angle function 60, 88 MULTI-DISC RESUME 76 Multilingual function 88 Muting 31 N Naming preset stations 69 O On-screen display Control Menu display 9 Setup Display 72 ORIGINAL 36 OSD 73 Other Component Hookup 24 P PARENTAL CONTROL 62, 88 PAUSE MODE 76 PBC Playback 7, 36, 88 PICTURE NAVI 40, 49 PLAY LIST 36 Preset Station 68 Program Play 32 PROGRESSIVE AUTO 20 Progressive format 20, 88 PROGRESSIVE VIDEO 21 Q Quick Setup 27 R Radio 69 Rear Panel 93 Region Code 7, 88 Remote 12...
..., 39 Multi Session CD 7 Multi-angle function 60, 88 MULTI-DISC RESUME 76 Multilingual function 88 Muting 31 N Naming preset stations 69 O On-screen display Control Menu display 9 Setup Display 72 ORIGINAL 36 OSD 73 Other Component Hookup 24 P PARENTAL CONTROL 62, 88 PAUSE MODE 76 PBC Playback 7, 36, 88 PICTURE NAVI 40, 49 PLAY LIST 36 Preset Station 68 Program Play 32 PROGRESSIVE AUTO 20 Progressive format 20, 88 PROGRESSIVE VIDEO 21 Q Quick Setup 27 R Radio 69 Rear Panel 93 Region Code 7, 88 Remote 12...
Marketing Specifications
Page 2
... 107mm); Subwoofer (RMS) 135 Watts) Power Requirements: 120V AC, 60Hz Power Consumption: 145 Watts (at 3 ohms and 1 kHz with a THD of .7% 1. Bass Reflex (Ported) Woofer(s): 2 1/2" Speaker Terminal Type: DAV Modular Connector DAV-DX150 Weight Receiver: 10 lbs 13 oz (4.9kg); Center: 1 lbs, 9 oz (700 g); Features and specifications are trademarks of their respective owners. Surround: 1 lbs, 2 oz (500 g); DAV-DX150 Integrated DVD System Specifications Amplifier Audio Digital Amplifier: S-Master® Digital Amplifier Sound Mode: Bass Boost function-DSGX, Dolby® Pro...
... 107mm); Subwoofer (RMS) 135 Watts) Power Requirements: 120V AC, 60Hz Power Consumption: 145 Watts (at 3 ohms and 1 kHz with a THD of .7% 1. Bass Reflex (Ported) Woofer(s): 2 1/2" Speaker Terminal Type: DAV Modular Connector DAV-DX150 Weight Receiver: 10 lbs 13 oz (4.9kg); Center: 1 lbs, 9 oz (700 g); Features and specifications are trademarks of their respective owners. Surround: 1 lbs, 2 oz (500 g); DAV-DX150 Integrated DVD System Specifications Amplifier Audio Digital Amplifier: S-Master® Digital Amplifier Sound Mode: Bass Boost function-DSGX, Dolby® Pro...


