Operating Instructions
Page 1
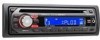
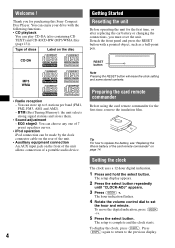
Refer to these numbers whenever you call upon your Sony dealer regarding this product. CDX-GT420IP © 2007 Sony Corporation To cancel the demonstration (DEMO) display, see page 11. CDX-GT420IP Serial No. 3-217-561-11 (1) FM/AM Compact Disc Player Operating Instructions US Mode d'emploi FR Owner's Record The model and serial numbers are located on the bottom of the unit. Record the serial number in the space provided below. Model No. Pour annuler l'affichage de démonstration (DEMO), reportez-vous à la page 12.
Refer to these numbers whenever you call upon your Sony dealer regarding this product. CDX-GT420IP © 2007 Sony Corporation To cancel the demonstration (DEMO) display, see page 11. CDX-GT420IP Serial No. 3-217-561-11 (1) FM/AM Compact Disc Player Operating Instructions US Mode d'emploi FR Owner's Record The model and serial numbers are located on the bottom of the unit. Record the serial number in the space provided below. Model No. Pour annuler l'affichage de démonstration (DEMO), reportez-vous à la page 12.
Operating Instructions
Page 2
... Rules. For installation and connections, see the supplied installation/connections manual. Warning This equipment has been tested and found to provide reasonable protection against harmful interference in the set the Auto Off function, press and hold (OFF) until the display disappears each time you turn the ignition off , which can radiate radio frequency energy and, if not installed and used in accordance with the instructions, may apply...
... Rules. For installation and connections, see the supplied installation/connections manual. Warning This equipment has been tested and found to provide reasonable protection against harmful interference in the set the Auto Off function, press and hold (OFF) until the display disappears each time you turn the ignition off , which can radiate radio frequency energy and, if not installed and used in accordance with the instructions, may apply...
Operating Instructions
Page 3
.../FAD/SUB 10 Customizing the equalizer curve - SET 11 Using optional equipment 11 Auxiliary audio equipment 11 Additional Information Precautions 12 Notes on discs 12 Playback order of controls and basic operations Main unit 6 Card remote commander RM-X151 6 CD Display items 8 Repeat and shuffle play 10 Scan 10 Other functions Changing the sound settings 10 Adjusting the sound characteristics - BTM 8 Storing manually 8 Receiving the stored stations 8 Tuning automatically 8 iPod Playing back iPod 9 Playing tracks 9 Display items 9 Setting the play mode 9 Selecting Album...
.../FAD/SUB 10 Customizing the equalizer curve - SET 11 Using optional equipment 11 Auxiliary audio equipment 11 Additional Information Precautions 12 Notes on discs 12 Playback order of controls and basic operations Main unit 6 Card remote commander RM-X151 6 CD Display items 8 Repeat and shuffle play 10 Scan 10 Other functions Changing the sound settings 10 Adjusting the sound characteristics - BTM 8 Storing manually 8 Receiving the stored stations 8 Tuning automatically 8 iPod Playing back iPod 9 Playing tracks 9 Display items 9 Setting the play mode 9 Selecting Album...
Operating Instructions
Page 4
... flashes. 4 Rotate the volume control dial to the previous display. Detach the front panel and press the RESET button with the following functions. • CD playback You can enjoy your drive with a pointed object, such as a ball-point pen. BTM (Best Tuning Memory): the unit selects strong signal stations and stores them. • Sound adjustment - Setting the clock The clock uses a 12-hour digital indication. 1 Press and hold the select button. You can play CD...
... flashes. 4 Rotate the volume control dial to the previous display. Detach the front panel and press the RESET button with the following functions. • CD playback You can enjoy your drive with a pointed object, such as a ball-point pen. BTM (Best Tuning Memory): the unit selects strong signal stations and stores them. • Sound adjustment - Setting the clock The clock uses a 12-hour digital indication. 1 Press and hold the select button. You can play CD...
Operating Instructions
Page 5
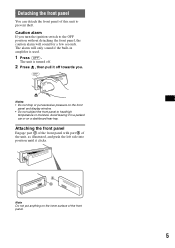
...you . The alarm will sound for a few seconds. Attaching the front panel Engage part A of the front panel with part B of this unit to prevent theft. Notes • Do not drop or put anything on the front panel and display window. • Do not subject the front panel to heat/high temperature ...or moisture. A B Note Do not put excessive pressure on the inner surface of the front panel. 5 The unit is used. 1 Press (OFF). Avoid leaving it in amplifier is turned off. 2 Press ...
...you . The alarm will sound for a few seconds. Attaching the front panel Engage part A of the front panel with part B of this unit to prevent theft. Notes • Do not drop or put anything on the front panel and display window. • Do not subject the front panel to heat/high temperature ...or moisture. A B Note Do not put excessive pressure on the inner surface of the front panel. 5 The unit is used. 1 Press (OFF). Avoid leaving it in amplifier is turned off. 2 Press ...
Operating Instructions
Page 6
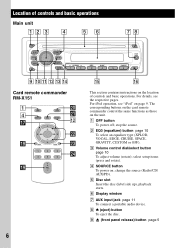
... section contains instructions on page 9. A OFF button To power off; D SOURCE button To power on the unit. H Z (eject) button To eject the disc. The corresponding buttons on the card remote commander control the same functions as those on ; C Volume control dial/select button page 10 To adjust volume (rotate); I (front panel release) button page 5 6 qa qs qd qf Card remote commander RM-X151 1 4 qj qk OFF ATT SOURCE SEL MODE + - B EQ3 (equalizer) button page 10 To select an equalizer type (XPLOD, VOCAL...
... section contains instructions on page 9. A OFF button To power off; D SOURCE button To power on the unit. H Z (eject) button To eject the disc. The corresponding buttons on the card remote commander control the same functions as those on ; C Volume control dial/select button page 10 To adjust volume (rotate); I (front panel release) button page 5 6 qa qs qd qf Card remote commander RM-X151 1 4 qj qk OFF ATT SOURCE SEL MODE + - B EQ3 (equalizer) button page 10 To select an equalizer type (XPLOD, VOCAL...
Operating Instructions
Page 7
... ). M BTM button page 8 To start the BTM function (press and hold ). Note If the unit is inserted to activate the unit first. 7 Setup, sound setting, etc., can be operated by M m. wf Number buttons To receive stored stations (press); P Receptor for the card remote commander The following buttons on the card remote commander have also different buttons/functions from the unit. button To adjust volume. scroll the display item (press and hold ). select the play mode of iPod.
... ). M BTM button page 8 To start the BTM function (press and hold ). Note If the unit is inserted to activate the unit first. 7 Setup, sound setting, etc., can be operated by M m. wf Number buttons To receive stored stations (press); P Receptor for the card remote commander The following buttons on the card remote commander have also different buttons/functions from the unit. button To adjust volume. scroll the display item (press and hold ). select the play mode of iPod.
Operating Instructions
Page 8
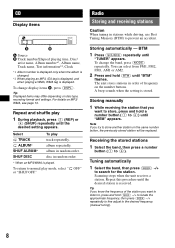
... unit receives a station. Tip Displayed items may differ depending on MP3/ WMA, see page 13. Radio Storing and receiving stations Caution When tuning in random order. * When an MP3/WMA is displayed. Tip If you know the frequency of frequency on the same number button, the previously stored station will be replaced. Storing automatically - To change the band, press (MODE) repeatedly. CD Display items A Source B Track number/Elapsed playing time, Disc/ artist name, Album number...
... unit receives a station. Tip Displayed items may differ depending on MP3/ WMA, see page 13. Radio Storing and receiving stations Caution When tuning in random order. * When an MP3/WMA is displayed. Tip If you know the frequency of frequency on the same number button, the previously stored station will be replaced. Storing automatically - To change the band, press (MODE) repeatedly. CD Display items A Source B Track number/Elapsed playing time, Disc/ artist name, Album number...

Operating Instructions
Page 9
... connector, operation from the iPod cannot be performed. • Before connecting the iPod to the dock connector, turn on automatically, and the display will turn down the volume of the unit, you cancel Resuming mode by pressing (MODE) or (1)/ (2) (ALBUM -/+), (3) (Repeat), (4) (Shuffle) or (5) (Scan) now function to change display items, press (DSPL). The iPod will appear on your car speakers, while controlling the iPod from the point last played. 3 Press (MODE) to select the play mode. 9 Setting...
... connector, operation from the iPod cannot be performed. • Before connecting the iPod to the dock connector, turn on automatically, and the display will turn down the volume of the unit, you cancel Resuming mode by pressing (MODE) or (1)/ (2) (ALBUM -/+), (3) (Repeat), (4) (Shuffle) or (5) (Scan) now function to change display items, press (DSPL). The iPod will appear on your car speakers, while controlling the iPod from the point last played. 3 Press (MODE) to select the play mode. 9 Setting...

Operating Instructions
Page 10
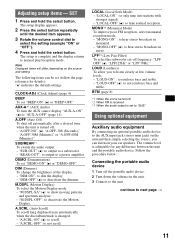
... (front-rear) t SUB (subwoofer volume)*2 t AUX*3 *1 When EQ3 is activated (page 10). *2 When the audio output is set equalizer curve, press and hold the select button before the setting is complete and the display returns to normal play mode, select "SCAN OFF." EQ3 "CUSTOM" of each track will not work during shuffle play . To return to adjust the selected item. After 3 seconds, the setting is complete. To restore the factory-set to normal play /reception mode.
... (front-rear) t SUB (subwoofer volume)*2 t AUX*3 *1 When EQ3 is activated (page 10). *2 When the audio output is set equalizer curve, press and hold the select button before the setting is complete and the display returns to normal play mode, select "SCAN OFF." EQ3 "CUSTOM" of each track will not work during shuffle play . To return to adjust the selected item. After 3 seconds, the setting is complete. To restore the factory-set to normal play /reception mode.
Operating Instructions
Page 11
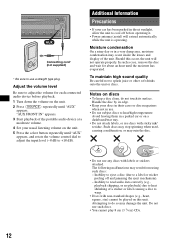
... time when the unit is complete and the display returns to "SUB." A.OFF (Auto Off) To shut off . *2 When FM is received. *3 When the audio output is changed. - "DIM-OFF" (z): to tune normal reception. "A.SCRL-ON" (z): to only tune into stations with stronger signals. - LPF*3 (Low Pass Filter) To select the subwoofer cut-off , - The volume level is adjustable for details): "z" indicates the default settings. The setup is turned off frequency...
... time when the unit is complete and the display returns to "SUB." A.OFF (Auto Off) To shut off . *2 When FM is received. *3 When the audio output is changed. - "DIM-OFF" (z): to tune normal reception. "A.SCRL-ON" (z): to only tune into stations with stronger signals. - LPF*3 (Low Pass Filter) To select the subwoofer cut-off , - The volume level is adjustable for details): "z" indicates the default settings. The setup is turned off frequency...
Operating Instructions
Page 12
... adjust the input level (-8 dB to cool off and jamming the eject mechanism). - Handle the disc by its surface. Avoid leaving them in use. • Do not subject discs to heat/high temperature. Moisture condensation On a rainy day or in direct sunlight, allow the unit to +18 dB). In such a case, remove the disc and wait for each connected audio device before operating it. • Power antenna...
... adjust the input level (-8 dB to cool off and jamming the eject mechanism). - Handle the disc by its surface. Avoid leaving them in use. • Do not subject discs to heat/high temperature. Moisture condensation On a rainy day or in direct sunlight, allow the unit to +18 dB). In such a case, remove the disc and wait for each connected audio device before operating it. • Power antenna...
Operating Instructions
Page 13
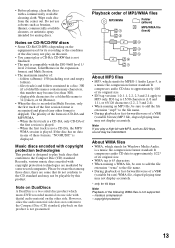
... not play back discs that conform to MP3 only. copyright-protected 13 Do not use solvents such as 320 kbps, sound may become less than 300). - Notes on CD-R/CD-RW discs • Some CD-Rs/CD-RWs (depending on this number may be sure to add the file extension ".wma" to the Compact Disc (CD) standard, playback on the equipment used for analog discs. When...
... not play back discs that conform to MP3 only. copyright-protected 13 Do not use solvents such as 320 kbps, sound may become less than 300). - Notes on CD-R/CD-RW discs • Some CD-Rs/CD-RWs (depending on this number may be sure to add the file extension ".wma" to the Compact Disc (CD) standard, playback on the equipment used for analog discs. When...
Operating Instructions
Page 14
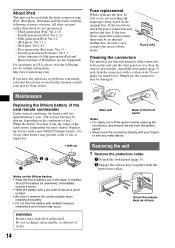
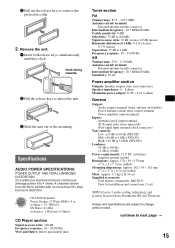
...-generation iPod: Ver.2.3.0 - Second-generation iPod nano: Ver.1.1 (video function of fifth-generation iPod and photo function of children. Do not apply too much force. Fourth-generation iPod: Ver.3.1.1 - First-generation iPod nano: Ver.1.3 - Removing the unit 1 Remove the protection collar. 1 Detach the front panel (page 5). 2 Engage the release keys together with a new CR2025 lithium battery. Fuse replacement When replacing the fuse, be sure to use .) When the battery becomes...
...-generation iPod: Ver.2.3.0 - Second-generation iPod nano: Ver.1.1 (video function of fifth-generation iPod and photo function of children. Do not apply too much force. Fourth-generation iPod: Ver.3.1.1 - First-generation iPod nano: Ver.1.3 - Removing the unit 1 Remove the protection collar. 1 Detach the front panel (page 5). 2 Engage the release keys together with a new CR2025 lithium battery. Fuse replacement When replacing the fuse, be sure to use .) When the battery becomes...
Operating Instructions
Page 15
... (aerial) terminal: External antenna (aerial) connector Intermediate frequency: 10.7 MHz/450 kHz Sensitivity: 30 µV Power amplifier section Outputs: Speaker outputs (sure seal connectors) Speaker impedance: 4 - 8 ohms Maximum power output: 52 W × 4 (at 4 ohms) General Output: Audio outputs terminal (front, sub/rear switchable) Power antenna (aerial) relay control terminal Power amplifier control terminal Inputs: Antenna (aerial) input terminal AUX input jack (stereo mini jack) iPod signal input terminal (dock connector) Tone controls: Low: ±10 dB at 60 Hz (XPLOD) Mid: ±10...
... (aerial) terminal: External antenna (aerial) connector Intermediate frequency: 10.7 MHz/450 kHz Sensitivity: 30 µV Power amplifier section Outputs: Speaker outputs (sure seal connectors) Speaker impedance: 4 - 8 ohms Maximum power output: 52 W × 4 (at 4 ohms) General Output: Audio outputs terminal (front, sub/rear switchable) Power antenna (aerial) relay control terminal Power amplifier control terminal Inputs: Antenna (aerial) input terminal AUX input jack (stereo mini jack) iPod signal input terminal (dock connector) Tone controls: Low: ±10 dB at 60 Hz (XPLOD) Mid: ±10...
Operating Instructions
Page 16
.... - The display disappears from paper. The Auto Off function activates after turning off the unit. Card remote commander operation is not correct. The sound skips. • Installation is not possible. Troubleshooting The following discs take longer to play back than 45° in amplifier. The power antenna (aerial) does not extend. Makes noise when the position of the fader control "FAD" is set , demonstration mode starts. If no operation is switched. t Press...
.... - The display disappears from paper. The Auto Off function activates after turning off the unit. Card remote commander operation is not correct. The sound skips. • Installation is not possible. Troubleshooting The following discs take longer to play back than 45° in amplifier. The power antenna (aerial) does not extend. Makes noise when the position of the fader control "FAD" is set , demonstration mode starts. If no operation is switched. t Press...
Operating Instructions
Page 17
.... NO IPOD No iPod connected. RESET The CD unit cannot be displayed with the unit. "" The character cannot be operated due to the dock connector, disconnect the iPod from the dock connector, then reconnect. If the error indication remains on in the track. Radio reception The stations cannot be received. t Check the connection of speakers/amplifiers is not written in the display, consult your nearest Sony dealer. NO NAME A disc/track name...
.... NO IPOD No iPod connected. RESET The CD unit cannot be displayed with the unit. "" The character cannot be operated due to the dock connector, disconnect the iPod from the dock connector, then reconnect. If the error indication remains on in the track. Radio reception The stations cannot be received. t Check the connection of speakers/amplifiers is not written in the display, consult your nearest Sony dealer. NO NAME A disc/track name...
Operating Instructions
Page 36
Note: Stored data may be erased. 3 Please contact (U.S.A. only); If you have any questions or for the latest support information on this product, try the following: 1 Read Troubleshooting in China Call 1-800-222-7669 URL http://www.SONY.com Support site If you have any questions/problems regarding this product, please visit the web site below: http://esupport.sony.com http://www.sony.com/xplod http://www.sony.net/ Sony Corporation Printed in these Operating Instructions. 2 Reset the unit.
Note: Stored data may be erased. 3 Please contact (U.S.A. only); If you have any questions or for the latest support information on this product, try the following: 1 Read Troubleshooting in China Call 1-800-222-7669 URL http://www.SONY.com Support site If you have any questions/problems regarding this product, please visit the web site below: http://esupport.sony.com http://www.sony.com/xplod http://www.sony.net/ Sony Corporation Printed in these Operating Instructions. 2 Reset the unit.


