
Operating Instructions (primary manual)
Page 2
... players)*1. • CD TEXT information (displayed when a CD TEXT disc*2 is encouraged to try to operate this equipment. This information is located on the drive unit's internal chassis. 2 If this equipment does cause harmful interference to radio or television reception, which the receiver is connected. - ... DIRECTLY WITH OPTICAL INSTRUMENTS This label is recorded on the bottom of the FCC Rules. CDX-CA705M only: This label is an audio CD that this manual could void your nearest authorized Sony dealer for a Class B digital device, pursuant to Part 15 of the chassis. The...
... players)*1. • CD TEXT information (displayed when a CD TEXT disc*2 is encouraged to try to operate this equipment. This information is located on the drive unit's internal chassis. 2 If this equipment does cause harmful interference to radio or television reception, which the receiver is connected. - ... DIRECTLY WITH OPTICAL INSTRUMENTS This label is recorded on the bottom of the FCC Rules. CDX-CA705M only: This label is an audio CD that this manual could void your nearest authorized Sony dealer for a Class B digital device, pursuant to Part 15 of the chassis. The...
Operating Instructions (primary manual)
Page 3
... - Repeat Play 21 Playing tracks in a station through a list - List-up 12 * Functions available with optional CD/MD unit Radio Storing stations automatically - Disc Memo 11 Locating a disc by name - Best Tuning Memory (BTM 13 Receiving the stored stations 13 Storing only the desired stations 14 Storing station names - Repeat Play 11 Playing...
... - Repeat Play 21 Playing tracks in a station through a list - List-up 12 * Functions available with optional CD/MD unit Radio Storing stations automatically - Disc Memo 11 Locating a disc by name - Best Tuning Memory (BTM 13 Receiving the stored stations 13 Storing only the desired stations 14 Storing station names - Repeat Play 11 Playing...
Operating Instructions (primary manual)
Page 4
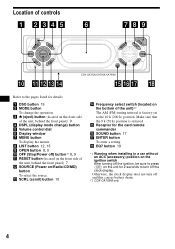
... DSPL (display mode change the operation. m SCRL (scroll) button 10 n Frequency select switch (located on /Radio/CD/MD) button To select the source. Otherwise, the clock display does not turn off and this causes battery drain. *2 CDX-CA705M only 4 Location of controls M RL M DI T ER N T ET DI SO PL O ODE DS DSO... SOURCE FF SC OPE ENU LIS SC/PRES SEEK SC/PRESE EQ7 UND ENT CDX-CA720X/CA700X/CA705M Refer to turn off the clock display. o Receptor for details. c Z (eject) button (located on the front side of the unit, behind the...
... DSPL (display mode change the operation. m SCRL (scroll) button 10 n Frequency select switch (located on /Radio/CD/MD) button To select the source. Otherwise, the clock display does not turn off and this causes battery drain. *2 CDX-CA705M only 4 Location of controls M RL M DI T ER N T ET DI SO PL O ODE DS DSO... SOURCE FF SC OPE ENU LIS SC/PRES SEEK SC/PRESE EQ7 UND ENT CDX-CA720X/CA700X/CA705M Refer to turn off the clock display. o Receptor for details. c Z (eject) button (located on the front side of the unit, behind the...
Operating Instructions (primary manual)
Page 8
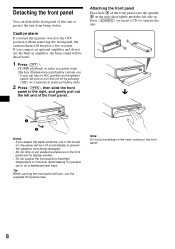
... lightly push the left end of the front panel. Note Do not put excessive pressure on the ignition switch, be deactivated. 1 Press (OFF)*. CD/MD playback or radio reception stops (the key illumination and display remain on). * If your car has no ACC position on the front panel and its display window... unit from being stolen. Attaching the front panel Place hole A of the front panel onto the spindle B on a dashboard/rear trays. Press (SOURCE) (or insert a CD) to operate the unit.
... lightly push the left end of the front panel. Note Do not put excessive pressure on the ignition switch, be deactivated. 1 Press (OFF)*. CD/MD playback or radio reception stops (the key illumination and display remain on). * If your car has no ACC position on the front panel and its display window... unit from being stolen. Attaching the front panel Place hole A of the front panel onto the spindle B on a dashboard/rear trays. Press (SOURCE) (or insert a CD) to operate the unit.
Operating Instructions (primary manual)
Page 13
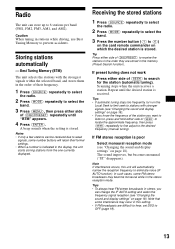
...locate the approximate frequency, then press (SEEK) repeatedly to fine adjust to , press and hold either side of the station you can be received due to weak signals, some number buttons will automatically narrow the reception frequency to OFF (page 19). 13 Storing stations automatically - Tips ...too frequently, turn on the Local Seek to limit seek to (6)) on the card remote commander on page 18). Receiving the stored stations 1 Press (SOURCE) repeatedly to select the radio. 2 Press (MODE) repeatedly to select the band. 3 Press the number button ((1) to stations with the ...
...locate the approximate frequency, then press (SEEK) repeatedly to fine adjust to , press and hold either side of the station you can be received due to weak signals, some number buttons will automatically narrow the reception frequency to OFF (page 19). 13 Storing stations automatically - Tips ...too frequently, turn on the Local Seek to limit seek to (6)) on the card remote commander on page 18). Receiving the stored stations 1 Press (SOURCE) repeatedly to select the radio. 2 Press (MODE) repeatedly to select the band. 3 Press the number button ((1) to stations with the ...
Operating Instructions (primary manual)
Page 14
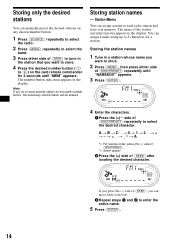
...character. Storing only the desired stations You can manually preset the desired stations on any chosen number button. 1 Press (SOURCE) repeatedly to select the radio. 2 Press (MODE) repeatedly to select the band. 3 Press either side of (DISC/PRESET) repeatedly until "MEM" appears. You can assign ...a name to store another station on the same number button, the previously stored station will be erased. The name of (SEEK), you try to each radio station and store it in the display. t _*2 t A *1 For reverse order, press the (-) side of (DISC/PRESET). *2 (blank space) 2 Press ...
...character. Storing only the desired stations You can manually preset the desired stations on any chosen number button. 1 Press (SOURCE) repeatedly to select the radio. 2 Press (MODE) repeatedly to select the band. 3 Press either side of (DISC/PRESET) repeatedly until "MEM" appears. You can assign ...a name to store another station on the same number button, the previously stored station will be erased. The name of (SEEK), you try to each radio station and store it in the display. t _*2 t A *1 For reverse order, press the (-) side of (DISC/PRESET). *2 (blank space) 2 Press ...
Operating Instructions (primary manual)
Page 15
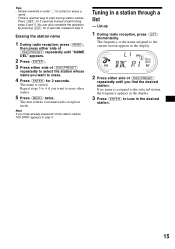
...selected station, the frequency appears in the desired station. 15 The unit returns to tune in the display. 3 Press (ENTER) to normal radio reception mode. Note If you find the desired station. Tuning in step 4. The frequency or the name assigned to erase. 4 Press (...4 if you want to start storing station names: Press (LIST) for 2 seconds instead of step 5. List-up 1 During radio reception, press (LIST) momentarily. Erasing the station name 1 During radio reception, press (MENU), then press either side of (DISC/PRESET) repeatedly until "NAME DEL" appears. 2 Press (ENTER)....
...selected station, the frequency appears in the desired station. 15 The unit returns to tune in the display. 3 Press (ENTER) to normal radio reception mode. Note If you find the desired station. Tuning in step 4. The frequency or the name assigned to erase. 4 Press (...4 if you want to start storing station names: Press (LIST) for 2 seconds instead of step 5. List-up 1 During radio reception, press (LIST) momentarily. Erasing the station name 1 During radio reception, press (MENU), then press either side of (DISC/PRESET) repeatedly until "NAME DEL" appears. 2 Press (ENTER)....
Operating Instructions (primary manual)
Page 16
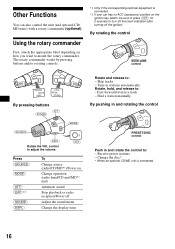
... to : - Using the rotary commander First, attach the appropriate label depending on Change operation (radio band/CD unit/MD*1 unit) Attenuate sound Stop playback or radio reception/Power off the ignition. Receive preset stations. - Change the disc*. * When an optional CD/MD unit is connected. *2 If your car has no ACC (accessory) position on the...
... to : - Using the rotary commander First, attach the appropriate label depending on Change operation (radio band/CD unit/MD*1 unit) Attenuate sound Stop playback or radio reception/Power off the ignition. Receive preset stations. - Change the disc*. * When an optional CD/MD unit is connected. *2 If your car has no ACC (accessory) position on the...
Operating Instructions (primary manual)
Page 19
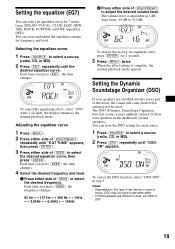
...you press (EQ7), the item changes. Adjusting the equalizer curve 1 Press (MENU). 2 Press either side of (DISC/PRESET) to select a source (radio, CD, or MD). 2 Press (EQ7) repeatedly until the desired equalizer curve. To restore the factory-set DSO to select the desired equalizer curve, then press... (ENTER). You can store and adjust the equalizer settings for each source. 1 Press (SOURCE) to select a source (radio, CD, or MD). 2 Press (DSO) repeatedly until "EQ7 TUNE" appears, then press (ENTER). 3 Press either side of music, DSO may not be...
...you press (EQ7), the item changes. Adjusting the equalizer curve 1 Press (MENU). 2 Press either side of (DISC/PRESET) to select a source (radio, CD, or MD). 2 Press (EQ7) repeatedly until the desired equalizer curve. To restore the factory-set DSO to select the desired equalizer curve, then press... (ENTER). You can store and adjust the equalizer settings for each source. 1 Press (SOURCE) to select a source (radio, CD, or MD). 2 Press (DSO) repeatedly until "EQ7 TUNE" appears, then press (ENTER). 3 Press either side of music, DSO may not be...
Operating Instructions (primary manual)
Page 25
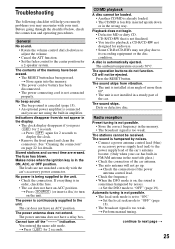
... connected properly. The car does not have a relay box. You entered the name edit mode. The sound skips from /do not function. Radio reception Preset tuning is not possible. • Store the correct frequency in amplifier. Indications disappear from vibration. • The unit is installed... in the wrong way. Before going through the checklist below, check the connection and operating procedures. If everything is too weak. CD will not be received. The stations cannot be ejected. The power is forcibly inserted upside down or in order, check the fuse. • The ...
... connected properly. The car does not have a relay box. You entered the name edit mode. The sound skips from /do not function. Radio reception Preset tuning is not possible. • Store the correct frequency in amplifier. Indications disappear from vibration. • The unit is installed... in the wrong way. Before going through the checklist below, check the connection and operating procedures. If everything is too weak. CD will not be received. The stations cannot be ejected. The power is forcibly inserted upside down or in order, check the fuse. • The ...

XM Satellite Radio Operating manual
Page 1
...for installation and connection (1 set to on the display. CDX-C8050X CDX-C800REC* CDX-M750 CDX-M650 CDX-M610 CDX-M600 MDX-C8500X XR-M550 * You may not function ...receiver completes receiving the information. Questions? Visit www.xmradio.com. Button locations vary with the instructions, may use an optional CD or MD changer. • Receive up to 8 characters. Examples of the receiver...if you want to : • Receive XM Satellite Radio programming (with subscription) by connecting a Sony master unit* compatible with the receiver, an error message will not display...
...for installation and connection (1 set to on the display. CDX-C8050X CDX-C800REC* CDX-M750 CDX-M650 CDX-M610 CDX-M600 MDX-C8500X XR-M550 * You may not function ...receiver completes receiving the information. Questions? Visit www.xmradio.com. Button locations vary with the instructions, may use an optional CD or MD changer. • Receive up to 8 characters. Examples of the receiver...if you want to : • Receive XM Satellite Radio programming (with subscription) by connecting a Sony master unit* compatible with the receiver, an error message will not display...


