

Limited Warranty (U.S. Only)
Page 1
...-488-SONY (7669) Repair / Replacement Warranty: This Limited Warranty shall apply to the Sony authorized service facility specified. For specific instructions on your responsibility to backup any such software is invalid if the factory-applied serial number has been altered or removed from the original date of purchase of one (1) year from your exclusive remedies. Please refer to the End User...
...-488-SONY (7669) Repair / Replacement Warranty: This Limited Warranty shall apply to the Sony authorized service facility specified. For specific instructions on your responsibility to backup any such software is invalid if the factory-applied serial number has been altered or removed from the original date of purchase of one (1) year from your exclusive remedies. Please refer to the End User...
Operating Instructions (primary manual)
Page 1
... connexions, consulter le manuel d'installation/raccordement fourni. For installation and connections, see the supplied installation/connections manual. Record these numbers whenever you call upon your Sony dealer regarding this product. CDX-CA720X CDX-CA700X CDX-CA705M © 2002 Sony Corporation Model No. CDX-CA720X/CA700X/CA705M Serial No. 3-237-887-11 (1) FM/AM Compact Disc Player Operating Instructions US Mode d'emploi FR Owner's Record The model and serial numbers are located on the bottom of the...
... connexions, consulter le manuel d'installation/raccordement fourni. For installation and connections, see the supplied installation/connections manual. Record these numbers whenever you call upon your Sony dealer regarding this product. CDX-CA720X CDX-CA700X CDX-CA705M © 2002 Sony Corporation Model No. CDX-CA720X/CA700X/CA705M Serial No. 3-237-887-11 (1) FM/AM Compact Disc Player Operating Instructions US Mode d'emploi FR Owner's Record The model and serial numbers are located on the bottom of the...
Operating Instructions (primary manual)
Page 2
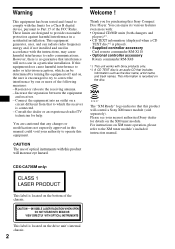
... radiate radio frequency energy and, if not installed and used in a particular installation. Please see your authority to operate this equipment. Welcome ! Connect the equipment into an outlet on XM tuner operation, please refer to which can be determined by one or more with: • Optional CD/MD units (both changers and players)*1. • CD TEXT information (displayed when a CD TEXT disc*2 is played). • Supplied controller accessory Card remote...
... radiate radio frequency energy and, if not installed and used in a particular installation. Please see your authority to operate this equipment. Welcome ! Connect the equipment into an outlet on XM tuner operation, please refer to which can be determined by one or more with: • Optional CD/MD units (both changers and players)*1. • CD TEXT information (displayed when a CD TEXT disc*2 is played). • Supplied controller accessory Card remote...
Operating Instructions (primary manual)
Page 3
... Removing the unit 23 Specifications 24 Troubleshooting 25 Error displays/Messages 26 3 List-up 12 * Functions available with optional CD/MD unit Radio Storing stations automatically - Repeat Play 11 Playing tracks in a station through a list - Best Tuning Memory (BTM 13 Receiving the stored stations 13 Storing only the desired stations 14 Storing station names - Table of Contents Location of controls 4 Precautions 6 Notes on discs 6 Getting Started Resetting the unit 7 Detaching the front panel 8 Setting the clock 9 CD Player CD/MD Unit (optional) Playing a disc...
... Removing the unit 23 Specifications 24 Troubleshooting 25 Error displays/Messages 26 3 List-up 12 * Functions available with optional CD/MD unit Radio Storing stations automatically - Repeat Play 11 Playing tracks in a station through a list - Best Tuning Memory (BTM 13 Receiving the stored stations 13 Storing only the desired stations 14 Storing station names - Table of Contents Location of controls 4 Precautions 6 Notes on discs 6 Getting Started Resetting the unit 7 Detaching the front panel 8 Setting the clock 9 CD Player CD/MD Unit (optional) Playing a disc...
Operating Instructions (primary manual)
Page 4
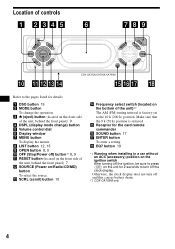
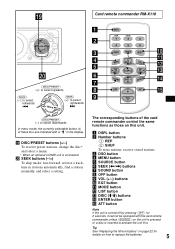
... listed for the card remote commander p SOUND button 17 q ENTER button To enter a setting. a DSO button 19 b MODE button To change ) button e Volume control dial f Display window g MENU button To display the menus. r EQ7 button 19 *1 Warning when installing in a car without an ACC (accessory) position on the ignition switch After turning off and this causes battery drain. *2 CDX-CA705M only 4 c Z (eject) button (located on the front side of the unit, behind the front panel) 7 l SOURCE (Power on the front side...
... listed for the card remote commander p SOUND button 17 q ENTER button To enter a setting. a DSO button 19 b MODE button To change ) button e Volume control dial f Display window g MENU button To display the menus. r EQ7 button 19 *1 Warning when installing in a car without an ACC (accessory) position on the ignition switch After turning off and this causes battery drain. *2 CDX-CA705M only 4 c Z (eject) button (located on the front side of the unit, behind the front panel) 7 l SOURCE (Power on the front side...
Operating Instructions (primary manual)
Page 5
... the card remote commander control the same functions as those on this unit. t SEEK buttons (-/+) To skip tracks, fast-forward, reverse a track, tune in the display. SEEK+ ENTER OFF ATT VOL The corresponding buttons of these four are indicated with a " M" in stations automatically, find a station manually, and select a setting. a DSPL button b Number buttons (1) REP (2) SHUF To store stations, receive stored stations. s DISC/PRESET buttons (+/-) To receive preset stations, change the disc* and select a menu. * When an optional CD/MD unit is connected. SOURCE SOUND DISC - D T ET...
... the card remote commander control the same functions as those on this unit. t SEEK buttons (-/+) To skip tracks, fast-forward, reverse a track, tune in the display. SEEK+ ENTER OFF ATT VOL The corresponding buttons of these four are indicated with a " M" in stations automatically, find a station manually, and select a setting. a DSPL button b Number buttons (1) REP (2) SHUF To store stations, receive stored stations. s DISC/PRESET buttons (+/-) To receive preset stations, change the disc* and select a menu. * When an optional CD/MD unit is connected. SOURCE SOUND DISC - D T ET...
Operating Instructions (primary manual)
Page 6
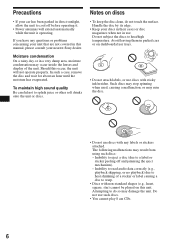
...; If your car has been parked in direct sunlight, allow the unit to a label or sticker peeling off before operating it. • Power antennas will not operate properly. The following malfunctions may damage the unit. Inability to eject a disc (due to cool off and jamming the eject mechanism). - Do not use discs with non-standard shapes (e.g., heart, square, star) cannot be played on discs •...
...; If your car has been parked in direct sunlight, allow the unit to a label or sticker peeling off before operating it. • Power antennas will not operate properly. The following malfunctions may damage the unit. Inability to eject a disc (due to cool off and jamming the eject mechanism). - Do not use discs with non-standard shapes (e.g., heart, square, star) cannot be played on discs •...
Operating Instructions (primary manual)
Page 9
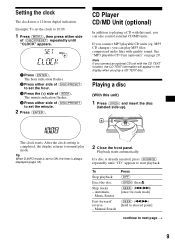
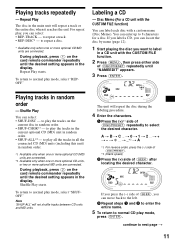
MP3 CD changer), you play a CD TEXT disc. Note If you connect an optional CD unit with the CD TEXT function, the CD TEXT information will appear in the display when you can also control external CD/MD units. Tip When D.INFO mode is set the clock to 10:08 1 Press (MENU), then press either side of (DISC/PRESET) repeatedly until "CD" appears to start playback. compressed audio files with this unit) 1 Press (OPEN) and...
MP3 CD changer), you play a CD TEXT disc. Note If you connect an optional CD unit with the CD TEXT function, the CD TEXT information will appear in the display when you can also control external CD/MD units. Tip When D.INFO mode is set the clock to 10:08 1 Press (MENU), then press either side of (DISC/PRESET) repeatedly until "CD" appears to start playback. compressed audio files with this unit) 1 Press (OPEN) and...
Operating Instructions (primary manual)
Page 10
... play . Tip When A.SCRL (Auto Scroll) is set to "ON," names exceeding 8 characters will continue on the disc is changed, the disc/track name does not scroll. 10 Playback starts. *MS: MG Memory Stick System-up Player MGS-X1 To Skip discs - If "MS" or another MD unit appears in the source display, press (MODE) to select "MS," to start playback. Disc selection Press (DISC/PRESET) (+/-) Cautions when connecting...
... play . Tip When A.SCRL (Auto Scroll) is set to "ON," names exceeding 8 characters will continue on the disc is changed, the disc/track name does not scroll. 10 Playback starts. *MS: MG Memory Stick System-up Player MGS-X1 To Skip discs - If "MS" or another MD unit appears in the source display, press (MODE) to select "MS," to start playback. Disc selection Press (DISC/PRESET) (+/-) Cautions when connecting...
Operating Instructions (primary manual)
Page 11
... FILE function. 2 Press (MENU), then press either side of (SEEK), you press the (-) side of (DISC/PRESET) repeatedly until the desired setting appears in the display. continue to label in random order. *1 Available only when one or more optional CD (MD) units are connected. *2 Available only when one or more optional MD units are connected. For repeat play mode, select "SHUFOFF." Disc Memo (For a CD unit with...
... FILE function. 2 Press (MENU), then press either side of (SEEK), you press the (-) side of (DISC/PRESET) repeatedly until the desired setting appears in the display. continue to label in random order. *1 Available only when one or more optional CD (MD) units are connected. *2 Available only when one or more optional MD units are connected. For repeat play mode, select "SHUFOFF." Disc Memo (For a CD unit with...
Operating Instructions (primary manual)
Page 12
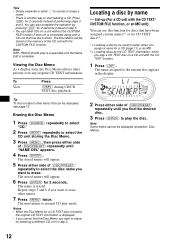
Note REP-TRACK/shuffle play a CD TEXT disc on a unit without the CUSTOM FILE function if that unit is connected along with the CD TEXT/ CUSTOM FILE function, or an MD unit) You can be displayed, see page 10. Erasing the Disc Memo 1 Press (SOURCE) repeatedly to select "CD." 2 Press (MODE) repeatedly to select the CD unit storing the Disc Memo. 3 Press (MENU), then press either side of (DISC/PRESET) repeatedly until the Name...
Note REP-TRACK/shuffle play a CD TEXT disc on a unit without the CUSTOM FILE function if that unit is connected along with the CD TEXT/ CUSTOM FILE function, or an MD unit) You can be displayed, see page 10. Erasing the Disc Memo 1 Press (SOURCE) repeatedly to select "CD." 2 Press (MODE) repeatedly to select the CD unit storing the Disc Memo. 3 Press (MENU), then press either side of (DISC/PRESET) repeatedly until the Name...
Operating Instructions (primary manual)
Page 13
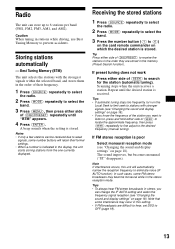
... know the frequency of their former settings. • When a number is received. Note that some FM stereo broadcasts may occur in stations while driving, use Best Tuning Memory to select the band. 3 Press (MENU), then press either side of (DISC/PRESET) repeatedly until the desired station is indicated in the memory (Preset Search function). Receiving the stored stations 1 Press (SOURCE) repeatedly to select the radio. 2 Press (MODE) repeatedly to select the band. 3 Press the number button ((1) to...
... know the frequency of their former settings. • When a number is received. Note that some FM stereo broadcasts may occur in stations while driving, use Best Tuning Memory to select the band. 3 Press (MENU), then press either side of (DISC/PRESET) repeatedly until the desired station is indicated in the memory (Preset Search function). Receiving the stored stations 1 Press (SOURCE) repeatedly to select the radio. 2 Press (MODE) repeatedly to select the band. 3 Press the number button ((1) to...
Operating Instructions (primary manual)
Page 16
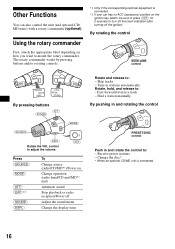
... control to adjust the volume. (OFF) Press (SOURCE) (MODE) (ATT) (OFF)*2 (SOUND) (DSPL) To Change source (radio/CD/MD*1)/Power on Change operation (radio band/CD unit/MD*1 unit) Attenuate sound Stop playback or radio reception/Power off the ignition. By pushing in and rotating the control PRESET/DISC control Push in stations automatically. Tune in and rotate the control to turn off the clock indication after turning off Adjust the sound menu Change the display item Rotate and release to : - The rotary commander works by pressing buttons...
... control to adjust the volume. (OFF) Press (SOURCE) (MODE) (ATT) (OFF)*2 (SOUND) (DSPL) To Change source (radio/CD/MD*1)/Power on Change operation (radio band/CD unit/MD*1 unit) Attenuate sound Stop playback or radio reception/Power off the ignition. By pushing in and rotating the control PRESET/DISC control Push in stations automatically. Tune in and rotate the control to turn off the clock indication after turning off Adjust the sound menu Change the display item Rotate and release to : - The rotary commander works by pressing buttons...
Operating Instructions (primary manual)
Page 18
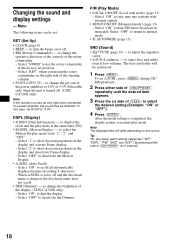
... (Local seek mode) (page 13) - Select "OFF" to return to adjust the equalizer curve. • LOUD (Loudness) - Menu The following items can easily switch among categories ("SET," "DSPL," "P/M," "SND," and "EDIT") by pressing either side of (DISC/PRESET) repeatedly until the desired item appears. 3 Press the (+) side of (DISC/PRESET) for 2 seconds. 18 to change the operative direction of the controls of the power amplifier to show...
... (Local seek mode) (page 13) - Select "OFF" to return to adjust the equalizer curve. • LOUD (Loudness) - Menu The following items can easily switch among categories ("SET," "DSPL," "P/M," "SND," and "EDIT") by pressing either side of (DISC/PRESET) repeatedly until the desired item appears. 3 Press the (+) side of (DISC/PRESET) for 2 seconds. 18 to change the operative direction of the controls of the power amplifier to show...
Operating Instructions (primary manual)
Page 19
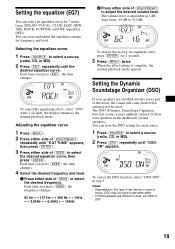
Selecting the equalizer curve 1 Press (SOURCE) to the normal playback mode. Adjusting the equalizer curve 1 Press (MENU). 2 Press either side of (DISC/PRESET) repeatedly until "EQ7 TUNE" appears, then press (ENTER). 3 Press either side of (DISC/PRESET) to adjust the desired volume level. The DSO (Dynamic Soundstage Organizer) function creates a more ambient sound as if there were speakers in step 2. ON" appears. Each time you press (SEEK), the frequency changes. 62 Hz...
Selecting the equalizer curve 1 Press (SOURCE) to the normal playback mode. Adjusting the equalizer curve 1 Press (MENU). 2 Press either side of (DISC/PRESET) repeatedly until "EQ7 TUNE" appears, then press (ENTER). 3 Press either side of (DISC/PRESET) to adjust the desired volume level. The DSO (Dynamic Soundstage Organizer) function creates a more ambient sound as if there were speakers in step 2. ON" appears. Each time you press (SEEK), the frequency changes. 62 Hz...
Operating Instructions (primary manual)
Page 20
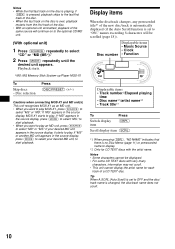
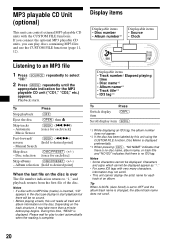
... " *." • For some ID3 tags with no sound. • Before playing a track, this unit using the CUSTOM FILE function, Disc Memo is displayed preferentially. *3 When pressing (DSPL), "NO NAME" indicates that there is changed, the album/track name does not scroll. 20 Manual Search Skip discs (DISC/PRESET) (+/-) - Display items Displayable items • Disc number • Album number*1 Displayable items • Source • Clock Listening to an MP3 file 1 Press...
... " *." • For some ID3 tags with no sound. • Before playing a track, this unit using the CUSTOM FILE function, Disc Memo is displayed preferentially. *3 When pressing (DSPL), "NO NAME" indicates that there is changed, the album/track name does not scroll. 20 Manual Search Skip discs (DISC/PRESET) (+/-) - Display items Displayable items • Disc number • Album number*1 Displayable items • Source • Clock Listening to an MP3 file 1 Press...
Operating Instructions (primary manual)
Page 24
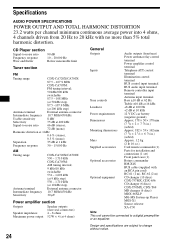
....) Card remote commander (1) Parts for installation and connections (1 set) Front panel case (1) Rotary commander RM-X4S BUS cable (supplied with no more than 5% total harmonic distortion. Specifications AUDIO POWER SPECIFICATIONS POWER OUTPUT AND TOTAL HARMONIC DISTORTION 23.2 watts per channel minimum continuous average power into 4 ohms, 4 channels driven from 20 Hz to 20 kHz with an RCA pin cord) RC-61 (1 m), RC-62 (2 m) CD changer (10 discs) CDX-757MX, CDX-656 CD changer (6 discs) CDX-T70MX, CDX-T69 MD changer (6 discs...
....) Card remote commander (1) Parts for installation and connections (1 set) Front panel case (1) Rotary commander RM-X4S BUS cable (supplied with no more than 5% total harmonic distortion. Specifications AUDIO POWER SPECIFICATIONS POWER OUTPUT AND TOTAL HARMONIC DISTORTION 23.2 watts per channel minimum continuous average power into 4 ohms, 4 channels driven from 20 Hz to 20 kHz with an RCA pin cord) RC-61 (1 m), RC-62 (2 m) CD changer (10 discs) CDX-757MX, CDX-656 CD changer (6 discs) CDX-T70MX, CDX-T69 MD changer (6 discs...
Operating Instructions (primary manual)
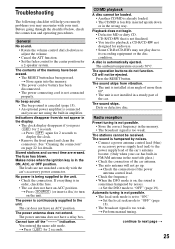
Page 25
General No sound. • Rotate the volume control dial clockwise to adjust the volume. • Cancel the ATT function. • Set the fader control to the center position for 2 seconds to display the clock. • Remove the front panel and clean the connectors. No beep sound. • The beep sound is canceled (page 18). • An optional power amplifier is connected and you press (OFF) for audio use. • Some CD-Rs/CD-RWs...
General No sound. • Rotate the volume control dial clockwise to adjust the volume. • Cancel the ATT function. • Set the fader control to the center position for 2 seconds to display the clock. • Remove the front panel and clean the connectors. No beep sound. • The beep sound is canceled (page 18). • An optional power amplifier is connected and you press (OFF) for audio use. • Some CD-Rs/CD-RWs...

XM Satellite Radio Operating manual
Page 1
... be connected to another channel. 3-243-168-11 (1) XM Satellite Radio Receiver Operating Instructions Owner's Record The model number is not malfunction. Record the serial number in a residential installation. Model No. XT-XM1 Serial No. XM Radio ID You need to subscribe to select a channel. These limits are not connected properly. This equipment generates, uses, and can control more of XM programming. • Display channel name, artist name, and song title for use the Disc/Preset buttons...
... be connected to another channel. 3-243-168-11 (1) XM Satellite Radio Receiver Operating Instructions Owner's Record The model number is not malfunction. Record the serial number in a residential installation. Model No. XT-XM1 Serial No. XM Radio ID You need to subscribe to select a channel. These limits are not connected properly. This equipment generates, uses, and can control more of XM programming. • Display channel name, artist name, and song title for use the Disc/Preset buttons...

XM Satellite Radio Operating manual
Page 2
... its shape. The unit is designed for a safe and secure installation. • Use only the supplied screws. Warning Use a fuse with an 8-pin plug (L-type) cannot be considerably impaired. POWER SONY BUS CONTROL OUT IN AUDIO L OUT R L IN R ANTENNA TER SAT 2 Connect as the connector hook facing down Green Yellow (Curry) XM antenna (not supplied) To a +12 V power terminal which is not subject to direct sunlight. - The unit is energized at...
... its shape. The unit is designed for a safe and secure installation. • Use only the supplied screws. Warning Use a fuse with an 8-pin plug (L-type) cannot be considerably impaired. POWER SONY BUS CONTROL OUT IN AUDIO L OUT R L IN R ANTENNA TER SAT 2 Connect as the connector hook facing down Green Yellow (Curry) XM antenna (not supplied) To a +12 V power terminal which is not subject to direct sunlight. - The unit is energized at...


