
Operating Instructions
Page 3
... with the instructions, may cause harmful interference to radio communications. These limits are cautioned that may call: Sony Customer Information Center 1-800-222-SONY (7669). Note: This equipment has been tested and found to comply with the limits for a digital device... that interference will not occur in a particular installation. Regulatory Information For the customers in this manual could void your authority to comply with Part15 of Conformity Trade Name: SONY Model No.: CCD-TRV608 Responsible Party: Sony Electronics lnc. CAUTION You are designed to provide...
... with the instructions, may cause harmful interference to radio communications. These limits are cautioned that may call: Sony Customer Information Center 1-800-222-SONY (7669). Note: This equipment has been tested and found to comply with the limits for a digital device... that interference will not occur in a particular installation. Regulatory Information For the customers in this manual could void your authority to comply with Part15 of Conformity Trade Name: SONY Model No.: CCD-TRV608 Responsible Party: Sony Electronics lnc. CAUTION You are designed to provide...
Operating Instructions
Page 5
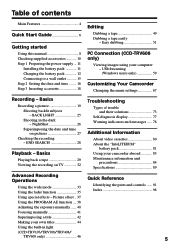
..." battery pack 81 Using your camcorder abroad 83 Maintenance information and precautions 84 Specifications 89 Advanced Recording Operations Using the wide mode 33 Using the fader function 35 Quick Reference Identifying the parts and controls ...... 91 Index 98 Using special effects - Easy dubbing 51 PC Connection (CCD-TRV608 only) Viewing images using your...
..." battery pack 81 Using your camcorder abroad 83 Maintenance information and precautions 84 Specifications 89 Advanced Recording Operations Using the wide mode 33 Using the fader function 35 Quick Reference Identifying the parts and controls ...... 91 Index 98 Using special effects - Easy dubbing 51 PC Connection (CCD-TRV608 only) Viewing images using your...
Operating Instructions
Page 11
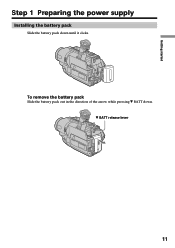
Getting started Step 1 Preparing the power supply Installing the battery pack Slide the battery pack down . V BATT release lever 11 To remove the battery pack Slide the battery pack out in the direction of the arrow while pressing V BATT down until it clicks.
Getting started Step 1 Preparing the power supply Installing the battery pack Slide the battery pack down . V BATT release lever 11 To remove the battery pack Slide the battery pack out in the direction of the arrow while pressing V BATT down until it clicks.
Operating Instructions
Page 13
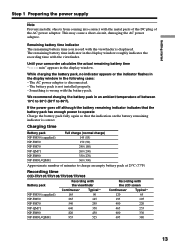
...to 86°F). The battery pack is disconnected. - Something is correct. Until your camcorder calculates the actual remaining battery time "- - - - Charging time Battery pack Full ...the indication on the battery remaining indicator is wrong with the LCD screen Continuous* Typical** 120 65 195 105 400 220 ... the AC power adaptor. The AC power adaptor is not installed properly. - If the power goes off although the battery ... battery pack at 25°C (77°F) Recording time CCD-TRV107/TRV108/TRV308/TRV408 Battery pack Recording with the viewfinder Continuous...
...to 86°F). The battery pack is disconnected. - Something is correct. Until your camcorder calculates the actual remaining battery time "- - - - Charging time Battery pack Full ...the indication on the battery remaining indicator is wrong with the LCD screen Continuous* Typical** 120 65 195 105 400 220 ... the AC power adaptor. The AC power adaptor is not installed properly. - If the power goes off although the battery ... battery pack at 25°C (77°F) Recording time CCD-TRV107/TRV108/TRV308/TRV408 Battery pack Recording with the viewfinder Continuous...
Operating Instructions
Page 19
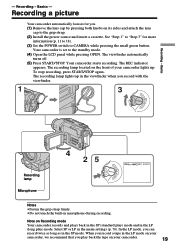
... up in the viewfinder when you can record twice as long as in the menu settings (p. 70). Recording - Your camcorder is set to the grip strap. (2) Install the power source and insert a cassette. The recording lamp lights up . See "Step 1" to CAMERA while pressing the small green button. To... (1) Remove the lens cap by pressing both knobs on Recording mode Your camcorder records and plays back in the SP (standard play) mode and in microphone during recording. Note on its sides and attach the lens cap to the standby mode. (4) Open the LCD panel while pressing OPEN. Recording -
... up in the viewfinder when you can record twice as long as in the menu settings (p. 70). Recording - Your camcorder is set to the grip strap. (2) Install the power source and insert a cassette. The recording lamp lights up . See "Step 1" to CAMERA while pressing the small green button. To... (1) Remove the lens cap by pressing both knobs on Recording mode Your camcorder records and plays back in the SP (standard play) mode and in microphone during recording. Note on its sides and attach the lens cap to the standby mode. (4) Open the LCD panel while pressing OPEN. Recording -
Operating Instructions
Page 29
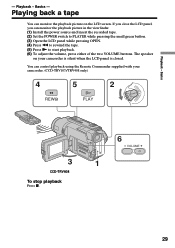
...back a tape You can monitor the playback picture in the viewfinder. (1) Install the power source and insert the recorded tape. (2) Set the POWER switch to PLAYER while pressing the small green button. (3) Open the LCD panel while pressing OPEN. (4) Press m to rewind the tape. (5) Press...control playback using the Remote Commander supplied with your camcorder is silent when the LCD panel is closed. Playback - Playback - The speaker on the LCD screen. Basics - If you close the LCD panel, you can monitor the playback picture on your camcorder. (CCD-TRV107/TRV408 only) AYER OFF(CHG) 4 ...
...back a tape You can monitor the playback picture in the viewfinder. (1) Install the power source and insert the recorded tape. (2) Set the POWER switch to PLAYER while pressing the small green button. (3) Open the LCD panel while pressing OPEN. (4) Press m to rewind the tape. (5) Press...control playback using the Remote Commander supplied with your camcorder is silent when the LCD panel is closed. Playback - Playback - The speaker on the LCD screen. Basics - If you close the LCD panel, you can monitor the playback picture on your camcorder. (CCD-TRV107/TRV408 only) AYER OFF(CHG) 4 ...
Operating Instructions
Page 59
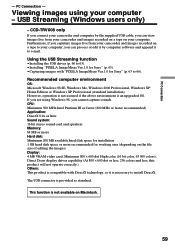
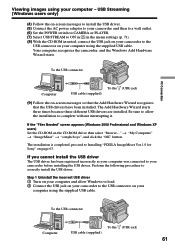
CCD-TRV608 only If you connect your camcorder and computer by computer software and append it is necessary to your computer, you can process or edit it by the supplied USB cable, you cannot capture sounds. Furthermore, if you caputure images live from your camcorder and images ...Streaming (Windows users only) - If you are using your computer. Using the USB Streaming function •Installing the USB driver (p. 60 to 63). •Installing "PIXELA ImageMixer Ver.1.0 for Sony" (p. 63 to e-mail. The USB connector is an upgraded OS. This function is compatible with "PIXELA...
CCD-TRV608 only If you connect your camcorder and computer by computer software and append it is necessary to your computer, you can process or edit it by the supplied USB cable, you cannot capture sounds. Furthermore, if you caputure images live from your camcorder and images ...Streaming (Windows users only) - If you are using your computer. Using the USB Streaming function •Installing the USB driver (p. 60 to 63). •Installing "PIXELA ImageMixer Ver.1.0 for Sony" (p. 63 to e-mail. The USB connector is an upgraded OS. This function is compatible with "PIXELA...
Operating Instructions
Page 60
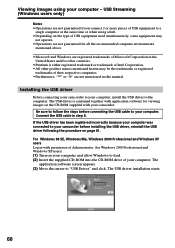
...load. (2) Insert the supplied CD-ROM into the CD-ROM drive of your computer. Installing the USB driver Before connecting your camcorder to your camcorder. Be sure to follow the steps before installing the USB driver, reinstall the USB driver following the procedure on page 61. The ...USB driver installation starts. 60 USB Streaming (Windows users only) Notes • Operations are not guaranteed ...
...load. (2) Insert the supplied CD-ROM into the CD-ROM drive of your computer. Installing the USB driver Before connecting your camcorder to your camcorder. Be sure to follow the steps before installing the USB driver, reinstall the USB driver following the procedure on page 61. The ...USB driver installation starts. 60 USB Streaming (Windows users only) Notes • Operations are not guaranteed ...
Operating Instructions
Page 61
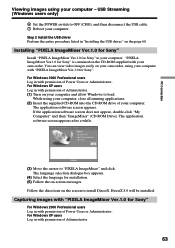
... that the Add Hardware Wizard recognizes that the USB drivers have been installed. Step 1 Uninstall the incorrect USB driver 1 Turn on your computer using your camcorder to complete without interrupting it. Perform the following procedure to Installing "PIXELA ImageMixer Ver.1.0 for Sony" on the CD-ROM driver then select "Browse...." Viewing images using the...
... that the Add Hardware Wizard recognizes that the USB drivers have been installed. Step 1 Uninstall the incorrect USB driver 1 Turn on your computer using your camcorder to complete without interrupting it. Perform the following procedure to Installing "PIXELA ImageMixer Ver.1.0 for Sony" on the CD-ROM driver then select "Browse...." Viewing images using the...
Operating Instructions
Page 63
...Windows to OFF (CHG), and then disconnect the USB cable. 7 Reboot your camcorder. DirectX 8.0 will be installed. PC Connection Viewing images using your computer. "PIXELA ImageMixer Ver.1.0 for Sony" For Windows 2000 Professional users Log in with permission of your computer - ...For Windows XP users Log in "Installing the USB driver" on your camcorder, using your computer. The language selection dialogue box appears. (4) Select the language for Sony" to your computer with permission of Power Users or Adminisitrator. USB ...
...Windows to OFF (CHG), and then disconnect the USB cable. 7 Reboot your camcorder. DirectX 8.0 will be installed. PC Connection Viewing images using your computer. "PIXELA ImageMixer Ver.1.0 for Sony" For Windows 2000 Professional users Log in with permission of your computer - ...For Windows XP users Log in "Installing the USB driver" on your camcorder, using your computer. The language selection dialogue box appears. (4) Select the language for Sony" to your computer with permission of Power Users or Adminisitrator. USB ...
Operating Instructions
Page 66
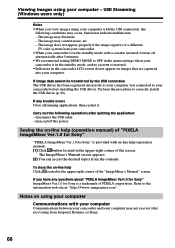
... quitting the application: - Refer to correctly install the USB driver (p. 60). If any questions about "PIXELA ImageMixer Ver1.0 for Sony" ImageMixer Ver.1.0 for Sony" is of a different TV color system from your camcorder. •When your computer Communications with the... ImageMixer Ver.1.0 for Sony" "PIXELA ImageMixer Ver.1.0 for Sony is inserted. •Indicators in the camcorder LCD screen do not indicate malfunction: - If you view images using your computer with your computer Communications between your camcorder and your camcorder before installing the USB driver....
... quitting the application: - Refer to correctly install the USB driver (p. 60). If any questions about "PIXELA ImageMixer Ver1.0 for Sony" ImageMixer Ver.1.0 for Sony" is of a different TV color system from your camcorder. •When your computer Communications with the... ImageMixer Ver.1.0 for Sony" "PIXELA ImageMixer Ver.1.0 for Sony is inserted. •Indicators in the camcorder LCD screen do not indicate malfunction: - If you view images using your computer with your computer Communications between your camcorder and your camcorder before installing the USB driver....

Operating Instructions
Page 73
...OFF (CHG) or PLAYER. c Clean the heads using your camcorder for at least 1 hour to CAMERA. (p. 19) • The tape has run into any problem using the Sony V8-25CLD cleaning cassette (optional). (p. 85) • The LCD panel is not a malfunction. This is open. If the ...camcorder has been in the standby mode for autofocus. The x indicator flashes in the viewfinder. Cause and/or Corrective Actions • The POWER switch is set to focus manually. (p. 41) • The video heads may be dirty. c Set the POWER switch to OFF (CHG) and then to the drum (moisture condensation). c Install...
...OFF (CHG) or PLAYER. c Clean the heads using your camcorder for at least 1 hour to CAMERA. (p. 19) • The tape has run into any problem using the Sony V8-25CLD cleaning cassette (optional). (p. 85) • The LCD panel is not a malfunction. This is open. If the ...camcorder has been in the standby mode for autofocus. The x indicator flashes in the viewfinder. Cause and/or Corrective Actions • The POWER switch is set to focus manually. (p. 41) • The video heads may be dirty. c Set the POWER switch to OFF (CHG) and then to the drum (moisture condensation). c Install...

Operating Instructions
Page 74
... the menu settings without a cassette inserted, your camcorder automatically starts the demonstration. c Clean the heads using the Sony V8-25CLD cleaning cassette (optional). (p. 85) ...CCD-TRV308/TRV408/TRV608 only In the playback mode Symptom The tape does not move when a video control button is turned to minimum. c Set it to OFF or use the NightShot function in incorrect or • NIGHTSHOT is heard when playing back a tape. c Install...The tape has run out. The playback picture is working. c Open the LCD panel and press VOLUME +. (p. 29) In the recording and playback modes Symptom...
... the menu settings without a cassette inserted, your camcorder automatically starts the demonstration. c Clean the heads using the Sony V8-25CLD cleaning cassette (optional). (p. 85) ...CCD-TRV308/TRV408/TRV608 only In the playback mode Symptom The tape does not move when a video control button is turned to minimum. c Set it to OFF or use the NightShot function in incorrect or • NIGHTSHOT is heard when playing back a tape. c Install...The tape has run out. The playback picture is working. c Open the LCD panel and press VOLUME +. (p. 29) In the recording and playback modes Symptom...
Operating Instructions
Page 76
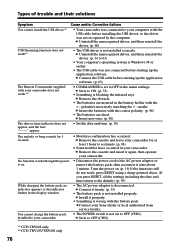
...Sony dealer or local authorized Sony service facility. • The POWER switch is on . (p. 19) If the functions still do not work .*2) The date or time indicator does not appear, and the bars "--:--:--" appear. • Your camcorder was not recognized by the computer. c Connect the USB cable before installing... the USB driver, so the driver was connected to OFF (CHG). *1) CCD-TRV608 only *2) CCD-TRV107/TRV408 only 76 c Remove the obstacle. &#...
...Sony dealer or local authorized Sony service facility. • The POWER switch is on . (p. 19) If the functions still do not work .*2) The date or time indicator does not appear, and the bars "--:--:--" appear. • Your camcorder was not recognized by the computer. c Connect the USB cable before installing... the USB driver, so the driver was connected to OFF (CHG). *1) CCD-TRV608 only *2) CCD-TRV107/TRV408 only 76 c Remove the obstacle. &#...
Operating Instructions
Page 86
...., regardless of the setting of the LCD screen may occur on the LCD screen. Charging the built-in your camcorder, and leave your camcorder with your fingers or a sharp-pointed object. •If your camcorder at all. Or install the fully charged battery pack in rechargeable... battery: - Noise may heat up inside the casing, unplug your camcorder and have it checked by a Sony...
...., regardless of the setting of the LCD screen may occur on the LCD screen. Charging the built-in your camcorder, and leave your camcorder with your fingers or a sharp-pointed object. •If your camcorder at all. Or install the fully charged battery pack in rechargeable... battery: - Noise may heat up inside the casing, unplug your camcorder and have it checked by a Sony...


