Operating Instructions
Page 10
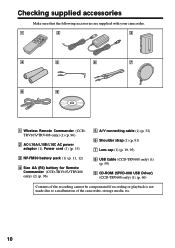
... for Remote Commander (CCD-TRV107/TRV408 only) (2) (p. 96) 5 A/V connecting cable (1) (p. 32) 6 Shoulder strap (1) (p. 91) 7 Lens cap (1) (p. 19, 95) 8 USB Cable (CCD-TRV608 only) (1) (p. 59) 9 CD-ROM (SPVD-008 USB Driver) (CCD-TRV608 only) (1) (p. 60) Contents of the recording cannot be compensated if recording or playback is not made due to a malfunction of the camcorder, storage media, etc...
... for Remote Commander (CCD-TRV107/TRV408 only) (2) (p. 96) 5 A/V connecting cable (1) (p. 32) 6 Shoulder strap (1) (p. 91) 7 Lens cap (1) (p. 19, 95) 8 USB Cable (CCD-TRV608 only) (1) (p. 59) 9 CD-ROM (SPVD-008 USB Driver) (CCD-TRV608 only) (1) (p. 60) Contents of the recording cannot be compensated if recording or playback is not made due to a malfunction of the camcorder, storage media, etc...
Operating Instructions
Page 59
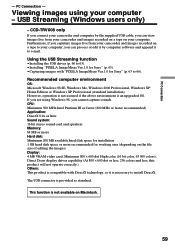
... (16 bit color, 65 000 colors), Direct Draw display driver capability (At 800 × 600 dot or less, 256 colors and less, this product will not operate correctly.) Others: This product is compatible with "PIXELA ImageMixer Ver.1.0 for Sony" (p. 63 to install DirectX. CPU: Minimum 500 MHz... for installation 1 GB hard disk space or more recommended for Sony" (p. 63). •Capturing images with DirectX technology, so it is provided as standard. The USB connector is necessary to 66). CCD-TRV608 only If you connect your camcorder and computer by computer software and append it to 63). ...
... (16 bit color, 65 000 colors), Direct Draw display driver capability (At 800 × 600 dot or less, 256 colors and less, this product will not operate correctly.) Others: This product is compatible with "PIXELA ImageMixer Ver.1.0 for Sony" (p. 63 to install DirectX. CPU: Minimum 500 MHz... for installation 1 GB hard disk space or more recommended for Sony" (p. 63). •Capturing images with DirectX technology, so it is provided as standard. The USB connector is necessary to 66). CCD-TRV608 only If you connect your camcorder and computer by computer software and append it to 63). ...
Operating Instructions
Page 60
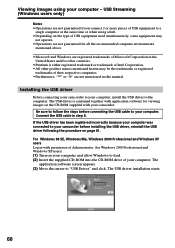
...computer was connected to load. (2) Insert the supplied CD-ROM into the CD-ROM drive of your camcorder before connecting the USB cable to your computer, install the USB driver to your computer. For Windows 98 SE, Windows Me, Windows 2000 Professional and Windows XP users Log... your computer - The application software screen appears. (3) Move the cursor to a single computer at the same time or when using your camcorder. The USB driver installation starts. 60 Viewing images using a hub. • Depending on the type of USB equipment used simultaneously, some equipment may be ...
...computer was connected to load. (2) Insert the supplied CD-ROM into the CD-ROM drive of your camcorder before connecting the USB cable to your computer, install the USB driver to your computer. For Windows 98 SE, Windows Me, Windows 2000 Professional and Windows XP users Log... your computer - The application software screen appears. (3) Move the cursor to a single computer at the same time or when using your camcorder. The USB driver installation starts. 60 Viewing images using a hub. • Depending on the type of USB equipment used simultaneously, some equipment may be ...
Operating Instructions
Page 61
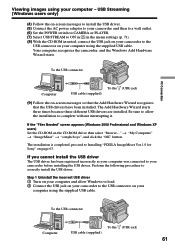
... (USB) jack USB cable (supplied) (9) Follow the on the CD-ROM driver then select "Browse...." t "My Computer" t "ImageMixer" t "sonyhcb.sys", and click the "OK" button. Perform the following procedure to Installing "PIXELA ImageMixer Ver.1.0 for Sony" on your camcorder to your camcorder to complete without interrupting it. Viewing images using your computer using the...
... (USB) jack USB cable (supplied) (9) Follow the on the CD-ROM driver then select "Browse...." t "My Computer" t "ImageMixer" t "sonyhcb.sys", and click the "OK" button. Perform the following procedure to Installing "PIXELA ImageMixer Ver.1.0 for Sony" on your camcorder to your camcorder to complete without interrupting it. Viewing images using your computer using the...
Operating Instructions
Page 63
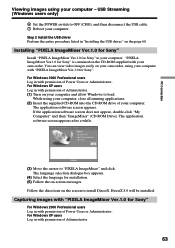
... Step 2 Install the USB driver Perform the entire procedure listed in "Installing the USB driver" on the CD-ROM supplied with permission of your computer. "PIXELA ImageMixer Ver.1.0 for Sony". Capturing images with "PIXELA ImageMixer Ver.1.0 for Sony" For Windows 2000 Professional users ... users only) 6 Set the POWER switch to your computer - Installing "PIXELA ImageMixer Ver.1.0 for Sony" Install "PIXELA ImageMixer Ver.1.0 for installation. (5) Follow the on your camcorder, using your computer. You can view video images easily on -screen messages. While using your computer...
... Step 2 Install the USB driver Perform the entire procedure listed in "Installing the USB driver" on the CD-ROM supplied with permission of your computer. "PIXELA ImageMixer Ver.1.0 for Sony". Capturing images with "PIXELA ImageMixer Ver.1.0 for Sony" For Windows 2000 Professional users ... users only) 6 Set the POWER switch to your computer - Installing "PIXELA ImageMixer Ver.1.0 for Sony" Install "PIXELA ImageMixer Ver.1.0 for installation. (5) Follow the on your camcorder, using your computer. You can view video images easily on -screen messages. While using your computer...
Operating Instructions
Page 66
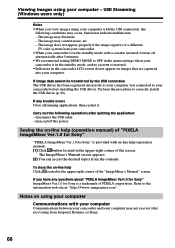
...cannot be transferred by the USB connection The USB driver has been registered incorrectly as your computer was connected to correctly install the USB driver (p. 60). Perform the procedure to your camcorder before installing the USB driver. turn on/off automatically after 5 minutes. •... (operation manual). (1) Click button located in the upper-right corner of "PIXELA ImageMixer Ver.1.0 for Sony" "PIXELA ImageMixer Ver.1.0 for Sony is inserted. •Indicators in the camcorder LCD screen do not indicate malfunction: - disconnect the USB cable - To close the on -line help ...
...cannot be transferred by the USB connection The USB driver has been registered incorrectly as your computer was connected to correctly install the USB driver (p. 60). Perform the procedure to your camcorder before installing the USB driver. turn on/off automatically after 5 minutes. •... (operation manual). (1) Click button located in the upper-right corner of "PIXELA ImageMixer Ver.1.0 for Sony" "PIXELA ImageMixer Ver.1.0 for Sony is inserted. •Indicators in the camcorder LCD screen do not indicate malfunction: - disconnect the USB cable - To close the on -line help ...
Operating Instructions
Page 76
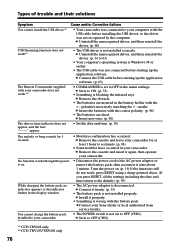
... Something is not installed correctly. Turn the power on . Types of the AC power adaptor or remove the battery pack, then reconnect it to your camcorder. c Set it firmly. (p. 15) • The battery pack is on . (p. 19) If the functions still do not work .*2) The ...driver is wrong with the + - c Remove the obstacle. • The batteries are dead. You cannot charge the battery pack installed to OFF (CHG). *1) CCD-TRV608 only *2) CCD-TRV107/TRV408 only 76 c Connect it to the default.) (p. 95) • The AC power adaptor is blocking the infrared rays. c Contact your Sony ...
... Something is not installed correctly. Turn the power on . Types of the AC power adaptor or remove the battery pack, then reconnect it to your camcorder. c Set it firmly. (p. 15) • The battery pack is on . (p. 19) If the functions still do not work .*2) The ...driver is wrong with the + - c Remove the obstacle. • The batteries are dead. You cannot charge the battery pack installed to OFF (CHG). *1) CCD-TRV608 only *2) CCD-TRV107/TRV408 only 76 c Connect it to the default.) (p. 95) • The AC power adaptor is blocking the infrared rays. c Contact your Sony ...


