Operating Instructions
Page 1
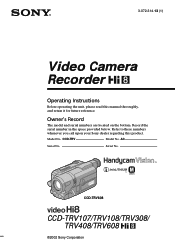
Model No. Serial No. CCD-TRV608 CCD-TRV107/TRV108/TRV308/ TRV408/TRV608 ©2002 Sony Corporation AC- Serial No. Record the serial number in the space provided below. Refer to these numbers whenever you call upon your Sony dealer regarding this manual thoroughly, and retain it for future reference. CCD-TRV Model No. Owner's Record The model and serial numbers are located on the bottom. 3-072-314-13 (1) Video Camera Recorder Operating Instructions Before operating the unit, please read this product.
Model No. Serial No. CCD-TRV608 CCD-TRV107/TRV108/TRV308/ TRV408/TRV608 ©2002 Sony Corporation AC- Serial No. Record the serial number in the space provided below. Refer to these numbers whenever you call upon your Sony dealer regarding this manual thoroughly, and retain it for future reference. CCD-TRV Model No. Owner's Record The model and serial numbers are located on the bottom. 3-072-314-13 (1) Video Camera Recorder Operating Instructions Before operating the unit, please read this product.
Operating Instructions
Page 5
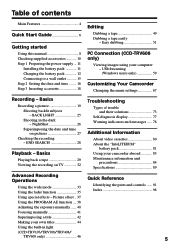
...Playing back a tape 29 Viewing the recording on pictures 27 Checking the recording - Table of trouble and their solutions 73 Self-diagnosis display 77 Warning indicators and messages ...... 78 Additional Information About video cassettes 80 About the "InfoLITHIUM" battery... 49 Dubbing a tape easily - Easy dubbing 51 PC Connection (CCD-TRV608 only) Viewing images using your computer - USB Streaming (Windows users only 59 Customizing Your Camcorder Changing the menu settings 67 Recording - END SEARCH 28 Playback - Basics Recording a picture 19 Shooting backlit subjects -
...Playing back a tape 29 Viewing the recording on pictures 27 Checking the recording - Table of trouble and their solutions 73 Self-diagnosis display 77 Warning indicators and messages ...... 78 Additional Information About video cassettes 80 About the "InfoLITHIUM" battery... 49 Dubbing a tape easily - Easy dubbing 51 PC Connection (CCD-TRV608 only) Viewing images using your computer - USB Streaming (Windows users only 59 Customizing Your Camcorder Changing the menu settings 67 Recording - END SEARCH 28 Playback - Basics Recording a picture 19 Shooting backlit subjects -
Operating Instructions
Page 18
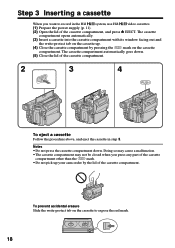
... into the cassette compartment with its window facing out and the write-protect tab on the cassette up your camcorder by pressing the mark on the cassette to record in step 3. The cassette compartment automatically goes down . To prevent accidental erasure Slide the write-protect tab on...by the lid of the cassette compartment. 2 3 4 EJECT To eject a cassette Follow the procedure above, and eject the cassette in the Hi8 system, use Hi8 video cassettes. (1) Prepare the power supply (p. 11). (2) Open the lid of the cassette compartment, and press Z EJECT. Notes •Do not...
... into the cassette compartment with its window facing out and the write-protect tab on the cassette up your camcorder by pressing the mark on the cassette to record in step 3. The cassette compartment automatically goes down . To prevent accidental erasure Slide the write-protect tab on...by the lid of the cassette compartment. 2 3 4 EJECT To eject a cassette Follow the procedure above, and eject the cassette in the Hi8 system, use Hi8 video cassettes. (1) Prepare the power supply (p. 11). (2) Open the lid of the cassette compartment, and press Z EJECT. Notes •Do not...
Operating Instructions
Page 31
...playback modes To operate video control buttons, set the POWER switch to normal speed. To advance the tape Press M in the stop mode. To locate a scene monitoring the picture (picture search) Keep pressing m or M during playback. To search the last scene recorded (END SEARCH) ... Commander during playback pause mode, slow playback* or picture search. When the playback pause mode lasts for about 1 minute (CCD-TRV107/TRV408 only) Your camcorder automatically returns to PLAYER. To resume normal playback, press N. To monitor the high-speed picture while advancing or rewinding the ...
...playback modes To operate video control buttons, set the POWER switch to normal speed. To advance the tape Press M in the stop mode. To locate a scene monitoring the picture (picture search) Keep pressing m or M during playback. To search the last scene recorded (END SEARCH) ... Commander during playback pause mode, slow playback* or picture search. When the playback pause mode lasts for about 1 minute (CCD-TRV107/TRV408 only) Your camcorder automatically returns to PLAYER. To resume normal playback, press N. To monitor the high-speed picture while advancing or rewinding the ...
Operating Instructions
Page 32
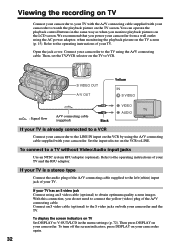
... TV. Then press DISPLAY on your camcorder again. 32 To turn off the screen indicators, press DISPLAY on your camcorder. Viewing the recording on TV Connect your camcorder to your TV with the A/V connecting cable supplied with your camcorder from a wall outlet using an S video cable (optional) to V-OUT/LCD in the same way as when you...
... TV. Then press DISPLAY on your camcorder again. 32 To turn off the screen indicators, press DISPLAY on your camcorder. Viewing the recording on TV Connect your camcorder to your TV with the A/V connecting cable supplied with your camcorder from a wall outlet using an S video cable (optional) to V-OUT/LCD in the same way as when you...

Operating Instructions
Page 49
... DISPLAY to LCD in in the menu settings (The default setting is set to PLAYER. (4) Play back the recorded tape on your camcorder. (5) Start recording on your camcorder as a player. Make the indicators disappear by using the A/V connecting cable supplied with the connected VCR by pressing the following buttons: - Editing - S VIDEO OUT A / V OUT Yellow IN S VIDEO : Signal...
... DISPLAY to LCD in in the menu settings (The default setting is set to PLAYER. (4) Play back the recorded tape on your camcorder. (5) Start recording on your camcorder as a player. Make the indicators disappear by using the A/V connecting cable supplied with the connected VCR by pressing the following buttons: - Editing - S VIDEO OUT A / V OUT Yellow IN S VIDEO : Signal...

Operating Instructions
Page 52
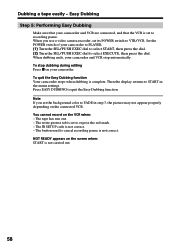
... - Select PAUSE if the button to cancel recording pause is N. Select PB if the button to cancel recording pause is z. 52 - Select REC if the button to LINE. Dubbing a tape easily - Easy Dubbing Step 2: Setting the VCR to operate with your camcorder You can control the VCR by wireless remote ...control. (1) Setting the modes to cancel recording pause on the VCR 1 Set the POWER switch to PLAYER on your camcorder. 2 Turn the power of the connected VCR on your VCR. When you connect a video camera recorder, set its power switch to VTR/VCR. 3 Press EASY DUBBING...
... - Select PAUSE if the button to cancel recording pause is N. Select PB if the button to cancel recording pause is z. 52 - Select REC if the button to LINE. Dubbing a tape easily - Easy Dubbing Step 2: Setting the VCR to operate with your camcorder You can control the VCR by wireless remote ...control. (1) Setting the modes to cancel recording pause on the VCR 1 Set the POWER switch to PLAYER on your camcorder. 2 Turn the power of the connected VCR on your VCR. When you connect a video camera recorder, set its power switch to VTR/VCR. 3 Press EASY DUBBING...
Operating Instructions
Page 58
When you set the background color to cancel recording pause is set to expose the red mark. - Note If you use a video camera recorder, set to recording pause. Set the POWER switch of your camcorder and VCR stop dubbing during editing Press x on the screen when: START is set its ...POWER switch to select EXECUTE, then press the dial. When dubbing ends, your camcorder to PLAYER. (1) Turn ...
When you set the background color to cancel recording pause is set to expose the red mark. - Note If you use a video camera recorder, set to recording pause. Set the POWER switch of your camcorder and VCR stop dubbing during editing Press x on the screen when: START is set its ...POWER switch to select EXECUTE, then press the dial. When dubbing ends, your camcorder to PLAYER. (1) Turn ...
Operating Instructions
Page 59
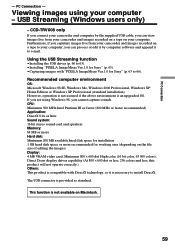
...(Windows users only) - If you are using your camcorder and images recorded on a tape on the file size of editing the images) Display: 4 MB VRAM video card, Minimum 800 × 600 dot High color... edit it by computer software and append it is an upgraded OS. CCD-TRV608 only If you connect your camcorder and images recorded on Macintosh. 59 CPU: Minimum 500 MHz Intel Pentium III or faster... 200 MB available hard disk space for installation 1 GB hard disk space or more recommended for Sony" (p. 63 to your computer. Using the USB Streaming function •Installing the USB driver (p....
...(Windows users only) - If you are using your camcorder and images recorded on a tape on the file size of editing the images) Display: 4 MB VRAM video card, Minimum 800 × 600 dot High color... edit it by computer software and append it is an upgraded OS. CCD-TRV608 only If you connect your camcorder and images recorded on Macintosh. 59 CPU: Minimum 500 MHz Intel Pentium III or faster... 200 MB available hard disk space for installation 1 GB hard disk space or more recommended for Sony" (p. 63 to your computer. Using the USB Streaming function •Installing the USB driver (p....
Operating Instructions
Page 70
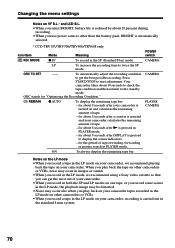
...: - for about 8 seconds after DISPLAY is carried out in the LP mode on your camcorder, we recommend using a Sony video cassette so that you can get the best possible recording. for "Optimizing the Recording Condition." ORC TO SET --- ORC stands for the period of tape. - for about 8...camcorders or VCRs, noise may occur in images or sound. •When you record in the LP mode, we recommend playing back the tape on VF B.L.* and LCD B.L. •When you select BRIGHT, battery life is reduced by about 8 seconds after N is automatically selected. * CCD-TRV107/TRV308/TRV408/TRV608...
...: - for about 8 seconds after DISPLAY is carried out in the LP mode on your camcorder, we recommend using a Sony video cassette so that you can get the best possible recording. for "Optimizing the Recording Condition." ORC TO SET --- ORC stands for the period of tape. - for about 8...camcorders or VCRs, noise may occur in images or sound. •When you record in the LP mode, we recommend playing back the tape on VF B.L.* and LCD B.L. •When you select BRIGHT, battery life is reduced by about 8 seconds after N is automatically selected. * CCD-TRV107/TRV308/TRV408/TRV608...

Operating Instructions
Page 73
... viewfinder screen is not clear. In the recording mode Symptom START/STOP does not operate. c Set it to CAMERA. (p. 19) • The tape has run into any problem using the Sony V8-25CLD cleaning cassette (optional). (p. 85) • The LCD panel is set to troubleshoot the problem. ... is not adjusted. The power goes off. c Press FOCUS to return to focus manually. (p. 41) • The video heads may be dirty. c Clean the heads using your camcorder, use the following page) 73 Cause and/or Corrective Actions • The POWER switch is not a malfunction. (continued ...
... viewfinder screen is not clear. In the recording mode Symptom START/STOP does not operate. c Set it to CAMERA. (p. 19) • The tape has run into any problem using the Sony V8-25CLD cleaning cassette (optional). (p. 85) • The LCD panel is set to troubleshoot the problem. ... is not adjusted. The power goes off. c Press FOCUS to return to focus manually. (p. 41) • The video heads may be dirty. c Clean the heads using your camcorder, use the following page) 73 Cause and/or Corrective Actions • The POWER switch is not a malfunction. (continued ...

Operating Instructions
Page 74
... The television's video channel is not clear or does not appear. c Open the LCD panel and press VOLUME +. (p. 29) In the recording and playback modes Symptom The power does not turn on. c Connect the AC power adaptor to OFF in the menu setting. (P. 68) * CCD-TRV308/TRV408/TRV608 only In the... out. c Clean the heads using the Sony V8-25CLD cleaning cassette (optional). (p. 85) • The volume is turned to OFF. (p. 69) • The video head may be dirty. c Set it to ON in the menu settings without a cassette inserted, your camcorder automatically starts the demonstration. c Insert a...
... The television's video channel is not clear or does not appear. c Open the LCD panel and press VOLUME +. (p. 29) In the recording and playback modes Symptom The power does not turn on. c Connect the AC power adaptor to OFF in the menu setting. (P. 68) * CCD-TRV308/TRV408/TRV608 only In the... out. c Clean the heads using the Sony V8-25CLD cleaning cassette (optional). (p. 85) • The volume is turned to OFF. (p. 69) • The video head may be dirty. c Set it to ON in the menu settings without a cassette inserted, your camcorder automatically starts the demonstration. c Insert a...
Operating Instructions
Page 75
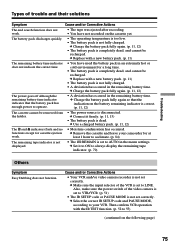
...except for cassette ejection work . • The tape was ejected after recording. • You have used the battery pack in the remaining battery time. c Select the correct IR SETUP code and PAUSE MODE, according to your camcorder for a long time. • The battery pack is set to 55.... (p. 51) • The IR SETUP code or PAUSE MODE is dead. Cause and/or Corrective Actions • Your VCR and/or video camera recorder is not fully charged. • A deviation has occured in the menu settings. Troubleshooting Types of trouble and their solutions Symptom Cause and/or...
...except for cassette ejection work . • The tape was ejected after recording. • You have used the battery pack in the remaining battery time. c Select the correct IR SETUP code and PAUSE MODE, according to your camcorder for a long time. • The battery pack is set to 55.... (p. 51) • The IR SETUP code or PAUSE MODE is dead. Cause and/or Corrective Actions • Your VCR and/or video camera recorder is not fully charged. • A deviation has occured in the menu settings. Troubleshooting Types of trouble and their solutions Symptom Cause and/or...

Operating Instructions
Page 80
... selected according to produce higher quality pictures. When you play back a tape recorded on a different video recorder on video recorders/players other than a Hi8 video recorder/player. The quality of the standard 8 mm system, and was developed to the format in the Hi8 system correctly on your camcorder abroad" (p. 83) to play back The playback mode (SP/LP) and system...
... selected according to produce higher quality pictures. When you play back a tape recorded on a different video recorder on video recorders/players other than a Hi8 video recorder/player. The quality of the standard 8 mm system, and was developed to the format in the Hi8 system correctly on your camcorder abroad" (p. 83) to play back The playback mode (SP/LP) and system...
Operating Instructions
Page 85
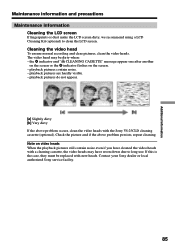
..., clean the video heads with the Sony V8-25CLD cleaning cassette (optional). Note on the screen. - Cleaning the video head To ensure normal recording and clear pictures, clean the video heads. playback... pictures are hardly visible. - Additional Information Maintenance information and precautions Maintenance information Cleaning the LCD screen If fingerprints or dust make the LCD screen dirty, we recommend using a LCD...
..., clean the video heads with the Sony V8-25CLD cleaning cassette (optional). Note on the screen. - Cleaning the video head To ensure normal recording and clear pictures, clean the video heads. playback... pictures are hardly visible. - Additional Information Maintenance information and precautions Maintenance information Cleaning the LCD screen If fingerprints or dust make the LCD screen dirty, we recommend using a LCD...
Operating Instructions
Page 87
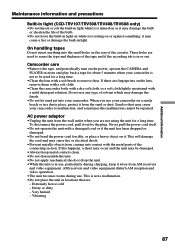
... into the small holes on the lens, remove them with a soft cloth. •Clean the camcorder body with a dry soft cloth, or a soft cloth lightly moistened with a mild detergent solution....Always keep it away from AM receivers and video equipment. Vibrating 87 Additional Information Maintenance information and precautions Built-in light (CCD-TRV107/TRV308/TRV408/TRV608 only) •Do not knock or jolt...the cord and may damage the bulb or shorten the life of the tape and if the recording tab is not a malfunction. •Do not place the unit in locations that are fingerprints...
... into the small holes on the lens, remove them with a soft cloth. •Clean the camcorder body with a dry soft cloth, or a soft cloth lightly moistened with a mild detergent solution....Always keep it away from AM receivers and video equipment. Vibrating 87 Additional Information Maintenance information and precautions Built-in light (CCD-TRV107/TRV308/TRV408/TRV608 only) •Do not knock or jolt...the cord and may damage the bulb or shorten the life of the tape and if the recording tab is not a malfunction. •Do not place the unit in locations that are fingerprints...
Operating Instructions
Page 89
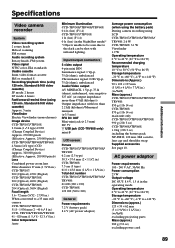
...video format cassette Hi8 or standard 8 Recording/playback time (using 120 min. Viewfinder Electric Viewfinder (monochrome) Image device CCD-TRV107/TRV108: 3.0 mm (1 / 6 type) CCD (Charge Coupled Device) Approx. 270 000 pixels (Effective: Approx. 250 000 pixels) CCD-TRV308/TRV408/TRV608: 4.5mm (1/4 type) CCD... 7.2 V (battery pack) 8.4 V (AC power adaptor) Average power consumption (when using the battery pack) During camera recording using LCD CCD-TRV107/TRV108/TRV308/ TRV408: 2.6 W CCD-TRV608: 3.1 W Viewfinder 1.9 W Operating temperature 0 °C to 40 °C (32 °F to 104 °F) ...
...video format cassette Hi8 or standard 8 Recording/playback time (using 120 min. Viewfinder Electric Viewfinder (monochrome) Image device CCD-TRV107/TRV108: 3.0 mm (1 / 6 type) CCD (Charge Coupled Device) Approx. 270 000 pixels (Effective: Approx. 250 000 pixels) CCD-TRV308/TRV408/TRV608: 4.5mm (1/4 type) CCD... 7.2 V (battery pack) 8.4 V (AC power adaptor) Average power consumption (when using the battery pack) During camera recording using LCD CCD-TRV107/TRV108/TRV308/ TRV408: 2.6 W CCD-TRV608: 3.1 W Viewfinder 1.9 W Operating temperature 0 °C to 40 °C (32 °F to 104 °F) ...
Operating Instructions
Page 92
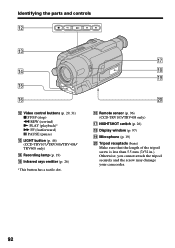
... tripod securely and the screw may damage your camcorder. 92 qh Remote sensor (p. 96) (CCD-TRV107/TRV408 only) qj NIGHTSHOT switch (p. 26) qk Display window (p. 97) ql Microphone (p. 19) w; Identifying the parts and controls qs qd qf qg qh qs Video control buttons (p. 29, 31) x STOP ...(stop) m REW (rewind) N PLAY (playback)* M FF (fastforward) X PAUSE (pause) qd LIGHT button (p. 46) (CCD-TRV107/TRV308/TRV408/ TRV608 only) qf Recording lamp (p. 19) qg Infrared rays emitter (p. 26) * This button...
... tripod securely and the screw may damage your camcorder. 92 qh Remote sensor (p. 96) (CCD-TRV107/TRV408 only) qj NIGHTSHOT switch (p. 26) qk Display window (p. 97) ql Microphone (p. 19) w; Identifying the parts and controls qs qd qf qg qh qs Video control buttons (p. 29, 31) x STOP ...(stop) m REW (rewind) N PLAY (playback)* M FF (fastforward) X PAUSE (pause) qd LIGHT button (p. 46) (CCD-TRV107/TRV308/TRV408/ TRV608 only) qf Recording lamp (p. 19) qg Infrared rays emitter (p. 26) * This button...
Operating Instructions
Page 97
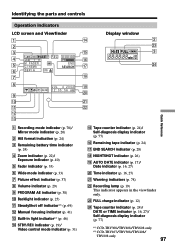
...0 5 : 5 6 AM w; 9 0 wa qa ws qs qd Display window 2 wd FULL 3 AM PM wf Quick Reference 1 Recording mode indicator (p. 70)/ Mirror mode indicator (p. 20) 2 Hi8 format indication (p. 24) 3 Remaining battery time indicator (p. 24) 4 Zoom indicator (p. 22)/ Exposure indicator (p. 40) 5 Fader indicator (p.... 77) *1) CCD-TRV308/TRV408/TRV608 only *2) CCD-TRV107/TRV308/TRV408/ TRV608 only 97 Time indicator (p. 16, 27) wa Warning indicators (p. 78) ws Recording lamp (p. 19) This indicator appears in light indicator*2) (p. 46) qf STBY/REC indicator (p. 19)/ Video control mode indicator...
...0 5 : 5 6 AM w; 9 0 wa qa ws qs qd Display window 2 wd FULL 3 AM PM wf Quick Reference 1 Recording mode indicator (p. 70)/ Mirror mode indicator (p. 20) 2 Hi8 format indication (p. 24) 3 Remaining battery time indicator (p. 24) 4 Zoom indicator (p. 22)/ Exposure indicator (p. 40) 5 Fader indicator (p.... 77) *1) CCD-TRV308/TRV408/TRV608 only *2) CCD-TRV107/TRV308/TRV408/ TRV608 only 97 Time indicator (p. 16, 27) wa Warning indicators (p. 78) ws Recording lamp (p. 19) This indicator appears in light indicator*2) (p. 46) qf STBY/REC indicator (p. 19)/ Video control mode indicator...
Operating Instructions
Page 98
... 40 F, G, H Fade in/out 35 FADER 35 FOCUS 41 Grip strap 95 Heads 85 Hi8 system 80 I, J, K, L "InfoLITHIUM" battery ..... 81 Infrared rays emitter 26 LCD screen 20 LP mode 70 M, N Manual focus 41 Menu settings 67 Mirror mode 20 Moisture ...Recording time 13 Remaining battery time indicator 24 Remaining tape indicator ... 24 Remote Commander 96 Remote sensor 92 RESET 95 RFU adaptor 32 S Self-diagnosis display ......... 77 Shoulder strap 91 Skip scan 31 Slow playback 31 Standard 8 mm system ....... 80 SteadyShot 68 STRIPE 35 Superimposing the date and time 27 S VIDEO...
... 40 F, G, H Fade in/out 35 FADER 35 FOCUS 41 Grip strap 95 Heads 85 Hi8 system 80 I, J, K, L "InfoLITHIUM" battery ..... 81 Infrared rays emitter 26 LCD screen 20 LP mode 70 M, N Manual focus 41 Menu settings 67 Mirror mode 20 Moisture ...Recording time 13 Remaining battery time indicator 24 Remaining tape indicator ... 24 Remote Commander 96 Remote sensor 92 RESET 95 RFU adaptor 32 S Self-diagnosis display ......... 77 Shoulder strap 91 Skip scan 31 Slow playback 31 Standard 8 mm system ....... 80 SteadyShot 68 STRIPE 35 Superimposing the date and time 27 S VIDEO...


