
Operating Instructions
Page 4
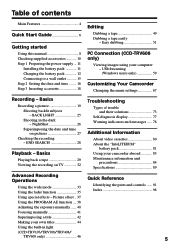
Main Features Taking moving images, and playing them back •Recording a picture (p. 19) •Playing back a tape (p. 29) Capturing images on your computer*1) •Viewing images recorded on a tape (p. 59) •Viewing images live from your camcorder (p. 59) Others Functions to adjust exposure in the recording mode •BACK LIGHT (p. 25) •NightShot (p. 26... and time (p. 16) •ORC [MENU] (p. 70) Function to use after recording •Easy Dubbing (p. 51) Function to make transition smooth •END SEARCH (P.28) *1) CCD-TRV608 only 4 *2) CCD-TRV107/TRV308/TRV408...
Main Features Taking moving images, and playing them back •Recording a picture (p. 19) •Playing back a tape (p. 29) Capturing images on your computer*1) •Viewing images recorded on a tape (p. 59) •Viewing images live from your camcorder (p. 59) Others Functions to adjust exposure in the recording mode •BACK LIGHT (p. 25) •NightShot (p. 26... and time (p. 16) •ORC [MENU] (p. 70) Function to use after recording •Easy Dubbing (p. 51) Function to make transition smooth •END SEARCH (P.28) *1) CCD-TRV608 only 4 *2) CCD-TRV107/TRV308/TRV408...
Operating Instructions
Page 5
...indicators and messages ...... 78 Additional Information About video cassettes 80 About the "InfoLITHIUM" battery pack 81 Using your camcorder abroad 83 Maintenance information and precautions 84 Specifications 89 Advanced Recording Operations Using the wide mode 33 Using the fader...END SEARCH 28 Playback - Basics Playing back a tape 29 Viewing the recording on pictures 27 Checking the recording - USB Streaming (Windows users only 59 Customizing Your Camcorder Changing the menu settings 67 Recording - Easy dubbing 51 PC Connection (CCD-TRV608 only) Viewing images using your ...
...indicators and messages ...... 78 Additional Information About video cassettes 80 About the "InfoLITHIUM" battery pack 81 Using your camcorder abroad 83 Maintenance information and precautions 84 Specifications 89 Advanced Recording Operations Using the wide mode 33 Using the fader...END SEARCH 28 Playback - Basics Playing back a tape 29 Viewing the recording on pictures 27 Checking the recording - USB Streaming (Windows users only 59 Customizing Your Camcorder Changing the menu settings 67 Recording - Easy dubbing 51 PC Connection (CCD-TRV608 only) Viewing images using your ...
Operating Instructions
Page 7
... eyecup. REW 3 Press N to start playback. 1 Set the POWER switch to your camcorder by the viewfinder, the LCD panel, or the battery pack. 7 CAME AYER OFF(CHG) PLAY Note Do not pick up your eyesight (p. 23). The picture appears on the LCD screen (p. 29) 2 Press m to CAMERA PL while pressing the POWER small green...
... eyecup. REW 3 Press N to start playback. 1 Set the POWER switch to your camcorder by the viewfinder, the LCD panel, or the battery pack. 7 CAME AYER OFF(CHG) PLAY Note Do not pick up your eyesight (p. 23). The picture appears on the LCD screen (p. 29) 2 Press m to CAMERA PL while pressing the POWER small green...
Operating Instructions
Page 14
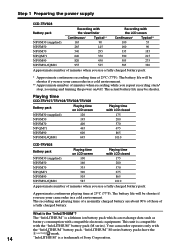
...% of those of a fully charged battery. This unit is a trademark of Sony Corporation. The battery life will be shorter if you repeat recording start/ stop, zooming and turning the power on LCD screen Playing time with LCD closed NP-FM30 (supplied) 100 175 NP-FM50 160 280 NP-FM70 335...FM70 400 NP-QM71 465 NP-FM90 600 NP-FM91/QM91 695 Playing time with LCD closed 175 280 570 675 865 1010 CCD-TRV608 Battery pack Playing time on /off. The actual battery life may be shorter if you use your camcorder in a cold environment. ** Approximate number of minutes when recording ...
...% of those of a fully charged battery. This unit is a trademark of Sony Corporation. The battery life will be shorter if you repeat recording start/ stop, zooming and turning the power on LCD screen Playing time with LCD closed NP-FM30 (supplied) 100 175 NP-FM50 160 280 NP-FM70 335...FM70 400 NP-QM71 465 NP-FM90 600 NP-FM91/QM91 695 Playing time with LCD closed 175 280 570 675 865 1010 CCD-TRV608 Battery pack Playing time on /off. The actual battery life may be shorter if you use your camcorder in a cold environment. ** Approximate number of minutes when recording ...
Operating Instructions
Page 19
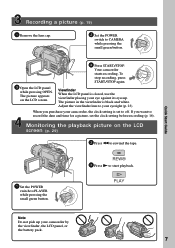
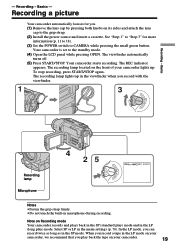
... START/STOP. The REC indicator appears. The recording lamp lights up . Basics - Select SP or LP in the LP (long play) mode. Recording a picture Your camcorder automatically focuses for more information (p. 11 to 18). (3) Set the POWER switch to the grip strap. (2) Install the power source.... See "Step 1" to the standby mode. (4) Open the LCD panel while pressing OPEN. To stop recording, press START/STOP again. Recording - In the LP mode, you play ) mode and in the menu settings (p. 70). Your camcorder starts recording. Basics - When you record a tape in the...
... START/STOP. The REC indicator appears. The recording lamp lights up . Basics - Select SP or LP in the LP (long play) mode. Recording a picture Your camcorder automatically focuses for more information (p. 11 to 18). (3) Set the POWER switch to the grip strap. (2) Install the power source.... See "Step 1" to the standby mode. (4) Open the LCD panel while pressing OPEN. To stop recording, press START/STOP again. Recording - In the LP mode, you play ) mode and in the menu settings (p. 70). Your camcorder starts recording. Basics - When you record a tape in the...
Operating Instructions
Page 24
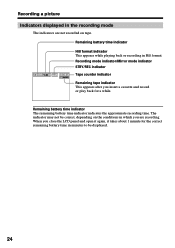
... not recorded on the conditions in which you are recording. When you insert a cassette and record or play back for the correct remaining battery time in Hi8 format. Recording mode indicator/Mirror mode indicator STBY/REC indicator 40min SP REC 0:00:01 Tape counter indicator...appears after you close the LCD panel and open it again, it takes about 1 minute for a while. Remaining battery time indicator The remaining battery time indicator indicates the approximate recording time. Remaining battery time indicator Hi8 format indicator This appears while playing back or recording in minutes...
... not recorded on the conditions in which you are recording. When you insert a cassette and record or play back for the correct remaining battery time in Hi8 format. Recording mode indicator/Mirror mode indicator STBY/REC indicator 40min SP REC 0:00:01 Tape counter indicator...appears after you close the LCD panel and open it again, it takes about 1 minute for a while. Remaining battery time indicator The remaining battery time indicator indicates the approximate recording time. Remaining battery time indicator Hi8 format indicator This appears while playing back or recording in minutes...
Operating Instructions
Page 28
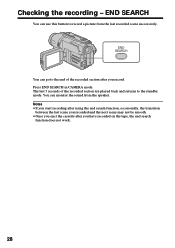
END SEARCH You can go to the end of the recorded section are played back and returns to record a picture from the speaker. You can use this button to the standby mode. END SEARCH You can monitor the sound ...
END SEARCH You can go to the end of the recorded section are played back and returns to record a picture from the speaker. You can use this button to the standby mode. END SEARCH You can monitor the sound ...
Operating Instructions
Page 29
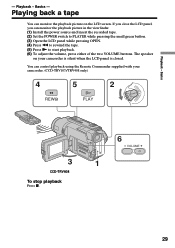
... monitor the playback picture on your camcorder. (CCD-TRV107/TRV408 only) AYER OFF(CHG) 4 REW 5 2 PL POWER PLAY RA CAME 3 CCD-TRV408 To stop playback Press x. 6 VOLUME 1 29 If you close the LCD panel, you can control playback using the Remote Commander supplied with your camcorder is silent when the LCD panel is closed. The speaker on...
... monitor the playback picture on your camcorder. (CCD-TRV107/TRV408 only) AYER OFF(CHG) 4 REW 5 2 PL POWER PLAY RA CAME 3 CCD-TRV408 To stop playback Press x. 6 VOLUME 1 29 If you close the LCD panel, you can control playback using the Remote Commander supplied with your camcorder is silent when the LCD panel is closed. The speaker on...
Operating Instructions
Page 30
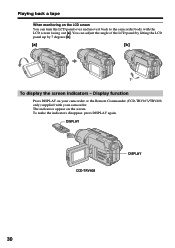
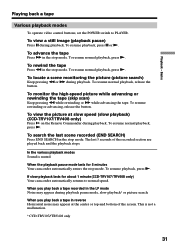
Playing back a tape When monitoring on the LCD screen You can adjust the angle of the LCD panel by lifting the LCD panel up by 7 degrees [b]. [a] [b] 7° To display the screen indicators - You can turn the LCD panel over and move it back to the camcorder body with your camcorder or the Remote Commander (CCD-TRV107/TRV408 only) supplied with the LCD screen facing out [a]. DISPLAY CCD-TRV408 DISPLAY 30 The indicators appear on your camcorder. Display function Press DISPLAY on the screen. To make the indicators disappear, press DISPLAY again.
Playing back a tape When monitoring on the LCD screen You can adjust the angle of the LCD panel by lifting the LCD panel up by 7 degrees [b]. [a] [b] 7° To display the screen indicators - You can turn the LCD panel over and move it back to the camcorder body with your camcorder or the Remote Commander (CCD-TRV107/TRV408 only) supplied with the LCD screen facing out [a]. DISPLAY CCD-TRV408 DISPLAY 30 The indicators appear on your camcorder. Display function Press DISPLAY on the screen. To make the indicators disappear, press DISPLAY again.
Operating Instructions
Page 31
... of the screen. In the various playback modes Sound is not a malfunction. * CCD-TRV107/TRV408 only 31 If slow playback lasts for 5 minutes Your camcorder automatically enters the stop mode. When you play back a tape recorded in the stop mode. Basics Playing back a tape Various playback modes To operate video control buttons, set the...
... of the screen. In the various playback modes Sound is not a malfunction. * CCD-TRV107/TRV408 only 31 If slow playback lasts for 5 minutes Your camcorder automatically enters the stop mode. When you play back a tape recorded in the stop mode. Basics Playing back a tape Various playback modes To operate video control buttons, set the...

Operating Instructions
Page 33
...can watch on a normal TV [b] or a wide-screen TV [c]. CINEMA Black bands appear on the screen during recording in the 16:9FULL mode [e], or playing back on a normal TV [f] or a wide-screen TV [g] is horizontally compressed. Refer to the operating instructions of the widescreen TV to the zoom mode... 16:9FULL 16:9FULL [e] [g] [h] 33 If you set the screen mode of the wide-screen TV to watch correctly proportioned images in the CINEMA mode [a], playing back on the 16:9 wide-screen TV (16:9FULL). If you can record a cinema-like picture (CINEMA) or a 16:9 wide picture to the full ...
...can watch on a normal TV [b] or a wide-screen TV [c]. CINEMA Black bands appear on the screen during recording in the 16:9FULL mode [e], or playing back on a normal TV [f] or a wide-screen TV [g] is horizontally compressed. Refer to the operating instructions of the widescreen TV to the zoom mode... 16:9FULL 16:9FULL [e] [g] [h] 33 If you set the screen mode of the wide-screen TV to watch correctly proportioned images in the CINEMA mode [a], playing back on the 16:9 wide-screen TV (16:9FULL). If you can record a cinema-like picture (CINEMA) or a 16:9 wide picture to the full ...
Operating Instructions
Page 43
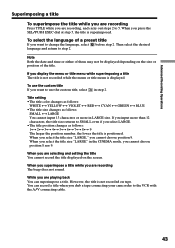
... Then select the desired language and return to change the language, select before step 2. When you select the title size "LARGE," you are playing back You can record a title when you are recording The beep does not sound. However, the title is not recorded on the size or... you want to use the custom title If you cannot choose position 8 nor 9. When you superimpose a title while you dub a tape connecting your camcorder to the VCR with the A/V connecting cable. 43 You can superimpose a title. Advanced Recording Operations Superimposing a title To superimpose the title while you ...
... Then select the desired language and return to change the language, select before step 2. When you select the title size "LARGE," you are playing back You can record a title when you are recording The beep does not sound. However, the title is not recorded on the size or... you want to use the custom title If you cannot choose position 8 nor 9. When you superimpose a title while you dub a tape connecting your camcorder to the VCR with the A/V connecting cable. 43 You can superimpose a title. Advanced Recording Operations Superimposing a title To superimpose the title while you ...

Operating Instructions
Page 49
...LCD in in the menu settings (The default setting is set to LCD.) If you want to LINE. Dubbing a tape Using the A/V connecting cable Connect your camcorder to the VCR using your camcorder.... (2) Set the input selector on the VCR to record over) into the VCR, and insert the recorded tape into your camcorder as a player. DISPLAY on your camcorder... of your camcorder - You ...camcorder. (5) Start recording on tapes. DISPLAY on the Remote Commander (CCD...
...LCD in in the menu settings (The default setting is set to LCD.) If you want to LINE. Dubbing a tape Using the A/V connecting cable Connect your camcorder to the VCR using your camcorder.... (2) Set the input selector on the VCR to record over) into the VCR, and insert the recorded tape into your camcorder as a player. DISPLAY on your camcorder... of your camcorder - You ...camcorder. (5) Start recording on tapes. DISPLAY on the Remote Commander (CCD...

Operating Instructions
Page 64
... jack on Windows. (7) Click the input mode button in the preview window. 64 Viewing images using the supplied USB cable. Preview window (9) Start playing back a tape on your camcorder. (4) Set the POWER switch to PLAYER. (5) Select USB STREAM to ON in in the menu settings (p. 71). (6) Select "Start" t "...Program" t "Pixela" t "ImageMixer" t "PIXELA ImageMixer Ver.1.0 for Sony" on the camcorder and the other end to load. (2) Connect one end of Start-up screen. (8) Select . To the USB connector Computer To the (USB) jack ...
... jack on Windows. (7) Click the input mode button in the preview window. 64 Viewing images using the supplied USB cable. Preview window (9) Start playing back a tape on your camcorder. (4) Set the POWER switch to PLAYER. (5) Select USB STREAM to ON in in the menu settings (p. 71). (6) Select "Start" t "...Program" t "Pixela" t "ImageMixer" t "PIXELA ImageMixer Ver.1.0 for Sony" on the camcorder and the other end to load. (2) Connect one end of Start-up screen. (8) Select . To the USB connector Computer To the (USB) jack ...

Operating Instructions
Page 69
...* CCD-TRV308/TRV408/TRV608 only Icon/item Mode Meaning POWER switch EDIT z OFF - PLAYER BRIGHT To brighten the LCD screen. CAMERA --- PLAYER CAMERA 69 DNR z ON To reduce picture noise. Icon/item LCD BRIGHT Mode --- Meaning POWER switch To adjust the brightness on the LCD screen... editing. Set TBC to OFF when playing back a tape on which you have dubbed over and recorded the signal of movement. DNR stands for "Digital Noise Reduction." LCD B.L. BRIGHT To brighten the viewfinder. Customizing Your Camcorder Changing the menu settings Notes on the...
...* CCD-TRV308/TRV408/TRV608 only Icon/item Mode Meaning POWER switch EDIT z OFF - PLAYER BRIGHT To brighten the LCD screen. CAMERA --- PLAYER CAMERA 69 DNR z ON To reduce picture noise. Icon/item LCD BRIGHT Mode --- Meaning POWER switch To adjust the brightness on the LCD screen... editing. Set TBC to OFF when playing back a tape on which you have dubbed over and recorded the signal of movement. DNR stands for "Digital Noise Reduction." LCD B.L. BRIGHT To brighten the viewfinder. Customizing Your Camcorder Changing the menu settings Notes on the...
Operating Instructions
Page 70
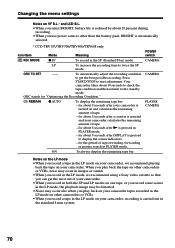
...camcorder takes about 8 seconds after N is pressed in the LP mode on your camcorder, we recommend using a Sony video cassette so that you record in the LP mode, we recommend playing back the tape on your camcorder...camcorder is turned on and calculates the remaining amount of tape rewinding, forwarding or picture search in the SP (Standard Play) mode. Changing the menu settings Notes on VF B.L.* and LCD ...When you play back on your camcorder tapes recorded in the LP mode on other than the battery pack, BRIGHT is automatically selected. * CCD-TRV107/TRV308/TRV408/TRV608 only Icon/...
...camcorder takes about 8 seconds after N is pressed in the LP mode on your camcorder, we recommend using a Sony video cassette so that you record in the LP mode, we recommend playing back the tape on your camcorder...camcorder is turned on and calculates the remaining amount of tape rewinding, forwarding or picture search in the SP (Standard Play) mode. Changing the menu settings Notes on VF B.L.* and LCD ...When you play back on your camcorder tapes recorded in the LP mode on other than the battery pack, BRIGHT is automatically selected. * CCD-TRV107/TRV308/TRV408/TRV608 only Icon/...

Operating Instructions
Page 74
... to CAMERA or OFF (CHG). c Open the LCD panel and press VOLUME +. (p. 29) In the...a wall outlet. (p. 15) 74 c Clean the heads using the Sony V8-25CLD cleaning cassette (optional). (p. 85) • The volume...to OFF in the menu settings without a cassette inserted, your camcorder automatically starts the demonstration. c Insert a cassette and the ...(p. 29) • The television's video channel is heard when playing back a tape. The playback button does not work. c Install...in the menu setting. (P. 68) * CCD-TRV308/TRV408/TRV608 only In the playback mode Symptom The tape ...
... to CAMERA or OFF (CHG). c Open the LCD panel and press VOLUME +. (p. 29) In the...a wall outlet. (p. 15) 74 c Clean the heads using the Sony V8-25CLD cleaning cassette (optional). (p. 85) • The volume...to OFF in the menu settings without a cassette inserted, your camcorder automatically starts the demonstration. c Insert a cassette and the ...(p. 29) • The television's video channel is heard when playing back a tape. The playback button does not work. c Install...in the menu setting. (P. 68) * CCD-TRV308/TRV408/TRV608 only In the playback mode Symptom The tape ...

Operating Instructions
Page 80
... in the standard 8 mm system. When you play back a tape recorded on a different video recorder on your camcorder. However, if you play back The playback mode (SP/LP) and system, Hi8 , or standard 8 mm are carried out in the Hi8 system. If you record on video recorders/players ...other than a Hi8 video recorder/player. This Hi8 system is an extension of the ...
... in the standard 8 mm system. When you play back a tape recorded on a different video recorder on your camcorder. However, if you play back The playback mode (SP/LP) and system, Hi8 , or standard 8 mm are carried out in the Hi8 system. If you record on video recorders/players ...other than a Hi8 video recorder/player. This Hi8 system is an extension of the ...

Operating Instructions
Page 81
... the standby mode or playback is 5 to 10 minutes. Remove the battery pack from the DC IN jack on your camcorder immediately before you start using the LCD panel or frequently operating playback, fast forward or rewind wears out the battery pack faster. Charging the battery pack •Be... sure to charge the battery pack before you start taking shots or playing back on the remaining battery time indicator is ...
... the standby mode or playback is 5 to 10 minutes. Remove the battery pack from the DC IN jack on your camcorder immediately before you start using the LCD panel or frequently operating playback, fast forward or rewind wears out the battery pack faster. Charging the battery pack •Be... sure to charge the battery pack before you start taking shots or playing back on the remaining battery time indicator is ...
Operating Instructions
Page 87
... the tape, and periodically turn on the power, operate the CAMERA and PLAYER sections and play back a tape for about 5 minutes when your camcorder is in use any type of solvent which may cause your camcorder. Never pull the power cord itself. •Do not operate the unit with the metal... disconnect the power cord, pull it . When you are used for a long time. Additional Information Maintenance information and precautions Built-in light (CCD-TRV107/TRV308/TRV408/TRV608 only) •Do not knock or jolt the built-in light while it is turned on as it may be damaged. •Always keep...
... the tape, and periodically turn on the power, operate the CAMERA and PLAYER sections and play back a tape for about 5 minutes when your camcorder is in use any type of solvent which may cause your camcorder. Never pull the power cord itself. •Do not operate the unit with the metal... disconnect the power cord, pull it . When you are used for a long time. Additional Information Maintenance information and precautions Built-in light (CCD-TRV107/TRV308/TRV408/TRV608 only) •Do not knock or jolt the built-in light while it is turned on as it may be damaged. •Always keep...


