Operating Instructions
Page 1
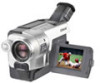
Serial No. 3-079-467-13 (1) Digital Video Camera Recorder Video Camera Recorder Operating Instructions Before operating the unit, please read this product. DCR-TRV350 TM SERIES DCR-TRV150/TRV250/TRV350/TRV351 CCD-TRV118/TRV318/TRV418 ©2003 Sony Corporation Record the serial number in the space provided below. Refer to these numbers whenever you call upon your Sony dealer regarding this manual thoroughly, and retain it for future reference. Model No. -TRV Model No. Owner's Record The model and serial numbers are located on the bottom. AC- Serial No.
Serial No. 3-079-467-13 (1) Digital Video Camera Recorder Video Camera Recorder Operating Instructions Before operating the unit, please read this product. DCR-TRV350 TM SERIES DCR-TRV150/TRV250/TRV350/TRV351 CCD-TRV118/TRV318/TRV418 ©2003 Sony Corporation Record the serial number in the space provided below. Refer to these numbers whenever you call upon your Sony dealer regarding this manual thoroughly, and retain it for future reference. Model No. -TRV Model No. Owner's Record The model and serial numbers are located on the bottom. AC- Serial No.

Operating Instructions
Page 4
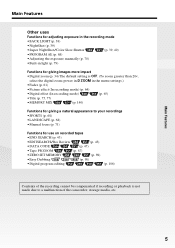
... from your camcorder using the USB cable (p. 197) •Viewing images recorded on a "Memory Stick" using the USB cable (p. 185) •Converting an analog signal into digital to indicate model names. Instructions with no icons are for all models. CCD-TRV118 : CCD-TRV318 : CCD-TRV418 : DCR-TRV150 : DCR-TRV250 : DCR-TRV350 : DCR-TRV351 : Instructions with...
... from your camcorder using the USB cable (p. 197) •Viewing images recorded on a "Memory Stick" using the USB cable (p. 185) •Converting an analog signal into digital to indicate model names. Instructions with no icons are for all models. CCD-TRV118 : CCD-TRV318 : CCD-TRV418 : DCR-TRV150 : DCR-TRV250 : DCR-TRV350 : DCR-TRV351 : Instructions with...
Operating Instructions
Page 5
...the digital zoom power in D ZOOM in the menu settings.) •Fader (p. 61) •Picture effect (In recording mode) (p. 64) •Digital effect (In recording mode) (p. 65) •Title (p. 75, 77) •MEMORY MIX (p. 140) Functions for giving a natural appearance to ...your recordings •SPORTS (p. 68) •LANDSCAPE (p. 68) •Manual focus (p. 71) Functions for use on recorded tapes •END SEARCH (p. 43) •EDITSEARCH/Rec Review (p. 43) •DATA CODE (p. 47) ...
...the digital zoom power in D ZOOM in the menu settings.) •Fader (p. 61) •Picture effect (In recording mode) (p. 64) •Digital effect (In recording mode) (p. 65) •Title (p. 75, 77) •MEMORY MIX (p. 140) Functions for giving a natural appearance to ...your recordings •SPORTS (p. 68) •LANDSCAPE (p. 68) •Manual focus (p. 71) Functions for use on recorded tapes •END SEARCH (p. 43) •EDITSEARCH/Rec Review (p. 43) •DATA CODE (p. 47) ...
Operating Instructions
Page 6
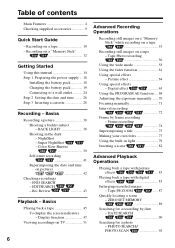
... battery pack 18 Charging the battery pack 19 Connecting to a wall outlet 24 Step 2 Setting the date and time ........ 26 Step 3 Inserting a cassette 28 Recording - Frame recording 74 Superimposing a title 75 Making your own titles 77 Using the built-in the dark - ZERO SET MEMORY 89 Searching for a photo - BACK LIGHT 38...
... battery pack 18 Charging the battery pack 19 Connecting to a wall outlet 24 Step 2 Setting the date and time ........ 26 Step 3 Inserting a cassette 28 Recording - Frame recording 74 Superimposing a title 75 Making your own titles 77 Using the built-in the dark - ZERO SET MEMORY 89 Searching for a photo - BACK LIGHT 38...
Operating Instructions
Page 7
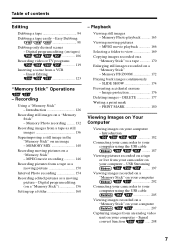
...your computer - Image protection 176 Deleting images - Digital program editing (on tapes 106 Recording video or TV programs 119 Inserting a scene from a tape as a moving picture 150 Interval Photo recording 154 Recording edited pictures as still images 136 Superimposing a still image in the "Memory Stick" on... Introduction 182 Connecting your camcorder to your computer using the USB cable 205 Viewing images recorded on a "Memory Stick" on your computer 207 Capturing images from an analog video unit on your computer - Table of contents Editing Dubbing a tape 94 Dubbing a ...
...your computer - Image protection 176 Deleting images - Digital program editing (on tapes 106 Recording video or TV programs 119 Inserting a scene from a tape as a moving picture 150 Interval Photo recording 154 Recording edited pictures as still images 136 Superimposing a still image in the "Memory Stick" on... Introduction 182 Connecting your camcorder to your computer using the USB cable 205 Viewing images recorded on a "Memory Stick" on your computer 207 Capturing images from an analog video unit on your computer - Table of contents Editing Dubbing a tape 94 Dubbing a ...

Operating Instructions
Page 10
... completely, close the lid. Quick Start Guide 10 AC Adaptor (supplied) Inserting a cassette (p. 28) 1 Slide OPEN/ EJECT in parentheses "( )" for more information. Quick Start Guide - Recording on a tape This chapter introduces you to the basic features to...
... completely, close the lid. Quick Start Guide 10 AC Adaptor (supplied) Inserting a cassette (p. 28) 1 Slide OPEN/ EJECT in parentheses "( )" for more information. Quick Start Guide - Recording on a tape This chapter introduces you to the basic features to...

Operating Instructions
Page 11
... CAM ME Note Do not pick up yet. V POWER ME CR OFF(CHG) CAM Viewfinder View a picture placing your eyesight (p. 35). REW 3 Press N to record the date and time for a picture, set up your camcorder by the viewfinder, the LCD panel, or the battery pack. * Modes on the POWER switch... START/ STOP again. When you purchase your camcorder, the clock is not set the clock before recording (p. 26). If you want to start playback. Adjust the viewfinder lens to CAMERA while pressing the small green button. The picture appears on models (p. 16). 11 The cap is not attached when you ...
... CAM ME Note Do not pick up yet. V POWER ME CR OFF(CHG) CAM Viewfinder View a picture placing your eyesight (p. 35). REW 3 Press N to record the date and time for a picture, set up your camcorder by the viewfinder, the LCD panel, or the battery pack. * Modes on the POWER switch... START/ STOP again. When you purchase your camcorder, the clock is not set the clock before recording (p. 26). If you want to start playback. Adjust the viewfinder lens to CAMERA while pressing the small green button. The picture appears on models (p. 16). 11 The cap is not attached when you ...

Operating Instructions
Page 12
... your camcorder. AC Adaptor (supplied) Inserting a "Memory Stick" (p. 127) Insert a "Memory Stick" in parentheses "( )" for more information. Recording on a "Memory Stick" Quick Start Guide This chapter introduces you to the basic features to record on a "Memory Stick" of your camcorder outdoors (p. 18). Power cord Connect the plug with the b mark facing the...
... your camcorder. AC Adaptor (supplied) Inserting a "Memory Stick" (p. 127) Insert a "Memory Stick" in parentheses "( )" for more information. Recording on a "Memory Stick" Quick Start Guide This chapter introduces you to the basic features to record on a "Memory Stick" of your camcorder outdoors (p. 18). Power cord Connect the plug with the b mark facing the...
Operating Instructions
Page 13
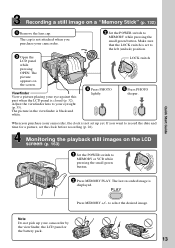
... 3 Open the LCD panel while pressing OPEN. The picture in the viewfinder is set the clock before recording (p. 26). PHOTO PHOTO 2 Set the POWER switch to MEMORY or VCR while pressing the small green ... lens to your eye against this part when the LCD panel is displayed. The last recorded image is closed (p. 32). When you purchase your camcorder by the viewfinder, the LCD panel or ...the battery pack. 13 If you want to record the date and time for a picture, set to select the desired image. Viewfinder View a picture ...
... 3 Open the LCD panel while pressing OPEN. The picture in the viewfinder is set the clock before recording (p. 26). PHOTO PHOTO 2 Set the POWER switch to MEMORY or VCR while pressing the small green ... lens to your eye against this part when the LCD panel is displayed. The last recorded image is closed (p. 32). When you purchase your camcorder by the viewfinder, the LCD panel or ...the battery pack. 13 If you want to record the date and time for a picture, set to select the desired image. Viewfinder View a picture ...

Operating Instructions
Page 14
As you can hear a beep to CAMERA. z z - - - - - Any differences in operation are clearly indicated in the text, for illustration purposes. Hi8 Hi8/8 OUT OUT - - - - z z Provided - z - When you carry out an operation, you ... indicated in this manual and operating your camcorder. Types of your camcorder, check the model number by looking at the bottom of differences Model Recording system Playback system AUDIO/VIDEO jack S VIDEO jack DV jack USB jack "Memory Stick" slot LANC jack SteadyShot Remote sensor RFU jack MIC jack Hi8 Hi8/8 OUT OUT...
As you can hear a beep to CAMERA. z z - - - - - Any differences in operation are clearly indicated in the text, for illustration purposes. Hi8 Hi8/8 OUT OUT - - - - z z Provided - z - When you carry out an operation, you ... indicated in this manual and operating your camcorder. Types of your camcorder, check the model number by looking at the bottom of differences Model Recording system Playback system AUDIO/VIDEO jack S VIDEO jack DV jack USB jack "Memory Stick" slot LANC jack SteadyShot Remote sensor RFU jack MIC jack Hi8 Hi8/8 OUT OUT...
Operating Instructions
Page 15
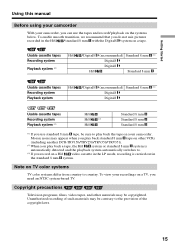
...Hi8 Standard 8 mm Standard 8 mm Standard 8 mm *1) If you use the tapes and record/playback on the systems below. To view your camcorder. Copyright precautions Television programs, films, video tapes, and other VCRs (including another DCR-TRV150/TRV250/TRV350/TRV351). *2) When you play ...back the tape on your recordings on a TV, you record on a Hi8 video cassette in the LP mode, recording is automatically detected and the playback system automatically switches to country. Getting Started Using this manual...
...Hi8 Standard 8 mm Standard 8 mm Standard 8 mm *1) If you use the tapes and record/playback on the systems below. To view your camcorder. Copyright precautions Television programs, films, video tapes, and other VCRs (including another DCR-TRV150/TRV250/TRV350/TRV351). *2) When you play ...back the tape on your recordings on a TV, you record on a Hi8 video cassette in the LP mode, recording is automatically detected and the playback system automatically switches to country. Getting Started Using this manual...
Operating Instructions
Page 17
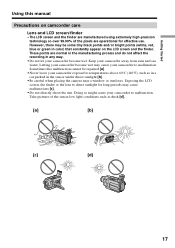
Letting your camcorder become wet. Take pictures of the pixels are normal in the manufacturing process and do not affect the recording in low light conditions such as dusk [d]. [a] [b] [c] [d] 17 Sometimes this manual Precautions on the LCD screen and the finder. However, there may be ...points and/or bright points (white, red, blue or green in the sun or under direct sunlight [b]. •Be careful when placing the camera near a window or outdoors. Exposing the LCD screen, the finder or the lens to malfunction. Keep your camcorder to direct sunlight for effective use...
Letting your camcorder become wet. Take pictures of the pixels are normal in the manufacturing process and do not affect the recording in low light conditions such as dusk [d]. [a] [b] [c] [d] 17 Sometimes this manual Precautions on the LCD screen and the finder. However, there may be ...points and/or bright points (white, red, blue or green in the sun or under direct sunlight [b]. •Be careful when placing the camera near a window or outdoors. Exposing the LCD screen, the finder or the lens to malfunction. Keep your camcorder to direct sunlight for effective use...

Operating Instructions
Page 20
... moves flashing and "CALCULATING BATTERY INFO..." If any trouble occurs with this unit, disconnect the plug from the wall outlet as soon as percentage and recordable time with the metal parts on your camcorder. The battery pack is fully discharged. 20 This may cause a short-circuit, damaging the AC Adaptor. The...
... moves flashing and "CALCULATING BATTERY INFO..." If any trouble occurs with this unit, disconnect the plug from the wall outlet as soon as percentage and recordable time with the metal parts on your camcorder. The battery pack is fully discharged. 20 This may cause a short-circuit, damaging the AC Adaptor. The...
Operating Instructions
Page 22
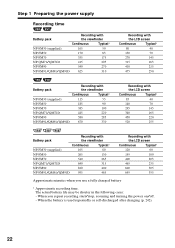
...-QM71/QM71D 415 205 NP-FM90 540 270 NP-FM91/QM91/QM91D 625 310 Recording with the LCD screen Continuous Typical* 80 40 130 70 270 145 315 165 410 215 475 250 Battery pack...-QM71/QM71D 445 220 NP-FM90 580 285 NP-FM91/QM91/QM91D 670 330 Recording with the LCD screen Continuous Typical* 85 40 140 70 295 145 340 165 450 220 520 255 Battery pack...FM70 540 265 NP-QM71/QM71D 640 315 NP-FM90 820 400 NP-FM91/QM91/QM91D 955 465 Recording with the LCD screen Continuous Typical* 120 60 195 100 400 205 465 235 600 305 695 355 Approximate ...
...-QM71/QM71D 415 205 NP-FM90 540 270 NP-FM91/QM91/QM91D 625 310 Recording with the LCD screen Continuous Typical* 80 40 130 70 270 145 315 165 410 215 475 250 Battery pack...-QM71/QM71D 445 220 NP-FM90 580 285 NP-FM91/QM91/QM91D 670 330 Recording with the LCD screen Continuous Typical* 85 40 140 70 295 145 340 165 450 220 520 255 Battery pack...FM70 540 265 NP-QM71/QM71D 640 315 NP-FM90 820 400 NP-FM91/QM91/QM91D 955 465 Recording with the LCD screen Continuous Typical* 120 60 195 100 400 205 465 235 600 305 695 355 Approximate ...
Operating Instructions
Page 24
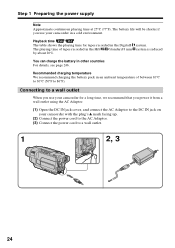
Recommended charging temperature We recommend charging the battery pack in an ambient temperature of tapes recorded in a cold environment. system is reduced You can charge the battery in the Digital8 The playing time of between 10°C to 30°C (50&#... at 25°C (77°F). Playback time The table shows the playing time for a long time, we recommend that you use your camcorder for tapes recorded in other countries For details, see page 246. The battery life will be shorter if you power it from a wall outlet using the AC Adaptor...
Recommended charging temperature We recommend charging the battery pack in an ambient temperature of tapes recorded in a cold environment. system is reduced You can charge the battery in the Digital8 The playing time of between 10°C to 30°C (50&#... at 25°C (77°F). Playback time The table shows the playing time for a long time, we recommend that you use your camcorder for tapes recorded in other countries For details, see page 246. The battery life will be shorter if you power it from a wall outlet using the AC Adaptor...
Operating Instructions
Page 27
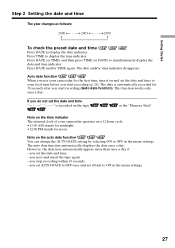
... - The auto date function automatically displays the date once a day. Auto date function When you do not set the date and time is automatically recorded for 10 seconds after you set the date and time. - However, the date may automatically appear more than once a day if: - you ...to display the date indicator. The date and/or time indicator disappears. Press TIME to simultaneously display the date and time indicator. you start recording (Auto date function). Getting Started Step 2 Setting the date and time The year changes as follows: 2000 2003 2079 To check the ...
... - The auto date function automatically displays the date once a day. Auto date function When you do not set the date and time is automatically recorded for 10 seconds after you set the date and time. - However, the date may automatically appear more than once a day if: - you ...to display the date indicator. The date and/or time indicator disappears. Press TIME to simultaneously display the date and time indicator. you start recording (Auto date function). Getting Started Step 2 Setting the date and time The year changes as follows: 2000 2003 2079 To check the ...
Operating Instructions
Page 29
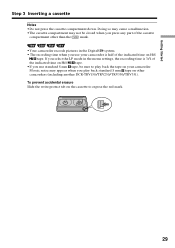
... tape on Hi8 tape. If you select the LP mode in the menu settings, the recording time is half of the cassette compartment other than the mark. •Your camcorder records pictures in the Digital8 system. • The recording time when you use standard 8 mm tape, be closed when you press any part...
... tape on Hi8 tape. If you select the LP mode in the menu settings, the recording time is half of the cassette compartment other than the mark. •Your camcorder records pictures in the Digital8 system. • The recording time when you use standard 8 mm tape, be closed when you press any part...

Operating Instructions
Page 30
... camcorder automatically focuses. (1) Remove the lens cap and attach the lens cap to CAMERA while pressing the small green button. Your camcorder starts recording. However, they are not displayed during recording. To display the data code (date/time), press DATA CODE on the screen. See...POWER CR OFF(CHG) CAM ME ERMAORY 5 50min SP REC 0:00:01 4 2 Camera recording lamp Microphone Notes •The data code (date/time when recorded) are recorded automatically onto the tape. The camera recording lamp located on the front of your camcorder to the standby mode. (4) Open the ...
... camcorder automatically focuses. (1) Remove the lens cap and attach the lens cap to CAMERA while pressing the small green button. Your camcorder starts recording. However, they are not displayed during recording. To display the data code (date/time), press DATA CODE on the screen. See...POWER CR OFF(CHG) CAM ME ERMAORY 5 50min SP REC 0:00:01 4 2 Camera recording lamp Microphone Notes •The data code (date/time when recorded) are recorded automatically onto the tape. The camera recording lamp located on the front of your camcorder to the standby mode. (4) Open the ...

Operating Instructions
Page 31
... on the LOCK switch When you turn off your camcorder does not turn it to prevent battery and tape wear. However, your camcorder. Basics Recording a picture Note on your camcorder, we recommend that you change the battery pack, set to 0:00:00 Press COUNTER RESET (p. 259). When...written properly between scenes. •The transition between the last scene you recorded and the next scene is to save battery power and to CAMERA again. Note on one tape. - The LOCK switch is not inserted. If you record in the standby mode for a certain period *2) while the cassette ...
... on the LOCK switch When you turn off your camcorder does not turn it to prevent battery and tape wear. However, your camcorder. Basics Recording a picture Note on your camcorder, we recommend that you change the battery pack, set to 0:00:00 Press COUNTER RESET (p. 259). When...written properly between scenes. •The transition between the last scene you recorded and the next scene is to save battery power and to CAMERA again. Note on one tape. - The LOCK switch is not inserted. If you record in the standby mode for a certain period *2) while the cassette ...
Operating Instructions
Page 32
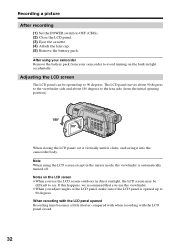
... (5) Remove the battery pack. After using the LCD screen except in direct sunlight, the LCD screen may be opened Recording time becomes a little shorter compared with when recording with the LCD panel opened up to see. If this happens, we recommend that you use the viewfinder. •When... mode, the viewfinder is opened up to 90 degrees. Adjusting the LCD screen The LCD panel can be difficult to 90 degrees. Recording a picture After recording (1) Set the POWER switch to the lens side (from your camcorder Remove the battery pack from the initial opening position). 180°...
... (5) Remove the battery pack. After using the LCD screen except in direct sunlight, the LCD screen may be opened Recording time becomes a little shorter compared with when recording with the LCD panel opened up to see. If this happens, we recommend that you use the viewfinder. •When... mode, the viewfinder is opened up to 90 degrees. Adjusting the LCD screen The LCD panel can be difficult to 90 degrees. Recording a picture After recording (1) Set the POWER switch to the lens side (from your camcorder Remove the battery pack from the initial opening position). 180°...


