Operating Instructions
Page 1
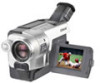
Record the serial number in the space provided below. Refer to these numbers whenever you call upon your Sony dealer regarding this manual thoroughly, and retain it for future reference. Model No. -TRV Model No. Owner's Record The model and serial numbers are located on the bottom. Serial No. DCR-TRV350 TM SERIES DCR-TRV150/TRV250/TRV350/TRV351 CCD-TRV118/TRV318/TRV418 ©2003 Sony Corporation Serial No. 3-079-467-13 (1) Digital Video Camera Recorder Video Camera Recorder Operating Instructions Before operating the unit, please read this product. AC-
Record the serial number in the space provided below. Refer to these numbers whenever you call upon your Sony dealer regarding this manual thoroughly, and retain it for future reference. Model No. -TRV Model No. Owner's Record The model and serial numbers are located on the bottom. Serial No. DCR-TRV350 TM SERIES DCR-TRV150/TRV250/TRV350/TRV351 CCD-TRV118/TRV318/TRV418 ©2003 Sony Corporation Serial No. 3-079-467-13 (1) Digital Video Camera Recorder Video Camera Recorder Operating Instructions Before operating the unit, please read this product. AC-

Operating Instructions
Page 14
... manual, buttons and settings on your camcorder. Set the POWER switch to indicate that the operation is being carried out. z - z z z z - Not provided 14 Before you can hear a beep to CAMERA. As you read through this manual and operating your camcorder, check the model number by looking at the bottom of differences Model Recording system Playback system AUDIO/VIDEO jack S VIDEO jack DV jack USB jack "Memory Stick" slot LANC jack SteadyShot Remote sensor RFU jack MIC...
... manual, buttons and settings on your camcorder. Set the POWER switch to indicate that the operation is being carried out. z - z z z z - Not provided 14 Before you can hear a beep to CAMERA. As you read through this manual and operating your camcorder, check the model number by looking at the bottom of differences Model Recording system Playback system AUDIO/VIDEO jack S VIDEO jack DV jack USB jack "Memory Stick" slot LANC jack SteadyShot Remote sensor RFU jack MIC...
Operating Instructions
Page 51
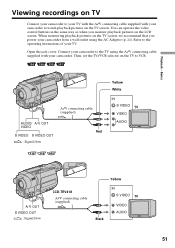
... power your TV. Refer to the operating instructions of your camcorder from a wall outlet using the A/V connecting cable supplied with your camcorder to your TV with the A/V connecting cable supplied with your camcorder. Then, set the TV/VCR selector on the LCD screen. A/V connecting cable (supplied) AUDIO/ A/ V OUT VIDEO Red S VIDEO S VIDEO OUT : Signal flow Yellow White IN S VIDEO TV VIDEO AUDIO A/ V OUT S VIDEO OUT : Signal flow CCD-TRV418 A/V connecting cable (supplied) Yellow IN S VIDEO TV Black VIDEO AUDIO 51 When monitoring playback pictures on TV Connect...
... power your TV. Refer to the operating instructions of your camcorder from a wall outlet using the A/V connecting cable supplied with your camcorder to your TV with the A/V connecting cable supplied with your camcorder. Then, set the TV/VCR selector on the LCD screen. A/V connecting cable (supplied) AUDIO/ A/ V OUT VIDEO Red S VIDEO S VIDEO OUT : Signal flow Yellow White IN S VIDEO TV VIDEO AUDIO A/ V OUT S VIDEO OUT : Signal flow CCD-TRV418 A/V connecting cable (supplied) Yellow IN S VIDEO TV Black VIDEO AUDIO 51 When monitoring playback pictures on TV Connect...
Operating Instructions
Page 105
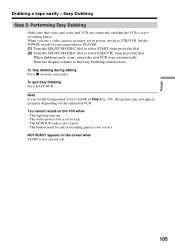
... you use a video camera recorder, set the background color to FADE in Step 3 (p. 103), the picture may not appear properly depending on your camcorder. The IR SETUP code is not correct. Set the POWER switch of your camcorder and VCR are connected, and that your camcorder to PLAYER. (1) Turn the SEL/PUSH EXEC dial to select START, then press the dial. (2) Turn the SEL/PUSH EXEC dial to recording pause. To stop...
... you use a video camera recorder, set the background color to FADE in Step 3 (p. 103), the picture may not appear properly depending on your camcorder. The IR SETUP code is not correct. Set the POWER switch of your camcorder and VCR are connected, and that your camcorder to PLAYER. (1) Turn the SEL/PUSH EXEC dial to select START, then press the dial. (2) Turn the SEL/PUSH EXEC dial to recording pause. To stop...
Operating Instructions
Page 107
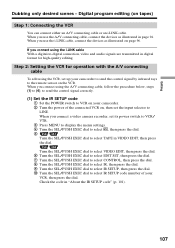
... you use the i.LINK cable, connect the devices as illustrated in "About the IR SETUP code" (p. 101). 107 If you connect a video camera recorder, set its power switch to VCR/ VTR. 3 Press MENU to display the menu settings. 4 Turn the SEL/PUSH EXEC dial to select , then press the dial. 5 Turn the SEL/PUSH EXEC dial to the remote sensor on tapes) Step 1: Connecting the VCR You can connect either an A/V connecting cable or an i.LINK cable. Turn the...
... you use the i.LINK cable, connect the devices as illustrated in "About the IR SETUP code" (p. 101). 107 If you connect a video camera recorder, set its power switch to VCR/ VTR. 3 Press MENU to display the menu settings. 4 Turn the SEL/PUSH EXEC dial to select , then press the dial. 5 Turn the SEL/PUSH EXEC dial to the remote sensor on tapes) Step 1: Connecting the VCR You can connect either an A/V connecting cable or an i.LINK cable. Turn the...
Operating Instructions
Page 151
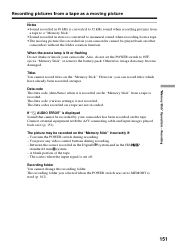
..., eject a "Memory Stick" or remove the battery pack. The data codes recorded on the "Memory Stick." Connect external equipment with the A/V connecting cable and input images played back on it is recorded on the "Memory Stick" from a tape as a moving picture Notes •Sound recorded in the Hi8 / standard 8 mm system. - A blank portion of the tape. - "Memory Stick" Operations - The data code (various settings) is converted to MEMORY is used (p. 162). 151 You press any video control buttons during recording. - However, you selected when the POWER switch was set the POWER switch...
..., eject a "Memory Stick" or remove the battery pack. The data codes recorded on the "Memory Stick." Connect external equipment with the A/V connecting cable and input images played back on it is recorded on the "Memory Stick" from a tape as a moving picture Notes •Sound recorded in the Hi8 / standard 8 mm system. - A blank portion of the tape. - "Memory Stick" Operations - The data code (various settings) is converted to MEMORY is used (p. 162). 151 You press any video control buttons during recording. - However, you selected when the POWER switch was set the POWER switch...
Operating Instructions
Page 156
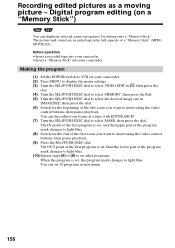
... EXEC dial to insert using the video control buttons, then pause playback. Recording edited pictures as a moving picture - You can fine-adjust one frame at a time with EDITSEARCH. (7) Turn the SEL/PUSH EXEC dial to insert using the video control buttons, then pause playback. (9) Press the SEL/PUSH EXEC dial. Digital program editing (on your camcorder. The OUT point of the first program is set , then the lower part of a "Memory Stick" (MPEG MOVIE EX).
... EXEC dial to insert using the video control buttons, then pause playback. Recording edited pictures as a moving picture - You can fine-adjust one frame at a time with EDITSEARCH. (7) Turn the SEL/PUSH EXEC dial to insert using the video control buttons, then pause playback. (9) Press the SEL/PUSH EXEC dial. Digital program editing (on your camcorder. The OUT point of the first program is set , then the lower part of a "Memory Stick" (MPEG MOVIE EX).
Operating Instructions
Page 193
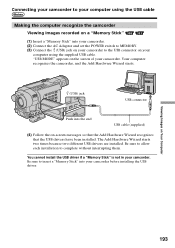
... a "Memory Stick" into your camcorder. You cannot install the USB driver if a "Memory Stick" is not in your computer using the USB cable Making the computer recognize the camcorder Viewing images recorded on a "Memory Stick" (1) Insert a "Memory Stick" into your camcorder. (2) Connect the AC Adaptor and set the POWER switch to MEMORY. (3) Connect the (USB) jack on your camcorder to the USB connector on your camcorder. Viewing Images on -screen messages so that the Add Hardware Wizard recognizes that the USB drivers have been installed. Connecting your camcorder to...
... a "Memory Stick" into your camcorder. You cannot install the USB driver if a "Memory Stick" is not in your computer using the USB cable Making the computer recognize the camcorder Viewing images recorded on a "Memory Stick" (1) Insert a "Memory Stick" into your camcorder. (2) Connect the AC Adaptor and set the POWER switch to MEMORY. (3) Connect the (USB) jack on your camcorder to the USB connector on your camcorder. Viewing Images on -screen messages so that the Add Hardware Wizard recognizes that the USB drivers have been installed. Connecting your camcorder to...
Operating Instructions
Page 194
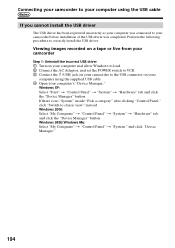
... USB cable. 4 Open your computer's "Device Manager." Windows XP: Select "Start" t "Control Panel" t "System" t "Hardware" tab and click the "Device Manager" button. Perform the following procedure to the USB connector on your computer was connected to classic view" instead. Viewing images recorded on a tape or live from your camcorder Step 1: Uninstall the incorrect USB driver 1 Turn on your computer and allow Windows to load. 2 Connect the AC Adaptor, and set the POWER switch to VCR. 3 Connect...
... USB cable. 4 Open your computer's "Device Manager." Windows XP: Select "Start" t "Control Panel" t "System" t "Hardware" tab and click the "Device Manager" button. Perform the following procedure to the USB connector on your computer was connected to classic view" instead. Viewing images recorded on a tape or live from your camcorder Step 1: Uninstall the incorrect USB driver 1 Turn on your computer and allow Windows to load. 2 Connect the AC Adaptor, and set the POWER switch to VCR. 3 Connect...
Operating Instructions
Page 196
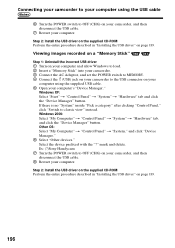
... USB driver" on page 189. 196 Viewing images recorded on a "Memory Stick" Step 1: Uninstall the incorrect USB driver 1 Turn on your computer and allow Windows to load. 2 Insert a "Memory Stick" into your camcorder. 3 Connect the AC Adaptor, and set the POWER switch to MEMORY. 4 Connect the (USB) jack on page 189. mark and delete. Step 2: Install the USB driver on the supplied CD-ROM Perform the entire procedure described in "Installing the USB driver" on your camcorder to classic view" instead. Windows...
... USB driver" on page 189. 196 Viewing images recorded on a "Memory Stick" Step 1: Uninstall the incorrect USB driver 1 Turn on your computer and allow Windows to load. 2 Insert a "Memory Stick" into your camcorder. 3 Connect the AC Adaptor, and set the POWER switch to MEMORY. 4 Connect the (USB) jack on page 189. mark and delete. Step 2: Install the USB driver on the supplied CD-ROM Perform the entire procedure described in "Installing the USB driver" on your camcorder to classic view" instead. Windows...
Operating Instructions
Page 197
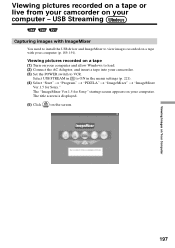
..." t "PIXELA" t "ImageMixer" t "ImageMixer Ver.1.5 for Sony" startup screen appears on your camcorder. (3) Set the POWER switch to view images recorded on your computer and allow Windows to load. (2) Connect the AC Adaptor, and insert a tape into your computer. Viewing Images on the screen. Viewing pictures recorded on a tape (1) Turn on a tape with ImageMixer You need to install the USB driver and ImageMixer to VCR. The title screen is displayed. (5) Click on Your Computer 197 USB Streaming Capturing images with your computer -
..." t "PIXELA" t "ImageMixer" t "ImageMixer Ver.1.5 for Sony" startup screen appears on your camcorder. (3) Set the POWER switch to view images recorded on your computer and allow Windows to load. (2) Connect the AC Adaptor, and insert a tape into your computer. Viewing Images on the screen. Viewing pictures recorded on a tape (1) Turn on a tape with ImageMixer You need to install the USB driver and ImageMixer to VCR. The title screen is displayed. (5) Click on Your Computer 197 USB Streaming Capturing images with your computer -
Operating Instructions
Page 203
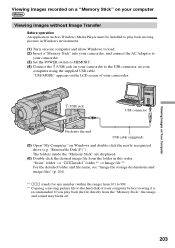
... file directly from the folder in Windows environment. (1) Turn on your computer and allow Windows to load. (2) Insert a "Memory Stick" into the end USB cable (supplied) (5) Open "My Computer" on Windows and double-click the newly recognized drive (e.g. Viewing Images on your computer using the supplied USB cable. "USB MODE" appears on the LCD screen of your camcorder. (USB) jack USB connector Push into your camcorder, and connect the AC Adaptor to your camcorder. (3) Set the POWER switch to MEMORY. (4) Connect the (USB...
... file directly from the folder in Windows environment. (1) Turn on your computer and allow Windows to load. (2) Insert a "Memory Stick" into the end USB cable (supplied) (5) Open "My Computer" on Windows and double-click the newly recognized drive (e.g. Viewing Images on your computer using the supplied USB cable. "USB MODE" appears on the LCD screen of your camcorder. (USB) jack USB connector Push into your camcorder, and connect the AC Adaptor to your camcorder. (3) Set the POWER switch to MEMORY. (4) Connect the (USB...
Operating Instructions
Page 205
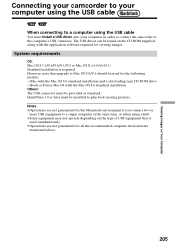
... on the type of USB equipment that upgrade to play back moving pictures. iMac with the Mac OS 8.6 standard installation and a slot loading type CD-ROM drive - QuickTime 3.0 or later must be installed to Mac OS 9.0/9.1 should be provided as standard. Notes •Operations are not guaranteed for viewing images. Viewing Images on Your Computer Connecting your camcorder to your computer using the USB cable When connecting to a computer using the USB cable You must install a USB driver onto...
... on the type of USB equipment that upgrade to play back moving pictures. iMac with the Mac OS 8.6 standard installation and a slot loading type CD-ROM drive - QuickTime 3.0 or later must be installed to Mac OS 9.0/9.1 should be provided as standard. Notes •Operations are not guaranteed for viewing images. Viewing Images on Your Computer Connecting your camcorder to your computer using the USB cable When connecting to a computer using the USB cable You must install a USB driver onto...
Operating Instructions
Page 207
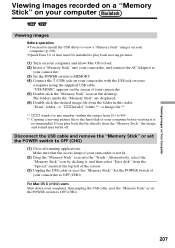
... "Memory Stick," the image and sound may break off. Disconnect the USB cable and remove the "Memory Stick" or set the POWER switch to OFF (CHG). 207 "Dcim" folder t "sssmsdcf" folder *1) t Image file *2) *1) sss stands for any number (within the range) from the "Special" menu at the top left of your camcorder is recommended. Viewing Images on Your Computer Viewing images recorded on a "Memory Stick" on your computer Viewing images Before operation •You need to install the USB driver to view a "Memory Stick" images...
... "Memory Stick," the image and sound may break off. Disconnect the USB cable and remove the "Memory Stick" or set the POWER switch to OFF (CHG). 207 "Dcim" folder t "sssmsdcf" folder *1) t Image file *2) *1) sss stands for any number (within the range) from the "Special" menu at the top left of your camcorder is recommended. Viewing Images on Your Computer Viewing images recorded on a "Memory Stick" on your computer Viewing images Before operation •You need to install the USB driver to view a "Memory Stick" images...
Operating Instructions
Page 224
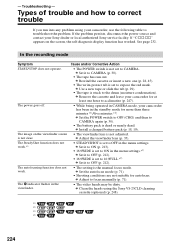
... the screen, the self-diagnosis display function has worked. c Set it to expose the red mark. The power goes off. c Install a charged battery pack (p. 18, 19). • The viewfinder lens is not clear. c Clean the heads using your camcorder for at least one (p. 28, 45). • The write-protect tab is set to CAMERA (p. 30). • The tape has run into any problem using the Sony V8-25CLD cleaning cassette (optional) (p. 248). *1) *2) *3) *4) 224 c Adjust...
... the screen, the self-diagnosis display function has worked. c Set it to expose the red mark. The power goes off. c Install a charged battery pack (p. 18, 19). • The viewfinder lens is not clear. c Clean the heads using your camcorder for at least one (p. 28, 45). • The write-protect tab is set to CAMERA (p. 30). • The tape has run into any problem using the Sony V8-25CLD cleaning cassette (optional) (p. 248). *1) *2) *3) *4) 224 c Adjust...
Operating Instructions
Page 229
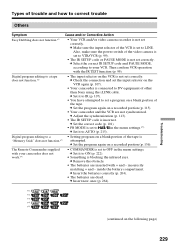
... does not function.*1) • Your VCR and/or video camera recorder is not set to / in the menu settings. Digital program editing to your camcorder does not work.*4) • COMMANDER is blocking the infrared rays. inside the battery compartment. c Check the connection and set a program on the VCR again (p. 107). • Your camcorder is connected to DV equipment of other than Sony using the i.LINK cable. Then confirm VCR operation with your VCR. c Set it...
... does not function.*1) • Your VCR and/or video camera recorder is not set to / in the menu settings. Digital program editing to your camcorder does not work.*4) • COMMANDER is blocking the infrared rays. inside the battery compartment. c Check the connection and set a program on the VCR again (p. 107). • Your camcorder is connected to DV equipment of other than Sony using the i.LINK cable. Then confirm VCR operation with your VCR. c Set it...
Operating Instructions
Page 238
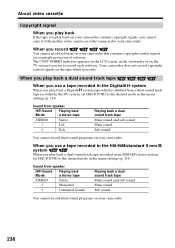
... play back a dual sound track tape When you use a tape recorded in the Hi8 /standard 8 mm system When you try to your camcorder. About video cassette Copyright signal When you play back If the tape you play back on your camcorder contains copyright signals, you cannot copy it records. Sound from a dual sound track tape recorded in the DV system, set HiFi SOUND to the desired mode in the menu settings (p. 214). When you use a tape recorded...
... play back a dual sound track tape When you use a tape recorded in the Hi8 /standard 8 mm system When you try to your camcorder. About video cassette Copyright signal When you play back If the tape you play back on your camcorder contains copyright signals, you cannot copy it records. Sound from a dual sound track tape recorded in the DV system, set HiFi SOUND to the desired mode in the menu settings (p. 214). When you use a tape recorded...
Operating Instructions
Page 253
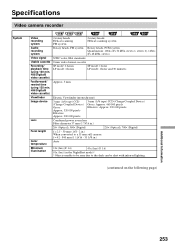
Specifications Video camera recorder System Video recording system Audio recording system Video signal Usable cassette Recording/ playback time (using 120 min. Hi8/Digital8 video cassette) Viewfinder Image device Lens Focal length Color temperature Minimum illumination 2 rotary heads Helical scanning FM system 2 rotary heads Helical scanning system Rotary heads, FM system Rotary heads, PCM system Quantization: 12bits (Fs 32 kHz, stereo 1, stereo 2), 16bits (Fs 48 kHz, stereo) NTSC color, EIA standards 8 mm video format cassette SP mode: 2 hours LP mode: 4 hours SP mode: 1 hour...
Specifications Video camera recorder System Video recording system Audio recording system Video signal Usable cassette Recording/ playback time (using 120 min. Hi8/Digital8 video cassette) Viewfinder Image device Lens Focal length Color temperature Minimum illumination 2 rotary heads Helical scanning FM system 2 rotary heads Helical scanning system Rotary heads, FM system Rotary heads, PCM system Quantization: 12bits (Fs 32 kHz, stereo 1, stereo 2), 16bits (Fs 48 kHz, stereo) NTSC color, EIA standards 8 mm video format cassette SP mode: 2 hours LP mode: 4 hours SP mode: 1 hour...

Operating Instructions
Page 267
... 214 AUDIO MODE 219 AUTO SHTR 211 A/V connecting cable ........... 51, 94, 119, 138, 152, 208 BACK LIGHT 38 BATTERY INFO 20 Battery pack 18 BEEP 222 BOUNCE 61 Built-in light 79 C, D Camera chroma key 140 Charging battery 19 Charging built-in rechargeable battery 249 Cleaning cassette indicator 248 Clock set 26 Color Slow Shutter 40 Data code 47 Date search 90 DEMO 221 DIGITAL EFFECT 65, 85 Digital8 system 237 Digital program editing 106, 156 DISPLAY...
... 214 AUDIO MODE 219 AUTO SHTR 211 A/V connecting cable ........... 51, 94, 119, 138, 152, 208 BACK LIGHT 38 BATTERY INFO 20 Battery pack 18 BEEP 222 BOUNCE 61 Built-in light 79 C, D Camera chroma key 140 Charging battery 19 Charging built-in rechargeable battery 249 Cleaning cassette indicator 248 Clock set 26 Color Slow Shutter 40 Data code 47 Date search 90 DEMO 221 DIGITAL EFFECT 65, 85 Digital8 system 237 Digital program editing 106, 156 DISPLAY...
Marketing Specifications
Page 1
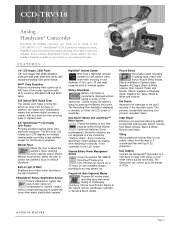
... modes make VHS copies of the recorded scene. Picture Effects Get creative when recording or playing back videos with exceptional analog video performance. Easy Dubbing Connect the Handycam® camcorder to a VCR deck to make recording easy even when filming in Camera mode: Negative Art, Sepia, Black & White, Solarize, Slim, Stretch, Pastel and Mosaic. Stamina Battery Power Management System Using the optional NP-QM91D InfoLithium® battery the CCD-TRV318 can capture video even when shooting...
... modes make VHS copies of the recorded scene. Picture Effects Get creative when recording or playing back videos with exceptional analog video performance. Easy Dubbing Connect the Handycam® camcorder to a VCR deck to make recording easy even when filming in Camera mode: Negative Art, Sepia, Black & White, Solarize, Slim, Stretch, Pastel and Mosaic. Stamina Battery Power Management System Using the optional NP-QM91D InfoLithium® battery the CCD-TRV318 can capture video even when shooting...


