
Operating Instructions
Page 1
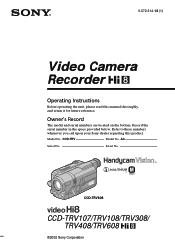
Record the serial number in the space provided below. CCD-TRV Model No. Serial No. Model No. 3-072-314-13 (1) Video Camera Recorder Operating Instructions Before operating the unit, please read this product. Owner's Record The model and serial numbers are located on the bottom. Refer to these numbers whenever you call upon your Sony dealer regarding this manual thoroughly, and retain it for future reference. CCD-TRV608 CCD-TRV107/TRV108/TRV308/ TRV408/TRV608 ©2002 Sony Corporation AC- Serial No.
Record the serial number in the space provided below. CCD-TRV Model No. Serial No. Model No. 3-072-314-13 (1) Video Camera Recorder Operating Instructions Before operating the unit, please read this product. Owner's Record The model and serial numbers are located on the bottom. Refer to these numbers whenever you call upon your Sony dealer regarding this manual thoroughly, and retain it for future reference. CCD-TRV608 CCD-TRV107/TRV108/TRV308/ TRV408/TRV608 ©2002 Sony Corporation AC- Serial No.

Operating Instructions
Page 2
... of rechargeable batteries, call toll free 1-800-822-8837, or visit http://www.rbrc.org/. For more information regarding recycling of this Sony Handycam VisionTM. This symbol is intended to alert the user to the presence of uninsulated "dangerous voltage" within the product's enclosure that ...may be producing home video that you can enjoy for years to persons. Your Handycam VisionTM is loaded with superior picture and sound quality. This symbol is very...
... of rechargeable batteries, call toll free 1-800-822-8837, or visit http://www.rbrc.org/. For more information regarding recycling of this Sony Handycam VisionTM. This symbol is intended to alert the user to the presence of uninsulated "dangerous voltage" within the product's enclosure that ...may be producing home video that you can enjoy for years to persons. Your Handycam VisionTM is loaded with superior picture and sound quality. This symbol is very...
Operating Instructions
Page 5
BACK LIGHT 25 Shooting in light (CCD-TRV107/TRV308/TRV408/ TRV608 only 46 5 NightShot ...function .... 38 Adjusting the exposure manually ...... 40 Focusing manually 41 Superimposing a title 42 Making your camcorder abroad 83 Maintenance information and precautions 84 Specifications 89 Advanced Recording Operations Using the wide mode 33 Using... trouble and their solutions 73 Self-diagnosis display 77 Warning indicators and messages ...... 78 Additional Information About video cassettes 80 About the "InfoLITHIUM" battery pack 81 Using your own titles 44 Using the built-in...
BACK LIGHT 25 Shooting in light (CCD-TRV107/TRV308/TRV408/ TRV608 only 46 5 NightShot ...function .... 38 Adjusting the exposure manually ...... 40 Focusing manually 41 Superimposing a title 42 Making your camcorder abroad 83 Maintenance information and precautions 84 Specifications 89 Advanced Recording Operations Using the wide mode 33 Using... trouble and their solutions 73 Self-diagnosis display 77 Warning indicators and messages ...... 78 Additional Information About video cassettes 80 About the "InfoLITHIUM" battery pack 81 Using your own titles 44 Using the built-in...
Operating Instructions
Page 18
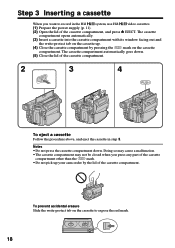
To prevent accidental erasure Slide the write-protect tab on the cassette up your camcorder by pressing the mark on the cassette compartment. Doing so may cause a malfunction. •The cassette compartment may not be closed when you want to ... the cassette compartment down . (5) Close the lid of the cassette compartment. 2 3 4 EJECT To eject a cassette Follow the procedure above, and eject the cassette in the Hi8 system, use Hi8 video cassettes. (1) Prepare the power supply (p. 11). (2) Open the lid of the cassette compartment, and press Z EJECT.
To prevent accidental erasure Slide the write-protect tab on the cassette up your camcorder by pressing the mark on the cassette compartment. Doing so may cause a malfunction. •The cassette compartment may not be closed when you want to ... the cassette compartment down . (5) Close the lid of the cassette compartment. 2 3 4 EJECT To eject a cassette Follow the procedure above, and eject the cassette in the Hi8 system, use Hi8 video cassettes. (1) Prepare the power supply (p. 11). (2) Open the lid of the cassette compartment, and press Z EJECT.
Operating Instructions
Page 31
...video control buttons, set the POWER switch to normal speed. To rewind the tape Press m in the stop mode. To locate a scene monitoring the picture (picture search) Keep pressing m or M during playback. When the playback pause mode lasts for about 1 minute (CCD-TRV107/TRV408 only) Your camcorder... N. To resume normal playback, press N. In the various playback modes Sound is not a malfunction. * CCD-TRV107/TRV408 only 31 If slow playback lasts for 5 minutes Your camcorder automatically enters the stop mode. To resume playback, press X or N. Playback - To resume normal playback,...
...video control buttons, set the POWER switch to normal speed. To rewind the tape Press m in the stop mode. To locate a scene monitoring the picture (picture search) Keep pressing m or M during playback. When the playback pause mode lasts for about 1 minute (CCD-TRV107/TRV408 only) Your camcorder... N. To resume normal playback, press N. In the various playback modes Sound is not a malfunction. * CCD-TRV107/TRV408 only 31 If slow playback lasts for 5 minutes Your camcorder automatically enters the stop mode. To resume playback, press X or N. Playback - To resume normal playback,...
Operating Instructions
Page 32
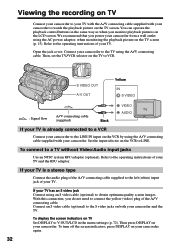
... do not need to connect the yellow (video) plug of your TV. To display the screen indicators on your camcorder. Then press DISPLAY on TV Set DISPLAY to V-OUT/LCD in the same way as when you power your camcorder from a wall outlet using an S video cable (optional) to obtain optimum quality screen... the TV. Then, set the TV/VCR selector on the TV screen. Refer to the operating instructions of your camcorder to the S video jacks on the LCD screen. You can operate the playback control buttons in the menu settings (p. 72). If your TV is already connected to a VCR Connect your TV...
... do not need to connect the yellow (video) plug of your TV. To display the screen indicators on your camcorder. Then press DISPLAY on TV Set DISPLAY to V-OUT/LCD in the same way as when you power your camcorder from a wall outlet using an S video cable (optional) to obtain optimum quality screen... the TV. Then, set the TV/VCR selector on the TV screen. Refer to the operating instructions of your camcorder to the S video jacks on the LCD screen. You can operate the playback control buttons in the menu settings (p. 72). If your TV is already connected to a VCR Connect your TV...
Operating Instructions
Page 49
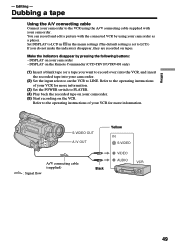
... in the menu settings (The default setting is set to LCD.) If you want to record over) into the VCR, and insert the recorded tape into your camcorder - DISPLAY on the Remote Commander (CCD-TRV107/TRV408 only) (1) Insert a blank tape (or a tape you do not make ... the following buttons: - S VIDEO OUT A / V OUT Yellow IN S VIDEO : Signal flow A/V connecting cable (supplied) Black VIDEO AUDIO 49 Editing - Refer to the operating instructions of your VCR for more information. (3) Set the POWER switch to LINE. Refer to the VCR using your camcorder. Dubbing a tape Using the ...
... in the menu settings (The default setting is set to LCD.) If you want to record over) into the VCR, and insert the recorded tape into your camcorder - DISPLAY on the Remote Commander (CCD-TRV107/TRV408 only) (1) Insert a blank tape (or a tape you do not make ... the following buttons: - S VIDEO OUT A / V OUT Yellow IN S VIDEO : Signal flow A/V connecting cable (supplied) Black VIDEO AUDIO 49 Editing - Refer to the operating instructions of your VCR for more information. (3) Set the POWER switch to LINE. Refer to the VCR using your camcorder. Dubbing a tape Using the ...

Operating Instructions
Page 50
...support the following systems: 8 mm , Hi8 , Digital 8 , VHS , S-VHS , VHSC , S-VHSC , Betamax , ED Betamax , mini DV , or DV If your VCR is a stereo type Connect the audio plug of the A/V connecting cable supplied to the left (white) input jack of your camcorder and the VCR. Dubbing a tape .... You can edit on both your VCR has an S video jack Connect using an S video cable (optional) to ON in the menu settings before dubbing. If your camcorder and the VCR. 50 Connect an S video cable (optional) to the S video jacks of pictures when dubbing Set EDIT to obtain optimum quality...
...support the following systems: 8 mm , Hi8 , Digital 8 , VHS , S-VHS , VHSC , S-VHSC , Betamax , ED Betamax , mini DV , or DV If your VCR is a stereo type Connect the audio plug of the A/V connecting cable supplied to the left (white) input jack of your camcorder and the VCR. Dubbing a tape .... You can edit on both your VCR has an S video jack Connect using an S video cable (optional) to ON in the menu settings before dubbing. If your camcorder and the VCR. 50 Connect an S video cable (optional) to the S video jacks of pictures when dubbing Set EDIT to obtain optimum quality...

Operating Instructions
Page 51
...that support the following systems: 8 mm , Hi8 , Digital 8 , VHS , S-VHS , VHSC , S-VHSC , Betamax , ED Betamax , mini DV , or DV If your camcorder when the VCR is connected. You can be controlled easily by using your VCR has an S video jack Connect using the same VCR again, ... Performing Easy Dubbing (p. 58). With this connection, you do not need to connect the yellow (video) plug of both your camcorder (p. 52 to the S video jacks of the A/V connecting cable. Connect an S video cable (optional) to 55). You can select one of titles. Step 1: Connecting the VCR Connect...
...that support the following systems: 8 mm , Hi8 , Digital 8 , VHS , S-VHS , VHSC , S-VHSC , Betamax , ED Betamax , mini DV , or DV If your camcorder when the VCR is connected. You can be controlled easily by using your VCR has an S video jack Connect using the same VCR again, ... Performing Easy Dubbing (p. 58). With this connection, you do not need to connect the yellow (video) plug of both your camcorder (p. 52 to the S video jacks of the A/V connecting cable. Connect an S video cable (optional) to 55). You can select one of titles. Step 1: Connecting the VCR Connect...

Operating Instructions
Page 52
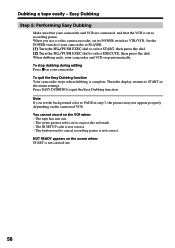
...PAUSE MODEb P A U S E I R TEST REC RETURN PB [ EASY DUB ] : END NORMAL Buttons for canceling recording pause on the VCR The buttons vary depending on your camcorder. 2 Turn the power of the connected VCR on, then set its power switch to VTR/VCR. 3 Press EASY DUBBING to display the menu. 4 Turn the...MODE, then press the dial. 6 Turn the SEL/PUSH EXEC dial to select the mode to cancel recording pause is N. When you connect a video camera recorder, set the input selector to cancel recording pause is X. - Dubbing a tape easily - Easy Dubbing Step 2: Setting the VCR to operate with...
...PAUSE MODEb P A U S E I R TEST REC RETURN PB [ EASY DUB ] : END NORMAL Buttons for canceling recording pause on the VCR The buttons vary depending on your camcorder. 2 Turn the power of the connected VCR on, then set its power switch to VTR/VCR. 3 Press EASY DUBBING to display the menu. 4 Turn the...MODE, then press the dial. 6 Turn the SEL/PUSH EXEC dial to select the mode to cancel recording pause is N. When you connect a video camera recorder, set the input selector to cancel recording pause is X. - Dubbing a tape easily - Easy Dubbing Step 2: Setting the VCR to operate with...

Operating Instructions
Page 54
... 8 Emerson 26, 82, 59, 48, 70, 81, 80 Fisher 36, 45, 37, 44 Funai 80 General Electric 8, 77, 32*, 94*, 101 Goldstar/LG 47 GO VIDEO 71 Hitachi 78, 8, 42 HQ 40 Instant Replay 77, 78 JC Penny 77, 42, 8, 36, 21, 33, 35 JVC 21, 12, 13, 14, 33, 35..., 33, 80, 35 Technics 77, 78 Toshiba 40, 7, 49 Wards 89, 88, 37, 95, 47 Yamaha 36, 21, 33, 35 Zenith 95 Note on your camcorder. Dubbing a tape easily - Be sure to set the correct code depending on IR SETUP code The Easy Dubbing is not possible if the VCR does...
... 8 Emerson 26, 82, 59, 48, 70, 81, 80 Fisher 36, 45, 37, 44 Funai 80 General Electric 8, 77, 32*, 94*, 101 Goldstar/LG 47 GO VIDEO 71 Hitachi 78, 8, 42 HQ 40 Instant Replay 77, 78 JC Penny 77, 42, 8, 36, 21, 33, 35 JVC 21, 12, 13, 14, 33, 35..., 33, 80, 35 Technics 77, 78 Toshiba 40, 7, 49 Wards 89, 88, 37, 95, 47 Yamaha 36, 21, 33, 35 Zenith 95 Note on your camcorder. Dubbing a tape easily - Be sure to set the correct code depending on IR SETUP code The Easy Dubbing is not possible if the VCR does...
Operating Instructions
Page 58
... READY appears on the VCR when: - Dubbing a tape easily - When you set its POWER switch to quit the Easy Dubbing function. When dubbing ends, your camcorder to PLAYER. (1) Turn the SEL/PUSH EXEC dial to select START, then press the dial. (2) Turn the SEL/PUSH EXEC dial to recording pause. Press... EASY DUBBING to VTR/VCR. The IR SETUP code is complete. Note If you use a video camera recorder, set the background color to expose the red mark. - The write-protect tab is set to FADE in the menu settings. The button...
... READY appears on the VCR when: - Dubbing a tape easily - When you set its POWER switch to quit the Easy Dubbing function. When dubbing ends, your camcorder to PLAYER. (1) Turn the SEL/PUSH EXEC dial to select START, then press the dial. (2) Turn the SEL/PUSH EXEC dial to recording pause. Press... EASY DUBBING to VTR/VCR. The IR SETUP code is complete. Note If you use a video camera recorder, set the background color to expose the red mark. - The write-protect tab is set to FADE in the menu settings. The button...
Operating Instructions
Page 59
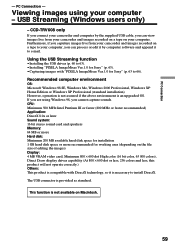
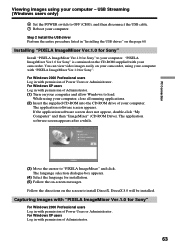
...Windows 98, you caputure images live from your computer - CCD-TRV608 only If you can process or edit it to e-mail. Using the USB Streaming function •Installing the USB driver (p. 60 to 63). •Installing "PIXELA ImageMixer Ver.1.0 for Sony" (p. 63). •Capturing images with DirectX technology, so... it is not available on a tape to your computer, you can view images live from your camcorder and images recorded on a tape on the file size of editing the images) Display: 4 MB VRAM video card, Minimum 800 × 600 dot High color (16 bit color, 65 000 colors), Direct...
...Windows 98, you caputure images live from your computer - CCD-TRV608 only If you can process or edit it to e-mail. Using the USB Streaming function •Installing the USB driver (p. 60 to 63). •Installing "PIXELA ImageMixer Ver.1.0 for Sony" (p. 63). •Capturing images with DirectX technology, so... it is not available on a tape to your computer, you can view images live from your camcorder and images recorded on a tape on the file size of editing the images) Display: 4 MB VRAM video card, Minimum 800 × 600 dot High color (16 bit color, 65 000 colors), Direct...
Operating Instructions
Page 63
... (4) Select the language for Sony" is contained on the CD-ROM supplied with permission of Administrator. (1) Turn on your camcorder, using your computer with "PIXELA ImageMixer Ver.1.0 for Sony" For Windows 2000 Professional users... Log in with permission of Power Users or Adminisitrator. For Windows XP users Log in with "PIXELA ImageMixer Ver.1.0 for Sony". Installing "PIXELA ImageMixer Ver.1.0 for Sony" Install "PIXELA ImageMixer Ver.1.0 for Sony" to load. You can view video...
... (4) Select the language for Sony" is contained on the CD-ROM supplied with permission of Administrator. (1) Turn on your camcorder, using your computer with "PIXELA ImageMixer Ver.1.0 for Sony" For Windows 2000 Professional users... Log in with permission of Power Users or Adminisitrator. For Windows XP users Log in with "PIXELA ImageMixer Ver.1.0 for Sony". Installing "PIXELA ImageMixer Ver.1.0 for Sony" Install "PIXELA ImageMixer Ver.1.0 for Sony" to load. You can view video...
Operating Instructions
Page 70
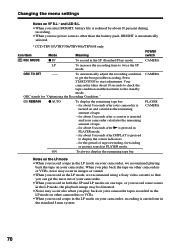
... POWER switch CAMERA CAMERA PLAYER CAMERA Notes on the LP mode •When you record a tape in the LP mode on your camcorder, we recommend using a Sony video cassette so that you can get the best possible recording. Press START/STOP to twice the SP mode. for about 8 seconds after... your camcorder tapes recorded in the LP mode on other than the battery pack, BRIGHT is automatically selected. * CCD-TRV107/TRV308/TRV408/TRV608 only Icon/item Mode Meaning REC MODE z SP To record in the SP (Standard Play) mode. Changing the menu settings Notes on VF B.L.* and LCD B.L. ...
... POWER switch CAMERA CAMERA PLAYER CAMERA Notes on the LP mode •When you record a tape in the LP mode on your camcorder, we recommend using a Sony video cassette so that you can get the best possible recording. Press START/STOP to twice the SP mode. for about 8 seconds after... your camcorder tapes recorded in the LP mode on other than the battery pack, BRIGHT is automatically selected. * CCD-TRV107/TRV308/TRV408/TRV608 only Icon/item Mode Meaning REC MODE z SP To record in the SP (Standard Play) mode. Changing the menu settings Notes on VF B.L.* and LCD B.L. ...

Operating Instructions
Page 73
...clear. c Set it to acclimate. (p. 84) • While being operated in CAMERA mode, your camcorder has been in the viewfinder. c Press FOCUS to return to the autofocus mode. (p. 41) &#...) • The tape has run into any problem using the Sony V8-25CLD cleaning cassette (optional). (p. 85) • The LCD panel is not a malfunction. (continued on the screen, the ...self-diagnosis display function has worked. c Use a new tape or slide the tab. (p. 18) • The tape is set to focus manually. (p. 41) • The video...
...clear. c Set it to acclimate. (p. 84) • While being operated in CAMERA mode, your camcorder has been in the viewfinder. c Press FOCUS to return to the autofocus mode. (p. 41) &#...) • The tape has run into any problem using the Sony V8-25CLD cleaning cassette (optional). (p. 85) • The LCD panel is not a malfunction. (continued on the screen, the ...self-diagnosis display function has worked. c Use a new tape or slide the tab. (p. 18) • The tape is set to focus manually. (p. 41) • The video...
Operating Instructions
Page 74
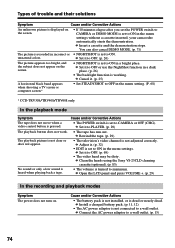
...menu setting. (P. 68) * CCD-TRV308/TRV408/TRV608 only In the playback mode Symptom The tape does not move when a video control button is pressed. c ... picture is dead or nearly dead. c Clean the heads using the Sony V8-25CLD cleaning cassette (optional). (p. 85) • The volume ...not clear or does not appear. unnatural colors. c Open the LCD panel and press VOLUME +. (p. 29) In the recording and playback.... c Set it to ON in the menu settings without a cassette inserted, your camcorder automatically starts the demonstration. c Install a charged battery pack. (p. 11, 12)...
...menu setting. (P. 68) * CCD-TRV308/TRV408/TRV608 only In the playback mode Symptom The tape does not move when a video control button is pressed. c ... picture is dead or nearly dead. c Clean the heads using the Sony V8-25CLD cleaning cassette (optional). (p. 85) • The volume ...not clear or does not appear. unnatural colors. c Open the LCD panel and press VOLUME +. (p. 29) In the recording and playback.... c Set it to ON in the menu settings without a cassette inserted, your camcorder automatically starts the demonstration. c Install a charged battery pack. (p. 11, 12)...
Operating Instructions
Page 75
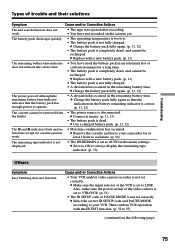
.... • The q REMAIN is completely dead, and cannot be recharged. c Select the correct IR SETUP code and PAUSE MODE, according to your camcorder for at least 1 hour to always display the remaining tape indicator. (p. 70) Others Symptom Easy Dubbing does not function. Also, make sure the ...power switch of the video camera is set to AUTO in the menu settings. c Replace with a new battery pack. (p. 11) The remaining battery time indicator does not indicate...
.... • The q REMAIN is completely dead, and cannot be recharged. c Select the correct IR SETUP code and PAUSE MODE, according to your camcorder for at least 1 hour to always display the remaining tape indicator. (p. 70) Others Symptom Easy Dubbing does not function. Also, make sure the ...power switch of the video camera is set to AUTO in the menu settings. c Replace with a new battery pack. (p. 11) The remaining battery time indicator does not indicate...
Operating Instructions
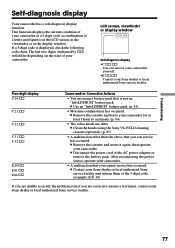
Page 77
... unable to acclimate. (p. 84) • The video heads are using the Sony V8-25CLD cleaning cassette (optional). (p. 85) • A malfunction other than the above that is displayed, check the following code chart. LCD screen, viewfinder or display window C:21:00 Self-... cassette and insert it again, then operate your camcorder. c Contact your camcorder. • A malfunction that you can service your camcorder yourself. •E:ss:ss Contact your camcorder as a 5-digit code (a combination of your Sony dealer or local authorized Sony service facility. c Use an "InfoLITHIUM" battery ...
... unable to acclimate. (p. 84) • The video heads are using the Sony V8-25CLD cleaning cassette (optional). (p. 85) • A malfunction other than the above that is displayed, check the following code chart. LCD screen, viewfinder or display window C:21:00 Self-... cassette and insert it again, then operate your camcorder. c Contact your camcorder. • A malfunction that you can service your camcorder yourself. •E:ss:ss Contact your camcorder as a 5-digit code (a combination of your Sony dealer or local authorized Sony service facility. c Use an "InfoLITHIUM" battery ...

Operating Instructions
Page 78
...the cassette is completely dead, and cannot be charged. Eject the cassette, turn off your camcorder, and leave it for more information. The tape has run out.*1) C:21:00 *1) You... for about 1 hour with the cassette compartment open. (p. 84) You need to clean the heads using the Sony V8-25CLD cleaning cassette (optional). (p. 85) The battery pack is near the end. Fast flashing: - The...is out (red). (p. 18) Fast flashing: - The tape has run out.*1) 78 Warning indicators The video heads are 5 to eject the cassette*1) Slow flashing: - The write-protect tab on the cassette is nearly...
...the cassette is completely dead, and cannot be charged. Eject the cassette, turn off your camcorder, and leave it for more information. The tape has run out.*1) C:21:00 *1) You... for about 1 hour with the cassette compartment open. (p. 84) You need to clean the heads using the Sony V8-25CLD cleaning cassette (optional). (p. 85) The battery pack is near the end. Fast flashing: - The...is out (red). (p. 18) Fast flashing: - The tape has run out.*1) 78 Warning indicators The video heads are 5 to eject the cassette*1) Slow flashing: - The write-protect tab on the cassette is nearly...


