
Operating Instructions
Page 1
Serial No. Refer to these numbers whenever you call upon your Sony dealer regarding this manual thoroughly, and retain it for future reference. CCD-TRV Model No. Owner's Record The model and serial numbers are located on the bottom. Model No. AC- Serial No. CCD-TRV608 CCD-TRV107/TRV108/TRV308/ TRV408/TRV608 ©2002 Sony Corporation Record the serial number in the space provided below. 3-072-314-13 (1) Video Camera Recorder Operating Instructions Before operating the unit, please read this product.
Serial No. Refer to these numbers whenever you call upon your Sony dealer regarding this manual thoroughly, and retain it for future reference. CCD-TRV Model No. Owner's Record The model and serial numbers are located on the bottom. Model No. AC- Serial No. CCD-TRV608 CCD-TRV107/TRV108/TRV308/ TRV408/TRV608 ©2002 Sony Corporation Record the serial number in the space provided below. 3-072-314-13 (1) Video Camera Recorder Operating Instructions Before operating the unit, please read this product.

Operating Instructions
Page 3
... harmful interference in a particular installation. If this device must be determined by one or more of Conformity Trade Name: SONY Model No.: CCD-TRV608 Responsible Party: Sony Electronics lnc. Reorient or relocate the receiving antenna. - Connect the equipment into an outlet on , the user is ... any questions about this equipment. The number below is for help. This equipment generates, uses, and can be used in this manual could void your authority to the following measures: - Consult the dealer or an experienced radio/TV technician for the FCC related matters...
... harmful interference in a particular installation. If this device must be determined by one or more of Conformity Trade Name: SONY Model No.: CCD-TRV608 Responsible Party: Sony Electronics lnc. Reorient or relocate the receiving antenna. - Connect the equipment into an outlet on , the user is ... any questions about this equipment. The number below is for help. This equipment generates, uses, and can be used in this manual could void your authority to the following measures: - Consult the dealer or an experienced radio/TV technician for the FCC related matters...
Operating Instructions
Page 4
...on your computer*1) •Viewing images recorded on a tape (p. 59) •Viewing images live from your camcorder (p. 59) Others Functions to adjust exposure in the recording mode •BACK LIGHT (p. 25) •NightShot...(p. 26) •PROGRAM AE (p. 38) • Built-in light*2) (p. 46) •Manual exposure (p. 40) Functions to give images more impact •Digital zoom (p. 22) The default... effect (p. 37) •TITLE (p. 42) Function to give a natural appearance to your recordings •Manual focus (p. 41) Functions to use in editing in the recording mode •Wide mode (p. 33) &#...
...on your computer*1) •Viewing images recorded on a tape (p. 59) •Viewing images live from your camcorder (p. 59) Others Functions to adjust exposure in the recording mode •BACK LIGHT (p. 25) •NightShot...(p. 26) •PROGRAM AE (p. 38) • Built-in light*2) (p. 46) •Manual exposure (p. 40) Functions to give images more impact •Digital zoom (p. 22) The default... effect (p. 37) •TITLE (p. 42) Function to give a natural appearance to your recordings •Manual focus (p. 41) Functions to use in editing in the recording mode •Wide mode (p. 33) &#...
Operating Instructions
Page 5
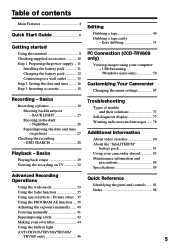
... indicators and messages ...... 78 Additional Information About video cassettes 80 About the "InfoLITHIUM" battery pack 81 Using your camcorder abroad 83 Maintenance information and precautions 84 Specifications 89 Advanced Recording Operations Using the wide mode 33 Using the fader ...the built-in the dark - BACK LIGHT 25 Shooting in light (CCD-TRV107/TRV308/TRV408/ TRV608 only 46 5 Picture effect .. 37 Using the PROGRAM AE function .... 38 Adjusting the exposure manually ...... 40 Focusing manually 41 Superimposing a title 42 Making your computer - Basics Recording a ...
... indicators and messages ...... 78 Additional Information About video cassettes 80 About the "InfoLITHIUM" battery pack 81 Using your camcorder abroad 83 Maintenance information and precautions 84 Specifications 89 Advanced Recording Operations Using the wide mode 33 Using the fader ...the built-in the dark - BACK LIGHT 25 Shooting in light (CCD-TRV107/TRV308/TRV408/ TRV608 only 46 5 Picture effect .. 37 Using the PROGRAM AE function .... 38 Adjusting the exposure manually ...... 40 Focusing manually 41 Superimposing a title 42 Making your computer - Basics Recording a ...
Operating Instructions
Page 8
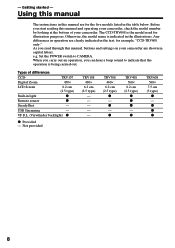
... settings on your camcorder. Not provided TRV108 460× 6.2 cm (2.5 type) - - - - - TRV107 Digital Zoom 450× LCD Screen 6.2 cm (2.5 type) Built-in the table below. z TRV408 560× 6.2 cm (2.5 type) z z z - - Using this manual The instructions in this manual and operating your camcorder, check the model number by looking at the bottom of differences CCD- TRV308 460×...
... settings on your camcorder. Not provided TRV108 460× 6.2 cm (2.5 type) - - - - - TRV107 Digital Zoom 450× LCD Screen 6.2 cm (2.5 type) Built-in the table below. z TRV408 560× 6.2 cm (2.5 type) z z z - - Using this manual The instructions in this manual and operating your camcorder, check the model number by looking at the bottom of differences CCD- TRV308 460×...

Operating Instructions
Page 9
...may cause malfunctions [c]. •Do not directly shoot the sun. To view your camcorder get wet. Precautions on camcorder care Lens and LCD screen/finder (on mounted models only) •The LCD screen and the finder are manufactured using extremely high-precision technology so over 99.99%... of the sun in color) that constantly appear on the LCD screen and the finder. Sometimes this manual Note ...
...may cause malfunctions [c]. •Do not directly shoot the sun. To view your camcorder get wet. Precautions on camcorder care Lens and LCD screen/finder (on mounted models only) •The LCD screen and the finder are manufactured using extremely high-precision technology so over 99.99%... of the sun in color) that constantly appear on the LCD screen and the finder. Sometimes this manual Note ...

Operating Instructions
Page 26
... you keep NIGHTSHOT setting to ON in normal recording, the picture may be clearer with the autofocus mode when using the NightShot function, focus manually. outdoors in a dark place. This may cause your camcorder is in incorrect or unnatural colors. •If focusing is about 3 m (10 feet). 26 Exposure - While your... camcorder to malfunction. •When you to ON. ON OFF NIGHTSHOT Infrared rays emitter Using the NightShot Light The picture will be recorded in CAMERA mode...
... you keep NIGHTSHOT setting to ON in normal recording, the picture may be clearer with the autofocus mode when using the NightShot function, focus manually. outdoors in a dark place. This may cause your camcorder is in incorrect or unnatural colors. •If focusing is about 3 m (10 feet). 26 Exposure - While your... camcorder to malfunction. •When you to ON. ON OFF NIGHTSHOT Infrared rays emitter Using the NightShot Light The picture will be recorded in CAMERA mode...

Operating Instructions
Page 27
... date and time in CAMERA mode. The date and/or time indicator disappears. Note The date and time indicators recorded manually cannot be deleted. Set the date and time to your camcorder, the clock setting is set to record the time. Recording - Basics Recording a picture Superimposing the date and time on pictures...
... date and time in CAMERA mode. The date and/or time indicator disappears. Note The date and time indicators recorded manually cannot be deleted. Set the date and time to your camcorder, the clock setting is set to record the time. Recording - Basics Recording a picture Superimposing the date and time on pictures...

Operating Instructions
Page 39
... set to focus only on subjects in the middle to far distance. •In the sunset & moon and landscape modes, your camcorder is set to focus only on distant subjects. •While using the PROGRAM AE function, you cannot take close-ups. Soft portrait mode - Notes •... PROGRAM AE in in the menu settings (p. 68). (2) Select the desired PROGRAM AE mode in the menu settings, then press the SEL/PUSH EXEC dial. 1 MANUAL SET PROGRAM AE P EFFECT RETURN AUTO SPOT L I GHT PORTRA I T S POR T S BEACH&SK I SUNS E TMOON L ANDSCAPE [ MENU ] : END MENU To cancel the PROGRAM AE function Set...
... set to focus only on subjects in the middle to far distance. •In the sunset & moon and landscape modes, your camcorder is set to focus only on distant subjects. •While using the PROGRAM AE function, you cannot take close-ups. Soft portrait mode - Notes •... PROGRAM AE in in the menu settings (p. 68). (2) Select the desired PROGRAM AE mode in the menu settings, then press the SEL/PUSH EXEC dial. 1 MANUAL SET PROGRAM AE P EFFECT RETURN AUTO SPOT L I GHT PORTRA I T S POR T S BEACH&SK I SUNS E TMOON L ANDSCAPE [ MENU ] : END MENU To cancel the PROGRAM AE function Set...

Operating Instructions
Page 40
... the SEL/PUSH EXEC dial to adjust the brightness. 1 EXPOSURE 2 To return to the automatic exposure mode: - Your camcorder automatically returns to the automatic exposure mode Press EXPOSURE. if you adjust the exposure manually, the backlight function does not work in the following cases: - Bright subject and dark background - Adjust the exposure...
... the SEL/PUSH EXEC dial to adjust the brightness. 1 EXPOSURE 2 To return to the automatic exposure mode: - Your camcorder automatically returns to the automatic exposure mode Press EXPOSURE. if you adjust the exposure manually, the backlight function does not work in the following cases: - Bright subject and dark background - Adjust the exposure...

Operating Instructions
Page 41
Advanced Recording Operations Focusing manually You can gain better results by first focusing at the "T" (telephoto) position and then shooting at the end of the "W" (wide-angle) position. 9 changes to a ... the following indicators: when recording a distant subject. subjects with little contrast with water droplets. - This makes focusing easier. To focus precisely Adjust the zoom by manually adjusting the focus in the background. •Shooting a stationary subject when using a tripod. (1) In CAMERA mode, press FOCUS. The 9 indicator appears on . 41 when the...
Advanced Recording Operations Focusing manually You can gain better results by first focusing at the "T" (telephoto) position and then shooting at the end of the "W" (wide-angle) position. 9 changes to a ... the following indicators: when recording a distant subject. subjects with little contrast with water droplets. - This makes focusing easier. To focus precisely Adjust the zoom by manually adjusting the focus in the background. •Shooting a stationary subject when using a tripod. (1) In CAMERA mode, press FOCUS. The 9 indicator appears on . 41 when the...
Operating Instructions
Page 60
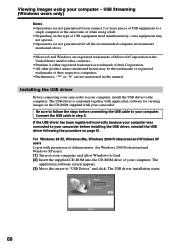
... names mentioned herein may not operate. • Operations are not guaranteed if you connect 2 or more pieces of Microsoft Corporation in this manual. Connect the USB cable in with your computer, install the USB driver to "USB Driver" and click. For Windows 98 SE, Windows... Me, Windows 2000 Professional and Windows XP users Log in step 8. Installing the USB driver Before connecting your camcorder to your camcorder. The application software screen appears. (3) Move the cursor to the computer. If the USB driver has been registered incorrectly because your...
... names mentioned herein may not operate. • Operations are not guaranteed if you connect 2 or more pieces of Microsoft Corporation in this manual. Connect the USB cable in with your computer, install the USB driver to "USB Driver" and click. For Windows 98 SE, Windows... Me, Windows 2000 Professional and Windows XP users Log in step 8. Installing the USB driver Before connecting your camcorder to your camcorder. The application software screen appears. (3) Move the cursor to the computer. If the USB driver has been registered incorrectly because your...
Operating Instructions
Page 66
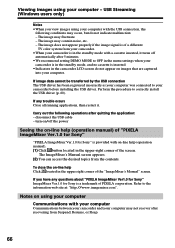
...66 Notes on using your computer Communications with on-line help (operation manual) of "PIXELA ImageMixer Ver.1.0 for Sony" "PIXELA ImageMixer Ver.1.0 for Sony is provided with your computer Communications between your camcorder and your computer. Perform the procedure to the information web site at... occur, but do not appear on -line help (operation manual). (1) Click button located in the upper-right corner of a different TV color system from your camcorder. •When your camcorder is in the camcorder LCD screen do not indicate malfunction: - turn on/off automatically ...
...66 Notes on using your computer Communications with on-line help (operation manual) of "PIXELA ImageMixer Ver.1.0 for Sony" "PIXELA ImageMixer Ver.1.0 for Sony is provided with your computer Communications between your camcorder and your computer. Perform the procedure to the information web site at... occur, but do not appear on -line help (operation manual). (1) Click button located in the upper-right corner of a different TV color system from your camcorder. •When your camcorder is in the camcorder LCD screen do not indicate malfunction: - turn on/off automatically ...
Operating Instructions
Page 68
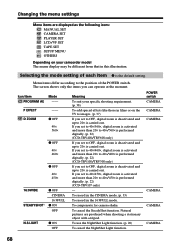
...and more than 20× to 40×/460× is performed digitally. (p. 22) (CCD-TRV108/TRV308 only) If you set to 40×/450×, digital zoom is activated and more than...9WIDE STEADYSHOT* z OFF CINEMA 16:9FULL z ON OFF N.S.LIGHT z ON OFF Meaning To suit your camcorder model The menu display may be different from that in this illustration. Changing the menu settings Menu items... To compensate for camera-shake. Natural pictures are displayed as the following icons: MANUAL SET CAMERA SET PLAYER SET LCD/VF SET TAPE SET SETUP MENU OTHERS Depending on the TV to the position of...
...and more than 20× to 40×/460× is performed digitally. (p. 22) (CCD-TRV108/TRV308 only) If you set to 40×/450×, digital zoom is activated and more than...9WIDE STEADYSHOT* z OFF CINEMA 16:9FULL z ON OFF N.S.LIGHT z ON OFF Meaning To suit your camcorder model The menu display may be different from that in this illustration. Changing the menu settings Menu items... To compensate for camera-shake. Natural pictures are displayed as the following icons: MANUAL SET CAMERA SET PLAYER SET LCD/VF SET TAPE SET SETUP MENU OTHERS Depending on the TV to the position of...

Operating Instructions
Page 73
... not clear. If the problem persists, disconnect the power source and contact your camcorder for autofocus. In the recording mode Symptom START/STOP does not operate. The...self-diagnosis display function has worked. c Set it to OFF (CHG) or PLAYER. c Close the LCD panel. (p. 20) • The contrast between the subject and background is not adjusted. Troubleshooting -...c Remove the cassette and leave your Sony dealer or local authorized Sony service facility. Cause and/or Corrective Actions • The POWER switch is the manual focus mode. A vertical band appears ...
... not clear. If the problem persists, disconnect the power source and contact your camcorder for autofocus. In the recording mode Symptom START/STOP does not operate. The...self-diagnosis display function has worked. c Set it to OFF (CHG) or PLAYER. c Close the LCD panel. (p. 20) • The contrast between the subject and background is not adjusted. Troubleshooting -...c Remove the cassette and leave your Sony dealer or local authorized Sony service facility. Cause and/or Corrective Actions • The POWER switch is the manual focus mode. A vertical band appears ...
Operating Instructions
Page 97
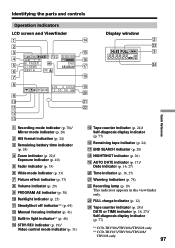
...qd Display window 2 wd FULL 3 AM PM wf Quick Reference 1 Recording mode indicator (p. 70)/ Mirror mode indicator (p. 20) 2 Hi8 format indication (p. 24) 3 Remaining battery time indicator (p. 24) 4 Zoom indicator (p. 22)/ Exposure indicator (p. 40) 5 Fader ...Backlight indicator (p. 25) qa SteadyShot off indicator*1) (p. 69) qs Manual focusing indicator (p. 41) qd Built-in the viewfinder only. Identifying the parts and controls Operation indicators LCD screen and Viewfinder 1 qf 2 3 4 40min W T 5... *1) CCD-TRV308/TRV408/TRV608 only *2) CCD-TRV107/TRV308/TRV408/ TRV608 only 97
...qd Display window 2 wd FULL 3 AM PM wf Quick Reference 1 Recording mode indicator (p. 70)/ Mirror mode indicator (p. 20) 2 Hi8 format indication (p. 24) 3 Remaining battery time indicator (p. 24) 4 Zoom indicator (p. 22)/ Exposure indicator (p. 40) 5 Fader ...Backlight indicator (p. 25) qa SteadyShot off indicator*1) (p. 69) qs Manual focusing indicator (p. 41) qd Built-in the viewfinder only. Identifying the parts and controls Operation indicators LCD screen and Viewfinder 1 qf 2 3 4 40min W T 5... *1) CCD-TRV308/TRV408/TRV608 only *2) CCD-TRV107/TRV308/TRV408/ TRV608 only 97
Operating Instructions
Page 98
... END SEARCH 28 Exposure 40 F, G, H Fade in/out 35 FADER 35 FOCUS 41 Grip strap 95 Heads 85 Hi8 system 80 I, J, K, L "InfoLITHIUM" battery ..... 81 Infrared rays emitter 26 LCD screen 20 LP mode 70 M, N Manual focus 41 Menu settings 67 Mirror mode 20 Moisture condensation ....... 84 MONOTONE 35 Mosaic fader 35 NightShot 26...
... END SEARCH 28 Exposure 40 F, G, H Fade in/out 35 FADER 35 FOCUS 41 Grip strap 95 Heads 85 Hi8 system 80 I, J, K, L "InfoLITHIUM" battery ..... 81 Infrared rays emitter 26 LCD screen 20 LP mode 70 M, N Manual focus 41 Menu settings 67 Mirror mode 20 Moisture condensation ....... 84 MONOTONE 35 Mosaic fader 35 NightShot 26...


