

Operating Instructions
Page 3
... a digital device pursuant to Part 15 of the FCC Rules. These limits are cautioned that may call: Sony Customer Information Center 1-800-222-SONY (7669). Connect the equipment into an outlet on , the user is encouraged to try to provide reasonable protection against harmful ... not cause harmful interference, and (2) this device must be determined by one or more of Conformity Trade Name: SONY Model No.: CCD-TRV608 Responsible Party: Sony Electronics lnc. Increase the separation between the equipment and receiver. - However, there is for help. Regulatory Information For...
... a digital device pursuant to Part 15 of the FCC Rules. These limits are cautioned that may call: Sony Customer Information Center 1-800-222-SONY (7669). Connect the equipment into an outlet on , the user is encouraged to try to provide reasonable protection against harmful ... not cause harmful interference, and (2) this device must be determined by one or more of Conformity Trade Name: SONY Model No.: CCD-TRV608 Responsible Party: Sony Electronics lnc. Increase the separation between the equipment and receiver. - However, there is for help. Regulatory Information For...
Operating Instructions
Page 5
...Warning indicators and messages ...... 78 Additional Information About video cassettes 80 About the "InfoLITHIUM" battery pack 81 Using your camcorder abroad 83 Maintenance information and precautions 84 Specifications 89 Advanced Recording Operations Using the wide mode 33 Using the fader function... ...... 91 Index 98 Using special effects - USB Streaming (Windows users only 59 Customizing Your Camcorder Changing the menu settings 67 Recording - Easy dubbing 51 PC Connection (CCD-TRV608 only) Viewing images using your computer - NightShot 26 Superimposing the date and time on ...
...Warning indicators and messages ...... 78 Additional Information About video cassettes 80 About the "InfoLITHIUM" battery pack 81 Using your camcorder abroad 83 Maintenance information and precautions 84 Specifications 89 Advanced Recording Operations Using the wide mode 33 Using the fader function... ...... 91 Index 98 Using special effects - USB Streaming (Windows users only 59 Customizing Your Camcorder Changing the menu settings 67 Recording - Easy dubbing 51 PC Connection (CCD-TRV608 only) Viewing images using your computer - NightShot 26 Superimposing the date and time on ...

Operating Instructions
Page 6
... cassette into the cassette compartment with its window facing out and the write-protect tab on the cassette compartment. Quick Start Guide 6 Connect the plug with its v mark facing up . 3 Close the cassette compartment by pressing the mark on the cassette up . See... you to the basic features of your camcorder outdoors (p. 11). The cassette compartment opens automatically. Close the lid of the cassette compartment, and press Z EJECT. Connecting the power cord (p. 15) Use the battery pack when using your camcorder. AC power adaptor (supplied) Inserting a...
... cassette into the cassette compartment with its window facing out and the write-protect tab on the cassette compartment. Quick Start Guide 6 Connect the plug with its v mark facing up . 3 Close the cassette compartment by pressing the mark on the cassette up . See... you to the basic features of your camcorder outdoors (p. 11). The cassette compartment opens automatically. Close the lid of the cassette compartment, and press Z EJECT. Connecting the power cord (p. 15) Use the battery pack when using your camcorder. AC power adaptor (supplied) Inserting a...
Operating Instructions
Page 10
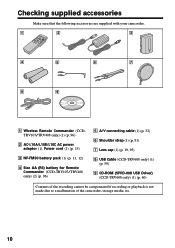
... that the following accessories are supplied with your camcorder. 1 2 3 4 5 6 7 8 9 1 Wireless Remote Commander (CCDTRV107/TRV408 only) (1) (p. 96) 2 AC-L10A/L10B/L10C AC power adaptor (1), Power cord (1) (p. 15) 3 NP-FM30 battery pack (1) (p. 11, 12) 4 Size AA (R6) battery for Remote Commander (CCD-TRV107/TRV408 only) (2) (p. 96) 5 A/V connecting cable (1) (p. 32) 6 Shoulder strap (1) (p. 91) 7 Lens cap (1) (p. 19...
... that the following accessories are supplied with your camcorder. 1 2 3 4 5 6 7 8 9 1 Wireless Remote Commander (CCDTRV107/TRV408 only) (1) (p. 96) 2 AC-L10A/L10B/L10C AC power adaptor (1), Power cord (1) (p. 15) 3 NP-FM30 battery pack (1) (p. 11, 12) 4 Size AA (R6) battery for Remote Commander (CCD-TRV107/TRV408 only) (2) (p. 96) 5 A/V connecting cable (1) (p. 32) 6 Shoulder strap (1) (p. 91) 7 Lens cap (1) (p. 19...
Operating Instructions
Page 12
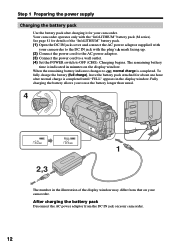
... RA FULL 1 2,3 The number in the illustration of the "InfoLITHIUM" battery pack. (1) Open the DC IN jack cover and connect the AC power adaptor supplied with your camcorder to the DC IN jack with the "InfoLITHIUM" battery pack (M series). To fully charge the battery (full charge), leave the ...After charging the battery pack Disconnect the AC power adaptor from that on the display window. Your camcorder operates only with the plug's v mark facing up. (2) Connect the power cord to the AC power adaptor. (3) Connect the power cord to a wall outlet. (4) Set the POWER switch to OFF (CHG). See...
... RA FULL 1 2,3 The number in the illustration of the "InfoLITHIUM" battery pack. (1) Open the DC IN jack cover and connect the AC power adaptor supplied with your camcorder to the DC IN jack with the "InfoLITHIUM" battery pack (M series). To fully charge the battery (full charge), leave the ...After charging the battery pack Disconnect the AC power adaptor from that on the display window. Your camcorder operates only with the plug's v mark facing up. (2) Connect the power cord to the AC power adaptor. (3) Connect the power cord to a wall outlet. (4) Set the POWER switch to OFF (CHG). See...
Operating Instructions
Page 15
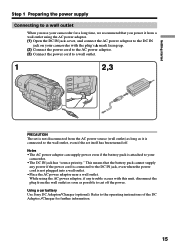
Using a car battery Use Sony DC Adaptor/Charger (optional). This means that you power it is connected to the wall outlet, even if the set is not plugged into a wall outlet. ...wall outlet using the AC power adaptor, if any power if the power cord is attached to your camcorder. •The DC IN jack has "source priority." Notes •The AC power adaptor can supply power even ...While using the AC power adaptor. (1) Open the DC IN jack cover, and connect the AC power adaptor to the DC IN jack on your camcorder with this unit, disconnect the plug from the wall outlet as soon as it from...
Using a car battery Use Sony DC Adaptor/Charger (optional). This means that you power it is connected to the wall outlet, even if the set is not plugged into a wall outlet. ...wall outlet using the AC power adaptor, if any power if the power cord is attached to your camcorder. •The DC IN jack has "source priority." Notes •The AC power adaptor can supply power even ...While using the AC power adaptor. (1) Open the DC IN jack cover, and connect the AC power adaptor to the DC IN jack on your camcorder with this unit, disconnect the plug from the wall outlet as soon as it from...
Operating Instructions
Page 32
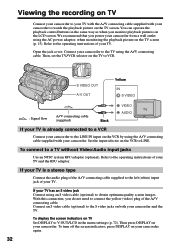
... TV screen (p. 15). Then press DISPLAY on the LCD screen. You can operate the playback control buttons in the menu settings (p. 72). Then, set the TV/VCR selector on the VCR by using the A/V connecting cable. If your TV is already connected to a VCR Connect your camcorder to the LINE IN input on the TV...
... TV screen (p. 15). Then press DISPLAY on the LCD screen. You can operate the playback control buttons in the menu settings (p. 72). Then, set the TV/VCR selector on the VCR by using the A/V connecting cable. If your TV is already connected to a VCR Connect your camcorder to the LINE IN input on the TV...

Operating Instructions
Page 43
...dial at step 5, the title is displayed. While you are playing back You can record a title when you dub a tape connecting your camcorder to 5. Advanced Recording Operations Superimposing a title To superimpose the title while you are recording Press TITLE while you are recording, ...and carry out steps 2 to the VCR with the A/V connecting cable. 43 Title setting •The title color changes as follows: WHITE y YELLOW y VIOLET y ...
...dial at step 5, the title is displayed. While you are playing back You can record a title when you dub a tape connecting your camcorder to 5. Advanced Recording Operations Superimposing a title To superimpose the title while you are recording Press TITLE while you are recording, ...and carry out steps 2 to the VCR with the A/V connecting cable. 43 Title setting •The title color changes as follows: WHITE y YELLOW y VIOLET y ...
Operating Instructions
Page 49
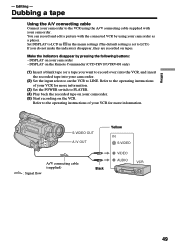
...CCD-TRV107/TRV408 only) (1) Insert a blank tape (or a tape you do not make the indicators disappear, they are recorded on tapes. Set DISPLAY to LCD in in the menu settings (The default setting is set to the operating instructions of your camcorder - S VIDEO OUT A / V OUT Yellow IN S VIDEO : Signal flow A/V connecting... cable (supplied) Black VIDEO AUDIO 49 Refer to LCD.) If you want to record over) into the VCR, and insert the recorded tape into your camcorder. (2) Set the...
...CCD-TRV107/TRV408 only) (1) Insert a blank tape (or a tape you do not make the indicators disappear, they are recorded on tapes. Set DISPLAY to LCD in in the menu settings (The default setting is set to the operating instructions of your camcorder - S VIDEO OUT A / V OUT Yellow IN S VIDEO : Signal flow A/V connecting... cable (supplied) Black VIDEO AUDIO 49 Refer to LCD.) If you want to record over) into the VCR, and insert the recorded tape into your camcorder. (2) Set the...

Operating Instructions
Page 50
... a tape Press x on VCRs that support the following systems: 8 mm , Hi8 , Digital 8 , VHS , S-VHS , VHSC , S-VHSC , Betamax , ED Betamax , mini DV , or DV If your VCR is a stereo type Connect the audio plug of the A/V connecting cable supplied to the left (white) input jack of your VCR has an S...quality screen images. You can edit on both your camcorder and the VCR. 50 Connect an S video cable (optional) to the S video jacks of both your camcorder and the VCR. If your VCR. Dubbing a tape When you do not need to connect the yellow (video) plug of pictures when dubbing Set...
... a tape Press x on VCRs that support the following systems: 8 mm , Hi8 , Digital 8 , VHS , S-VHS , VHSC , S-VHSC , Betamax , ED Betamax , mini DV , or DV If your VCR is a stereo type Connect the audio plug of the A/V connecting cable supplied to the left (white) input jack of your VCR has an S...quality screen images. You can edit on both your camcorder and the VCR. 50 Connect an S video cable (optional) to the S video jacks of both your camcorder and the VCR. If your VCR. Dubbing a tape When you do not need to connect the yellow (video) plug of pictures when dubbing Set...

Operating Instructions
Page 51
... of eight preset titles and two custom titles stored in your camcorder as illustrated in "Making your camcorder (p. 52 to obtain optimum quality screen images. With this connection, you can skip step 2. You can skip step 3. Connect an S video cable (optional) to put in a title,... support the following systems: 8 mm , Hi8 , Digital 8 , VHS , S-VHS , VHSC , S-VHSC , Betamax , ED Betamax , mini DV , or DV If your VCR has an S video jack Connect using your camcorder and the VCR. 51 Using the Easy Dubbing function Step 1 Connecting the VCR (p. 51). Step 5 Performing ...
... of eight preset titles and two custom titles stored in your camcorder as illustrated in "Making your camcorder (p. 52 to obtain optimum quality screen images. With this connection, you can skip step 2. You can skip step 3. Connect an S video cable (optional) to put in a title,... support the following systems: 8 mm , Hi8 , Digital 8 , VHS , S-VHS , VHSC , S-VHSC , Betamax , ED Betamax , mini DV , or DV If your VCR has an S video jack Connect using your camcorder and the VCR. 51 Using the Easy Dubbing function Step 1 Connecting the VCR (p. 51). Step 5 Performing ...

Operating Instructions
Page 52
... PAUSE if the button to cancel recording pause is N. To cancel recording pause: - Easy Dubbing Step 2: Setting the VCR to operate with your camcorder You can control the VCR by wireless remote control. (1) Setting the modes to cancel recording pause on the VCR 1 Set the POWER switch to ...PLAYER on your camcorder. 2 Turn the power of the connected VCR on your VCR. Select PB if the button to cancel recording pause is z. 52 - When you connect a video camera recorder, set its power switch to VTR/VCR. 3 Press EASY DUBBING...
... PAUSE if the button to cancel recording pause is N. To cancel recording pause: - Easy Dubbing Step 2: Setting the VCR to operate with your camcorder You can control the VCR by wireless remote control. (1) Setting the modes to cancel recording pause on the VCR 1 Set the POWER switch to ...PLAYER on your camcorder. 2 Turn the power of the connected VCR on your VCR. Select PB if the button to cancel recording pause is z. 52 - When you connect a video camera recorder, set its power switch to VTR/VCR. 3 Press EASY DUBBING...

Operating Instructions
Page 55
...of your camcorder and face it towards the remote sensor of your VCR. 55 Set the devices about 30 cm (12 in .) away from the VCR. •Refer to face each other Locate the Infrared rays emitter of the VCR. Infrared rays emitter Editing Remote sensor A/V connecting cable (supplied...) (4) Confirming the VCR operation 1 Insert a recordable tape into the VCR, then set IR SETUP or PAUSE MODE again. •Place your camcorder at least 30 cm (12 in .) apart, and remove any obstacles...
...of your camcorder and face it towards the remote sensor of your VCR. 55 Set the devices about 30 cm (12 in .) away from the VCR. •Refer to face each other Locate the Infrared rays emitter of the VCR. Infrared rays emitter Editing Remote sensor A/V connecting cable (supplied...) (4) Confirming the VCR operation 1 Insert a recordable tape into the VCR, then set IR SETUP or PAUSE MODE again. •Place your camcorder at least 30 cm (12 in .) apart, and remove any obstacles...
Operating Instructions
Page 58
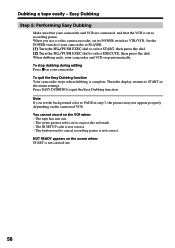
When dubbing ends, your camcorder and VCR stop dubbing during editing Press x on the connected VCR. Note If you use a video camera recorder, set the background color to recording pause. Press EASY DUBBING to cancel recording pause is set to ... START, then press the dial. (2) Turn the SEL/PUSH EXEC dial to START in step 3, the picture may not appear properly depending on your camcorder and VCR are connected, and that the VCR is not carried out. 58 To stop automatically. The tape has run out. - Easy Dubbing Step 5: Performing Easy Dubbing...
When dubbing ends, your camcorder and VCR stop dubbing during editing Press x on the connected VCR. Note If you use a video camera recorder, set the background color to recording pause. Press EASY DUBBING to cancel recording pause is set to ... START, then press the dial. (2) Turn the SEL/PUSH EXEC dial to START in step 3, the picture may not appear properly depending on your camcorder and VCR are connected, and that the VCR is not carried out. 58 To stop automatically. The tape has run out. - Easy Dubbing Step 5: Performing Easy Dubbing...
Operating Instructions
Page 59
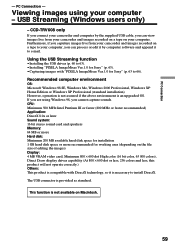
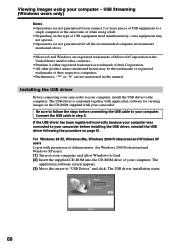
...Sony" (p. 63 to install DirectX. The USB connector is an upgraded OS. This function is necessary to 66). Furthermore, if you cannot capture sounds. If you can process or edit it is not available on your camcorder and images recorded on a tape to e-mail. CCD-TRV608 only If you connect your camcorder... and computer by computer software and append it to your computer, you are using your camcorder and images recorded on a tape on Macintosh....
...Sony" (p. 63 to install DirectX. The USB connector is an upgraded OS. This function is necessary to 66). Furthermore, if you cannot capture sounds. If you can process or edit it is not available on your camcorder and images recorded on a tape to e-mail. CCD-TRV608 only If you connect your camcorder... and computer by computer software and append it to your computer, you are using your camcorder and images recorded on a tape on Macintosh....
Operating Instructions
Page 60
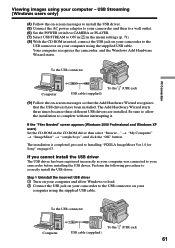
...are registered trademarks of your computer, install the USB driver to your computer. Connect the USB cable in with permission of Administrator. (for viewing images on the CD-ROM supplied with your camcorder before connecting the USB cable to follow the steps before installing the USB driver, reinstall... time or when using your computer. Be sure to your computer - The application software screen appears. (3) Move the cursor to your camcorder. For Windows 98 SE, Windows Me, Windows 2000 Professional and Windows XP users Log in step 8. The USB driver installation starts. ...
...are registered trademarks of your computer, install the USB driver to your computer. Connect the USB cable in with permission of Administrator. (for viewing images on the CD-ROM supplied with your camcorder before connecting the USB cable to follow the steps before installing the USB driver, reinstall... time or when using your computer. Be sure to your computer - The application software screen appears. (3) Move the cursor to your camcorder. For Windows 98 SE, Windows Me, Windows 2000 Professional and Windows XP users Log in step 8. The USB driver installation starts. ...
Operating Instructions
Page 61
..." t "sonyhcb.sys", and click the "OK" button. Viewing images using your camcorder before installing the USB driver. Be sure to allow Windows to load. 2 Connect the USB jack on your computer was connected to Installing "PIXELA ImageMixer Ver.1.0 for Sony" on your camcorder to correctly install the USB driver. Step 1 Uninstall the incorrect USB driver...
..." t "sonyhcb.sys", and click the "OK" button. Viewing images using your camcorder before installing the USB driver. Be sure to allow Windows to load. 2 Connect the USB jack on your computer was connected to Installing "PIXELA ImageMixer Ver.1.0 for Sony" on your camcorder to correctly install the USB driver. Step 1 Uninstall the incorrect USB driver...
Operating Instructions
Page 62
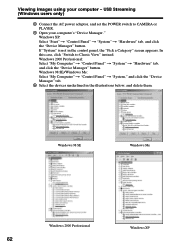
.... 4 Open your computer - Windows 2000 Professional: Select "My Computer" t "Control Panel" t "System" t "Hardware" tab, and click the "Device Manager" button. USB Streaming (Windows users only) 3 Connect the AC power adaptor, and set the POWER switch to Classic View" instead. Viewing images using your computer's "Device Manager." Windows 98 SE Windows Me...
.... 4 Open your computer - Windows 2000 Professional: Select "My Computer" t "Control Panel" t "System" t "Hardware" tab, and click the "Device Manager" button. USB Streaming (Windows users only) 3 Connect the AC power adaptor, and set the POWER switch to Classic View" instead. Viewing images using your computer's "Device Manager." Windows 98 SE Windows Me...
Operating Instructions
Page 63
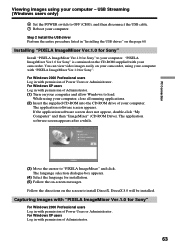
PC Connection Viewing images using your computer. Step 2 Install the USB driver Perform the entire procedure listed in "Installing the USB driver" on the CD-ROM supplied with your computer. "PIXELA ImageMixer Ver.1.0 for Sony" For Windows 2000 Professional users Log in with permission of... appears after a while. (3) Move the cursor to your camcorder. Capturing images with permission of Administrator. (1) Turn on the screen to install DirectX. For Windows XP users Log in with "PIXELA ImageMixer Ver.1.0 for Sony" is contained on the page 60. If the application software...
PC Connection Viewing images using your computer. Step 2 Install the USB driver Perform the entire procedure listed in "Installing the USB driver" on the CD-ROM supplied with your computer. "PIXELA ImageMixer Ver.1.0 for Sony" For Windows 2000 Professional users Log in with permission of... appears after a while. (3) Move the cursor to your camcorder. Capturing images with permission of Administrator. (1) Turn on the screen to install DirectX. For Windows XP users Log in with "PIXELA ImageMixer Ver.1.0 for Sony" is contained on the page 60. If the application software...
Operating Instructions
Page 64
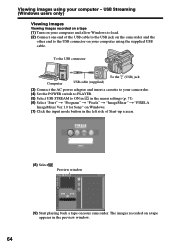
... on a tape (1) Turn on your computer and allow Windows to load. (2) Connect one end of Start-up screen. (8) Select . Preview window (9) Start playing back a tape on your computer using your camcorder. (4) Set the POWER switch to PLAYER. (5) Select USB STREAM to ON in... t "Program" t "Pixela" t "ImageMixer" t "PIXELA ImageMixer Ver.1.0 for Sony" on Windows. (7) Click the input mode button in the preview window. 64 To the USB connector Computer To the (USB) jack USB cable (supplied) (3) Connect the AC power adaptor and insert a cassette to your computer - The images recorded...
... on a tape (1) Turn on your computer and allow Windows to load. (2) Connect one end of Start-up screen. (8) Select . Preview window (9) Start playing back a tape on your computer using your camcorder. (4) Set the POWER switch to PLAYER. (5) Select USB STREAM to ON in... t "Program" t "Pixela" t "ImageMixer" t "PIXELA ImageMixer Ver.1.0 for Sony" on Windows. (7) Click the input mode button in the preview window. 64 To the USB connector Computer To the (USB) jack USB cable (supplied) (3) Connect the AC power adaptor and insert a cassette to your computer - The images recorded...


