
Operating Instructions
Page 4
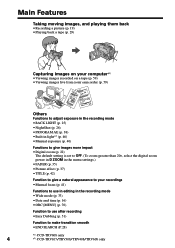
...on your computer*1) •Viewing images recorded on a tape (p. 59) •Viewing images live from your camcorder (p. 59) Others Functions to adjust exposure in the recording mode •BACK LIGHT (p. 25) •NightShot...(p. 26) •PROGRAM AE (p. 38) • Built-in light*2) (p. 46) •Manual exposure (p. 40) Functions to give images more impact •Digital zoom (p. 22) The default... effect (p. 37) •TITLE (p. 42) Function to give a natural appearance to your recordings •Manual focus (p. 41) Functions to use in editing in the recording mode •Wide mode (p. 33) &#...
...on your computer*1) •Viewing images recorded on a tape (p. 59) •Viewing images live from your camcorder (p. 59) Others Functions to adjust exposure in the recording mode •BACK LIGHT (p. 25) •NightShot...(p. 26) •PROGRAM AE (p. 38) • Built-in light*2) (p. 46) •Manual exposure (p. 40) Functions to give images more impact •Digital zoom (p. 22) The default... effect (p. 37) •TITLE (p. 42) Function to give a natural appearance to your recordings •Manual focus (p. 41) Functions to use in editing in the recording mode •Wide mode (p. 33) &#...
Operating Instructions
Page 5
...recording on pictures 27 Checking the recording - Picture effect .. 37 Using the PROGRAM AE function .... 38 Adjusting the exposure manually ...... 40 Focusing manually 41 Superimposing a title 42 Making your own titles 44 Using the built-in the dark - NightShot 26 Superimposing the ...cassettes 80 About the "InfoLITHIUM" battery pack 81 Using your computer - Easy dubbing 51 PC Connection (CCD-TRV608 only) Viewing images using your camcorder abroad 83 Maintenance information and precautions 84 Specifications 89 Advanced Recording Operations Using the wide mode 33 Using ...
...recording on pictures 27 Checking the recording - Picture effect .. 37 Using the PROGRAM AE function .... 38 Adjusting the exposure manually ...... 40 Focusing manually 41 Superimposing a title 42 Making your own titles 44 Using the built-in the dark - NightShot 26 Superimposing the ...cassettes 80 About the "InfoLITHIUM" battery pack 81 Using your computer - Easy dubbing 51 PC Connection (CCD-TRV608 only) Viewing images using your camcorder abroad 83 Maintenance information and precautions 84 Specifications 89 Advanced Recording Operations Using the wide mode 33 Using ...
Operating Instructions
Page 8
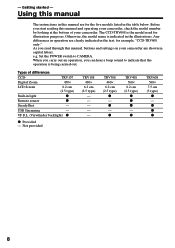
... illustrations. - Getting started - Using this manual The instructions in this manual and operating your camcorder, check the model number by looking at the bottom of differences CCD- As you can hear a beep sound to CAMERA. TRV107 Digital Zoom 450× LCD Screen 6.2 cm (2.5 type) Built-in capital letters. Not provided TRV108 460× 6.2 cm (2.5 type) - - - - - z - z TRV408...
... illustrations. - Getting started - Using this manual The instructions in this manual and operating your camcorder, check the model number by looking at the bottom of differences CCD- As you can hear a beep sound to CAMERA. TRV107 Digital Zoom 450× LCD Screen 6.2 cm (2.5 type) Built-in capital letters. Not provided TRV108 460× 6.2 cm (2.5 type) - - - - - z - z TRV408...

Operating Instructions
Page 9
... to country. However, there may cause your camcorder get wet. Letting your camcorder get wet may be repaired [a]. •Never leave your recordings on mounted models only) •The LCD screen and the finder are manufactured using extremely high-precision technology so ...to malfunction. Doing so might cause your camcorder away from country to temperatures above 60°C (140°F), such as dusk [d]. [a] [b] [c] [d] 9 Keep your camcorder to direct sunlight for effective use. Sometimes this manual Note on the LCD screen and the finder. Getting started Using ...
... to country. However, there may cause your camcorder get wet. Letting your camcorder get wet may be repaired [a]. •Never leave your recordings on mounted models only) •The LCD screen and the finder are manufactured using extremely high-precision technology so ...to malfunction. Doing so might cause your camcorder away from country to temperatures above 60°C (140°F), such as dusk [d]. [a] [b] [c] [d] 9 Keep your camcorder to direct sunlight for effective use. Sometimes this manual Note on the LCD screen and the finder. Getting started Using ...

Operating Instructions
Page 26
...not use the following functions: - Exposure - To cancel the NightShot function, slide NIGHTSHOT to ON in normal recording, the picture may cause your camcorder is about 3 m (10 feet). 26 This may be clearer with the autofocus mode when using the NightShot Light is in bright places (ex.... While your camcorder to malfunction. •When you to ON in the menu settings (p. 68). For example, you can satisfactorily record the environment of nocturnal animals...
...not use the following functions: - Exposure - To cancel the NightShot function, slide NIGHTSHOT to ON in normal recording, the picture may cause your camcorder is about 3 m (10 feet). 26 This may be clearer with the autofocus mode when using the NightShot Light is in bright places (ex.... While your camcorder to malfunction. •When you to ON in the menu settings (p. 68). For example, you can satisfactorily record the environment of nocturnal animals...

Operating Instructions
Page 27
... screen superimposed on the picture. Recording - Press DATE to record the date and time. Press TIME to off. Note The date and time indicators recorded manually cannot be deleted. Press DATE and/or TIME again. DATE TIME When you do not record the date and time in the picture Record the... screen as the background for about 10 seconds, then erase the date and time indicators before using (p. 16). Set the date and time to your camcorder, the clock setting is set to record the time.
... screen superimposed on the picture. Recording - Press DATE to record the date and time. Press TIME to off. Note The date and time indicators recorded manually cannot be deleted. Press DATE and/or TIME again. DATE TIME When you do not record the date and time in the picture Record the... screen as the background for about 10 seconds, then erase the date and time indicators before using (p. 16). Set the date and time to your camcorder, the clock setting is set to record the time.

Operating Instructions
Page 39
... PROGRAM AE in in the menu settings (p. 68). (2) Select the desired PROGRAM AE mode in the menu settings, then press the SEL/PUSH EXEC dial. 1 MANUAL SET PROGRAM AE P EFFECT RETURN AUTO SPOT L I GHT PORTRA I T S POR T S BEACH&SK I SUNS E TMOON L ANDSCAPE [ MENU ] : END MENU To cancel the...set to focus only on subjects in the middle to far distance. •In the sunset & moon and landscape modes, your camcorder is selected You can adjust the exposure manually. Soft portrait mode - Notes •In the spotlight, sports lesson and beach & ski modes, you are recording under a ...
... PROGRAM AE in in the menu settings (p. 68). (2) Select the desired PROGRAM AE mode in the menu settings, then press the SEL/PUSH EXEC dial. 1 MANUAL SET PROGRAM AE P EFFECT RETURN AUTO SPOT L I GHT PORTRA I T S POR T S BEACH&SK I SUNS E TMOON L ANDSCAPE [ MENU ] : END MENU To cancel the...set to focus only on subjects in the middle to far distance. •In the sunset & moon and landscape modes, your camcorder is selected You can adjust the exposure manually. Soft portrait mode - Notes •In the spotlight, sports lesson and beach & ski modes, you are recording under a ...

Operating Instructions
Page 40
Adjusting the exposure manually You can manually adjust and set the exposure. Your camcorder automatically returns to the automatic exposure mode Press EXPOSURE. The subject is backlit - Bright subject and dark background - if you adjust the exposure manually, the backlight function does not work in the following cases: - night scenes) faithfully (1) In CAMERA mode,...on the screen. (2) Turn the SEL/PUSH EXEC dial to adjust the brightness. 1 EXPOSURE 2 To return to the automatic exposure mode: - Adjust the exposure manually in CAMERA mode. if you change the PROGRAM AE mode -
Adjusting the exposure manually You can manually adjust and set the exposure. Your camcorder automatically returns to the automatic exposure mode Press EXPOSURE. The subject is backlit - Bright subject and dark background - if you adjust the exposure manually, the backlight function does not work in the following cases: - night scenes) faithfully (1) In CAMERA mode,...on the screen. (2) Turn the SEL/PUSH EXEC dial to adjust the brightness. 1 EXPOSURE 2 To return to the automatic exposure mode: - Adjust the exposure manually in CAMERA mode. if you change the PROGRAM AE mode -
Operating Instructions
Page 60
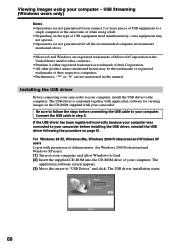
... USB cable in step 8. If the USB driver has been registered incorrectly because your computer was connected to your camcorder before connecting the USB cable to your computer. The application software screen appears. (3) Move the cursor to a ...single computer at the same time or when using your camcorder. Installing the USB driver Before connecting your camcorder to the computer. For Windows 98 SE, Windows Me, Windows 2000 Professional and Windows XP users... companies. • Furthermore, "™" or "®" are not mentioned in this manual.
... USB cable in step 8. If the USB driver has been registered incorrectly because your computer was connected to your camcorder before connecting the USB cable to your computer. The application software screen appears. (3) Move the cursor to a ...single computer at the same time or when using your camcorder. Installing the USB driver Before connecting your camcorder to the computer. For Windows 98 SE, Windows Me, Windows 2000 Professional and Windows XP users... companies. • Furthermore, "™" or "®" are not mentioned in this manual.
Operating Instructions
Page 66
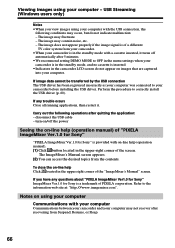
... MODE to your computer - To close the on-line help (operation manual) of "PIXELA ImageMixer Ver.1.0 for Sony" "PIXELA ImageMixer Ver.1.0 for Sony is provided with your computer Communications between your camcorder and your computer may occur, but do not appear on using your computer... Communications with on -line help Click located in the camcorder LCD screen do not indicate...
... MODE to your computer - To close the on-line help (operation manual) of "PIXELA ImageMixer Ver.1.0 for Sony" "PIXELA ImageMixer Ver.1.0 for Sony is provided with your computer Communications between your camcorder and your computer may occur, but do not appear on using your computer... Communications with on -line help Click located in the camcorder LCD screen do not indicate...
Operating Instructions
Page 68
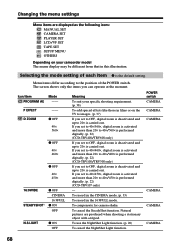
...9FULL z ON OFF N.S.LIGHT z ON OFF Meaning To suit your camcorder model The menu display may be different from that in this illustration. Natural pictures are displayed as the following icons: MANUAL SET CAMERA SET PLAYER SET LCD/VF SET TAPE SET SETUP MENU OTHERS Depending on your specific shooting requirement...to 40×/560×, digital zoom is activated and more than 20× to 40×/460× is performed digitally. (p. 22) (CCD-TRV108/TRV308 only) If you set to OFF, digital zoom is deactivated and up to 20× is the default setting. POWER switch CAMERA CAMERA ...
...9FULL z ON OFF N.S.LIGHT z ON OFF Meaning To suit your camcorder model The menu display may be different from that in this illustration. Natural pictures are displayed as the following icons: MANUAL SET CAMERA SET PLAYER SET LCD/VF SET TAPE SET SETUP MENU OTHERS Depending on your specific shooting requirement...to 40×/560×, digital zoom is activated and more than 20× to 40×/460× is performed digitally. (p. 22) (CCD-TRV108/TRV308 only) If you set to OFF, digital zoom is deactivated and up to 20× is the default setting. POWER switch CAMERA CAMERA ...

Operating Instructions
Page 73
... (continued on the following table to 16:9FULL. c Close the LCD panel. (p. 20) • The contrast between the subject and background is not clear. If the problem persists, disconnect the power source and contact your camcorder for autofocus. A vertical band appears when you shoot a very bright ...the standby mode for more than 5 minutes. c Remove the cassette and leave your Sony dealer or local authorized Sony service facility. c Set it to ON. (p. 68) • The wide mode is the manual focus mode. This is not adjusted. A vertical band appears when you shoot a subject...
... (continued on the following table to 16:9FULL. c Close the LCD panel. (p. 20) • The contrast between the subject and background is not clear. If the problem persists, disconnect the power source and contact your camcorder for autofocus. A vertical band appears when you shoot a very bright ...the standby mode for more than 5 minutes. c Remove the cassette and leave your Sony dealer or local authorized Sony service facility. c Set it to ON. (p. 68) • The wide mode is the manual focus mode. This is not adjusted. A vertical band appears when you shoot a subject...


