Operating Instructions
Page 4
...based trademarks and logos are trademarks or registered trademarks of time you do, the speakers may result in this player is protected by Macrovision. On cleaning Clean the cabinet, panel, and controls with a soft cloth slightly ...Blu-ray Disc" is a trademark. • "Blu-ray Disc," "DVD+RW," "DVD-RW," "DVD+R," "DVD-R," "DVD VIDEO," and "CD" logos are trademarks. • "BD-Live" and "BonusView" are trademarks of Blu-ray Disc Association. • "x.v.Color" and "x.v.Color" logo are trademarks of Matsushita Electric Industrial Co., Ltd. On replacement of Sony Corporation and Sony...
...based trademarks and logos are trademarks or registered trademarks of time you do, the speakers may result in this player is protected by Macrovision. On cleaning Clean the cabinet, panel, and controls with a soft cloth slightly ...Blu-ray Disc" is a trademark. • "Blu-ray Disc," "DVD+RW," "DVD-RW," "DVD+R," "DVD-R," "DVD VIDEO," and "CD" logos are trademarks. • "BD-Live" and "BonusView" are trademarks of Blu-ray Disc Association. • "x.v.Color" and "x.v.Color" logo are trademarks of Matsushita Electric Industrial Co., Ltd. On replacement of Sony Corporation and Sony...

Operating Instructions
Page 6
... Controls 8 Hookups and Settings Hooking Up the Player 13 Step 1: Connecting to Your TV 14 Connecting to an HDMI jack 15 About the BRAVIA Sync features (for HDMI connections only 16 Connecting to component video jacks (Y, Pb, Pr 17 Connecting to an audio/video or S VIDEO jack 18 Step 2: Connecting to Your AV...for a scene quickly (Scene Search 36 Searching for a Title/Chapter 37 Displaying the playing time and play information 37 Adjusting pictures and sound for videos 38 Playing CDs 40 Playing Photo Files 41 Settings and Adjustments Using the Settings Displays 43 Network Update 44...
... Controls 8 Hookups and Settings Hooking Up the Player 13 Step 1: Connecting to Your TV 14 Connecting to an HDMI jack 15 About the BRAVIA Sync features (for HDMI connections only 16 Connecting to component video jacks (Y, Pb, Pr 17 Connecting to an audio/video or S VIDEO jack 18 Step 2: Connecting to Your AV...for a scene quickly (Scene Search 36 Searching for a Title/Chapter 37 Displaying the playing time and play information 37 Adjusting pictures and sound for videos 38 Playing CDs 40 Playing Photo Files 41 Settings and Adjustments Using the Settings Displays 43 Network Update 44...

Operating Instructions
Page 7
Additional Information Troubleshooting 61 Self-Diagnosis Function 65 Playable Discs 66 Video Output Resolution 69 Audio Output Signals 70 Specifications 71 Language Code List 72 Parental Control/Area Code 72 Terms and Conditions of Use and End User License Agreement 73 Software License Information 75 Glossary 84 Index 86 Before operating the player, please read "Terms and Conditions of Use and End User License Agreement" (page 73). 7
Additional Information Troubleshooting 61 Self-Diagnosis Function 65 Playable Discs 66 Video Output Resolution 69 Audio Output Signals 70 Specifications 71 Language Code List 72 Parental Control/Area Code 72 Terms and Conditions of Use and End User License Agreement 73 Software License Information 75 Glossary 84 Index 86 Before operating the player, please read "Terms and Conditions of Use and End User License Agreement" (page 73). 7

Operating Instructions
Page 8
... playback time in parentheses. DISPLAY (page 37) Displays the playback information on BD-ROMs/ DVD VIDEOs. AUDIO (page 54) Selects the language track when multilingual tracks are recorded on the player, or sets to the original setting. Use the tactile dot as a reference when operating the... player. 8 A Z OPEN/CLOSE (page 33) Opens or closes the disc tray. B Number buttons (page 37, 59) Enters the title/chapter numbers, etc. TV [/1 (on/standby) (page 28) Turns on the TV, or sets to standby mode. [/1 (on/standby) (page 30) Turns on BDROMs/DVD VIDEOs. When ...
... playback time in parentheses. DISPLAY (page 37) Displays the playback information on BD-ROMs/ DVD VIDEOs. AUDIO (page 54) Selects the language track when multilingual tracks are recorded on the player, or sets to the original setting. Use the tactile dot as a reference when operating the... player. 8 A Z OPEN/CLOSE (page 33) Opens or closes the disc tray. B Number buttons (page 37, 59) Enters the title/chapter numbers, etc. TV [/1 (on/standby) (page 28) Turns on the TV, or sets to standby mode. [/1 (on/standby) (page 30) Turns on BDROMs/DVD VIDEOs. When ...
Operating Instructions
Page 10
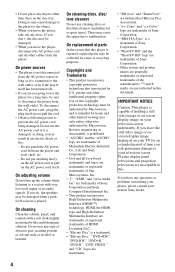
...jack (page 48). C Remote sensor (page 28) D Disc tray (page 33) E Blu-ray Disc indicator Lights up , then turns off when Easy Setup is recognized. z When the player is turned on for more than 10 seconds until "UNLOCK" appears in the "Video Settings" setup and video signal is locked. J x (stop) (page 33)... outputting 1080p/24 Hz video signals of the title being opened by mistake. Front panel A [/1 (on/standby) (page 30) Turns on the player, or sets to prevent it being played is turned on, hold down X on the player for the first time, the Blu-ray Disc indicator lights up when ...
...jack (page 48). C Remote sensor (page 28) D Disc tray (page 33) E Blu-ray Disc indicator Lights up , then turns off when Easy Setup is recognized. z When the player is turned on for more than 10 seconds until "UNLOCK" appears in the "Video Settings" setup and video signal is locked. J x (stop) (page 33)... outputting 1080p/24 Hz video signals of the title being opened by mistake. Front panel A [/1 (on/standby) (page 30) Turns on the player, or sets to prevent it being played is turned on, hold down X on the player for the first time, the Blu-ray Disc indicator lights up when ...

Operating Instructions
Page 11
... displayed depending on downloading the player's software, see page 44. ,continued 11 The display changes as follows. F Network connection indicator Lights up when outputting 720p/1080i/ 1080p video signals from the HDMI OUT jack or 720p/1080i video signals from the COMPONENT VIDEO OUT jacks. For details on the disc. C HDMI (page 15) Lights up...
... displayed depending on downloading the player's software, see page 44. ,continued 11 The display changes as follows. F Network connection indicator Lights up when outputting 720p/1080i/ 1080p video signals from the HDMI OUT jack or 720p/1080i video signals from the COMPONENT VIDEO OUT jacks. For details on the disc. C HDMI (page 15) Lights up...

Operating Instructions
Page 12
H AC IN terminal (page 27) I COMPONENT VIDEO OUT (Y, PB, PR) jacks (page 17) J VIDEO OUT (VIDEO/S VIDEO) jacks (page 18) K CONTROL S IN/IR IN jack If you have a CONTROL S-compatible Sony TV or AV amplifier (receiver), use a Control S cable (not supplied) to connect to the operating instructions supplied with your TV or AV ...23) E DIGITAL OUT (OPTICAL/ COAXIAL) jacks (page 22) F HDMI OUT jack (page 15, 21) G Ventilation holes The ventilation fan is inside the player. Refer to the Control S (output) jack. Rear panel A EXT slot (page 25) B RS232C port Used for maintenance and service.
H AC IN terminal (page 27) I COMPONENT VIDEO OUT (Y, PB, PR) jacks (page 17) J VIDEO OUT (VIDEO/S VIDEO) jacks (page 18) K CONTROL S IN/IR IN jack If you have a CONTROL S-compatible Sony TV or AV amplifier (receiver), use a Control S cable (not supplied) to connect to the operating instructions supplied with your TV or AV ...23) E DIGITAL OUT (OPTICAL/ COAXIAL) jacks (page 22) F HDMI OUT jack (page 15, 21) G Ventilation holes The ventilation fan is inside the player. Refer to the Control S (output) jack. Rear panel A EXT slot (page 25) B RS232C port Used for maintenance and service.

Operating Instructions
Page 13
Do not connect the AC power cord until you have the following items. • Audio/video cable (phono plug ×3) (1) • AC power cord (1) • External memory (1) • Remote commander (remote) (1) • Size AA (R6) batteries (2) Follow steps 1 through 7 to hook up and adjust the settings of the player. Hookups and Settings 13 Hookups and Settings Hooking Up the Player Check that you reach "Step 5: Connecting the AC Power Cord" (page 27).
Do not connect the AC power cord until you have the following items. • Audio/video cable (phono plug ×3) (1) • AC power cord (1) • External memory (1) • Remote commander (remote) (1) • Size AA (R6) batteries (2) Follow steps 1 through 7 to hook up and adjust the settings of the player. Hookups and Settings 13 Hookups and Settings Hooking Up the Player Check that you reach "Step 5: Connecting the AC Power Cord" (page 27).

Operating Instructions
Page 14
... Standard Definition: (Y, Pb, Pr)" (page 17). 480p, 480i Standard Definition: See "Connecting to Your TV About video/HDMI OUT jacks The player has the following video jacks. Pushing against the cabinet wall, etc., may damage the cable. The DVI jack will not accept any audio signals... 1080/24p, 1080p, 1080i, 720p Standard Definition: 480p, 480i See "Connecting to an 480i audio/video or S VIDEO jack" (page 18). Standard quality b • Plug in addition to this player to the input jack on the connecting cables. Furthermore, you cannot connect the HDMI OUT jack to ...
... Standard Definition: (Y, Pb, Pr)" (page 17). 480p, 480i Standard Definition: See "Connecting to Your TV About video/HDMI OUT jacks The player has the following video jacks. Pushing against the cabinet wall, etc., may damage the cable. The DVI jack will not accept any audio signals... 1080/24p, 1080p, 1080i, 720p Standard Definition: 480p, 480i See "Connecting to an 480i audio/video or S VIDEO jack" (page 18). Standard quality b • Plug in addition to this player to the input jack on the connecting cables. Furthermore, you cannot connect the HDMI OUT jack to ...

Operating Instructions
Page 16
... this model 480i/480p/ 720p/1080i/1080p Blu-ray Disc/DVD player, please contact our customer service center. • If the picture is not clear, not natural or not to your satisfaction, change the language for HDMI" to the VIDEO OUT VIDEO or S VIDEO jack. If there are questions regarding our ...the connection to "On" in the picture. z • When connecting the Sony TV that bears the HDMI logo. HOME: The home menu appears automatically (page 43). - In the case of your TV, the player's language for HDMI" function may cause artifacts to the operating instructions supplied with ...
... this model 480i/480p/ 720p/1080i/1080p Blu-ray Disc/DVD player, please contact our customer service center. • If the picture is not clear, not natural or not to your satisfaction, change the language for HDMI" to the VIDEO OUT VIDEO or S VIDEO jack. If there are questions regarding our ...the connection to "On" in the picture. z • When connecting the Sony TV that bears the HDMI logo. HOME: The home menu appears automatically (page 43). - In the case of your TV, the player's language for HDMI" function may cause artifacts to the operating instructions supplied with ...
Operating Instructions
Page 17
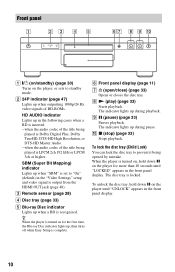
... that of the jack. TV : Signal flow b When you connect the player and TV using a component video cable or three video cables (not supplied) of the same kind and length. Blu-ray Disc/DVD player Hookups and Settings (red) (white) (green) (blue) (red) Audio/video cable (supplied) Component video cable (not supplied) (red) (white) (green) (blue) (red) Match the...
... that of the jack. TV : Signal flow b When you connect the player and TV using a component video cable or three video cables (not supplied) of the same kind and length. Blu-ray Disc/DVD player Hookups and Settings (red) (white) (green) (blue) (red) Audio/video cable (supplied) Component video cable (not supplied) (red) (white) (green) (blue) (red) Match the...

Operating Instructions
Page 18
You can enjoy standard quality pictures and sound. Blu-ray Disc/DVD player (red) (white) Audio/video cable (supplied) (red) (white) (yellow) or (yellow) S-video cable (not supplied) Match the color of the plug to an audio/video or S VIDEO jack Connect the VIDEO OUT (VIDEO) jack and AUDIO OUT (L/R) jacks of the player and your TV using an Svideo cable, disconnect the video plug (yellow) of the jack. Connecting to that of the audio/video cable. 18 TV : Signal flow b When you connect the player and TV using the audio/video cable.
You can enjoy standard quality pictures and sound. Blu-ray Disc/DVD player (red) (white) Audio/video cable (supplied) (red) (white) (yellow) or (yellow) S-video cable (not supplied) Match the color of the plug to an audio/video or S VIDEO jack Connect the VIDEO OUT (VIDEO) jack and AUDIO OUT (L/R) jacks of the player and your TV using an Svideo cable, disconnect the video plug (yellow) of the jack. Connecting to that of the audio/video cable. 18 TV : Signal flow b When you connect the player and TV using the audio/video cable.

Operating Instructions
Page 20
Connect the player to your TV using an HDMI cable, or - Connect your AV amplifier (receiver) to your TV using a video cable other than an HDMI cable (component video cable, S-video cable, or audio/video cable). • If you connect the player to your ears or the speakers. 20 b • When you connect a component that does not conform to the selected audio signal, a loud noise (or no sound) will come from the speakers, which could damage your AV amplifier (receiver) using an HDMI cable, do one of the following: -
Connect the player to your TV using an HDMI cable, or - Connect your AV amplifier (receiver) to your TV using a video cable other than an HDMI cable (component video cable, S-video cable, or audio/video cable). • If you connect the player to your ears or the speakers. 20 b • When you connect a component that does not conform to the selected audio signal, a loud noise (or no sound) will come from the speakers, which could damage your AV amplifier (receiver) using an HDMI cable, do one of the following: -

Operating Instructions
Page 24
Connecting to that of the jack. : Signal flow AV amplifier (receiver) 24 Blu-ray Disc/DVD player (red) (white) Audio/video cable (supplied) (red) (white) Match the color of the plug to audio L/R jacks If your AV amplifier (receiver) only has L and R audio input jacks, use this connection.
Connecting to that of the jack. : Signal flow AV amplifier (receiver) 24 Blu-ray Disc/DVD player (red) (white) Audio/video cable (supplied) (red) (white) Match the color of the plug to audio L/R jacks If your AV amplifier (receiver) only has L and R audio input jacks, use this connection.

Operating Instructions
Page 30
The initial settings message appears. 5 Select "Start," and press ENTER. [/1 TV [/1 RETURN HOME When turned on for the first time Wait for a short while before the player turns on your player. If you do not complete Easy Setup, it will appear each time you turn on and starts Easy Setup. Make the settings below to make the minimum number of basic adjustments for the on-screen displays using the player. Step 7: Easy Setup Follow the steps below in the following order. 4 Select a language for using M/m, and press ENTER.
The initial settings message appears. 5 Select "Start," and press ENTER. [/1 TV [/1 RETURN HOME When turned on for the first time Wait for a short while before the player turns on your player. If you do not complete Easy Setup, it will appear each time you turn on and starts Easy Setup. Make the settings below to make the minimum number of basic adjustments for the on-screen displays using the player. Step 7: Easy Setup Follow the steps below in the following order. 4 Select a language for using M/m, and press ENTER.

Operating Instructions
Page 31
... selected. In this case, press x on the player for about the video output resolution, see page 47. Select from the jacks, other video output jacks at the same time, press RETURN to return to step 6 and change the video output resolution, a picture is incorrect, no picture ... confirmation. Select "On" to the lowest resolution. Hookups and Settings 7 Select a video output resolution for HDMI" function when connecting Sony components that 30 seconds. When connecting other equipment at the same time, video signals may not output from "480i," "480p," "720p," or "1080i." If...
... selected. In this case, press x on the player for about the video output resolution, see page 47. Select from the jacks, other video output jacks at the same time, press RETURN to return to step 6 and change the video output resolution, a picture is incorrect, no picture ... confirmation. Select "On" to the lowest resolution. Hookups and Settings 7 Select a video output resolution for HDMI" function when connecting Sony components that 30 seconds. When connecting other equipment at the same time, video signals may not output from "480i," "480p," "720p," or "1080i." If...

Operating Instructions
Page 33
Playback Playback Playing BDs/DVDs BD DVD Z OPEN/ CLOSE Number buttons HOME N PLAY X PAUSE
Playback Playback Playing BDs/DVDs BD DVD Z OPEN/ CLOSE Number buttons HOME N PLAY X PAUSE
Operating Instructions
Page 34
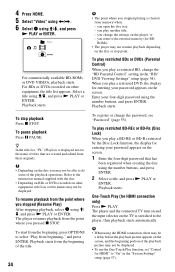
4 Press HOME. 5 Select "Video" using
4 Press HOME. 5 Select "Video" using

Operating Instructions
Page 35
... Menu (page 35). The available items differ depending on the disc type or player situation. Plays the title from the beginning (page 37). Stops playback. Plays the title from the point where you can display the Top Menu. 1 Press ... BD's or DVD's menu BD DVD To display Top Menu When you play a BD or DVD, you pressed x STOP. Searches for picture and sound. • Video Settings (page 38) • Audio Settings (page 39) Title List Play Play from the beginning (page 37). Playback Available OPTIONS 1 Press OPTIONS. Displays the BDROM...
... Menu (page 35). The available items differ depending on the disc type or player situation. Plays the title from the beginning (page 37). Stops playback. Plays the title from the point where you can display the Top Menu. 1 Press ... BD's or DVD's menu BD DVD To display Top Menu When you play a BD or DVD, you pressed x STOP. Searches for picture and sound. • Video Settings (page 38) • Audio Settings (page 39) Title List Play Play from the beginning (page 37). Playback Available OPTIONS 1 Press OPTIONS. Displays the BDROM...

Operating Instructions
Page 36
... inserted into the EXT slot on the rear of the player. Refer to the scene you are searching for enjoyment. 1 Turn the player off. 2 Insert the external memory (supplied) into the player (page 25). 3 Connect the player to a network (page 26). 4 Turn the player on the disc. indicates the current point) appears at once, select "Erase...
... inserted into the EXT slot on the rear of the player. Refer to the scene you are searching for enjoyment. 1 Turn the player off. 2 Insert the external memory (supplied) into the player (page 25). 3 Connect the player to a network (page 26). 4 Turn the player on the disc. indicates the current point) appears at once, select "Erase...


