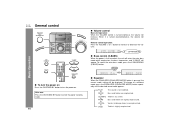
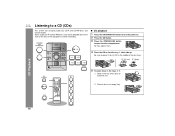
XL-ES5 | XL-ES50 Operation Manual
Page 1
MICRO COMPONENT SYSTEM MODEL XL-ES5 XL-ES50 Thank you in this operation manual are for purchasing this manual carefully. To obtain the best performance from this product, please read this SHARP product. XL-ES50 Micro Component System consisting of XL-ES5 (main unit), CPES5F (front speakers) and CP-ES5SW (subwoofer). OPERATION MANUAL The illustrations printed in operating your SHARP product. It will guide you for the model XLES50. XL-ES5 Micro Component System consisting of XL-ES50 (main unit), CP-ES50F (front speakers) and CP-ES50SW (subwoofer).
XL-ES5 | XL-ES50 Operation Manual
Page 2
... of important operating and maintenance (servicing) instructions in a particular installation. These limits are located on the rear of the FCC Rules. Important Instruction SPECIAL NOTES XL-ES5 XL-ES50 CAUTION: TO REDUCE THE RISK OF ELECTRIC SHOCK, DO NOT REMOVE COVER (OR BACK). However, there is intended to alert the user to Part 15...
XL-ES5 | XL-ES50 Operation Manual
Page 3
... you are unable to cords at plugs, convenience receptacles, and the point where they may be followed. 5 Cleaning - The product is a safety feature. Important Instruction XL-ES5 XL-ES50 3 Do not use this product from battery power, or other ). If replacement of protective device. Do not use instructions should still fail to fit, contact...
XL-ES5 | XL-ES50 Operation Manual
Page 4
... result in damage and will prevent damage to the product due to the product, be located in proper operating condition. 24 Wall or Ceiling Mounting - XL-ES5 XL-ES50 IMPORTANT SAFETY INSTRUCTIONS (continued) Important Instruction 15 Outdoor Antenna Grounding -
XL-ES5 | XL-ES50 Operation Manual
Page 5
... sleep operation 24 - 26 Enhancing your system 27 References Troubleshooting chart 28, 29 Maintenance 29 Specifications 30 CONSUMER LIMITED WARRANTY Back cover General Information XL-ES5 XL-ES50 5 Accessories Please confirm that the following accessories are included. Remote control 1 (RRMCGA003SJSA) FM/AM loop antenna 1 (QANTL0009SJZZ) AC power cord 1 (QACCU0003SJ00) Note: Only the above...
XL-ES5 | XL-ES50 Operation Manual
Page 6
General Information XL-ES5 XL-ES50 Precautions General z Please ensure that the equipment is positioned in a well-ventilated area...with the volume control setting up high, or while continually listening at a given volume setting depends on your local SHARP service facility. Warning: The voltage used within the range of accident causing damage. z If your system does not...can damage internal wires. z In case of this unit. Plug the AC power cord back in electric shock. SHARP will not be the same as that which is dangerous and may result in , and then turn on speaker ...
XL-ES5 | XL-ES50 Operation Manual
Page 7
... 11 12 13 14 15 16 17 18 6 78 9 10 Front panel Reference page 1. Timer Indicator 25 4. FM Stereo Receiving Indicator 22 General Information XL-ES5 XL-ES50 7 CD Play or Repeat, Tuning Up Button 17, 20, 22 13. Sleep Indicator 26 8. CD Button 16 6. Disc Compartment 16 9. FM Stereo Mode Indicator 22...
XL-ES5 | XL-ES50 Operation Manual
Page 8
Super Tweeter 2. Speaker Wire 4 Subwoofer 1. Speaker Terminals 11 3. Sub Duct Pipe 2 2. Video/Auxiliary (Audio Signal) Input Jacks 27 5. Cooling Fan 12 General Information 1 2 1 8 Front speaker 1. Speaker Wire 3 Note: The speaker grilles are not removable. Bass Reflex Duct 3 4. FM/AM Loop Antenna Jack 11 4. Woofer 3. XL-ES5 XL-ES50 Controls and indicators (continued) 1 3 4 2 5 Rear panel Reference page 1. AC Power Input Jack 12 2. Subwoofer 3.
XL-ES5 | XL-ES50 Operation Manual
Page 9
... 19 2 4. CD Button 16 4 14 12. Tuner (Band) Button 22 9 19 10 20 11 9 CD Pause Button 18 6 16 15. CD Random Button 20 7 17. XL-ES5 XL-ES50 General Information Remote control 1 Reference page 1. Extra Bass Button 14 7. Memory/Set Button 15, 21, 23, 24, 26 13 10. Video/Auxiliary Button 27...
XL-ES5 | XL-ES50 Operation Manual
Page 10
XL-ES5 XL-ES50 System connections Make sure to unplug the AC power cord before any connections. Subwoofer FM/AM loop antenna connection (see page 11) FM antenna Front speaker (right) AM loop antenna Front speaker (left) Preparation for Use Speaker connection (see page 11) 10 AC outlet (AC 120 V, 60 Hz) Connecting the AC power cord (see page 12)
XL-ES5 | XL-ES50 Operation Manual
Page 11
... the FM/AM loop antenna to an external antenna as lower impedance speakers can damage the unit. z Do not mistake the right and the left ) XL-ES5 XL-ES50 Preparation for better reception. Place the AM loop antenna on the stereo system or near the AC power cord may cause noise pickup.
XL-ES5 | XL-ES50 Operation Manual
Page 12
XL-ES5 XL-ES50 System connections (continued) Preparation for a prolonged period of this unit into the AC outlet. z If any kind of magnet or an electromagnet is in the ...
XL-ES5 | XL-ES50 Operation Manual
Page 13
...: Press the ON/STAND-BY button. tion. 8" - 20' (0.2 m - 6 m) Remote sensor 13 Batteries are not included. 1 Remove the battery cover. 2 Insert the batteries according to malfunc- XL-ES5 XL-ES50 Preparation for Use Precautions for long periods of time. Notes concerning use rechargeable batteries (nickel-cadmium battery, etc.). Does the power turn on the unit...
XL-ES5 | XL-ES50 Operation Manual
Page 14
... When the EQUALIZER (EQUALIZER MODE) button is pressed, the current mode setting will appear. FLAT ROCK The sound is turned clockwise, the volume will decrease. XL-ES5 XL-ES50 General control Volume control Main unit operation: When the VOLUME control is not modified. Basic Operation To turn the power on Press the...
XL-ES5 | XL-ES50 Operation Manual
Page 15
...: The "CLOCK" or time will appear. (AM 12:00 - Basic Operation In this example, the clock is restored after a power failure or unplugging the unit. XL-ES5 XL-ES50 Press the PRESET ( or ) button once to advance the time by 1 hour. PM 11:59) The 24-hour display will appear. (0:00 - 23:59) Press...
XL-ES5 | XL-ES50 Operation Manual
Page 16
... of the disc trays. 5" (12 cm) 3" (8 cm) CD Playback 5 To place discs in the trays 2 - 5 1. Place a disc in the tray with a disc toward the unit. 2. XL-ES5 XL-ES50 Listening to place 3" (8 cm) CD in the middle of the disc or the equipment used for recording. CD playback 1 Press the ON/STAND-BY...
XL-ES5 | XL-ES50 Operation Manual
Page 17
... tray 1. 3. z When there is played, the CD player stops automatically. Press the OPEN/CLOSE button. 3. ment. When trays open, exchange discs. To remove the CDs: 1. XL-ES5 XL-ES50 CD Playback z Playback will automatically play indicator To exchange other CDs while playing a disc: Press the OPEN/CLOSE button. 6 Press the OPEN/CLOSE button to...
XL-ES5 | XL-ES50 Operation Manual
Page 18
... paused. Press in the stop mode, press the / button to start the desired track. If you press the button in the playback or stop mode. XL-ES5 XL-ES50 Listening to a CD (CDs) (continued) Various CD functions Function Play Main unit Remote control Operation Press in the stop mode. z When the end of...
XL-ES5 | XL-ES50 Operation Manual
Page 19
... using the direct search buttons, the desired tracks on the remote control to select the desired track while playing the selected disc. Selected track number XL-ES5 XL-ES50 CD Playback Selected disc number 2 Press the / button. z After the last track on the disc cannot be played. z When selecting number 10 or higher, use...
XL-ES5 | XL-ES50 Operation Manual
Page 20
... cancel random play all tracks on up to press the button. ically. (You cannot select the order of the track being played will play continuously. XL-ES5 XL-ES50 Advanced CD playback (continued) Repeat play You can play up to 5 discs: Press the / button twice. Random play The tracks on the disc...