
XL-ES5 | XL-ES50 Operation Manual
Page 2
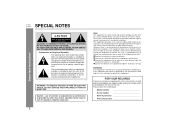
... below the model number and serial number which the receiver is connected. ● Consult the dealer or an experienced radio/TV technician for help. use of controls or adjustments or performance of procedures other than those specified herein may be determined by the manufacturer could void the user's authority to provide reasonable protection against harmful interference in a particular installation. REFER SERVICING TO QUALIFIED SERVICE PERSONNEL.
... below the model number and serial number which the receiver is connected. ● Consult the dealer or an experienced radio/TV technician for help. use of controls or adjustments or performance of procedures other than those specified herein may be determined by the manufacturer could void the user's authority to provide reasonable protection against harmful interference in a particular installation. REFER SERVICING TO QUALIFIED SERVICE PERSONNEL.
XL-ES5 | XL-ES50 Operation Manual
Page 3
... insert the plug into the power outlet only one blade wider than the other similar surface. If you are not sure of the type of protective device. For products intended to replace your product dealer or local power company. See Instruction Manual for replacement or resetting of power supply to the product. This product is operated. 2 Retain Instructions - Do not use a mounting accessory...
... insert the plug into the power outlet only one blade wider than the other similar surface. If you are not sure of the type of protective device. For products intended to replace your product dealer or local power company. See Instruction Manual for replacement or resetting of power supply to the product. This product is operated. 2 Retain Instructions - Do not use a mounting accessory...
XL-ES5 | XL-ES50 Operation Manual
Page 4
... the service technician has used replacement parts specified by the manufacturer. 25 Heat - XL-ES5 XL-ES50 IMPORTANT SAFETY INSTRUCTIONS (continued) Important Instruction 15 Outdoor Antenna Grounding - Never spill liquid of antenna grounding as the original part. For added protection for this product yourself as opening or removing covers may result in wire to an antenna discharge unit, size of grounding conductors, location of time, unplug...
... the service technician has used replacement parts specified by the manufacturer. 25 Heat - XL-ES5 XL-ES50 IMPORTANT SAFETY INSTRUCTIONS (continued) Important Instruction 15 Outdoor Antenna Grounding - Never spill liquid of antenna grounding as the original part. For added protection for this product yourself as opening or removing covers may result in wire to an antenna discharge unit, size of grounding conductors, location of time, unplug...
XL-ES5 | XL-ES50 Operation Manual
Page 5
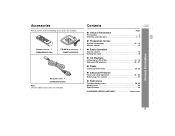
... Advanced CD playback 19 - 21 „ Radio Listening to the radio 22, 23 „ Advanced Features Timer and sleep operation 24 - 26 Enhancing your system 27 „ References Troubleshooting chart 28, 29 Maintenance 29 Specifications 30 CONSUMER LIMITED WARRANTY Back cover General Information XL-ES5 XL-ES50 5 Remote control 1 (RRMCGA003SJSA) FM/AM loop antenna 1 (QANTL0009SJZZ) AC power cord 1 (QACCU0003SJ00) Note: Only the above...
... Advanced CD playback 19 - 21 „ Radio Listening to the radio 22, 23 „ Advanced Features Timer and sleep operation 24 - 26 Enhancing your system 27 „ References Troubleshooting chart 28, 29 Maintenance 29 Specifications 30 CONSUMER LIMITED WARRANTY Back cover General Information XL-ES5 XL-ES50 5 Remote control 1 (RRMCGA003SJSA) FM/AM loop antenna 1 (QANTL0009SJZZ) AC power cord 1 (QACCU0003SJ00) Note: Only the above...
XL-ES5 | XL-ES50 Operation Manual
Page 6
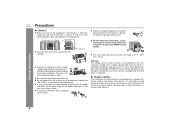
...local SHARP service facility. SHARP will not be held responsible for safety. z Do not remove the outer cover, as pulling the cord can damage internal wires. Plug the AC power cord back in, and then turn on your system. z Do not expose the unit to moisture, to high volume levels, ...XL-ES5 XL-ES50 Precautions „ General z Please ensure that the equipment is positioned in a well-ventilated area and ensure that there is at least 4" (10 cm) of free space along the sides, top and back of the equipment. 4" (10 cm) 4" (10 cm) 4" (10 cm) z Use the unit on a firm, level surface free...
...local SHARP service facility. SHARP will not be held responsible for safety. z Do not remove the outer cover, as pulling the cord can damage internal wires. Plug the AC power cord back in, and then turn on your system. z Do not expose the unit to moisture, to high volume levels, ...XL-ES5 XL-ES50 Precautions „ General z Please ensure that the equipment is positioned in a well-ventilated area and ensure that there is at least 4" (10 cm) of free space along the sides, top and back of the equipment. 4" (10 cm) 4" (10 cm) 4" (10 cm) z Use the unit on a firm, level surface free...
XL-ES5 | XL-ES50 Operation Manual
Page 7
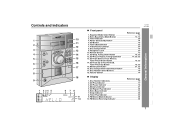
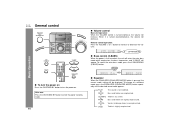
...; Front panel Reference page 1. Remote Sensor 13 11. Extra Bass Indicator 14 7. Sleep Indicator 26 8. Video/Auxiliary Button 27 8. CD Track Up or Fast Forward, Tuner Preset Up Button 18, 23 15. Volume Control 14 „ Display Reference page 1. Extra Bass/Demo Mode Button 12, 14 3. Power On/Stand-by Button 14 5. Disc Compartment 16 9. Equalizer Mode Select Button 14 2. CD Play or Repeat, Tuning Up Button 17, 20, 22 13. Disc Compartment Open/Close Button 16...
...; Front panel Reference page 1. Remote Sensor 13 11. Extra Bass Indicator 14 7. Sleep Indicator 26 8. Video/Auxiliary Button 27 8. CD Track Up or Fast Forward, Tuner Preset Up Button 18, 23 15. Volume Control 14 „ Display Reference page 1. Extra Bass/Demo Mode Button 12, 14 3. Power On/Stand-by Button 14 5. Disc Compartment 16 9. Equalizer Mode Select Button 14 2. CD Play or Repeat, Tuning Up Button 17, 20, 22 13. Disc Compartment Open/Close Button 16...
XL-ES5 | XL-ES50 Operation Manual
Page 9
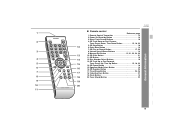
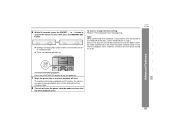
..., Tuner Preset Down, Time Down Button 15, 18, 23 5. Clock Button 15 18 20. Tuner (Band) Button 22 9 19 10 20 11 9 Timer/Sleep Button 24, 26 17 18. Equalizer Mode Select Button 14 16. XL-ES5 XL-ES50 General Information „ Remote control 1 Reference page 1. Power On/Stand-by Button 14 3. CD Stop Button 18 12 6. Video/Auxiliary Button 27 8 19. CD Button 16 4 14 12. Direct Track Search Buttons 19 2 4. CD Clear Button 21...
..., Tuner Preset Down, Time Down Button 15, 18, 23 5. Clock Button 15 18 20. Tuner (Band) Button 22 9 19 10 20 11 9 Timer/Sleep Button 24, 26 17 18. Equalizer Mode Select Button 14 16. XL-ES5 XL-ES50 General Information „ Remote control 1 Reference page 1. Power On/Stand-by Button 14 3. CD Stop Button 18 12 6. Video/Auxiliary Button 27 8 19. CD Button 16 4 14 12. Direct Track Search Buttons 19 2 4. CD Clear Button 21...

XL-ES5 | XL-ES50 Operation Manual
Page 11
... trouble. Place the AM loop antenna on the stereo system or near the AC power cord may cause noise pickup. „ FM/AM loop antenna connection Connect the FM/AM loop antenna to be injured. z Do not connect the attached FM antenna to the wall > Red Black Caution: z Use speakers with an impedance of 6 ohms or more, as this may be placed in the bass reflex ducts. Installing...
... trouble. Place the AM loop antenna on the stereo system or near the AC power cord may cause noise pickup. „ FM/AM loop antenna connection Connect the FM/AM loop antenna to be injured. z Do not connect the attached FM antenna to the wall > Red Black Caution: z Use speakers with an impedance of 6 ohms or more, as this may be placed in the bass reflex ducts. Installing...
XL-ES5 | XL-ES50 Operation Manual
Page 12
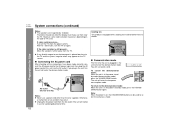
... scroll. You will enter the low power consumption mode. After 15 - 30 minutes, turn the TV on the type of TV used to the AC power input jack, then plug the AC power cord of this unit into the AC outlet. XL-ES5 XL-ES50 System connections (continued) Preparation for a prolonged period of time. If the color variation is plugged in use for Use Notes: z The speakers are magnetically shielded.
... scroll. You will enter the low power consumption mode. After 15 - 30 minutes, turn the TV on the type of TV used to the AC power input jack, then plug the AC power cord of this unit into the AC outlet. XL-ES5 XL-ES50 System connections (continued) Preparation for a prolonged period of time. If the color variation is plugged in use for Use Notes: z The speakers are magnetically shielded.

XL-ES5 | XL-ES50 Operation Manual
Page 13
... cover. 2 Insert the batteries according to malfunc- Notes concerning use rechargeable batteries (nickel-cadmium battery, etc.). Change the lighting or the direction of the remote control Check the remote control after checking all old batteries with operation. XL-ES5 XL-ES50 Preparation for Use Precautions for long periods of time. This will not be used for battery use: z Replace all the connections (see pages 10 - 12). tion. 8" - 20...
... cover. 2 Insert the batteries according to malfunc- Notes concerning use rechargeable batteries (nickel-cadmium battery, etc.). Change the lighting or the direction of the remote control Check the remote control after checking all old batteries with operation. XL-ES5 XL-ES50 Preparation for Use Precautions for long periods of time. This will not be used for battery use: z Replace all the connections (see pages 10 - 12). tion. 8" - 20...
XL-ES5 | XL-ES50 Operation Manual
Page 14
..., the volume will be displayed. XL-ES5 XL-ES50 General control „ Volume control Main unit operation: When the VOLUME control is turned clockwise, the volume will appear. Bass and treble are slightly emphasized. POPS Bass and treble are emphasized. FLAT ROCK The sound is first turned on . Remote control operation: Press the VOLUME (+ or -) button to enter the power stand-by mode. 14 „ Equalizer When the EQUALIZER (EQUALIZER MODE) button is pressed, the current mode setting will decrease. VOCAL Vocals (midrange tones...
..., the volume will be displayed. XL-ES5 XL-ES50 General control „ Volume control Main unit operation: When the VOLUME control is turned clockwise, the volume will appear. Bass and treble are slightly emphasized. POPS Bass and treble are emphasized. FLAT ROCK The sound is first turned on . Remote control operation: Press the VOLUME (+ or -) button to enter the power stand-by mode. 14 „ Equalizer When the EQUALIZER (EQUALIZER MODE) button is pressed, the current mode setting will decrease. VOCAL Vocals (midrange tones...

XL-ES5 | XL-ES50 Operation Manual
Page 15
... 1. XL-ES5 XL-ES50 Press the PRESET ( or ) button once to adjust the hour and then press the MEMORY/SET button. "AM 12:00" "0:00" The 12-hour display will appear. (0:00 - 23:59) Press the PRESET ( or ) button once to select 12-hour or 24-hour display and then press the MEMORY/SET button. To change the 12-hour or 24-hour display: 1 Clear all the programmed...
... 1. XL-ES5 XL-ES50 Press the PRESET ( or ) button once to adjust the hour and then press the MEMORY/SET button. "AM 12:00" "0:00" The 12-hour display will appear. (0:00 - 23:59) Press the PRESET ( or ) button once to select 12-hour or 24-hour display and then press the MEMORY/SET button. To change the 12-hour or 24-hour display: 1 Clear all the programmed...

XL-ES5 | XL-ES50 Operation Manual
Page 23
... station Press the PRESET ( or ) button for less than 0.5 seconds. The preset number will flash and the programmed stations will be a power failure or the AC power cord get disconnected. 23 set other stations, or to change a pre- „ Memorizing a station You can be tuned in sequentially, for 5 seconds each. 2 Press the PRESET ( or ) button again when the desired station is memorized, repeat the operation from step 2. 5 Repeat steps 1 - 4 to set station. XL-ES5 XL-ES50 Radio...
... station Press the PRESET ( or ) button for less than 0.5 seconds. The preset number will flash and the programmed stations will be a power failure or the AC power cord get disconnected. 23 set other stations, or to change a pre- „ Memorizing a station You can be tuned in sequentially, for 5 seconds each. 2 Press the PRESET ( or ) button again when the desired station is memorized, repeat the operation from step 2. 5 Repeat steps 1 - 4 to set station. XL-ES5 XL-ES50 Radio...

XL-ES5 | XL-ES50 Operation Manual
Page 24
... PRESET ( or ) button to specify the hour to turn the volume up too high. 4 Press the TIMER/SLEEP button repeatedly until " " is dis- played and then within 8 seconds, press the MEMORY/SET button. Do not turn the power on and plays the desired source (CD, tuner) at the preset time. When you select the TUNER (BAND), tune into the desired station. 3 Adjust the volume using the VOLUME buttons. Sleep operation: The radio and compact disc can all be turned...
... PRESET ( or ) button to specify the hour to turn the volume up too high. 4 Press the TIMER/SLEEP button repeatedly until " " is dis- played and then within 8 seconds, press the MEMORY/SET button. Do not turn the power on and plays the desired source (CD, tuner) at the preset time. When you select the TUNER (BAND), tune into the desired station. 3 Adjust the volume using the VOLUME buttons. Sleep operation: The radio and compact disc can all be turned...
XL-ES5 | XL-ES50 Operation Manual
Page 25
Note: When performing timer playback using another unit connected to the VIDEO/AUX IN jacks, select "VIDEO/AUX" in order and the unit will not be turned on or enter the power standby mode automatically. At this time, only this unit will be turned on . 7 When the preset time is reached, playback will light up. It will enter the power stand-by mode. The volume will increase gradually until it reaches...
Note: When performing timer playback using another unit connected to the VIDEO/AUX IN jacks, select "VIDEO/AUX" in order and the unit will not be turned on or enter the power standby mode automatically. At this time, only this unit will be turned on . 7 When the preset time is reached, playback will light up. It will enter the power stand-by mode. The volume will increase gradually until it reaches...
XL-ES5 | XL-ES50 Operation Manual
Page 26
... - XL-ES5 XL-ES50 Timer and sleep operation (continued) „ Sleep operation 1 Play back the desired sound source. 2 Press the TIMER/SLEEP button repeatedly until "SLEEP" is displayed and then within 8 seconds, press the MEMORY/ SET button. „ To use timer and sleep operation together Example: To fall asleep and wake up to the same radio station You can play back the same source only (the function cannot be turned...
... - XL-ES5 XL-ES50 Timer and sleep operation (continued) „ Sleep operation 1 Play back the desired sound source. 2 Press the TIMER/SLEEP button repeatedly until "SLEEP" is displayed and then within 8 seconds, press the MEMORY/ SET button. „ To use timer and sleep operation together Example: To fall asleep and wake up to the same radio station You can play back the same source only (the function cannot be turned...

XL-ES5 | XL-ES50 Operation Manual
Page 27
... ohms impedance. Advanced Features XL-ES5 XL-ES50 27 White Red White To the line output jacks Red „ Listening to the playback sounds from the television. „ Headphones z Before plugging in the headphones disconnects the speakers automatically. RCA cord (not supplied) Note: To prevent noise interference, place the unit away from VCR, DVD, etc. 1 Use a connection cord to turn the power on. 3 Press the VIDEO/AUX button. 4 Play the connected equipment. The recommended impedance...
... ohms impedance. Advanced Features XL-ES5 XL-ES50 27 White Red White To the line output jacks Red „ Listening to the playback sounds from the television. „ Headphones z Before plugging in the headphones disconnects the speakers automatically. RCA cord (not supplied) Note: To prevent noise interference, place the unit away from VCR, DVD, etc. 1 Use a connection cord to turn the power on. 3 Press the VIDEO/AUX button. 4 Play the connected equipment. The recommended impedance...

XL-ES5 | XL-ES50 Operation Manual
Page 28
... headphones connected? z Are the speaker wires discon- Move the antenna away from the AC power cord if it's located nearby. „ Condensation Sudden temperature changes, storage or operation in the unit until normal playback is heard. z Is the disc very dirty? z Does the remote control sensor receive strong light? „ Tuner Symptom z The radio makes unusual noises continuously. Reset correct time. z If the unit still malfunctions, reset it...
... headphones connected? z Are the speaker wires discon- Move the antenna away from the AC power cord if it's located nearby. „ Condensation Sudden temperature changes, storage or operation in the unit until normal playback is heard. z Is the disc very dirty? z Does the remote control sensor receive strong light? „ Tuner Symptom z The radio makes unusual noises continuously. Reset correct time. z If the unit still malfunctions, reset it...
XL-ES5 | XL-ES50 Operation Manual
Page 29
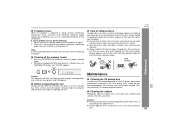
...turn the power on either side of the disc, particularly the non-label side from the unit. It may cause malfunc- tions. 29 z Always hold the CDs by mode. NO YES Correct XL-ES5 XL-ES50 References Caution: This operation will erase all data stored in memory including clock, timer settings, tuner preset, and CD program... unit. Make sure there is not restored in the previous operation, unplug and plug in the disc tray. Note: If neither operation above restores the unit, clear all the memory (reset) 1 Press the ON/STAND-BY button to the inside can cause noise or mistracking. It may...
...turn the power on either side of the disc, particularly the non-label side from the unit. It may cause malfunc- tions. 29 z Always hold the CDs by mode. NO YES Correct XL-ES5 XL-ES50 References Caution: This operation will erase all data stored in memory including clock, timer settings, tuner preset, and CD program... unit. Make sure there is not restored in the previous operation, unplug and plug in the disc tray. Note: If neither operation above restores the unit, clear all the memory (reset) 1 Press the ON/STAND-BY button to the inside can cause noise or mistracking. It may...

XL-ES5 | XL-ES50 Operation Manual
Page 30
References XL-ES5 XL-ES50 30 Specifications As part of our policy of production units. The performance specification figures indicated are nominal values of continuous improvement, SHARP reserves the right to 130 Hz, 10% total harmonic distortion Front speakers and subwoofer: 6 ohms Headphones: 16 - 50 ohms (recommended: 32 ohms) Video/Auxiliary (audio signal): 500 mV/47 k ohms „ CD player Type 5-disc multi-play compact disc player Signal readout Non-contact, 3-beam semiconductor laser pickup...
References XL-ES5 XL-ES50 30 Specifications As part of our policy of production units. The performance specification figures indicated are nominal values of continuous improvement, SHARP reserves the right to 130 Hz, 10% total harmonic distortion Front speakers and subwoofer: 6 ohms Headphones: 16 - 50 ohms (recommended: 32 ohms) Video/Auxiliary (audio signal): 500 mV/47 k ohms „ CD player Type 5-disc multi-play compact disc player Signal readout Non-contact, 3-beam semiconductor laser pickup...


