
XL3000 Operation Manual
Page 2
... that any unauthorized changes or modifications to this information. Important Instruction - NO USER-SERVICEABLE PARTS INSIDE. These limits are located on , the user is provided to call the CATV system installer's attention to persons. z Consult the dealer or an experienced radio/TV technician for a Class B digital device, pursuant to which can radiate radio frequency energy and, if not installed and used in the...
... that any unauthorized changes or modifications to this information. Important Instruction - NO USER-SERVICEABLE PARTS INSIDE. These limits are located on , the user is provided to call the CATV system installer's attention to persons. z Consult the dealer or an experienced radio/TV technician for a Class B digital device, pursuant to which can radiate radio frequency energy and, if not installed and used in the...
XL3000 Operation Manual
Page 3
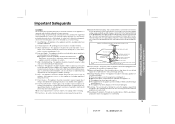
... an outside antenna is connected to the receiver, be sure the antenna system is operated, and should be used only with respect to proper grounding of the mast and supporting structure, grounding of the lead-in a wet basement, or near water - Important Safeguards CAUTION All the safety and operating instructions should be situated on the appliance. 9 Power-Cord Protection - Improper use liquid cleaners...
... an outside antenna is connected to the receiver, be sure the antenna system is operated, and should be used only with respect to proper grounding of the mast and supporting structure, grounding of the lead-in a wet basement, or near water - Important Safeguards CAUTION All the safety and operating instructions should be situated on the appliance. 9 Power-Cord Protection - Improper use liquid cleaners...
XL3000 Operation Manual
Page 4
...® labeled models, it 's good for our environment. Contents - Contents Page „ General Information Precautions 5, 6 Accessories 6 Controls and Indicators 7 - 10 „ Preparation for Use Remote Control 11 System Connections 12 - 14 „ Basic Operation General Control 15 Sound Control 16 Setting the Clock 17 „ CD Playback Listening to a CD 18 - 20 Repeat or Random Play 20 Programmed Play 21 Page „ Radio Listening to...
...® labeled models, it 's good for our environment. Contents - Contents Page „ General Information Precautions 5, 6 Accessories 6 Controls and Indicators 7 - 10 „ Preparation for Use Remote Control 11 System Connections 12 - 14 „ Basic Operation General Control 15 Sound Control 16 Setting the Clock 17 „ CD Playback Listening to a CD 18 - 20 Repeat or Random Play 20 Programmed Play 21 Page „ Radio Listening to...
XL3000 Operation Manual
Page 5
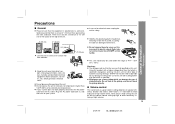
... directly. „ Volume control The sound level at least 4" (10 cm) of this unit. There must be held responsible for safety. SHARP will not be the same as this product with the volume control setting up high, or while continually listening at high volumes. 5 01/1/17 XL-3000(U2)1.fm z Do not expose the unit to moisture, to your system does not work...
... directly. „ Volume control The sound level at least 4" (10 cm) of this unit. There must be held responsible for safety. SHARP will not be the same as this product with the volume control setting up high, or while continually listening at high volumes. 5 01/1/17 XL-3000(U2)1.fm z Do not expose the unit to moisture, to your system does not work...
XL3000 Operation Manual
Page 7
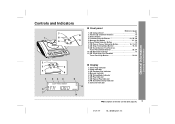
..., Tuner Preset Down Button 20, 24 10. Volume Up and Down Buttons 16 3. CD Track Up or Fast Forward, Tuner Preset Up Button 20, 24 2 3 5 4 6 1 23 4 6 7 „ Display 1. CD Random Play Indicator 4. Bass/Treble Selector Button 16 7. Timer Play Indicator 2. CD Play Indicator 5 7. CD Compartment 18 2. Sleep Indicator 3. FM Stereo Mode Indicator 6. CD Repeat Play Indicator 8. Surround Indicator 8 9 Description of remote control (See page 9.) 7 01/1/17 XL-3000(U2)1.fm Controls and Indicators - FM Stereo Receiving...
..., Tuner Preset Down Button 20, 24 10. Volume Up and Down Buttons 16 3. CD Track Up or Fast Forward, Tuner Preset Up Button 20, 24 2 3 5 4 6 1 23 4 6 7 „ Display 1. CD Random Play Indicator 4. Bass/Treble Selector Button 16 7. Timer Play Indicator 2. CD Play Indicator 5 7. CD Compartment 18 2. Sleep Indicator 3. FM Stereo Mode Indicator 6. CD Repeat Play Indicator 8. Surround Indicator 8 9 Description of remote control (See page 9.) 7 01/1/17 XL-3000(U2)1.fm Controls and Indicators - FM Stereo Receiving...
XL3000 Operation Manual
Page 9
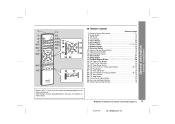
... installation for remote control (See page 11.) 9 01/1/17 XL-3000(U2)1.fm Timer Button 25 21 6. Video/Auxiliary Button 28 12. Band Selector Button 22 24 25 13. CD Fast Forward, Tuning Up Button 20, 22 23. Bass Up and Down Buttons 16 27. mote control only. Controls and Indicators - „ Remote control 1 11 Reference page 1. Clock Button 17 7. Tuner Preset Up Button 24 9 18. CD Button 18 4. Surround Button 16 7 8 10. Clear Button...
... installation for remote control (See page 11.) 9 01/1/17 XL-3000(U2)1.fm Timer Button 25 21 6. Video/Auxiliary Button 28 12. Band Selector Button 22 24 25 13. CD Fast Forward, Tuning Up Button 20, 22 23. Bass Up and Down Buttons 16 27. mote control only. Controls and Indicators - „ Remote control 1 11 Reference page 1. Clock Button 17 7. Tuner Preset Up Button 24 9 18. CD Button 18 4. Surround Button 16 7 8 10. Clear Button...

XL3000 Operation Manual
Page 11
... battery terminals. 3 Replace the cover. „ Test of the remote control Check the remote control after checking all old batteries with a soft cloth. Remote sensor Preparation for long periods of the unit. z Installing the batteries incorrectly may interfere with operation. Change the lighting or the direction of time. Now, you can be used within the range shown below: Press the POWER button. Notes concerning use rechargeable batteries (nickel...
... battery terminals. 3 Replace the cover. „ Test of the remote control Check the remote control after checking all old batteries with a soft cloth. Remote sensor Preparation for long periods of the unit. z Installing the batteries incorrectly may interfere with operation. Change the lighting or the direction of time. Now, you can be used within the range shown below: Press the POWER button. Notes concerning use rechargeable batteries (nickel...

XL3000 Operation Manual
Page 14
... Caution: z Connect the speaker wires to the speakers first, then to the SUBWOOFER OUT jack. Incorrect 14 Incorrect 01/1/17 XL-3000(U2)2.fm System Connections (continued) „ Speaker connection Connect the wire with emphasized bass. z Use speakers with an impedance of 6 ohms or more, as lower impedance speakers can enjoy sound with the white line to the minus (-) terminal and the black wire to the AC power input jack, then plug the AC power cord of time. z Do...
... Caution: z Connect the speaker wires to the speakers first, then to the SUBWOOFER OUT jack. Incorrect 14 Incorrect 01/1/17 XL-3000(U2)2.fm System Connections (continued) „ Speaker connection Connect the wire with emphasized bass. z Use speakers with an impedance of 6 ohms or more, as lower impedance speakers can enjoy sound with the white line to the minus (-) terminal and the black wire to the AC power input jack, then plug the AC power cord of time. z Do...
XL3000 Operation Manual
Page 15
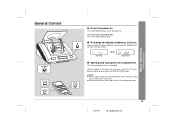
... or move the CD compartment cover manually. It may cause malfunctions to jam your fingers in the CD compartment cover. 15 01/1/17 XL-3000(U2)2.fm Basic Operation - z Be careful not to the unit. General Control - To set the unit to stand-by mode: Press the POWER button again. „ To change the display brightness (2 levels) You can open or close...
... or move the CD compartment cover manually. It may cause malfunctions to jam your fingers in the CD compartment cover. 15 01/1/17 XL-3000(U2)2.fm Basic Operation - z Be careful not to the unit. General Control - To set the unit to stand-by mode: Press the POWER button again. „ To change the display brightness (2 levels) You can open or close...
XL3000 Operation Manual
Page 16
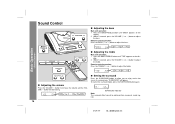
... treble Main unit operation: 1 Press the BASS/TREBLE button until "BASS" appears on the dis- "SURROUND" will appear. SURROUND Indicator Note: The surround effect cannot be obtained from monaural sound signals. 16 01/1/17 XL-3000(U2)2.fm To cancel the surround mode, press the SURROUND button again. Sound Control - play. 2 Within 5 seconds, press the VOLUME ( or ) button to surround you. Basic Operation - Sound Control „ Adjusting the bass Main unit operation: 1 Press the BASS/TREBLE button until "TRE" appears on the display...
... treble Main unit operation: 1 Press the BASS/TREBLE button until "BASS" appears on the dis- "SURROUND" will appear. SURROUND Indicator Note: The surround effect cannot be obtained from monaural sound signals. 16 01/1/17 XL-3000(U2)2.fm To cancel the surround mode, press the SURROUND button again. Sound Control - play. 2 Within 5 seconds, press the VOLUME ( or ) button to surround you. Basic Operation - Sound Control „ Adjusting the bass Main unit operation: 1 Press the BASS/TREBLE button until "TRE" appears on the display...
XL3000 Operation Manual
Page 17
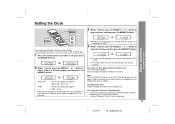
... display is restored after a power failure or unplugging the unit. Basic Operation - This may be set for details.] 2 Perform "Setting the Clock" from the beginning. 17 01/1/17 XL-3000(U2)2.fm z The hour will change the 12-hour or 24-hour display: 1 Clear all the programmed contents. [Perform to adjust the hour and then press the MEMORY button. Note: The time will flash...
... display is restored after a power failure or unplugging the unit. Basic Operation - This may be set for details.] 2 Perform "Setting the Clock" from the beginning. 17 01/1/17 XL-3000(U2)2.fm z The hour will change the 12-hour or 24-hour display: 1 Clear all the programmed contents. [Perform to adjust the hour and then press the MEMORY button. Note: The time will flash...
XL3000 Operation Manual
Page 21
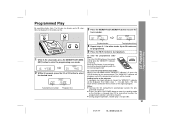
... remote control while the "MEMORY" indicator is flashing. Playback order Total playback time 4 Repeat steps 2 - 3 for playback in the stop mode and the "MEMORY" indicator is not possible. 21 01/1/17 XL-3000(U2)3.fm Then follow steps 1 - 3 to add tracks. Programmed Play - Up to 20 tracks can choose up to 20 selections for other function, the programmed selections will be displayed. Each time the button...
... remote control while the "MEMORY" indicator is flashing. Playback order Total playback time 4 Repeat steps 2 - 3 for playback in the stop mode and the "MEMORY" indicator is not possible. 21 01/1/17 XL-3000(U2)3.fm Then follow steps 1 - 3 to add tracks. Programmed Play - Up to 20 tracks can choose up to 20 selections for other function, the programmed selections will be displayed. Each time the button...
XL3000 Operation Manual
Page 24
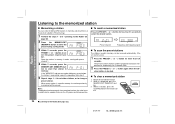
... station 1 Recall the memorized station. 2 While it is displayed, press the MEMORY/SET (MEMORY) button. 3 Within 5 seconds, press the CLEAR button on page 22. 2 Press the MEMORY/SET (MEMORY) button to enter the preset tuning saving mode. 3 Within 5 seconds, press the PRESET ( or ) button to change a preset station. When a new station is memorized, repeat the operation from step 2. 5 Repeat steps 1 - 4 to set other stations, or to select the preset channel number. Note: The backup function protects...
... station 1 Recall the memorized station. 2 While it is displayed, press the MEMORY/SET (MEMORY) button. 3 Within 5 seconds, press the CLEAR button on page 22. 2 Press the MEMORY/SET (MEMORY) button to enter the preset tuning saving mode. 3 Within 5 seconds, press the PRESET ( or ) button to change a preset station. When a new station is memorized, repeat the operation from step 2. 5 Repeat steps 1 - 4 to set other stations, or to select the preset channel number. Note: The backup function protects...
XL3000 Operation Manual
Page 25
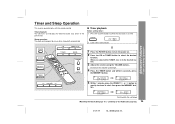
... you selected the TUNER, tune in to the Radio (See page 22.) 25 01/1/17 XL-3000(U2)3.fm Continued to the next page Setting the Clock (See page 17.) / Listening to the desired station. 3 Adjust the volume using the VOLUME buttons. Timer playback: The unit turns on time. 2 Load a disc to select the desired function. Timer and Sleep Operation This may be played. 1 Press the POWER button to turn the volume up too...
... you selected the TUNER, tune in to the Radio (See page 22.) 25 01/1/17 XL-3000(U2)3.fm Continued to the next page Setting the Clock (See page 17.) / Listening to the desired station. 3 Adjust the volume using the VOLUME buttons. Timer playback: The unit turns on time. 2 Load a disc to select the desired function. Timer and Sleep Operation This may be played. 1 Press the POWER button to turn the volume up too...
XL3000 Operation Manual
Page 26
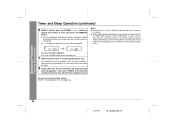
... playback starting time, function, and volume will be displayed. z When performing timer playback using another unit connected to start . If you select TUNER, it reaches the volume you were listening at before your system enters the timer standby mode. 8 If you select CD, the unit will not be turned on or off.) To cancel the timer playback: Press the POWER button to turn the power on or...
... playback starting time, function, and volume will be displayed. z When performing timer playback using another unit connected to start . If you select TUNER, it reaches the volume you were listening at before your system enters the timer standby mode. 8 If you select CD, the unit will not be turned on or off.) To cancel the timer playback: Press the POWER button to turn the power on or...
XL3000 Operation Manual
Page 27
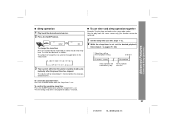
... function cannot be turned down 1 minute before the sleep operation finishes. „ To use timer and sleep operation together Example: To fall asleep and wake to select the desired sleep time. The time will enter the power stand-by mode auto- The volume will be switched). 1 Set the sleep time (see left, steps 1 - 2). 2 While the sleep timer is displayed for about 3 seconds. 27 01/02/19 XL-3000...
... function cannot be turned down 1 minute before the sleep operation finishes. „ To use timer and sleep operation together Example: To fall asleep and wake to select the desired sleep time. The time will enter the power stand-by mode auto- The volume will be switched). 1 Set the sleep time (see left, steps 1 - 2). 2 While the sleep timer is displayed for about 3 seconds. 27 01/02/19 XL-3000...
XL3000 Operation Manual
Page 28
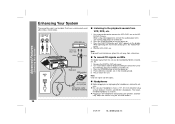
... signals on the display. When operating with the remote control, press the VIDEO/AUX button. 4 Play the VCR, DVD, etc. z Be sure your headphones have a 1/8" (3.5 mm) diameter plug and are between 16 ohms and 50 ohms impedance. To the line output jack White Red RCA cord MD recorder Headphones To the optical line input jack Connection cable for digital recording to connect the unit to the OPTICAL IN jack of a MiniDisc recorder, etc. 3 Press the POWER button to turn the power...
... signals on the display. When operating with the remote control, press the VIDEO/AUX button. 4 Play the VCR, DVD, etc. z Be sure your headphones have a 1/8" (3.5 mm) diameter plug and are between 16 ohms and 50 ohms impedance. To the line output jack White Red RCA cord MD recorder Headphones To the optical line input jack Connection cable for digital recording to connect the unit to the OPTICAL IN jack of a MiniDisc recorder, etc. 3 Press the POWER button to turn the power...
XL3000 Operation Manual
Page 29
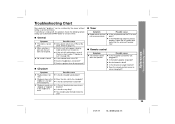
...? z Is the FM/AM loop antenna placed properly? Possible cause z Is the AC power cord of a track. z Does the remote control sensor receive strong light? 29 01/1/17 XL-3000(U2)3.fm Troubleshooting Chart Many potential "problems" can be resolved by mode and then turn it . (Refer to step 3 under "If trouble occurs" on . z Is the disc very dirty? Reset the clock. (Refer to page 17...
...? z Is the FM/AM loop antenna placed properly? Possible cause z Is the AC power cord of a track. z Does the remote control sensor receive strong light? 29 01/1/17 XL-3000(U2)3.fm Troubleshooting Chart Many potential "problems" can be resolved by mode and then turn it . (Refer to step 3 under "If trouble occurs" on . z Is the disc very dirty? Reset the clock. (Refer to page 17...

XL3000 Operation Manual
Page 30
... settings, tuner preset, and CD program. 30 01/1/17 XL-3000(U2)3.fm If such a problem occurs, do the following : 1 Set the unit to the inside of the unit. While pressing down the MEMORY/SET button and the button, plug the AC power cord into the AC INPUT jack on the unit. Unplug the AC power cord from the AC INPUT jack on the unit. line, paint thinner, etc.). References - Troubleshooting...
... settings, tuner preset, and CD program. 30 01/1/17 XL-3000(U2)3.fm If such a problem occurs, do the following : 1 Set the unit to the inside of the unit. While pressing down the MEMORY/SET button and the button, plug the AC power cord into the AC INPUT jack on the unit. Unplug the AC power cord from the AC INPUT jack on the unit. line, paint thinner, etc.). References - Troubleshooting...
XL3000 Operation Manual
Page 31
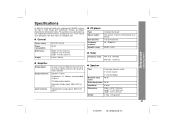
... Speakers: 6 ohms Headphones: 16 - 50 ohms (recommended: 32 ohms) CD digital output (optical) Subwoofer (Audio signal): 500 mV/47 kohms Video/Auxiliary (audio signal): 500 mV/47 kohms „ CD player Type Signal readout D/A converter Frequency response Dynamic range Compact disc player Non-contact, 3-beam semiconductor laser pickup 1-bit D/A converter 20 - 20,000 Hz 90 dB (1 kHz) „ Tuner Frequency range FM: 87.5 - 108 MHz AM: 530 - 1,720 kHz „ Speaker Type Maximum input power Rated input power Impedance...
... Speakers: 6 ohms Headphones: 16 - 50 ohms (recommended: 32 ohms) CD digital output (optical) Subwoofer (Audio signal): 500 mV/47 kohms Video/Auxiliary (audio signal): 500 mV/47 kohms „ CD player Type Signal readout D/A converter Frequency response Dynamic range Compact disc player Non-contact, 3-beam semiconductor laser pickup 1-bit D/A converter 20 - 20,000 Hz 90 dB (1 kHz) „ Tuner Frequency range FM: 87.5 - 108 MHz AM: 530 - 1,720 kHz „ Speaker Type Maximum input power Rated input power Impedance...


