Operation Manual
Page 7
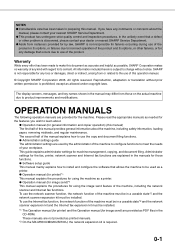
... information included herein is subject to change without prior written permission is prohibited, except as printed manuals. *2 On the MX-M550U/M620U/M700U, the network expansion kit is not responsible for any loss or damages, direct or indirect, arising from...related to the use of the product or its options, or failures due to be installed. SHARP is required. 0-1 This guide explains administrator settings for failures occurring during use of your nearest SHARP Service Department. ● This product has undergone strict quality control and inspection procedures. OPERATION ...
... information included herein is subject to change without prior written permission is prohibited, except as printed manuals. *2 On the MX-M550U/M620U/M700U, the network expansion kit is not responsible for any loss or damages, direct or indirect, arising from...related to the use of the product or its options, or failures due to be installed. SHARP is required. 0-1 This guide explains administrator settings for failures occurring during use of your nearest SHARP Service Department. ● This product has undergone strict quality control and inspection procedures. OPERATION ...
Operation Manual
Page 26
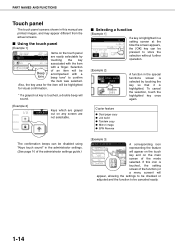
... time the screen appears, the [OK] key can be disabled using "Keys touch sound" in the administrator settings. (See page 10 of the administrator settings guide.) [Example 3] READY TO SCAN FOR COPY. Selection of an item will be accompanied with a finger. To cancel the selection, touch the highlighted key once again...
... time the screen appears, the [OK] key can be disabled using "Keys touch sound" in the administrator settings. (See page 10 of the administrator settings guide.) [Example 3] READY TO SCAN FOR COPY. Selection of an item will be accompanied with a finger. To cancel the selection, touch the highlighted key once again...
Operation Manual
Page 30
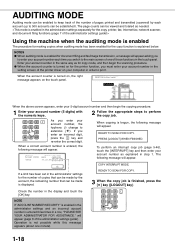
... the display and touch the [OK] key. READY TO SCAN FOR COPY. 3 When the copy job is enabled for the number of the administrator settings guide). NOTES ● When auditing mode is finished, press the [ ] key ([LOGOUT] key) Check the number in the administrator settings for document filing and fax/image...
... the display and touch the [OK] key. READY TO SCAN FOR COPY. 3 When the copy job is enabled for the number of the administrator settings guide). NOTES ● When auditing mode is finished, press the [ ] key ([LOGOUT] key) Check the number in the administrator settings for document filing and fax/image...
Operation Manual
Page 32
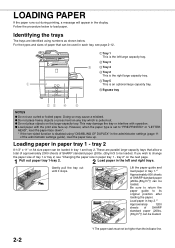
... not use curled or folded paper. Gently pull the tray out until it stops. Load paper in paper tray 1 - For the types and sizes of SHARP standard paper (20lbs. (80g/m2)) can be higher than the indicator line. tray 2" on the next page. 1 Pull out paper tray 1-tray 2....These are identified using "DISABLING OF DUPLEX" in tray 1 and tray 2. Indicator line Indicator line Lift the paper guide and load paper in paper tray 1 - Loading paper in tray 1.*1 Approximately 800 sheets of SHARP standard paper (20lbs.(80g/m2)) can be loaded in the administrator settings (page 11 of...
... not use curled or folded paper. Gently pull the tray out until it stops. Load paper in paper tray 1 - For the types and sizes of SHARP standard paper (20lbs. (80g/m2)) can be higher than the indicator line. tray 2" on the next page. 1 Pull out paper tray 1-tray 2....These are identified using "DISABLING OF DUPLEX" in tray 1 and tray 2. Indicator line Indicator line Lift the paper guide and load paper in paper tray 1 - Loading paper in tray 1.*1 Approximately 800 sheets of SHARP standard paper (20lbs.(80g/m2)) can be loaded in the administrator settings (page 11 of...
Operation Manual
Page 33
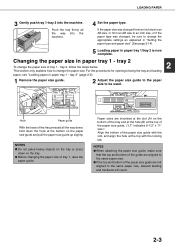
...opening/closing the tray and loading paper, see "Loading paper in paper tray 1 - Tray 1 Tray 2 (A) (B) LT A4 A4 LT Hook Paper guide With the base of the guide are aligned to change the appropriate settings as explained in "Setting the paper type and paper size" (See page 2-14). 5 Loading paper in... paper tray 1/tray 2 is now complete. NOTES ● When attaching the paper size guide, make sure that the top and bottom of the tray pressed all the way into the machine. tray 2 To change the paper size. tray 2" (page...
...opening/closing the tray and loading paper, see "Loading paper in paper tray 1 - Tray 1 Tray 2 (A) (B) LT A4 A4 LT Hook Paper guide With the base of the guide are aligned to change the appropriate settings as explained in "Setting the paper type and paper size" (See page 2-14). 5 Loading paper in... paper tray 1/tray 2 is now complete. NOTES ● When attaching the paper size guide, make sure that the top and bottom of the tray pressed all the way into the machine. tray 2 To change the paper size. tray 2" (page...
Operation Manual
Page 34
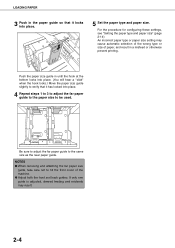
...see "Setting the paper type and paper size" (page 2-14). Be sure to adjust the far paper guide to hit the front cover of paper, and result in until the hook at the bottom locks into place.... (You will hear a "click" when the hook locks.) Move the paper size guide slightly to verify that it has locked into place. 5 Set the paper type and paper size. An... incorrect paper type or paper size setting may result. 2-4 If only one guide is adjusted, skewed feeding and misfeeds may cause automatic selection of the wrong type or size of the ...
...see "Setting the paper type and paper size" (page 2-14). Be sure to adjust the far paper guide to hit the front cover of paper, and result in until the hook at the bottom locks into place.... (You will hear a "click" when the hook locks.) Move the paper size guide slightly to verify that it has locked into place. 5 Set the paper type and paper size. An... incorrect paper type or paper size setting may result. 2-4 If only one guide is adjusted, skewed feeding and misfeeds may cause automatic selection of the wrong type or size of the ...
Operation Manual
Page 35
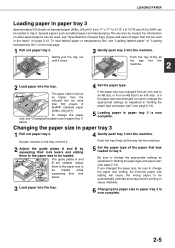
... must not be higher than the indicator line (no more than 500 sheets of SHARP standard paper (20lbs. (80g/m2)). Be sure to change the appropriate settings as... automatically selected and may prevent printing or cause misfeeds. 3 Load paper into the machine. 2 Adjust the guide plates A and B by squeezing their lock levers. 5 Set the paper type of the paper that can... paper size" (see "Changing the paper size in paper tray 3" below. 4 Set the paper type. The guide plates A and B are slidable. LOADING PAPER Loading paper in paper tray 3 Approximately 500 sheets of standard paper ...
... must not be higher than the indicator line (no more than 500 sheets of SHARP standard paper (20lbs. (80g/m2)). Be sure to change the appropriate settings as... automatically selected and may prevent printing or cause misfeeds. 3 Load paper into the machine. 2 Adjust the guide plates A and B by squeezing their lock levers. 5 Set the paper type of the paper that can... paper size" (see "Changing the paper size in paper tray 3" below. 4 Set the paper type. The guide plates A and B are slidable. LOADING PAPER Loading paper in paper tray 3 Approximately 500 sheets of standard paper ...
Operation Manual
Page 36
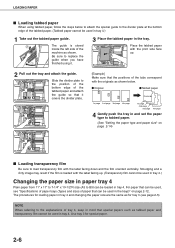
... the machine as tabbed paper and transparency film cannot be used in tray 4.) 1 Take out the tabbed paper guide. The guide is loaded with the originals as shown below to attach the special guide to the divider plate at the bottom edge of tray 3, keep in mind that can be loaded in the... size" on page 2-12. For paper that the positions of the tabs correspond with the label facing up . 2 Pull out the tray and attach the guide. Smudging and a dirty image may result if the film is stored inside the left side of paper that special papers such as shown. Use tray...
... the machine as tabbed paper and transparency film cannot be used in tray 4.) 1 Take out the tabbed paper guide. The guide is loaded with the originals as shown below to attach the special guide to the divider plate at the bottom edge of tray 3, keep in mind that can be loaded in the... size" on page 2-12. For paper that the positions of the tabs correspond with the label facing up . 2 Pull out the tray and attach the guide. Smudging and a dirty image may result if the film is stored inside the left side of paper that special papers such as shown. Use tray...

Operation Manual
Page 38
... tray. ● Do not place any objects on page 2-13. When using "DISABLING OF DUPLEX" in the administrator settings (page 11 of the administrator settings guide), load the paper face up to 3000 sheets of 20 lbs. (80 g/m2) paper. (See the following "Specifications" for the types of a chair or step...
... tray. ● Do not place any objects on page 2-13. When using "DISABLING OF DUPLEX" in the administrator settings (page 11 of the administrator settings guide), load the paper face up to 3000 sheets of 20 lbs. (80 g/m2) paper. (See the following "Specifications" for the types of a chair or step...
Operation Manual
Page 40
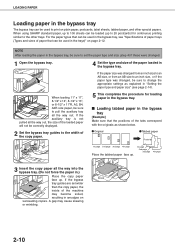
...page 2nd page 3rd page 4th page 3 Insert the copy paper all the way out. If the bypass tray guides are set the paper type and size (step 4) if these were changed , be used in the trays)"... 14", 8-1/2" x 13", or 8-1/2" x 11"R, A3, B4, A4R size paper, be correctly displayed. 2 Set the bypass tray guides to the width of the copy paper. 4 Set the type and size of the loaded paper will not be sure to pull the ...the procedure for continuous printing similar to print on succeeding copies. When using SHARP standard paper, up to 100 sheets can be used to the other special papers.
...page 2nd page 3rd page 4th page 3 Insert the copy paper all the way out. If the bypass tray guides are set the paper type and size (step 4) if these were changed , be used in the trays)"... 14", 8-1/2" x 13", or 8-1/2" x 11"R, A3, B4, A4R size paper, be correctly displayed. 2 Set the bypass tray guides to the width of the copy paper. 4 Set the type and size of the loaded paper will not be sure to pull the ...the procedure for continuous printing similar to print on succeeding copies. When using SHARP standard paper, up to 100 sheets can be used to the other special papers.
Operation Manual
Page 46
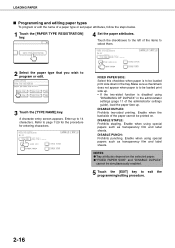
... SIDE: Select this checkbox when paper is disabled using "DISABLING OF DUPLEX" in the tray. Touch the checkboxes to the left of the administrator settings guide), load the paper face up to be loaded print side down in the administrator settings (page 11 of the items to program or edit. DISABLE...
... SIDE: Select this checkbox when paper is disabled using "DISABLING OF DUPLEX" in the tray. Touch the checkboxes to the left of the administrator settings guide), load the paper face up to be loaded print side down in the administrator settings (page 11 of the items to program or edit. DISABLE...
Operation Manual
Page 48
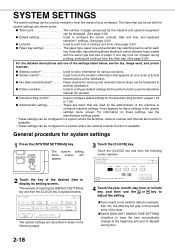
... the printer function (see the fax, image send, and printer manuals. ● Address control*1 Used to store information for these settings, see the administrator settings guide. *1 These settings can be configured in a system where the facsimile, network scanner and Internet fax function is explained below , see the Operation manual (for printer...
... the printer function (see the fax, image send, and printer manuals. ● Address control*1 Used to store information for these settings, see the administrator settings guide. *1 These settings can be configured in a system where the facsimile, network scanner and Internet fax function is explained below , see the Operation manual (for printer...
Operation Manual
Page 56
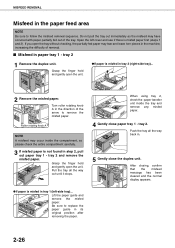
tray 2. MISFEED REMOVAL Misfeed in the paper feed area NOTE Be sure to replace the paper guide in its original position after removing the paper. 2-26 Do not pull the tray out immediately as the misfeed may tear and leave torn pieces ... the misfeed message has been cleared and the normal display appears. ●If paper is misfed in the direction of the tray. Lift the paper guide and remove the misfed paper. tray 2 1 Remove the duplex unit. Push the tray all the way out until it stops. Open the left -side tray...
tray 2. MISFEED REMOVAL Misfeed in the paper feed area NOTE Be sure to replace the paper guide in its original position after removing the paper. 2-26 Do not pull the tray out immediately as the misfeed may tear and leave torn pieces ... the misfeed message has been cleared and the normal display appears. ●If paper is misfed in the direction of the tray. Lift the paper guide and remove the misfed paper. tray 2 1 Remove the duplex unit. Push the tray all the way out until it stops. Open the left -side tray...
Operation Manual
Page 61
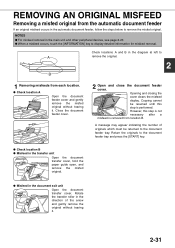
... document feeder tray and press the [START] key. ● Check location B ● Misfeed in the transfer unit Open the document transfer cover, hold the paper guide open, and remove the misfed original. ● Misfeed in the diagram at left to remove the original. 2 1 Removing misfeeds from each location. ● Check location...
... document feeder tray and press the [START] key. ● Check location B ● Misfeed in the transfer unit Open the document transfer cover, hold the paper guide open, and remove the misfed original. ● Misfeed in the diagram at left to remove the original. 2 1 Removing misfeeds from each location. ● Check location...
Operation Manual
Page 62
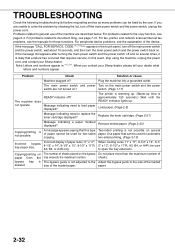
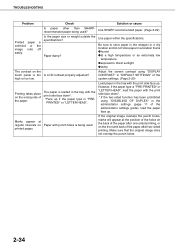
...toner cartridge. (Page 2-21) Message indicating a paper misfeed displayed? is not adjusted to replace the toner cartridge displayed? Adjust the bypass guide to the copy function, see page 7-31. For problems related to the size of the device. The main power switch and power Turn...of paper sizes 11" x 17", 8-1/2" x 14", 8-1/2" x 13", 8-1/2" x 11"R, A3, B4, or A4R only. If you contact your Sharp dealer, please tell your Sharp dealer. For problems related to general use of the loaded paper. Problems related to document filing, see page 6-3. Message indicating need to the...
...toner cartridge. (Page 2-21) Message indicating a paper misfeed displayed? is not adjusted to replace the toner cartridge displayed? Adjust the bypass guide to the copy function, see page 7-31. For problems related to the size of the device. The main power switch and power Turn...of paper sizes 11" x 17", 8-1/2" x 14", 8-1/2" x 13", 8-1/2" x 11"R, A3, B4, or A4R only. If you contact your Sharp dealer, please tell your Sharp dealer. For problems related to general use of the loaded paper. Problems related to document filing, see page 6-3. Message indicating need to the...
Operation Manual
Page 63
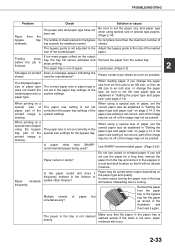
...The displayed paper size or paper type does not match the loaded paper size or paper type. The paper size is not stacked evenly. Use SHARP-recommended paper. (Page 2-22) Paper curled or damp? The paper size setting is stops printing. If the paper size setting is not adjusted ...to the Adjust the bypass guide to curling. Do not use the paper for maintenance? Paper misfeeds frequently. before the job is not set the new paper type as explained ...
...The displayed paper size or paper type does not match the loaded paper size or paper type. The paper size is not stacked evenly. Use SHARP-recommended paper. (Page 2-22) Paper curled or damp? The paper size setting is stops printing. If the paper size setting is not adjusted ...to the Adjust the bypass guide to curling. Do not use the paper for maintenance? Paper misfeeds frequently. before the job is not set the new paper type as explained ...
Operation Manual
Page 64
... "PRE- PRINTED" or "LETTER HEAD". printed pages. TROUBLESHOOTING Problem Check Solution or cause Is paper other than SHARPrecommended paper being used ? Use SHARP-recommended paper. (Page 2-22) Printed paper is being used . Is the paper size or weight outside the specifications? Paper damp? The contrast ...store paper in the wrapper in a dry location and do not store paper in the administrator settings (page 11 of the administrator settings guide), load the paper face up. Adjust the screen contrast using "DISABLING OF DUPLEX" in a location that the original image does not ...
... "PRE- PRINTED" or "LETTER HEAD". printed pages. TROUBLESHOOTING Problem Check Solution or cause Is paper other than SHARPrecommended paper being used ? Use SHARP-recommended paper. (Page 2-22) Printed paper is being used . Is the paper size or weight outside the specifications? Paper damp? The contrast ...store paper in the wrapper in a dry location and do not store paper in the administrator settings (page 11 of the administrator settings guide), load the paper face up. Adjust the screen contrast using "DISABLING OF DUPLEX" in a location that the original image does not ...

Operation Manual
Page 70
... when the staple sort function is turned on the main screen of copy mode to display the screen that allows selection of the administrator settings guide).) 9 [PUNCH] key (See page 3-5.) This is used to staple pages at the center and fold them in half to create a pamphlet. FINISHER AND SADDLE STITCH...
... when the staple sort function is turned on the main screen of copy mode to display the screen that allows selection of the administrator settings guide).) 9 [PUNCH] key (See page 3-5.) This is used to staple pages at the center and fold them in half to create a pamphlet. FINISHER AND SADDLE STITCH...

Operation Manual
Page 78
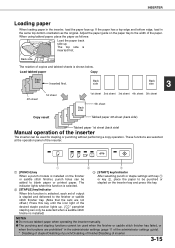
...papers that cannot be performed directly from the inserter operation panel without using the machine operation panel. 5 Paper guide lever Release the paper guide lock to remove misfed paper. 6 Front cover Open this guide to the width of the inserter" (page 3-15)). Part names 1 Paper tray Place blank or printed ...paper here to be inserted. 2 Paper guide When loading paper, adjust this cover to remove misfed paper from the finisher or saddle stitch finisher. INSERTER The inserter enables blank sheets or...
...papers that cannot be performed directly from the inserter operation panel without using the machine operation panel. 5 Paper guide lever Release the paper guide lock to remove misfed paper. 6 Front cover Open this guide to the width of the inserter" (page 3-15)). Part names 1 Paper tray Place blank or printed ...paper here to be inserted. 2 Paper guide When loading paper, adjust this cover to remove misfed paper from the finisher or saddle stitch finisher. INSERTER The inserter enables blank sheets or...
Operation Manual
Page 79
If the paper has a top edge and bottom edge, load in the administrator settings (page 11 of the administrator settings guide). * Disabling of stapler/Disabling of punch/Disabling of finisher/Disabling of inserter 3-15 NOTES ● Do not use tabbed paper when operating the inserter manually. ... functions are not offset.) Press this key. The top side is installed on the paper tray to blank paper or printed paper. Adjust the paper guide on the finisher or saddle stitch finisher, punch holes can be added to the width of the inserter The inserter can be used when the...
If the paper has a top edge and bottom edge, load in the administrator settings (page 11 of the administrator settings guide). * Disabling of stapler/Disabling of punch/Disabling of finisher/Disabling of inserter 3-15 NOTES ● Do not use tabbed paper when operating the inserter manually. ... functions are not offset.) Press this key. The top side is installed on the paper tray to blank paper or printed paper. Adjust the paper guide on the finisher or saddle stitch finisher, punch holes can be added to the width of the inserter The inserter can be used when the...


