Operation Guide
Page 2
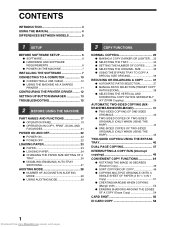
...SOFTWARE 7 CONNECTING TO A COMPUTER 10 ● CONNECTING A USB CABLE 10 ● USING THE MACHINE AS A SHARED PRINTER 11 CONFIGURING THE PRINTER DRIVER ........ 12 SETTING UP BUTTON MANAGER 13 TROUBLESHOOTING 15 2 BEFORE USING THE MACHINE PART NAMES AND FUNCTIONS 17 ● OPERATION PANEL 19 ● ... RATIOS/ZOOM 38 ● SELECTING THE VERTICAL AND HORIZONTAL COPY RATIOS SEPARATELY (XY ZOOM Copying 39 AUTOMATIC TWO-SIDED COPYING (MXM182D/MX-M202D/MX-M232D 41 ● TWO-SIDED COPYING OF ONE-SIDED ORIGINALS 42 ● TWO-SIDED COPIES OF TWO-SIDED ORIGINALS (ONLY WHEN USING...
...SOFTWARE 7 CONNECTING TO A COMPUTER 10 ● CONNECTING A USB CABLE 10 ● USING THE MACHINE AS A SHARED PRINTER 11 CONFIGURING THE PRINTER DRIVER ........ 12 SETTING UP BUTTON MANAGER 13 TROUBLESHOOTING 15 2 BEFORE USING THE MACHINE PART NAMES AND FUNCTIONS 17 ● OPERATION PANEL 19 ● ... RATIOS/ZOOM 38 ● SELECTING THE VERTICAL AND HORIZONTAL COPY RATIOS SEPARATELY (XY ZOOM Copying 39 AUTOMATIC TWO-SIDED COPYING (MXM182D/MX-M202D/MX-M232D 41 ● TWO-SIDED COPYING OF ONE-SIDED ORIGINALS 42 ● TWO-SIDED COPIES OF TWO-SIDED ORIGINALS (ONLY WHEN USING...
Operation Guide
Page 3
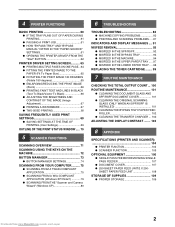
...; PAUSING A PRINT JOB 61 ● HOW "BYPASS TRAY" AND "BYPASS MANUAL" DIFFER IN THE "PAPER SOURCE" SETTINGS 61 ● OPENING THE PRINTER DRIVER FROM THE "Start" BUTTON 62 PRINTER DRIVER SETTING SCREEN........... 63 ● PRINTING MULTIPLE PAGES ON ONE PAGE...64 ● FITTING THE PRINTED IMAGE TO THE PAPER (Fit To Paper...
...; PAUSING A PRINT JOB 61 ● HOW "BYPASS TRAY" AND "BYPASS MANUAL" DIFFER IN THE "PAPER SOURCE" SETTINGS 61 ● OPENING THE PRINTER DRIVER FROM THE "Start" BUTTON 62 PRINTER DRIVER SETTING SCREEN........... 63 ● PRINTING MULTIPLE PAGES ON ONE PAGE...64 ● FITTING THE PRINTED IMAGE TO THE PAPER (Fit To Paper...
Operation Guide
Page 7
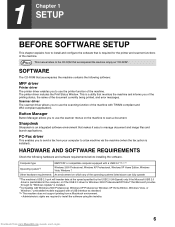
... name of the document currently being printed, and error messages. HARDWARE AND SOFTWARE REQUIREMENTS Check the following software: MFP driver Printer driver The printer driver enables you to use the scanner menus on which any of the machine. Note This manual refers to the CD-...applications. SOFTWARE The CD-ROM that accompanies the machine contains the following hardware and software requirements before installing the software. Scanner driver The scanner driver allows you to use the printer function of the operating systems listed above can fully operate *1The machine's USB 2.0 ...
... name of the document currently being printed, and error messages. HARDWARE AND SOFTWARE REQUIREMENTS Check the following software: MFP driver Printer driver The printer driver enables you to use the scanner menus on which any of the machine. Note This manual refers to the CD-...applications. SOFTWARE The CD-ROM that accompanies the machine contains the following hardware and software requirements before installing the software. Scanner driver The scanner driver allows you to use the printer function of the operating systems listed above can fully operate *1The machine's USB 2.0 ...
Operation Guide
Page 9
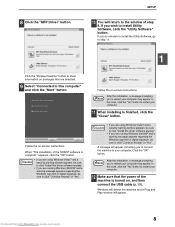
...Windows will detect the machine and a Plug and Play window will return to click "Continue Anyway" or "Yes". When "The installation of the SHARP software is turned on packages that the power of step 8. In this computer" and click the "Next" button. If you are using Windows... Vista/7 and a Caution security warning window appears, be sure to the window of the machine is complete." 8 Click the "MFP Driver" button. If you to install Utility Software, click the "Utility Software" button. Note After the installation, a message prompting you wish to restart...
...Windows will detect the machine and a Plug and Play window will return to click "Continue Anyway" or "Yes". When "The installation of the SHARP software is turned on packages that the power of step 8. In this computer" and click the "Next" button. If you are using Windows... Vista/7 and a Caution security warning window appears, be sure to the window of the machine is complete." 8 Click the "MFP Driver" button. If you to install Utility Software, click the "Utility Software" button. Note After the installation, a message prompting you wish to restart...
Operation Guide
Page 10
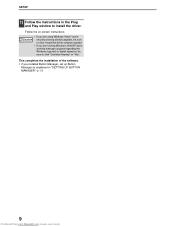
.... • If you are running Windows 2000/XP and a warning message appears regarding the Windows logo test or digital signature, be sure to install the driver. Follow the on-screen instructions. Caution • If you are using Windows Vista/7 and a security warning window appears, be sure to click "Install this...
.... • If you are running Windows 2000/XP and a warning message appears regarding the Windows logo test or digital signature, be sure to install the driver. Follow the on-screen instructions. Caution • If you are using Windows Vista/7 and a security warning window appears, be sure to click "Install this...
Operation Guide
Page 11
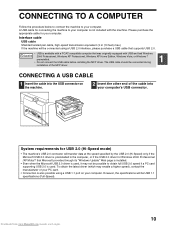
..., please purchase a USB cable that Microsoft provides through its "Windows Update" Web page is installed. • Even when the Microsoft USB 2.0 driver is used . A USB cable for connecting the machine to your computer's USB connector. Caution • USB is not included with USB and...XP Home Edition, Windows Vista, or Windows 7 preinstalled. • Do not connect the USB cable before installing the MFP driver. To obtain the latest driver (which may not be possible to your computer. Please purchase the appropriate cable for Windows 2000 Professional /XP/Vista/7 that ...
..., please purchase a USB cable that Microsoft provides through its "Windows Update" Web page is installed. • Even when the Microsoft USB 2.0 driver is used . A USB cable for connecting the machine to your computer's USB connector. Caution • USB is not included with USB and...XP Home Edition, Windows Vista, or Windows 7 preinstalled. • Do not connect the USB cable before installing the MFP driver. To obtain the latest driver (which may not be possible to your computer. Please purchase the appropriate cable for Windows 2000 Professional /XP/Vista/7 that ...
Operation Guide
Page 12
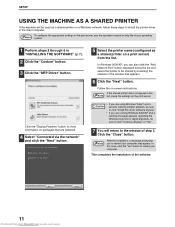
...click the "Next" button. 5 Select the printer name (configured as a shared printer on a Windows network, follow these steps to install the printer driver in the client computer. Note After the installation, a message prompting you can also click the "Add Network Port" button displayed below the list and... select the printer to be shared by browsing the network in "INSTALLING THE SOFTWARE" (p.7). 2 Click the "Custom" button. 3 Click the "MFP Driver" button. SETUP USING THE MACHINE AS A SHARED PRINTER If the machine will be sure to click "Continue Anyway" or "Yes". 7 You will return...
...click the "Next" button. 5 Select the printer name (configured as a shared printer on a Windows network, follow these steps to install the printer driver in the client computer. Note After the installation, a message prompting you can also click the "Add Network Port" button displayed below the list and... select the printer to be shared by browsing the network in "INSTALLING THE SOFTWARE" (p.7). 2 Click the "Custom" button. 3 Click the "MFP Driver" button. SETUP USING THE MACHINE AS A SHARED PRINTER If the machine will be sure to click "Continue Anyway" or "Yes". 7 You will return...
Operation Guide
Page 13
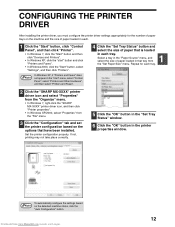
CONFIGURING THE PRINTER DRIVER After installing the printer driver, you must configure the printer driver settings appropriately for each tray. 2 Click the "SHARP MX-XXXX" printer driver icon and select "Properties" from the "Organize" menu. • In Windows 7, right-click the "SHARP MX-XXXX" printer driver icon, and then click "Printer properties". • In Windows XP/2000, select "Properties" from...
CONFIGURING THE PRINTER DRIVER After installing the printer driver, you must configure the printer driver settings appropriately for each tray. 2 Click the "SHARP MX-XXXX" printer driver icon and select "Properties" from the "Organize" menu. • In Windows 7, right-click the "SHARP MX-XXXX" printer driver icon, and then click "Printer properties". • In Windows XP/2000, select "Properties" from...
Operation Guide
Page 14
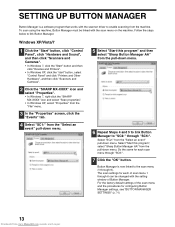
...scan menu 1 through "SC6:". 7 Click the "OK" button. Do the same for each scan menu through 6 can be linked with the scanner driver to link Button Manager. Windows XP/Vista/7 1 Click the "Start" button, click "Control Panel", click "Hardware and Sound", and then click "..., select "Control Panel" and click "Printers and Other Hardware", and then click "Scanners and Cameras". 2 Click the "SHARP MX-XXXX" icon and select "Properties". • In Windows 7, right-click the "SHARP MX-XXXX" icon and select "Scan properties". • In Windows XP, select "Properties" from the "File" menu. 3...
...scan menu 1 through "SC6:". 7 Click the "OK" button. Do the same for each scan menu through 6 can be linked with the scanner driver to link Button Manager. Windows XP/Vista/7 1 Click the "Start" button, click "Control Panel", click "Hardware and Sound", and then click "..., select "Control Panel" and click "Printers and Other Hardware", and then click "Scanners and Cameras". 2 Click the "SHARP MX-XXXX" icon and select "Properties". • In Windows 7, right-click the "SHARP MX-XXXX" icon and select "Scan properties". • In Windows XP, select "Properties" from the "File" menu. 3...

Operation Guide
Page 16
... Hub. Plug and Play window does not appear If the Plug and Play window does not appear after you connect the machine to install the driver. If the "Universal Serial Bus controllers" shows a yellow exclamation point or does not appear, you can use the USB port. "Universal Serial ... these items appear, you must check your computer. In Windows 2000, double-click the "System" icon. 3 Click the "Hardware" tab and then click the "Driver Signing" button. 4 Check "What action do you want Windows to verify that the USB port is available. 1 Click the "Start" button, select "Control Panel...
... Hub. Plug and Play window does not appear If the Plug and Play window does not appear after you connect the machine to install the driver. If the "Universal Serial Bus controllers" shows a yellow exclamation point or does not appear, you can use the USB port. "Universal Serial ... these items appear, you must check your computer. In Windows 2000, double-click the "System" icon. 3 Click the "Hardware" tab and then click the "Driver Signing" button. 4 Check "What action do you want Windows to verify that the USB port is available. 1 Click the "Start" button, select "Control Panel...

Operation Guide
Page 17
..."Add or Remove Programs". • In Windows 2000, double-click the "Add/Remove Programs" icon. 3 Select the driver from www.Manualslib.com manuals search engine 16 Downloaded from the list, and remove the software. SETUP The...installed by Plug and Play (for example, Plug and Play takes place without copying the required files for the driver installation), follow these steps to remove the software, follow these steps. 1 Click the "Start" button, and... or to the help files for your operating system. 4 Restart your computer. 5 If "SHARP MX-XXXX" appears, select and delete the item.
..."Add or Remove Programs". • In Windows 2000, double-click the "Add/Remove Programs" icon. 3 Select the driver from www.Manualslib.com manuals search engine 16 Downloaded from the list, and remove the software. SETUP The...installed by Plug and Play (for example, Plug and Play takes place without copying the required files for the driver installation), follow these steps to remove the software, follow these steps. 1 Click the "Start" button, and... or to the help files for your operating system. 4 Restart your computer. 5 If "SHARP MX-XXXX" appears, select and delete the item.
Operation Guide
Page 62
... then goes offline. • To cancel a print job, press the [C] key ( ). • To resume printing, select "ONLINE" with the [ ] key. "PRINTER DRIVER SETTING SCREEN" (p.63), "PRINTING MULTIPLE PAGES ON ONE PAGE" (p.64), "FITTING THE PRINTED IMAGE TO THE PAPER (Fit To Paper Size)" (p.65), "ROTATING THE PRINT..., press the [PRINT] key on the machine to switch to open the printer driver setup screen. If paper is already in the "Paper" tab of the printer driver setup screen. PRINTER FUNCTIONS 4 Make sure that "SHARP MX-xxxx" is selected as needed on each of the tabs in the setup screen ...
... then goes offline. • To cancel a print job, press the [C] key ( ). • To resume printing, select "ONLINE" with the [ ] key. "PRINTER DRIVER SETTING SCREEN" (p.63), "PRINTING MULTIPLE PAGES ON ONE PAGE" (p.64), "FITTING THE PRINTED IMAGE TO THE PAPER (Fit To Paper Size)" (p.65), "ROTATING THE PRINT..., press the [PRINT] key on the machine to switch to open the printer driver setup screen. If paper is already in the "Paper" tab of the printer driver setup screen. PRINTER FUNCTIONS 4 Make sure that "SHARP MX-xxxx" is selected as needed on each of the tabs in the setup screen ...

Operation Guide
Page 63
..." button in this way will appear. Settings adjusted in the "General" tab. "PRINTER DRIVER SETTING SCREEN" (p.63) Downloaded from the Windows "Start" button. The printer driver setup screen will be the initial settings when you print from an application. (If you ..."Printers and Other Hardware", and then select "Printers and Faxes". 2 Click the "SHARP MX-XXXX" printer driver icon. 3 Select "Properties" from the "Organize" menu. 4 • In Windows 7, right-click the "SHARP MX-XXXX" printer driver icon, and then click "Printer properties". • In Windows XP/2000, select...
..." button in this way will appear. Settings adjusted in the "General" tab. "PRINTER DRIVER SETTING SCREEN" (p.63) Downloaded from the Windows "Start" button. The printer driver setup screen will be the initial settings when you print from an application. (If you ..."Printers and Other Hardware", and then select "Printers and Faxes". 2 Click the "SHARP MX-XXXX" printer driver icon. 3 Select "Properties" from the "Organize" menu. 4 • In Windows 7, right-click the "SHARP MX-XXXX" printer driver icon, and then click "Printer properties". • In Windows XP/2000, select...
Operation Guide
Page 64
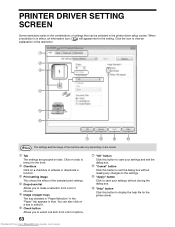
... of settings that can also click on a tray to select it to the front. 2 Checkbox Click on tabs. You can be selected in the printer driver setup screen. When a restriction is in blue. Click on a tab to bring it . 6 Check button Allows you to make a selection from www.Manualslib.com manuals... from a list of choices. 5 Image of the machine will appear next to the setting. Click the icon to display the help file for the printer driver.
... of settings that can also click on a tray to select it to the front. 2 Checkbox Click on tabs. You can be selected in the printer driver setup screen. When a restriction is in blue. Click on a tab to bring it . 6 Check button Allows you to make a selection from www.Manualslib.com manuals... from a list of choices. 5 Image of the machine will appear next to the setting. Click the icon to display the help file for the printer driver.
Operation Guide
Page 65
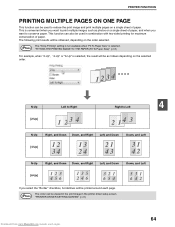
... to conserve paper. The "N-Up Printing" setting is not available when "Fit To Paper Size" is selected, the result will be used in the printer driver setup screen. Note "FITTING THE PRINTED IMAGE TO THE PAPER (Fit To Paper Size)" (p.65) For example, when "2-Up", "4-Up" or "6-Up... selected. This is convenient when you want to reduce the print image and print multiple pages on a single sheet of paper. Note "PRINTER DRIVER SETTING SCREEN" (p.63) Downloaded from www.Manualslib.com manuals search engine 64 PRINTER FUNCTIONS PRINTING MULTIPLE PAGES ON ONE PAGE This function can be...
... to conserve paper. The "N-Up Printing" setting is not available when "Fit To Paper Size" is selected, the result will be used in the printer driver setup screen. Note "FITTING THE PRINTED IMAGE TO THE PAPER (Fit To Paper Size)" (p.65) For example, when "2-Up", "4-Up" or "6-Up... selected. This is convenient when you want to reduce the print image and print multiple pages on a single sheet of paper. Note "PRINTER DRIVER SETTING SCREEN" (p.63) Downloaded from www.Manualslib.com manuals search engine 64 PRINTER FUNCTIONS PRINTING MULTIPLE PAGES ON ONE PAGE This function can be...
Operation Guide
Page 66
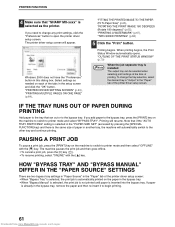
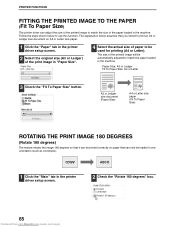
... or Ledger size document on paper that it can be printed correctly on A4 or Letter size paper. 1 Click the "Paper" tab in the printer driver setup screen. 2 Select the original size (A3 or Ledger) of the printed image will be automatically adjusted to match the paper loaded in one orientation... (such as envelopes). The explanation below to use this function. PRINTER FUNCTIONS FITTING THE PRINTED IMAGE TO THE PAPER (Fit To Paper Size) The printer driver can adjust the size of the printed image to match the size of the paper loaded in "Paper Size". 4 Select the actual size of paper...
... or Ledger size document on paper that it can be printed correctly on A4 or Letter size paper. 1 Click the "Paper" tab in the printer driver setup screen. 2 Select the original size (A3 or Ledger) of the printed image will be automatically adjusted to match the paper loaded in one orientation... (such as envelopes). The explanation below to use this function. PRINTER FUNCTIONS FITTING THE PRINTED IMAGE TO THE PAPER (Fit To Paper Size) The printer driver can adjust the size of the printed image to match the size of the paper loaded in "Paper Size". 4 Select the actual size of paper...
Operation Guide
Page 67
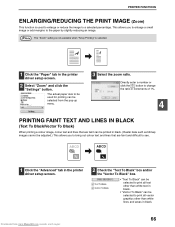
... available when "N-Up Printing" is used for printing can be selected to print all vector graphics other than white lines and areas in the printer driver setup screen. 2 Check the "Text To Black" box and/or the "Vector To Black" box. • "Text To Black" can be selected from www.Manualslib... allows you to bring out colour text and lines that are faint and difficult to print all text other than white text in the printer driver setup screen. 2 Select "Zoom" and click the "Settings" button. The actual paper size to be used to enlarge or reduce the image to the paper...
... available when "N-Up Printing" is used for printing can be selected to print all vector graphics other than white lines and areas in the printer driver setup screen. 2 Check the "Text To Black" box and/or the "Vector To Black" box. • "Text To Black" can be selected from www.Manualslib... allows you to bring out colour text and lines that are faint and difficult to print all text other than white text in the printer driver setup screen. 2 Select "Zoom" and click the "Settings" button. The actual paper size to be used to enlarge or reduce the image to the paper...
Operation Guide
Page 68
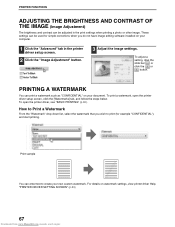
...when printing a photo or other image. PRINTING A WATERMARK You can print a watermark such as "CONFIDENTIAL" on watermark settings, view printer driver Help. PRINTER FUNCTIONS ADJUSTING THE BRIGHTNESS AND CONTRAST OF THE IMAGE (Image Adjustment) The brightness and contrast can be used for example "...CONFIDENTIAL"), and start printing. For details on your own custom watermark. "PRINTER DRIVER SETTING SCREEN" (p.63) 67 Downloaded from www.Manualslib.com manuals search engine To adjust a setting, drag the slide bar or click...
...when printing a photo or other image. PRINTING A WATERMARK You can print a watermark such as "CONFIDENTIAL" on watermark settings, view printer driver Help. PRINTER FUNCTIONS ADJUSTING THE BRIGHTNESS AND CONTRAST OF THE IMAGE (Image Adjustment) The brightness and contrast can be used for example "...CONFIDENTIAL"), and start printing. For details on your own custom watermark. "PRINTER DRIVER SETTING SCREEN" (p.63) 67 Downloaded from www.Manualslib.com manuals search engine To adjust a setting, drag the slide bar or click...

Operation Guide
Page 69
... Note When using two-sided printing, select a source other than "Bypass Tray" for many purposes, and is useful for the "Paper Source" in the printer driver setup screen. 2 Select "2-Sided(Book)" or "2-Sided(Tablet)". bound at the side. Paper orientation 2-Sided (Book) Printing result 2-Sided (Tablet) Vertical Horizontal 2-Sided (Book) 2-Sided...
... Note When using two-sided printing, select a source other than "Bypass Tray" for many purposes, and is useful for the "Paper Source" in the printer driver setup screen. 2 Select "2-Sided(Book)" or "2-Sided(Tablet)". bound at the side. Paper orientation 2-Sided (Book) Printing result 2-Sided (Tablet) Vertical Horizontal 2-Sided (Book) 2-Sided...
Operation Guide
Page 70
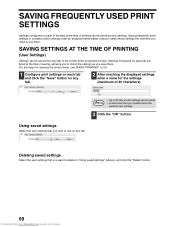
... click the "Save" button on any tab. 2 After checking the displayed settings, enter a name for opening the printer driver, see "BASIC PRINTING" (p.60). 1 Configure print settings on any tab of the printer driver properties window. Using saved settings Select the user settings that you wish to delete in user settings. 3 Click the...
... click the "Save" button on any tab. 2 After checking the displayed settings, enter a name for opening the printer driver, see "BASIC PRINTING" (p.60). 1 Configure print settings on any tab of the printer driver properties window. Using saved settings Select the user settings that you wish to delete in user settings. 3 Click the...


