Operation Guide
Page 2
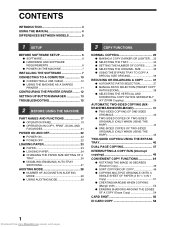
... ● CONNECTING A USB CABLE 10 ● USING THE MACHINE AS A SHARED PRINTER 11 CONFIGURING THE PRINTER DRIVER ........ 12 SETTING UP BUTTON MANAGER 13 TROUBLESHOOTING 15 2 BEFORE USING THE MACHINE PART NAMES AND FUNCTIONS 17 ● OPERATION PANEL 19 ● OPERATION IN COPY, PRINT, SCAN, AND FAX MODES 21 POWER ON AND OFF 22 ● POWER ON 22 ● POWER OFF 22 LOADING PAPER 23 ● PAPER 23 ● LOADING PAPER 24 ● CHANGING THE PAPER SIZE SETTING OF A TRAY 26 ● DISABLING (ENABLING) AUTO TRAY SWITCHING 27 AUDITING MODE 28 ● NUMBER OF ACCOUNTS...
... ● CONNECTING A USB CABLE 10 ● USING THE MACHINE AS A SHARED PRINTER 11 CONFIGURING THE PRINTER DRIVER ........ 12 SETTING UP BUTTON MANAGER 13 TROUBLESHOOTING 15 2 BEFORE USING THE MACHINE PART NAMES AND FUNCTIONS 17 ● OPERATION PANEL 19 ● OPERATION IN COPY, PRINT, SCAN, AND FAX MODES 21 POWER ON AND OFF 22 ● POWER ON 22 ● POWER OFF 22 LOADING PAPER 23 ● PAPER 23 ● LOADING PAPER 24 ● CHANGING THE PAPER SIZE SETTING OF A TRAY 26 ● DISABLING (ENABLING) AUTO TRAY SWITCHING 27 AUDITING MODE 28 ● NUMBER OF ACCOUNTS...
Operation Guide
Page 3
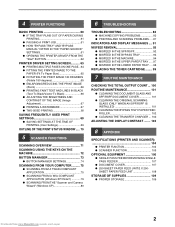
... THE LOWER PAPER TRAY .... 98 REPLACING THE TONER CARTRIDGE ........ 99 7 ROUTINE MAINTENANCE CHECKING THE TOTAL OUTPUT COUNT ... 100 ROUTINE MAINTENANCE 101 ● CLEANING THE DOCUMENT GLASS AND SPF/RSPF/DOCUMENT COVER 101 ● CLEANING THE ORIGINAL SCANNING GLASS (ONLY WHEN AN SPF/RSPF IS INSTALLED 101 ● CLEANING THE BYPASS TRAY PAPER FEED ROLLER 102 ● CLEANING THE TRANSFER CHARGER ... 102 ADJUSTING THE DISPLAY CONTRAST ........ 103 8 APPENDIX SPECIFICATIONS (PRINTER AND SCANNER 104 ● PRINTER FUNCTION 104 ● SCANNER FUNCTION 105 OPTIONAL EQUIPMENT...
... THE LOWER PAPER TRAY .... 98 REPLACING THE TONER CARTRIDGE ........ 99 7 ROUTINE MAINTENANCE CHECKING THE TOTAL OUTPUT COUNT ... 100 ROUTINE MAINTENANCE 101 ● CLEANING THE DOCUMENT GLASS AND SPF/RSPF/DOCUMENT COVER 101 ● CLEANING THE ORIGINAL SCANNING GLASS (ONLY WHEN AN SPF/RSPF IS INSTALLED 101 ● CLEANING THE BYPASS TRAY PAPER FEED ROLLER 102 ● CLEANING THE TRANSFER CHARGER ... 102 ADJUSTING THE DISPLAY CONTRAST ........ 103 8 APPENDIX SPECIFICATIONS (PRINTER AND SCANNER 104 ● PRINTER FUNCTION 104 ● SCANNER FUNCTION 105 OPTIONAL EQUIPMENT...
Operation Guide
Page 5
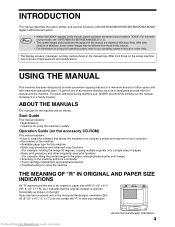
... of the MX-M182/MX-M182D/MX-M202D/MX-M232D digital multifunctional system. To get full use , SHARP recommends printing out this manual and keep it in a handy location. INTRODUCTION This manual describes the copier, printer, and scanner functions of your model, see "DIFFERENCES BETWEEN MODELS" (p.5). • The screen images and procedures that appear in this manual are as follows: Start Guide This manual explains: • Specifications • Cautions for using the machine in safety Operation Guide (on...
... of the MX-M182/MX-M182D/MX-M202D/MX-M232D digital multifunctional system. To get full use , SHARP recommends printing out this manual and keep it in a handy location. INTRODUCTION This manual describes the copier, printer, and scanner functions of your model, see "DIFFERENCES BETWEEN MODELS" (p.5). • The screen images and procedures that appear in this manual are as follows: Start Guide This manual explains: • Specifications • Cautions for using the machine in safety Operation Guide (on...
Operation Guide
Page 7
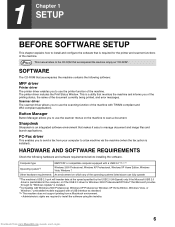
... scan a document. Button Manager Button Manager allows you to manage document and image files and launch applications. The printer driver includes the Print Status Window. Scanner driver The scanner driver allows you to use the scanner menus on which any of the machine. Sharpdesk Sharpdesk is required for the printer and scanner functions of the operating systems listed above can fully operate *1The machine's USB 2.0 port will transfer data at the speed specified by the USB 2.0 (Hi-Speed) only if the Microsoft USB 2.0 driver...
... scan a document. Button Manager Button Manager allows you to manage document and image files and launch applications. The printer driver includes the Print Status Window. Scanner driver The scanner driver allows you to use the scanner menus on which any of the machine. Sharpdesk Sharpdesk is required for the printer and scanner functions of the operating systems listed above can fully operate *1The machine's USB 2.0 port will transfer data at the speed specified by the USB 2.0 (Hi-Speed) only if the Microsoft USB 2.0 driver...

Operation Guide
Page 10
... install the driver. Follow the on-screen instructions. Caution • If you are using Windows Vista/7 and a security warning window appears, be sure to click "Install this driver software anyway". • If you installed Button Manager, set up Button Manager as explained in the Plug and Play window to click "Continue Anyway" or "Yes". SETUP 13 Follow the instructions in "SETTING UP BUTTON MANAGER" (p.13) 9 Downloaded from www.Manualslib.com manuals...
... install the driver. Follow the on-screen instructions. Caution • If you are using Windows Vista/7 and a security warning window appears, be sure to click "Install this driver software anyway". • If you installed Button Manager, set up Button Manager as explained in the Plug and Play window to click "Continue Anyway" or "Yes". SETUP 13 Follow the instructions in "SETTING UP BUTTON MANAGER" (p.13) 9 Downloaded from www.Manualslib.com manuals...
Operation Guide
Page 11
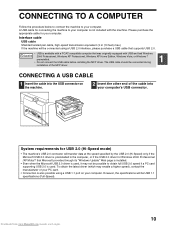
...; USB is used , it may enable a higher speed), contact the manufacturer of the cable into the USB connector on your computer. The USB cable should be possible to obtain full USB 2.0 speed if a PC card supporting USB 2.0 is available with a PC/AT compatible computer that Microsoft provides through its "Windows Update" Web page is installed. • Even when the Microsoft USB 2.0 driver is used . System requirements for USB 2.0 (Hi-Speed mode) • The machine's USB 2.0 connector...
...; USB is used , it may enable a higher speed), contact the manufacturer of the cable into the USB connector on your computer. The USB cable should be possible to obtain full USB 2.0 speed if a PC card supporting USB 2.0 is available with a PC/AT compatible computer that Microsoft provides through its "Windows Update" Web page is installed. • Even when the Microsoft USB 2.0 driver is used . System requirements for USB 2.0 (Hi-Speed mode) • The machine's USB 2.0 connector...
Operation Guide
Page 12
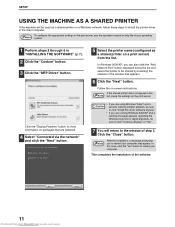
... the Note list, check the settings on the print server. • If you to restart your operating Note system. 1 Perform steps 2 through 6 in the print server, see the operation manual or help file of your computer may appear. In this driver software anyway". • If you can also click the "Add Network Port" button displayed below the list and select the printer to install the printer driver in the window that are running Windows 2000/XP...
... the Note list, check the settings on the print server. • If you to restart your operating Note system. 1 Perform steps 2 through 6 in the print server, see the operation manual or help file of your computer may appear. In this driver software anyway". • If you can also click the "Add Network Port" button displayed below the list and select the printer to install the printer driver in the window that are running Windows 2000/XP...
Operation Guide
Page 14
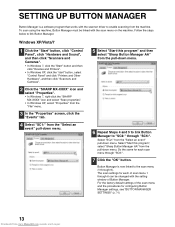
... scan settings for configuring Button Manager settings, see "BUTTON MANAGER SETTINGS" (p.74). 13 Downloaded from the "Select an event" pull-down menu. Select "Start this program" and then select "Sharp Button Manager AA" from the pull-down menu. To scan using the machine, Button Manager must be changed with the setting window of Button Manager. Button Manager is a software program that works with the scan menu on the machine. For the factory default settings of scan menu 1 through 6 can be linked with the scanner driver to enable scanning...
... scan settings for configuring Button Manager settings, see "BUTTON MANAGER SETTINGS" (p.74). 13 Downloaded from the "Select an event" pull-down menu. Select "Start this program" and then select "Sharp Button Manager AA" from the pull-down menu. To scan using the machine, Button Manager must be changed with the setting window of Button Manager. Button Manager is a software program that works with the scan menu on the machine. For the factory default settings of scan menu 1 through 6 can be linked with the scanner driver to enable scanning...
Operation Guide
Page 19
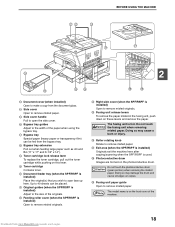
... lever To replace the toner cartridge, pull out the toner cartridge while pushing on these levers and remove the paper. Do not touch the fusing unit when removing misfed paper. 21 22 23 BEFORE USING THE MACHINE 27 24 19 2 20 26 25 28 29 13 Document cover (when installed) Open to make a copy from the document glass. 14 Side cover Open to remove misfed paper. 15 Side cover handle Pull to open the side cover. 16 Bypass tray guides Adjust to...
... lever To replace the toner cartridge, pull out the toner cartridge while pushing on these levers and remove the paper. Do not touch the fusing unit when removing misfed paper. 21 22 23 BEFORE USING THE MACHINE 27 24 19 2 20 26 25 28 29 13 Document cover (when installed) Open to make a copy from the document glass. 14 Side cover Open to remove misfed paper. 15 Side cover handle Pull to open the side cover. 16 Bypass tray guides Adjust to...
Operation Guide
Page 20
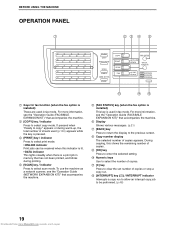
... to enter the selected setting. 10 Numeric keys Use to select the number of copies. 11 [C] key Press to select scan mode. appears or during printing. 4 [SCAN] key / indicator Press to clear the set number of sheets used in fax mode. To use the machine as a network scanner, see the "Operation Guide (FACSIMILE EXPANSION KIT)" that accompanies the machine. 6 Display Shows various messages. (p.21) 7 [BACK] key Press to return the display to copy." SETTING SPACE/- If pressed when "Ready to the previous screen. 8 Copy number display...
... to enter the selected setting. 10 Numeric keys Use to select the number of copies. 11 [C] key Press to select scan mode. appears or during printing. 4 [SCAN] key / indicator Press to clear the set number of sheets used in fax mode. To use the machine as a network scanner, see the "Operation Guide (FACSIMILE EXPANSION KIT)" that accompanies the machine. 6 Display Shows various messages. (p.21) 7 [BACK] key Press to return the display to copy." SETTING SPACE/- If pressed when "Ready to the previous screen. 8 Copy number display...
Operation Guide
Page 24
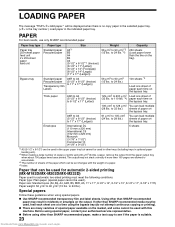
... trays (including trays in optional paper feeding unit). *2 When making a large number of copies or prints using the bypass tray (do not attempt continuous copying or printing). ● There are many varieties of a paper. *4 Index Paper that can be used in the upper paper tray but cannot be used in other than 100 pages are allowed to accumulate. *3 The number of sheets of the paper which can be set changes with this machine. LOADING PAPER The message "TRAY< >:Add paper." will be used , feed each sheet...
... trays (including trays in optional paper feeding unit). *2 When making a large number of copies or prints using the bypass tray (do not attempt continuous copying or printing). ● There are many varieties of a paper. *4 Index Paper that can be used in the upper paper tray but cannot be used in other than 100 pages are allowed to accumulate. *3 The number of sheets of the paper which can be set changes with this machine. LOADING PAPER The message "TRAY< >:Add paper." will be used , feed each sheet...
Operation Guide
Page 62
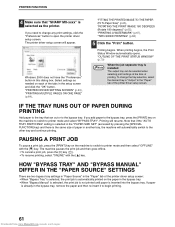
... bypass tray, remove the paper and then re-insert it to printer mode and then select "OFFLINE" with the [ ] key. The printer driver setup screen will resume. Note that if the "AUTO TRAY SWITCHING" setting is selected in the "PAPER SIZE SET" (accessed by pressing the [SPECIAL FUNCTION] key) and there is already in another tray, the machine will automatically switch to open the printer driver setup screen. To change any print settings, click the "Preferences" button to the other tray and continue printing. PAUSING A PRINT JOB...
... bypass tray, remove the paper and then re-insert it to printer mode and then select "OFFLINE" with the [ ] key. The printer driver setup screen will resume. Note that if the "AUTO TRAY SWITCHING" setting is selected in the "PAPER SIZE SET" (accessed by pressing the [SPECIAL FUNCTION] key) and there is already in another tray, the machine will automatically switch to open the printer driver setup screen. To change any print settings, click the "Preferences" button to the other tray and continue printing. PAUSING A PRINT JOB...
Operation Guide
Page 72
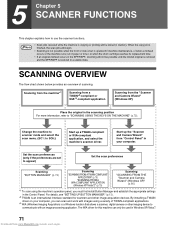
... "SCANNING USING THE KEYS ON THE MACHINE" (p.72). Change the machine to scanner mode and select the scan menu. (SC1: to use the scanner functions. For details, see "SETTING UP BUTTON MANAGER" (p.13). *2 TWAIN is opened for scanners and other imaging device to communicate with images using the machine's operation panel, you can only be possible until the misfed original is removed and the SPF/RSPF is a Windows function that allows a scanner, digital camera or other image acquisition devices. Start up...
... "SCANNING USING THE KEYS ON THE MACHINE" (p.72). Change the machine to scanner mode and select the scan menu. (SC1: to use the scanner functions. For details, see "SETTING UP BUTTON MANAGER" (p.13). *2 TWAIN is opened for scanners and other imaging device to communicate with images using the machine's operation panel, you can only be possible until the misfed original is removed and the SPF/RSPF is a Windows function that allows a scanner, digital camera or other image acquisition devices. Start up...
Operation Guide
Page 73
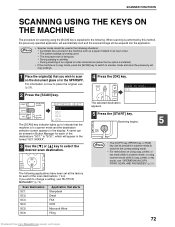
... scan on using copy, printer, or fax mode while in scanner mode, or using the [SCAN] key is in copy mode, press the [SCAN] key to switch to scanner mode and clear the previously set at the factory for each of the scan destinations 1 to 6. SC2: PY AN The selected destination appears. 5 Press the [START] key. PRINT ON LINE DATA DESTINATION SELECT SC1: SCAN SC2: FAX LINE DATA SC3: SC4: The [SCAN] key indicator lights up to place the original, see (p.29). 2 Press the [SCAN] key...
... scan on using copy, printer, or fax mode while in scanner mode, or using the [SCAN] key is in copy mode, press the [SCAN] key to switch to scanner mode and clear the previously set at the factory for each of the scan destinations 1 to 6. SC2: PY AN The selected destination appears. 5 Press the [START] key. PRINT ON LINE DATA DESTINATION SELECT SC1: SCAN SC2: FAX LINE DATA SC3: SC4: The [SCAN] key indicator lights up to place the original, see (p.29). 2 Press the [SCAN] key...
Operation Guide
Page 74
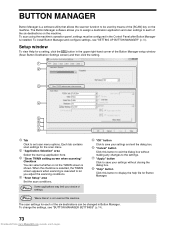
.... 8 "Help" button Click this button to display the help file for the scan menu. 2 "Application Selection" area Select the start-up application here. 3 "Show TWAIN setting screen when scanning" Checkbox You can be changed in the upper right-hand corner of the six destinations on this machine. Setup window To view Help for each of the Button Manager setup window (Scan Button Destination Settings screen) and then click the setting. 1 2 3 Full Colour 4 5 6 7 8 1 Tab Click to set scan menu options...
.... 8 "Help" button Click this button to display the help file for the scan menu. 2 "Application Selection" area Select the start-up application here. 3 "Show TWAIN setting screen when scanning" Checkbox You can be changed in the upper right-hand corner of the six destinations on this machine. Setup window To view Help for each of the Button Manager setup window (Scan Button Destination Settings screen) and then click the setting. 1 2 3 Full Colour 4 5 6 7 8 1 Tab Click to set scan menu options...
Operation Guide
Page 83
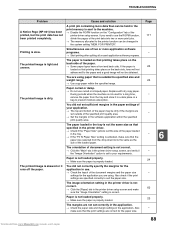
... Printing is slow...88 The printed image is light and uneven...88 The printed image is dirty...88 The printed image is slow...90 INDICATORS AND DISPLAY MESSAGES 91 MISFEED REMOVAL 92 REPLACING THE TONER CARTRIDGE 99 Downloaded from www.Manualslib.com manuals search engine 82 MACHINE/COPYING PROBLEMS The machine does not operate...83 Copies are too dark or too light...83 Blank copies...83 Part of the original...85 Copies are unable to scan the image...90 Scanner transfer speed...
... Printing is slow...88 The printed image is light and uneven...88 The printed image is dirty...88 The printed image is slow...90 INDICATORS AND DISPLAY MESSAGES 91 MISFEED REMOVAL 92 REPLACING THE TONER CARTRIDGE 99 Downloaded from www.Manualslib.com manuals search engine 82 MACHINE/COPYING PROBLEMS The machine does not operate...83 Copies are too dark or too light...83 Blank copies...83 Part of the original...85 Copies are unable to scan the image...90 Scanner transfer speed...

Operation Guide
Page 88
... the printer driver port setting is complete. The machine is set on , press the [PRINT] key to switch to printer mode and then use the [ ] key to change it . Problem The machine does not print. (ONLINE indicator does not blink.) The machine does not print. (DATA indicator does not blink.) The machine does not print. (ONLINE indicator was blinking.) Cause and solution The machine is not correctly connected with your machine) printer displayed in the paper tray. In Windows XP, click the "start" button...
... the printer driver port setting is complete. The machine is set on , press the [PRINT] key to switch to printer mode and then use the [ ] key to change it . Problem The machine does not print. (ONLINE indicator does not blink.) The machine does not print. (DATA indicator does not blink.) The machine does not print. (ONLINE indicator was blinking.) Cause and solution The machine is not correctly connected with your machine) printer displayed in the paper tray. In Windows XP, click the "start" button...
Operation Guide
Page 89
... application software programs. The paper is loaded so that is the same as that specified in the printer driver. → Check if the "Paper Size" options suit the size of the printer driver setup screen. Paper is not loaded properly. → Make sure the paper is dirty. Simultaneous use of the loaded paper. Paper curled or damp. → Do not use the ROPM function, divide the pages of the document margins and the paper size settings for a long time, remove the paper from...
... application software programs. The paper is loaded so that is the same as that specified in the printer driver. → Check if the "Paper Size" options suit the size of the printer driver setup screen. Paper is not loaded properly. → Make sure the paper is dirty. Simultaneous use of the loaded paper. Paper curled or damp. → Do not use the ROPM function, divide the pages of the document margins and the paper size settings for a long time, remove the paper from...

Operation Guide
Page 114
...key. 113 Downloaded from www.Manualslib.com manuals search engine PQ SPECIAL FUNCTION PAPER SIZE SET ED COPY DISPLAY CONTRAST LEX SCAN LEX SCAN TOTAL COUNT ACC SYSTEM SETTINGS 3 Press the [OK] key. OK COPIER EXPOSURE ADJUST MARGIN DEFAULT ERASE ADJUST The settings of them. Several programs will appear. USING THE SYSTEM SETTINGS 1 Press the [SPECIAL FUNCTION] key. MODE SELECT CHANGE ADMIN PW COPIER PRINTER SCANNER Example: The screen when "COPIER" is selected. 6 Press the [OK] key. SPECIAL FUNCTION ID CARD COPY SPECIAL MODES ORIG. To disable the function...
...key. 113 Downloaded from www.Manualslib.com manuals search engine PQ SPECIAL FUNCTION PAPER SIZE SET ED COPY DISPLAY CONTRAST LEX SCAN LEX SCAN TOTAL COUNT ACC SYSTEM SETTINGS 3 Press the [OK] key. OK COPIER EXPOSURE ADJUST MARGIN DEFAULT ERASE ADJUST The settings of them. Several programs will appear. USING THE SYSTEM SETTINGS 1 Press the [SPECIAL FUNCTION] key. MODE SELECT CHANGE ADMIN PW COPIER PRINTER SCANNER Example: The screen when "COPIER" is selected. 6 Press the [OK] key. SPECIAL FUNCTION ID CARD COPY SPECIAL MODES ORIG. To disable the function...
Operation Guide
Page 115
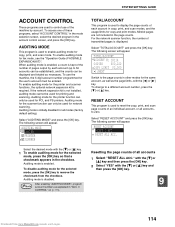
... 1 Select "RESET ALL ACC." Auditing mode is used to control use the machine, the 5-digit account number programmed for all modes (factory default setting). The following screen will appear. Auditing mode is enabled. Misfed pages are used to reset the copy, print, and scan page counts of the machine by each account in other modes for copy and print modes. RESET ACCOUNT This program is initially disabled for the user's account must be entered. Select "AUDITING MODE" and press the [OK] key. The following screen will...
... 1 Select "RESET ALL ACC." Auditing mode is used to control use the machine, the 5-digit account number programmed for all modes (factory default setting). The following screen will appear. Auditing mode is enabled. Misfed pages are used to reset the copy, print, and scan page counts of the machine by each account in other modes for copy and print modes. RESET ACCOUNT This program is initially disabled for the user's account must be entered. Select "AUDITING MODE" and press the [OK] key. The following screen will...


