MX-2310U Operation Manual
Page 41
... manual. Illustrations and the operation panel and touch panel shown in the case of Mac OS X. Icons used in the manuals The icons in this manual, please substitute your dealer or nearest SHARP Service Department. • This product has undergone strict quality control and inspection procedures... may vary depending on the version of the operating system or the software application. • Wherever "MX-xxxx" appears in this manual assume that occurs due to use the MX-2310U digital full color multifunctional system. When "System Settings:" appears: A general setting is a risk of ...
... manual. Illustrations and the operation panel and touch panel shown in the case of Mac OS X. Icons used in the manuals The icons in this manual, please substitute your dealer or nearest SHARP Service Department. • This product has undergone strict quality control and inspection procedures... may vary depending on the version of the operating system or the software application. • Wherever "MX-xxxx" appears in this manual assume that occurs due to use the MX-2310U digital full color multifunctional system. When "System Settings:" appears: A general setting is a risk of ...
MX-2310U Operation Manual
Page 281
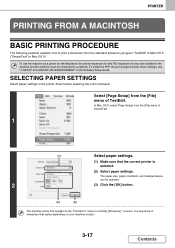
...characters that appears in the "Format for the Macintosh, the printer expansion kit and PS3 expansion kit must be installed in Mac OS 9). To install the PPD file and configure printer driver settings, see "3. Select [Page Setup] from the standard accessory program "TextEdit" ...PRINTING PROCEDURE The following example explains how to a network. SETUP IN A MACINTOSH ENVIRONMENT" in the printer driver before selecting the print command. In Mac OS 9, select [Page Setup] from the [File] menu of SimpleText. 1 (1) Select paper settings. (1) Make sure that the correct printer is a sequence...
...characters that appears in the "Format for the Macintosh, the printer expansion kit and PS3 expansion kit must be installed in Mac OS 9). To install the PPD file and configure printer driver settings, see "3. Select [Page Setup] from the standard accessory program "TextEdit" ...PRINTING PROCEDURE The following example explains how to a network. SETUP IN A MACINTOSH ENVIRONMENT" in the printer driver before selecting the print command. In Mac OS 9, select [Page Setup] from the [File] menu of SimpleText. 1 (1) Select paper settings. (1) Make sure that the correct printer is a sequence...

MX-2310U Operation Manual
Page 282
... "Printer" menu is normally [SCxxxxxx]. ("xxxxxx" is selected. 2 The machine name that appears in Mac OS X v10.5 to 10.5.8 and 10.6 to 10.6.2, click " " next to the printer name. • In Mac OS 9, click next to [General] and select the settings that you wish to execute printing may vary... depending on the machine model.) Select print settings. • In Mac OS X, click next to [Copies & Pages] and select the settings that...
... "Printer" menu is normally [SCxxxxxx]. ("xxxxxx" is selected. 2 The machine name that appears in Mac OS X v10.5 to 10.5.8 and 10.6 to 10.6.2, click " " next to the printer name. • In Mac OS 9, click next to [General] and select the settings that you wish to execute printing may vary... depending on the machine model.) Select print settings. • In Mac OS X, click next to [Copies & Pages] and select the settings that...

MX-2310U Operation Manual
Page 284
... can also be placed in the bypass tray. PRINTER SELECTING THE PAPER This section explains the [Paper Feed] settings ("Paper Source" setting in [General] in Mac OS 9) in the print settings window. • When [Auto Select] is selected A tray with the specified type of paper and the size specified in "Paper...
... can also be placed in the bypass tray. PRINTER SELECTING THE PAPER This section explains the [Paper Feed] settings ("Paper Source" setting in [General] in Mac OS 9) in the print settings window. • When [Auto Select] is selected A tray with the specified type of paper and the size specified in "Paper...

MX-2310U Operation Manual
Page 285
... Select the bypass tray. (1) Select [Paper Feed] on the page setup screen. BEFORE USING THE MACHINE". In Mac OS 9, select [General]. (2) Select [Bypass Tray(Envelope)] from the "All pages from" menu. • In Mac OS 9, select [Bypass Tray(Envelope)] from 2 the "All pages from" menu of "Paper Source". •.... (1) Select the envelope size from the printer driver properties screen is recommended that you can rotate the image 180 degrees if needed. In Mac OS 9, select the envelope size from the "Paper" menu on an envelope from the "Paper Size" menu on the print screen. For...
... Select the bypass tray. (1) Select [Paper Feed] on the page setup screen. BEFORE USING THE MACHINE". In Mac OS 9, select [General]. (2) Select [Bypass Tray(Envelope)] from the "All pages from" menu. • In Mac OS 9, select [Bypass Tray(Envelope)] from 2 the "All pages from" menu of "Paper Source". •.... (1) Select the envelope size from the printer driver properties screen is recommended that you can rotate the image 180 degrees if needed. In Mac OS 9, select the envelope size from the "Paper" menu on an envelope from the "Paper Size" menu on the print screen. For...

MX-2310U Operation Manual
Page 286
... vary depending on the software application. (1) Display the job handling screen. (1) Make sure that the machine's printer name is selected. (2) Select [Job Handling]. • In Mac OS X v10.5 to 10.5.8 and 10.6 to 10.6.2, select [Job Handling] and then click the 2 [Authentication] tab in the screen that appears. • In...
... vary depending on the software application. (1) Display the job handling screen. (1) Make sure that the machine's printer name is selected. (2) Select [Job Handling]. • In Mac OS X v10.5 to 10.5.8 and 10.6 to 10.6.2, select [Job Handling] and then click the 2 [Authentication] tab in the screen that appears. • In...

MX-2310U Operation Manual
Page 287
...; User Name 3 Enter your computer login name will appear. (3) Click the [Print] button. If you can click the (lock) button after entering your administrator. In Mac OS X, you do not enter a job name, the file name set in the software application will appear. • Job Name (1) (2) (3) Enter a job name (maximum of...
...; User Name 3 Enter your computer login name will appear. (3) Click the [Print] button. If you can click the (lock) button after entering your administrator. In Mac OS X, you do not enter a job name, the file name set in the software application will appear. • Job Name (1) (2) (3) Enter a job name (maximum of...

MX-2310U Operation Manual
Page 292
Macintosh (1) PRINTER (2) (1) Select [Layout]. (2) Select [Long-edged binding] or [Short-edged binding]. • In Mac OS X v10.2.8, select the settings in [Advanced]. • In Mac OS 9, select [Output/Document Style] and then select [Flip on long edge] or [Flip on short edge]. 3-28 Contents
Macintosh (1) PRINTER (2) (1) Select [Layout]. (2) Select [Long-edged binding] or [Short-edged binding]. • In Mac OS X v10.2.8, select the settings in [Advanced]. • In Mac OS 9, select [Output/Document Style] and then select [Flip on long edge] or [Flip on short edge]. 3-28 Contents

MX-2310U Operation Manual
Page 293
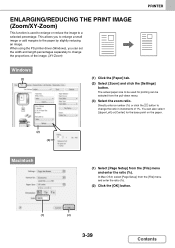
... paper loaded in the machine. To change the print image size, use the "Paper Size" menu that appears when [Page Setup] is not loaded in Mac OS X v10.4.11, v10.5 to 10.5.8 and 10.6 to print when the same size of the print image (for example: Ledger). (3) (4) 3-29 Contents Macintosh (This...
... paper loaded in the machine. To change the print image size, use the "Paper Size" menu that appears when [Page Setup] is not loaded in Mac OS X v10.4.11, v10.5 to 10.5.8 and 10.6 to print when the same size of the print image (for example: Ledger). (3) (4) 3-29 Contents Macintosh (This...

MX-2310U Operation Manual
Page 297
... function, select the number of staples in the "Staple" menu. • For the punch function, click the [Punch] checkbox so that a checkmark appears. • In Mac OS X v10.2.8, select the settings in [Advanced]. • In Mac OS 9, select the settings in [Output/Document Style]. 3-33 Contents
... function, select the number of staples in the "Staple" menu. • For the punch function, click the [Punch] checkbox so that a checkmark appears. • In Mac OS X v10.2.8, select the settings in [Advanced]. • In Mac OS 9, select the settings in [Output/Document Style]. 3-33 Contents

MX-2310U Operation Manual
Page 299
Macintosh (1) (3) PRINTER (2) (1) Select [Printer Features]. (2) Select the "Binding Edge". (3) Select [Tiled Pamphlet] or [2-Up Pamphlet]. • In Mac OS X v10.2.8, select from the "2-Side Printing" and "Binding Edge" menus in [Advanced]. • In Mac OS 9, select the settings in [Output/Document Style]. 3-35 Contents
Macintosh (1) (3) PRINTER (2) (1) Select [Printer Features]. (2) Select the "Binding Edge". (3) Select [Tiled Pamphlet] or [2-Up Pamphlet]. • In Mac OS X v10.2.8, select from the "2-Side Printing" and "Binding Edge" menus in [Advanced]. • In Mac OS 9, select the settings in [Output/Document Style]. 3-35 Contents

MX-2310U Operation Manual
Page 300
Macintosh (1) (3) (2) (3) (1) Select [Printer Features]. (2) Select the "Binding Edge". (3) Select the "Margin Shift". • In Mac OS X v10.2.8, select from the "Binding Edge" and "Margin Shift" menus in [Advanced]. • In Mac OS 9, select [Advanced] and then select the binding edge and margin shift from the "Margin Shift" menu. PRINTER Windows (1) (2) (1) Configure the settings...
Macintosh (1) (3) (2) (3) (1) Select [Printer Features]. (2) Select the "Binding Edge". (3) Select the "Margin Shift". • In Mac OS X v10.2.8, select from the "Binding Edge" and "Margin Shift" menus in [Advanced]. • In Mac OS 9, select [Advanced] and then select the binding edge and margin shift from the "Margin Shift" menu. PRINTER Windows (1) (2) (1) Configure the settings...

MX-2310U Operation Manual
Page 302
... that it can be printed correctly on paper that can only be loaded in one orientation (such as envelopes or paper with punch holes). (In Mac OS X, a portrait image cannot be rotated 180 degrees.) ABCD ABCD Windows (1) (2) (1) Select the setting on the [Main] tab. (2) Select the [Rotate 180 degrees] checkbox . Macintosh... Setup] from the [File] menu and select [PostScript Options]. Then select the [Flip Horizontal] and [Flip Vertical] checkbox . (2) Click the [OK] button. (1) (2) 3-38 Contents In Mac OS 9, select [Page Setup] from the [File] menu and click the button.
... that it can be printed correctly on paper that can only be loaded in one orientation (such as envelopes or paper with punch holes). (In Mac OS X, a portrait image cannot be rotated 180 degrees.) ABCD ABCD Windows (1) (2) (1) Select the setting on the [Main] tab. (2) Select the [Rotate 180 degrees] checkbox . Macintosh... Setup] from the [File] menu and select [PostScript Options]. Then select the [Flip Horizontal] and [Flip Vertical] checkbox . (2) Click the [OK] button. (1) (2) 3-38 Contents In Mac OS 9, select [Page Setup] from the [File] menu and click the button.
MX-2310U Operation Manual
Page 303
... to be selected from the pull-down menu. (3) Select the zoom ratio. Directly enter a number (%) or click the button to change the proportions of 1%. In Mac OS 9, select [Page Setup] from the [File] menu and enter the ratio (%). You can also select [Upper Left] or [Center] for printing can be used...
... to be selected from the pull-down menu. (3) Select the zoom ratio. Directly enter a number (%) or click the button to change the proportions of 1%. In Mac OS 9, select [Page Setup] from the [File] menu and enter the ratio (%). You can also select [Upper Left] or [Center] for printing can be used...

MX-2310U Operation Manual
Page 305
... create a mirror image. To reverse the image vertically, select [Flip Vertical]. (3) Click the [OK] button. (3) 3-41 Contents B PRINTER B Windows (This function can be used in Mac OS 9.) (1) (2) (1) Select [Page Setup] from the [File] menu and select [PostScript Options]. (2) Select "Visual Effects". This function can be used .) (1) (2) (1) Click the [Advanced] tab. (2) Select...
... create a mirror image. To reverse the image vertically, select [Flip Vertical]. (3) Click the [OK] button. (3) 3-41 Contents B PRINTER B Windows (This function can be used in Mac OS 9.) (1) (2) (1) Select [Page Setup] from the [File] menu and select [PostScript Options]. (2) Select "Visual Effects". This function can be used .) (1) (2) (1) Click the [Advanced] tab. (2) Select...

MX-2310U Operation Manual
Page 306
... your computer. PRINTER COLOR MODE ADJUSTMENT FUNCTION ADJUSTING THE BRIGHTNESS AND CONTRAST OF THE IMAGE (Color Adjustment) The brightness and contrast can be adjusted in Mac OS X v10.3.9 and v10.4.11.) (1) (1) Select [Color]. (2) Click the [Color Adjustment] button. (3) Select the [Color Adjustment] checkbox and adjust the color...
... your computer. PRINTER COLOR MODE ADJUSTMENT FUNCTION ADJUSTING THE BRIGHTNESS AND CONTRAST OF THE IMAGE (Color Adjustment) The brightness and contrast can be adjusted in Mac OS X v10.3.9 and v10.4.11.) (1) (1) Select [Color]. (2) Click the [Color Adjustment] button. (3) Select the [Color Adjustment] checkbox and adjust the color...

MX-2310U Operation Manual
Page 309
...Intent: • Output Profile: • CMYK Correction: • Screening: • Neutral Gray: • Pure Black Print: • Trapping: • Sharpness: • Black Overprint: • CMYK Simulation: • Simulation Profile: Color management method in a Windows environment Color management method in almost the same colors ...as those on the computer screen. To use the Mac OS Color Management function, select the [ColorSync] checkbox . An image type to match the data to print gray areas. When...
...Intent: • Output Profile: • CMYK Correction: • Screening: • Neutral Gray: • Pure Black Print: • Trapping: • Sharpness: • Black Overprint: • CMYK Simulation: • Simulation Profile: Color management method in a Windows environment Color management method in almost the same colors ...as those on the computer screen. To use the Mac OS Color Management function, select the [ColorSync] checkbox . An image type to match the data to print gray areas. When...

MX-2310U Operation Manual
Page 311
... the [Edit] button to create a new watermark... Adjust the size and angle of the watermark in the "Text" box and click the [Add] button. In Mac OS 9, select [Watermark] and configure the settings. 3-47 Contents You can be selected from the pull-down menu. The text can be adjusted. If you...
... the [Edit] button to create a new watermark... Adjust the size and angle of the watermark in the "Text" box and click the [Add] button. In Mac OS 9, select [Watermark] and configure the settings. 3-47 Contents You can be selected from the pull-down menu. The text can be adjusted. If you...

MX-2310U Operation Manual
Page 315
In Mac OS 9, select [Different Paper] and then select the settings for the cover page and last page. PRINTER Macintosh (This function can only be used in Mac OS 9, Mac OS X v10.4.11, v10.5 to 10.5.8 and v10.6 to 10.6.2.) (1) (2) (3) (1) Select [Printer Features]. (2) Select [Different Paper]. (3) Select cover insertion settings. Select the print setting, paper tray, and paper type for the cover page and last page. 3-51 Contents
In Mac OS 9, select [Different Paper] and then select the settings for the cover page and last page. PRINTER Macintosh (This function can only be used in Mac OS 9, Mac OS X v10.4.11, v10.5 to 10.5.8 and v10.6 to 10.6.2.) (1) (2) (3) (1) Select [Printer Features]. (2) Select [Different Paper]. (3) Select cover insertion settings. Select the print setting, paper tray, and paper type for the cover page and last page. 3-51 Contents

MX-2310U Operation Manual
Page 316
... print the same content on each inserted sheet of paper as is printed on the sheet of transparency film, select [Print] in [Advanced]. • In Mac OS 9, select [Transparency Inserts] and select from sticking together by inserting a sheet of paper between each sheet of film. Select the paper source and type...]. (3) Select transparency insert settings. Select the paper source and type if needed. • Set [Transparency] for the "Paper Type" of the bypass tray. • In Mac OS X v10.2.8, select the [Transparency Inserts] checkbox in "Transparency Inserts".
... print the same content on each inserted sheet of paper as is printed on the sheet of transparency film, select [Print] in [Advanced]. • In Mac OS 9, select [Transparency Inserts] and select from sticking together by inserting a sheet of paper between each sheet of film. Select the paper source and type...]. (3) Select transparency insert settings. Select the paper source and type if needed. • Set [Transparency] for the "Paper Type" of the bypass tray. • In Mac OS X v10.2.8, select the [Transparency Inserts] checkbox in "Transparency Inserts".


