
Operation Manual
Page 9
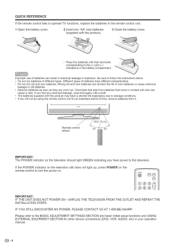
... battery cover. Remove batteries as soon as they are worn out. IF YOU STILL ENCOUNTER NO POWER, PLEASE CONTACT US AT 1-800-BE-SHARP. Do not mix old and new batteries. Chemicals that come in your operation manual. _=8 UNPLUG THE TELEVISION FROM THE OUTLET AND REPEAT THE...SECTION and basic Initial setup functions and USING EXTERNAL EQUIPMENT SECTION for an extended period of time, remove batteries from batteries that leak from it. Remote control sensor IMPORTANT: The POWER indicator on . CDCD MUTE (::3 I_ DISPLAY INPUT @® IMPORTANT: IF THE UNIT DOES NOT POWER ON ...
... battery cover. Remove batteries as soon as they are worn out. IF YOU STILL ENCOUNTER NO POWER, PLEASE CONTACT US AT 1-800-BE-SHARP. Do not mix old and new batteries. Chemicals that come in your operation manual. _=8 UNPLUG THE TELEVISION FROM THE OUTLET AND REPEAT THE...SECTION and basic Initial setup functions and USING EXTERNAL EQUIPMENT SECTION for an extended period of time, remove batteries from batteries that leak from it. Remote control sensor IMPORTANT: The POWER indicator on . CDCD MUTE (::3 I_ DISPLAY INPUT @® IMPORTANT: IF THE UNIT DOES NOT POWER ON ...
Operation Manual
Page 10
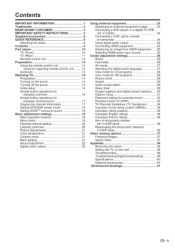
Contents iMPORTANT iNFORMATiON 1 Trademarks 2 DEAR SHARP CUSTOMER 3 iMPORTANT SAFETY iNSTRUCTiONS 3 Supplied accessories 6 QUICK REFERENCE 6 Attaching the stand 6 Contents 9 Part names 10 TV (Front 10 TV (Rear 11 Remote control unit 12 Preparation 13 Using the remote control unit 13 Cautions regarding remote control unit ......... 13 Antennas 13 Watching TV 14 Preparation 14 Turning on the...
Contents iMPORTANT iNFORMATiON 1 Trademarks 2 DEAR SHARP CUSTOMER 3 iMPORTANT SAFETY iNSTRUCTiONS 3 Supplied accessories 6 QUICK REFERENCE 6 Attaching the stand 6 Contents 9 Part names 10 TV (Front 10 TV (Rear 11 Remote control unit 12 Preparation 13 Using the remote control unit 13 Cautions regarding remote control unit ......... 13 Antennas 13 Watching TV 14 Preparation 14 Turning on the...
Operation Manual
Page 13
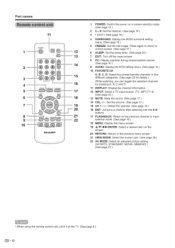
... the screen size. (See page 28.) 22 AV MODE: Select an adjusted picture setting. (SPORTS, STANDARD, MOVIE, MEMORY.) (See page 27.) • When using the remote control unit, point it at the TV. (See page 8.) _=12
... the screen size. (See page 28.) 22 AV MODE: Select an adjusted picture setting. (SPORTS, STANDARD, MOVIE, MEMORY.) (See page 27.) • When using the remote control unit, point it at the TV. (See page 8.) _=12

Operation Manual
Page 14
The heat may cause deformation of the TV set. 1. In such cases, change the angle of the lighting or the TV, or operate the remote control unit closer to shock. To enjoy a clearer picture, use an outdoor antenna. If your TV set , do not place in an area with F-type...ANTENNA _or _ iv_nLan_ii 'aHy _=13 A 75-ohm system is a brief explanation of the types of internal circuit, etc.) f- If tools are used , it towards the remote control sensor on the TV is a flat "twin-lead" cable that can easily be finger-tightened only. A 300-ohm system is under direct sunlight. Objects...
The heat may cause deformation of the TV set. 1. In such cases, change the angle of the lighting or the TV, or operate the remote control unit closer to shock. To enjoy a clearer picture, use an outdoor antenna. If your TV set , do not place in an area with F-type...ANTENNA _or _ iv_nLan_ii 'aHy _=13 A 75-ohm system is a brief explanation of the types of internal circuit, etc.) f- If tools are used , it towards the remote control sensor on the TV is a flat "twin-lead" cable that can easily be finger-tightened only. A 300-ohm system is under direct sunlight. Objects...
Operation Manual
Page 15
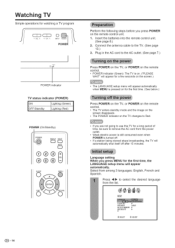
... the first time. (See below.) Press POWER on the TV, or POWER on the remote control. • The TV enters standby mode and the image on the screen disappears. • The POWER indicator ...on the remote control unit. 1. Press 4/t_ to the TV. (See page 13.) 3. Select from the list. Plug ... AC cord to the AC outlet. (See page 7.) Press POWER on the TV, or POWER on the remote control. • POWER indicator (Green): The TV is on. ("PLEASE WAIT" wilt appear for watching a TV program -- Insert...
... the first time. (See below.) Press POWER on the TV, or POWER on the remote control. • The TV enters standby mode and the image on the screen disappears. • The POWER indicator ...on the remote control unit. 1. Press 4/t_ to the TV. (See page 13.) 3. Select from the list. Plug ... AC cord to the AC outlet. (See page 7.) Press POWER on the TV, or POWER on the remote control. • POWER indicator (Green): The TV is on. ("PLEASE WAIT" wilt appear for watching a TV program -- Insert...

Operation Manual
Page 17
... POWER CDCD DISPLAY INPUT MUTE CD FREEZE SURROUND FLASHBACK CZ) CD SLEEP MENU 5 AUDIO CC VIEWMODE AVMODE CD CD C:::)C:::) CK)GD CE)CZ} FAVORITE CH SHARP Method 1 Using CH A/V TV. C • FLASHBACK wilt not work if no operation within a few seconds, • If you push "0" by ...your channelup function wilt scroll through the analog channel first, then the digital channel. Although it is no operation within a few seconds. on the remote control unit or on . Method 2 1 Press FLASHBACK to switch to the previously tuned channel. 2 Press FLASHBACK again to switch back to the...
... POWER CDCD DISPLAY INPUT MUTE CD FREEZE SURROUND FLASHBACK CZ) CD SLEEP MENU 5 AUDIO CC VIEWMODE AVMODE CD CD C:::)C:::) CK)GD CE)CZ} FAVORITE CH SHARP Method 1 Using CH A/V TV. C • FLASHBACK wilt not work if no operation within a few seconds, • If you push "0" by ...your channelup function wilt scroll through the analog channel first, then the digital channel. Although it is no operation within a few seconds. on the remote control unit or on . Method 2 1 Press FLASHBACK to switch to the previously tuned channel. 2 Press FLASHBACK again to switch back to the...

Operation Manual
Page 18
...1 • Analog channel status wilt display on the screen for approx. 10 seconds. • Mute can change the volume on the TV or on the remote control unit. Digital channel status will appear. • Broadcast program name • Station name • Remaining time • Audio language • V-CHIP ... or SD mark • Closed Caption mark • V-Chip mark • VOL+/= on the TV operates the same as VOL+/= on the remote control unit. Watching TV Changing the volume You can be displayed on the screen, and the sound is silenced. VOLUME 25 When the TV receives...
...1 • Analog channel status wilt display on the screen for approx. 10 seconds. • Mute can change the volume on the TV or on the remote control unit. Digital channel status will appear. • Broadcast program name • Station name • Remaining time • Audio language • V-CHIP ... or SD mark • Closed Caption mark • V-Chip mark • VOL+/= on the TV operates the same as VOL+/= on the remote control unit. Watching TV Changing the volume You can be displayed on the screen, and the sound is silenced. VOLUME 25 When the TV receives...
Operation Manual
Page 20
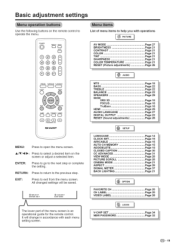
Basic adjustment settings Use the following buttons on the remote control to operate the menu, ,dF,
Basic adjustment settings Use the following buttons on the remote control to operate the menu, ,dF,
Operation Manual
Page 24
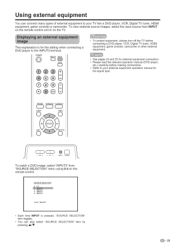
... "SOURCE SELECTION" menu using 0-4 on the TV. TV 2, INPUT2 3. VOL + V CH /N ®C3 INPUT POWER To watch a DVD image, select "INPUT3" from INPUT on the remote control unit or on the...
... "SOURCE SELECTION" menu using 0-4 on the TV. TV 2, INPUT2 3. VOL + V CH /N ®C3 INPUT POWER To watch a DVD image, select "INPUT3" from INPUT on the remote control unit or on the...
Operation Manual
Page 26
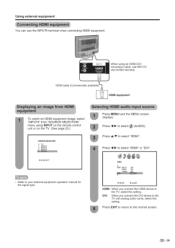
... the TV with analog audio cords, select this setting. Using external equipment You can use INPUT4 and AUDIO terminal. INPUT 4 When using INPUT on the remote control unit or on the TV. (See page 23.) SOURCE SELECTION 0. INPUT2 3. DVI: When you connect the HDMI device to your external equipment operation manual...
... the TV with analog audio cords, select this setting. Using external equipment You can use INPUT4 and AUDIO terminal. INPUT 4 When using INPUT on the remote control unit or on the TV. (See page 23.) SOURCE SELECTION 0. INPUT2 3. DVI: When you connect the HDMI device to your external equipment operation manual...
Operation Manual
Page 30
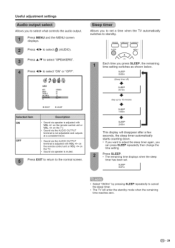
... counting down. • If you want to adjust the sleep timer again, you can press SLEEP repeatedly then change the time setting. on the remote control unit or VOL -/+ on the TV. SLEEP 2hOOm This display will enter the standby mode when the remaining time reaches zero. _= 29 Allows...timer has been set a time when the TV automatically switches to the normal screen. Press 4/t_ to select what controls the audio output. on the remote control unit or VOL -/+ on the TV. Sound via speaker is adjusted with VOL +/- Each time you press SLEEP, the remaining time setting switches...
... counting down. • If you want to adjust the sleep timer again, you can press SLEEP repeatedly then change the time setting. on the remote control unit or VOL -/+ on the TV. SLEEP 2hOOm This display will enter the standby mode when the remaining time reaches zero. _= 29 Allows...timer has been set a time when the TV automatically switches to the normal screen. Press 4/t_ to select what controls the audio output. on the remote control unit or VOL -/+ on the TV. Sound via speaker is adjusted with VOL +/- Each time you press SLEEP, the remaining time setting switches...
Operation Manual
Page 40
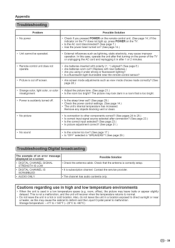
...appear slightly delayed. Are screen mode adjustments such as lightning, static electricity, may look dark in a location exposed to direct sunlight or near the remote control sensor? Also, do not leave the unit in a room that the antenna is correctly setup. • DIGITAL CHANNEL IS SCRAMBLED •...the picture tone. (See page 21 .) misalignment Is the room too bright? Appendix Problem • No power • Unit cannot be operated. • Remote control unit does not operate. • Picture is cut off . • No picture Is the sleep timer set? (See page 29.) Check the ...
...appear slightly delayed. Are screen mode adjustments such as lightning, static electricity, may look dark in a location exposed to direct sunlight or near the remote control sensor? Also, do not leave the unit in a room that the antenna is correctly setup. • DIGITAL CHANNEL IS SCRAMBLED •...the picture tone. (See page 21 .) misalignment Is the room too bright? Appendix Problem • No power • Unit cannot be operated. • Remote control unit does not operate. • Picture is cut off . • No picture Is the sleep timer set? (See page 29.) Check the ...
Operation Manual
Page 41
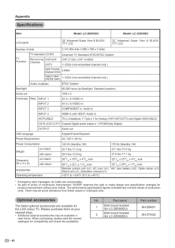
... and check the availability. 1 Wall mount bracket (for LC-26SH20U) Wall mount bracket 2 (for the LCD colour TV. Appendix Item Model: LC-26SH20U Model: LC-32SH20U LCD panel 26" Advanced Super View & BLACK TFT...stand Operating temperature 26W16 x 1959/64 X 439/64inch 3221/64x 23W64x 445/64inch 26W16 X 221/4 X 119/64 inch Remote control unit (xl), AC cord (xl), Stand unit (xl), Operation manual (xl) +32°F to +104°F... nominal values of continuous improvement, SHARP reserves the right to make design and specification changes for product improvement without prior notice.
... and check the availability. 1 Wall mount bracket (for LC-26SH20U) Wall mount bracket 2 (for the LCD colour TV. Appendix Item Model: LC-26SH20U Model: LC-32SH20U LCD panel 26" Advanced Super View & BLACK TFT...stand Operating temperature 26W16 x 1959/64 X 439/64inch 3221/64x 23W64x 445/64inch 26W16 X 221/4 X 119/64 inch Remote control unit (xl), AC cord (xl), Stand unit (xl), Operation manual (xl) +32°F to +104°F... nominal values of continuous improvement, SHARP reserves the right to make design and specification changes for product improvement without prior notice.
Operation Manual
Page 43
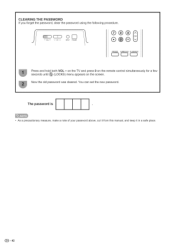
CLEARING THE PASSWORD If you forget the password, clear the password using the following procedure. / c:::D ° © -- The password is • As a precautionary measure, make a note of your password above, cut it from this manual, and keep it in a safe place. = 42 Now the old password was cleared. VOL -_- You can set the new password. V CH /_, iNPUT POWER "/_" ®@@ FREEZE SURROUND FLASHBACK CD CD CD Press and hold both VOL = on the TV and press 0 on the remote control simultaneously for a few seconds until (LOCKS) menu appears on the screen.
CLEARING THE PASSWORD If you forget the password, clear the password using the following procedure. / c:::D ° © -- The password is • As a precautionary measure, make a note of your password above, cut it from this manual, and keep it in a safe place. = 42 Now the old password was cleared. VOL -_- You can set the new password. V CH /_, iNPUT POWER "/_" ®@@ FREEZE SURROUND FLASHBACK CD CD CD Press and hold both VOL = on the TV and press 0 on the remote control simultaneously for a few seconds until (LOCKS) menu appears on the screen.
Operation Manual
Page 45
... information on contract, negligence, strict liability or otherwise. This warranty constitutes the entire express warranty granted by Sharp and no other than Sharp, Sharp's Authorized Service Centres or Sharp's Authorized Servicing Dealers. (c) Damage caused or repairs required as a result of the use with items not... dealer, service centre or their agent or employee is free, under normal use of the product including but not limited to earphones, remote controms, AC adapters, batteries, temperature probe, stymus, trays, fimters, belts, ribbons, cables and paper. (e) Any cosmetic damage to...
... information on contract, negligence, strict liability or otherwise. This warranty constitutes the entire express warranty granted by Sharp and no other than Sharp, Sharp's Authorized Service Centres or Sharp's Authorized Servicing Dealers. (c) Damage caused or repairs required as a result of the use with items not... dealer, service centre or their agent or employee is free, under normal use of the product including but not limited to earphones, remote controms, AC adapters, batteries, temperature probe, stymus, trays, fimters, belts, ribbons, cables and paper. (e) Any cosmetic damage to...


