Owners Manual
Page 6
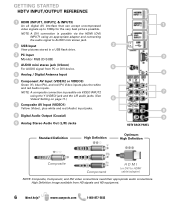
... is possible via VIDEO INPUT2 7 using an appropriate adapter and connecting the audio signal to HDMI cable/adapter) NOTE: Composite, Component, and DVI video connections need their appropriate audio connections. GETTING STARTED HDTV INPUT/OUTPUT REFERENCE 1 HDMI (INPUT1, INPUT2, ...Input (VIDEO2 or VIDEO3) Green (Y), blue (Pb), and red (Pr) Video inputs plus white and red (Audio) input jacks. 8 8 Digital Audio Output (Coaxial) 9 9 Analog Stereo Audio Out (L/R) Jacks HDTV BACK PANEL Standard Definition High Definition Optimum High Definition Composite Component H D M I (or DVI...
... is possible via VIDEO INPUT2 7 using an appropriate adapter and connecting the audio signal to HDMI cable/adapter) NOTE: Composite, Component, and DVI video connections need their appropriate audio connections. GETTING STARTED HDTV INPUT/OUTPUT REFERENCE 1 HDMI (INPUT1, INPUT2, ...Input (VIDEO2 or VIDEO3) Green (Y), blue (Pb), and red (Pr) Video inputs plus white and red (Audio) input jacks. 8 8 Digital Audio Output (Coaxial) 9 9 Analog Stereo Audio Out (L/R) Jacks HDTV BACK PANEL Standard Definition High Definition Optimum High Definition Composite Component H D M I (or DVI...

Owners Manual
Page 7
...used to hookup a multichannel receiver with the use of an appropriate DVI to HDMI cable or adapter. MULTICHANNEL RECEIVER STEREO AMPLIFIER NOTE: Audio/Video cables are not supplied Audio Output L/R are used to hookup your analog equipment such as well NOTE: HDMI INPUT1 may also be used to hookup a DVI ...device with the use of a phono-type digital audio cable. Use them for great image quality from digital devices such as a Blu-ray player, HD Cable Box, HD Satellite Receiver or Video-game ...
...used to hookup a multichannel receiver with the use of an appropriate DVI to HDMI cable or adapter. MULTICHANNEL RECEIVER STEREO AMPLIFIER NOTE: Audio/Video cables are not supplied Audio Output L/R are used to hookup your analog equipment such as well NOTE: HDMI INPUT1 may also be used to hookup a DVI ...device with the use of a phono-type digital audio cable. Use them for great image quality from digital devices such as a Blu-ray player, HD Cable Box, HD Satellite Receiver or Video-game ...
Owners Manual
Page 8
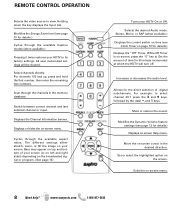
.... While Off Timer is on -screen cursor in the memory database. Cycles through the channels in the desired direction. Increases or decreases the audio level. Move the on -screen, press the "0" key to view. Exits the on -screen menu. Switch between current channel and last selected channel or input. ...
.... While Off Timer is on -screen cursor in the memory database. Cycles through the channels in the desired direction. Increases or decreases the audio level. Move the on -screen, press the "0" key to view. Exits the on -screen menu. Switch between current channel and last selected channel or input. ...
Owners Manual
Page 11
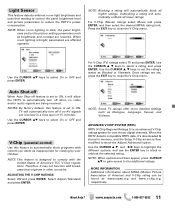
..., respectively. Use the CURSOR LM keys to block or unblock the selected rating. Auto Shut-off When Auto Shut-off if no video and/or audio signals are received in memory, and the Setup V-Chip screen is dark, the panel brightness and/or the picture setting parameters such as Dialogue, Language...
..., respectively. Use the CURSOR LM keys to block or unblock the selected rating. Auto Shut-off When Auto Shut-off if no video and/or audio signals are received in memory, and the Setup V-Chip screen is dark, the panel brightness and/or the picture setting parameters such as Dialogue, Language...

Owners Manual
Page 13
... icon will appear if a picture cannot be personally adjusted: • Bass & Treble • Bass Extension • Audyssey Dynamic Volume 1 • Detailed Setting - 4-Band Equalizer: Personalize audio highs and lows. eter you may turn the Shuffle and Quick Change options ON or OFF. Press ENTER on Start Slideshow either from the Thumbnail...
... icon will appear if a picture cannot be personally adjusted: • Bass & Treble • Bass Extension • Audyssey Dynamic Volume 1 • Detailed Setting - 4-Band Equalizer: Personalize audio highs and lows. eter you may turn the Shuffle and Quick Change options ON or OFF. Press ENTER on Start Slideshow either from the Thumbnail...
Owners Manual
Page 14
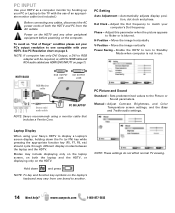
... computer monitor by hooking up your PC or Laptop to the TV with your HDTV. Adjust the Dot frequency to match your Sanyo HDTV to HDMI cable and RCA audio cables (see HDMI (DVI) INPUT1 on page 3. Phase - Move the image vertically Power Saving - PC Picture and Sound Standard... Resolution chart on page 7.) PC Setting Auto Adjustment - HDTV BACK RGB OUTPUT JACK DVI OUTPUT JACK RGB Monitor cable Stereo mini audio cable PC OR LAPTOP NOTE: Sanyo recommends using your computer's Dot frequency. Adjust Contrast, Brightness, and Color Temperature screen settings, and the Bass and Treble...
... computer monitor by hooking up your PC or Laptop to the TV with your HDTV. Adjust the Dot frequency to match your Sanyo HDTV to HDMI cable and RCA audio cables (see HDMI (DVI) INPUT1 on page 3. Phase - Move the image vertically Power Saving - PC Picture and Sound Standard... Resolution chart on page 7.) PC Setting Auto Adjustment - HDTV BACK RGB OUTPUT JACK DVI OUTPUT JACK RGB Monitor cable Stereo mini audio cable PC OR LAPTOP NOTE: Sanyo recommends using your computer's Dot frequency. Adjust Contrast, Brightness, and Color Temperature screen settings, and the Bass and Treble...


