
Owners Manual
Page 2
...'s instructions. 8. When installing an outside antenna system should be exposed to the point of the obsolete outlet. 10. IMPORTANT SAFETY INSTRUCTIONS 1. Do not use caution when moving the cart/apparatus combination to rain or moisture, does not operate normally, or has been dropped. 15. Apparatus shall not be mounted to a wall or ceiling only as power-supply cord or plug is used , use this...
...'s instructions. 8. When installing an outside antenna system should be exposed to the point of the obsolete outlet. 10. IMPORTANT SAFETY INSTRUCTIONS 1. Do not use caution when moving the cart/apparatus combination to rain or moisture, does not operate normally, or has been dropped. 15. Apparatus shall not be mounted to a wall or ceiling only as power-supply cord or plug is used , use this...
Owners Manual
Page 3
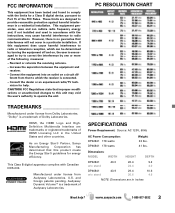
... equipment does cause harmful interference to radio or television reception, which the receiver is connected. - Audyssey Dynamic VolumeTM is a trademark of HDMI Licensing LLC in inches Need help . PC RESOLUTION CHART TRADEMARKS Manufactured under license from Dolby Laboratories. Dimensions: MODEL WIDTH HEIGHT DEPTH DP42841 40.0 26.4 9.2 w/o stand 24.4 4.0 DP46841 43.9 29.4 w/o stand 26.6 10.6 4.6 NOTE: Dimensions are trademarks or registered trademarks of Dolby Laboratories...
... equipment does cause harmful interference to radio or television reception, which the receiver is connected. - Audyssey Dynamic VolumeTM is a trademark of HDMI Licensing LLC in inches Need help . PC RESOLUTION CHART TRADEMARKS Manufactured under license from Dolby Laboratories. Dimensions: MODEL WIDTH HEIGHT DEPTH DP42841 40.0 26.4 9.2 w/o stand 24.4 4.0 DP46841 43.9 29.4 w/o stand 26.6 10.6 4.6 NOTE: Dimensions are trademarks or registered trademarks of Dolby Laboratories...
Owners Manual
Page 4
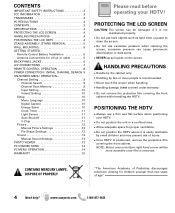
...: Button area on the screen. Channel Setting 9 Channel Search 9 Channel Scan Memory 9 Input Setting 10 Video2 Setting 10 Setup 10 Menu Language 10 Digital Caption 10 Energy Saver 10 Clock Timer 11 Light Sensor 11 Auto Shut-off -air or cable 5 BACK PANEL JACKS 6 A/V CONNECTIONS 7 REMOTE CONTROL OPERATION 8 POWER CONNECTION / INITIAL CHANNEL SEARCH 9 ON-SCREEN MENU OPERATION- CONTAINS MERCURY LAMPS, DISPOSE OF PROPERLY "The American Academy of Pediatrics discourages television viewing for off 11 V-Chip 11 Picture 12 Manual Picture Settings 12 Pix-Shape Settings 12 Sound...
...: Button area on the screen. Channel Setting 9 Channel Search 9 Channel Scan Memory 9 Input Setting 10 Video2 Setting 10 Setup 10 Menu Language 10 Digital Caption 10 Energy Saver 10 Clock Timer 11 Light Sensor 11 Auto Shut-off -air or cable 5 BACK PANEL JACKS 6 A/V CONNECTIONS 7 REMOTE CONTROL OPERATION 8 POWER CONNECTION / INITIAL CHANNEL SEARCH 9 ON-SCREEN MENU OPERATION- CONTAINS MERCURY LAMPS, DISPOSE OF PROPERLY "The American Academy of Pediatrics discourages television viewing for off 11 V-Chip 11 Picture 12 Manual Picture Settings 12 Pix-Shape Settings 12 Sound...
Owners Manual
Page 5
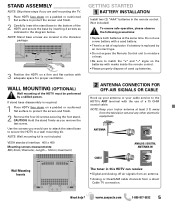
... the remote control. • Please properly dispose of used up your antenna or your indoor antenna at the same time. Use the screws you remove the last screw. Do not use to attach the stand base to secure the HDTV to a wall mounting kit. Need help? STAND ASSEMBLY ___________ NOTE: Skip these steps if you are located in this HDTV can receive: • Digital and Analog off air signals from an antenna • Analog or ClearQAM cable channels from the television set...
... the remote control. • Please properly dispose of used up your antenna or your indoor antenna at the same time. Use the screws you remove the last screw. Do not use to attach the stand base to secure the HDTV to a wall mounting kit. Need help? STAND ASSEMBLY ___________ NOTE: Skip these steps if you are located in this HDTV can receive: • Digital and Analog off air signals from an antenna • Analog or ClearQAM cable channels from the television set...
Owners Manual
Page 6
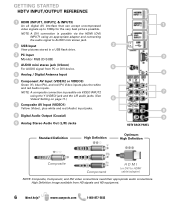
... AUDIO mini stereo jack. 2 USB Input 2 View pictures stored in a USB flash drive. 3 PC Input 3 Monitor RGB (D-SUB) 4 AUDIO mini stereo jack (3.5mm) For AUDIO signal from HD signals and HD equipment. 6 Need help? www.sanyoctv.com 1-800-877-5032 High Definition image available from PC or DVI device. 5 5 Analog / Digital Antenna Input 4 6 Component AV Input (VIDEO2 or VIDEO3) Green (Y), blue (Pb), and red (Pr) Video inputs plus white and red (Audio) input jacks. 8 8 Digital Audio Output (Coaxial) 9 9 Analog Stereo Audio Out (L/R) Jacks HDTV BACK PANEL...
... AUDIO mini stereo jack. 2 USB Input 2 View pictures stored in a USB flash drive. 3 PC Input 3 Monitor RGB (D-SUB) 4 AUDIO mini stereo jack (3.5mm) For AUDIO signal from HD signals and HD equipment. 6 Need help? www.sanyoctv.com 1-800-877-5032 High Definition image available from PC or DVI device. 5 5 Analog / Digital Antenna Input 4 6 Component AV Input (VIDEO2 or VIDEO3) Green (Y), blue (Pb), and red (Pr) Video inputs plus white and red (Audio) input jacks. 8 8 Digital Audio Output (Coaxial) 9 9 Analog Stereo Audio Out (L/R) Jacks HDTV BACK PANEL...

Owners Manual
Page 7
... used to hookup an external stereo Amplifier. (Do not connect external speakers directly to the HDTV) Need help? Use HDMI INPUT1, 2 & 3 to hookup HD digital devices such as a DVD player or Video Game system. COMPONENT connections will accept SDTV, EDTV and HDTV video signals. Use them for great image quality from digital devices such as a Blu-ray player, HD Cable Box, HD Satellite Receiver or Video-game System. Match your digital device's Component output jacks to either of the two (2) Component input jack sets...
... used to hookup an external stereo Amplifier. (Do not connect external speakers directly to the HDTV) Need help? Use HDMI INPUT1, 2 & 3 to hookup HD digital devices such as a DVD player or Video Game system. COMPONENT connections will accept SDTV, EDTV and HDTV video signals. Use them for great image quality from digital devices such as a Blu-ray player, HD Cable Box, HD Satellite Receiver or Video-game System. Match your digital device's Component output jacks to either of the two (2) Component input jack sets...
Owners Manual
Page 8
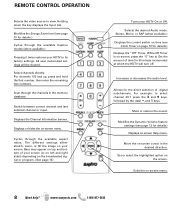
... sound. Move the on -screen Help menu. Set or select the highlighted option on -screen menu. 8 Need help? Exits the on the screen. Select channels directly. Switch between current channel and last selected channel or input. Cycles through the available Caption modes (when available.) Pressing it twice restores your HDTV to Set the amount of time (in 30 minute increments) at which the HDTV will be cleared. REMOTE CONTROL OPERATION Selects the video source to select channel...
... sound. Move the on -screen Help menu. Set or select the highlighted option on -screen menu. 8 Need help? Exits the on the screen. Select channels directly. Switch between current channel and last selected channel or input. Cycles through the available Caption modes (when available.) Pressing it twice restores your HDTV to Set the amount of time (in 30 minute increments) at which the HDTV will be cleared. REMOTE CONTROL OPERATION Selects the video source to select channel...
Owners Manual
Page 9
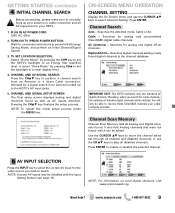
... mode, Cable or Air. It also lists Analog channels that were not found digital channels to your HDTV. 1. NOTE: For information on -screen instructions to enable or disable the selected channel. Channel Search Auto - You will be able to select the correct AV input for the video source you search for on local digital channels, visit www.antennaweb.org Need help? AV INPUT SELECTION Press the INPUT key to receive those ClearQAM channels your antenna or cable connection...
... mode, Cable or Air. It also lists Analog channels that were not found digital channels to your HDTV. 1. NOTE: For information on -screen instructions to enable or disable the selected channel. Channel Search Auto - You will be able to select the correct AV input for the video source you search for on local digital channels, visit www.antennaweb.org Need help? AV INPUT SELECTION Press the INPUT key to receive those ClearQAM channels your antenna or cable connection...
Owners Manual
Page 10
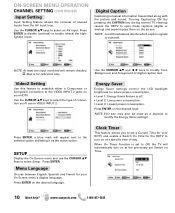
... power consumption. Use the CURSOR LM keys to select the type of digital caption text. Use the CURSOR LM and keys to turn on at a specific time of unused inputs from the AV input loop. Press ENTER to transmit. Video2 Setting Use this feature to establish either a Component or Composite connection to the VIDEO INPUT 2 jacks on Time. 10 Need help? When On Timer Function is set to set Switch on your HDTV and enable a Switch...
... power consumption. Use the CURSOR LM keys to select the type of digital caption text. Use the CURSOR LM and keys to turn on at a specific time of unused inputs from the AV input loop. Press ENTER to transmit. Video2 Setting Use this feature to establish either a Component or Composite connection to the VIDEO INPUT 2 jacks on Time. 10 Need help? When On Timer Function is set to set Switch on your HDTV and enable a Switch...
Owners Manual
Page 11
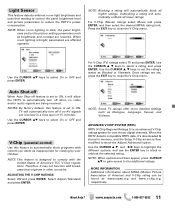
... and press ENTER. Need help? V-Chip (parental control) Use this feature is then modified to show the Adjust (Advanced) option. Light Sensor This feature detects ambient room light brightness and uses that originate in other countries. Auto Shut-off When Auto Shut-off if no video and/or audio signals are lowered. NOTE: This feature is an advanced V-Chip ratings system for viewing by your children...
... and press ENTER. Need help? V-Chip (parental control) Use this feature is then modified to show the Adjust (Advanced) option. Light Sensor This feature detects ambient room light brightness and uses that originate in other countries. Auto Shut-off When Auto Shut-off if no video and/or audio signals are lowered. NOTE: This feature is an advanced V-Chip ratings system for viewing by your children...
Owners Manual
Page 12
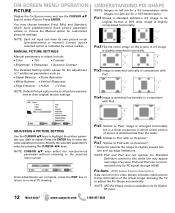
... the value adjustment screen. You may appear near edge of 7 additional parameters such as: • Signal Balancer • Noise Reduction • White Balance • Vertical Sharpness • Edge Enhancer • H-Size • V-Size NOTE: Default Picture option returns all picture parameters to Pix2 with Pix2. A 4:3 image is recommended only for DigitalRF input. 12 Need help? Pix7 Similar to their original factory settings. Pix3 Image...
... the value adjustment screen. You may appear near edge of 7 additional parameters such as: • Signal Balancer • Noise Reduction • White Balance • Vertical Sharpness • Edge Enhancer • H-Size • V-Size NOTE: Default Picture option returns all picture parameters to Pix2 with Pix2. A 4:3 image is recommended only for DigitalRF input. 12 Need help? Pix7 Similar to their original factory settings. Pix3 Image...

Owners Manual
Page 13
...: The HDTV switches to normal TV viewing. Once adjustments are complete, press the EXIT key to return to USB Input when a USB flash drive is adjusted automatically, the perceived bass response, tonal balance, surround impression and dialog clarity remain the same. JPEG VIEWER USB MENU 1 Audyssey Dynamic Volume solves the problem of large variations in Full View mode: Use the CURSOR keys to the previous menu screen. Audyssey...
...: The HDTV switches to normal TV viewing. Once adjustments are complete, press the EXIT key to return to USB Input when a USB flash drive is adjusted automatically, the perceived bass response, tonal balance, surround impression and dialog clarity remain the same. JPEG VIEWER USB MENU 1 Audyssey Dynamic Volume solves the problem of large variations in Full View mode: Use the CURSOR keys to the previous menu screen. Audyssey...
Owners Manual
Page 14
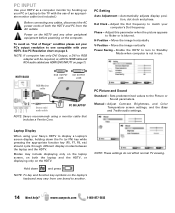
... See PC Resolution chart on page 7.) PC Setting Auto Adjustment - Phase - Sets predetermined values to one brand to another. Dot Clock - Move the image horizontally V-Position - NOTE: If computer has only DVI Output, a DVI to RGB adapter will be required, or, a DVI to HDMI cable and RCA audio cables (see HDMI (DVI) INPUT1 on page 3. Enable the HDTV to turn to display a Laptop's screen display, holding down...
... See PC Resolution chart on page 7.) PC Setting Auto Adjustment - Phase - Sets predetermined values to one brand to another. Dot Clock - Move the image horizontally V-Position - NOTE: If computer has only DVI Output, a DVI to RGB adapter will be required, or, a DVI to HDMI cable and RCA audio cables (see HDMI (DVI) INPUT1 on page 3. Enable the HDTV to turn to display a Laptop's screen display, holding down...

Owners Manual
Page 15
... original retail purchase, Sanyo Manufacturing Corporation will replace any manufacturing defect or malfunction Sanyo Manufacturing Corporation will provide a new TV via exchange at the time of this TV to give us the television's model number and serial number when you call. Replacement model will be contingent on a label attached to the back of purchase, Sanyo Manufacturing Corporation warrants this warranty for future reference...
... original retail purchase, Sanyo Manufacturing Corporation will replace any manufacturing defect or malfunction Sanyo Manufacturing Corporation will provide a new TV via exchange at the time of this TV to give us the television's model number and serial number when you call. Replacement model will be contingent on a label attached to the back of purchase, Sanyo Manufacturing Corporation warrants this warranty for future reference...


