
Sanyo DP55441 Support Question
Sanyo DP55441 Support Question
Find answers below for this question about Sanyo DP55441.Need a Sanyo DP55441 manual? We have 1 online manual for this item!
Question posted by guitarsoldier1973 on November 24th, 2011
No Audio On Hdmi
The audio works fine while watching cable, but as soon as we try to watch a DVD through the blue ray we get video but no audio. The HMDI cable is running straight from the DVD player to the TV. Cannot figure out how to get sound. Occassionaly, a picture of a speaker will appear in the top right corner of the screen with "off" next to it but we cannot figure out how to turn it on.
Current Answers
Related Sanyo DP55441 Manual Pages
Owners Manual - Page 3

...ANTENNA LEAD IN WIRE
heat registers, stoves or other apparatus (including amplifiers) that the
cable ground shall be located in the
2 Do not install near water. Unplug this ...12. IMPORTANT SAFETY INSTRUCTIONS
1. Provide appropriate space on the LCD TV. When installing an outside antenna is connected to the television equipment, be sure the antenna system is grounded so as ...
Owners Manual - Page 4

... that improper modifications or unauthorized changes to
this television meet rigid U.L.
HANDLING PRECAUTIONS
• Handle by...TV technician for ENERGY STAR qualification.
NEVER spray liquids on the screen can be damaged if it is encouraged to try...trademarks or registered trademarks of Dolby Laboratories.
HDMI, the HDMI logo and High-Definition Multimedia Interface are ...
Owners Manual - Page 5

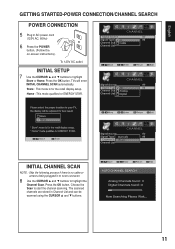
... SETUP 11 INITIAL CHANNEL SCAN 11 GETTING STARTED-POWER CONNECTION/CHANNEL SEARCH..11
ADVANCED AV CONNECTIONS........... 12 ADVANCED DIGITAL SIGNAL CONNECTIONS-HDMI TO HDMI.......12 DVI TO HDMI 12 DIGITAL AUDIO 12 AUDIO OUT JACKS 12
PC CONNECTIONS 13 PC MONITOR OPERATION 13
SPORTS MODE 14
ON-SCREEN MENU OPERATION 15 MENU NAVIGATION MAP 15...
Owners Manual - Page 6

... screen.
2 Remove screws in 4 holes with soft materials (such as a blanket) for
protecting the display screen.
3 12 4
Uninstalling Stand (55")
1 Place the LCD TV screen facing down on a flat surface with screw driver.
3 12 4
5 Failure to follow correct procedures could result in damage to the equipment or injury to a person. English
INSTALLING...
Owners Manual - Page 7

... x 400mm
Wall Mounting Inserts
Mounting screws measurements: 55" TV M8 Diameter, Length - 13mm (min.); 16mm (max.)
Wall
• (60mm)
6 Do not position ...standmounting inserts on the back of set weight. NOTE: 1. English
INSTALLATION POSITIONING THE LCD HDTV
Always use a firm-flat surface when positioning your HDTV to secure it to a wall mounting kit. Wall mounting kit shall be able to ...
Owners Manual - Page 8

... up batteries.
2 Antenna Connection for Clear QAM Cable channels. (see page 11)
For the best picture, connect your Cable box or Satellite receiver to HDMI or component (VIDEO3) jacks. Digital and Analog ... off -air signals from a direct Cable TV connection. This HDTV can receive ANY unscrambled RF signal being broadcast.
7
Analog or Clear QAM cable channels from an antenna.
PReCAUTIONS
Do ...
Owners Manual - Page 9

..., PAGE 7 -
HDMI INPUT (INPUT1, INPUT2 or INPUT3), PAGE 12 - A digital AV interface that accepts uncompressed video signals for updating the television's firmware and accessing JPEG files.
8 This terminal is separated from another Stereo Mini Jack (PC AUDIO INPUT). Use for the best picture. Use a Phono-Type (Coaxial) Digital Audio Out Cable to connect Digital Audio Output to...
Owners Manual - Page 10

...Channel Number, CC State, Channel Title, Video Resolution, Analog Sound information, and Program Rating.
If you execute RESET function, the TV will need to switch CC mode among Off...Press to the last or next channel.
EXIT Button - RESET Button - CAPTION Button- INPUT Button- AUDIO Button- Press hese buttons to default (all customized settings. OK Button -
Press 6 then 1-- ...
Owners Manual - Page 11

...Cables are included on the HDTV and to your digital device as shown. (Cable is not supplied))
10 VIDEO1 or VIDEO2 (Shared with Green video jack, White and Red audio jacks can be used as a HD Cable Box, HD Satellite Receiver, DVD Player...INPUT button to set Green, Blue, and Red video jacks asVIDEO2 or VIDEO3(YPbPr) on this HDTV will accept HDTV, EDTV, and SDTV video signals and make a great ...
Owners Manual - Page 12
... ▲ and ▼ buttons.
11
Press the OK button. Store : This mode is no cable or antenna being plugged-in to tuner connector.
8 Use the CURSOR ▲ and ▼ buttons...POWER button, (Follow the on-screen instructions). Home : This mode qualifies for the retail display setup. TVs will enter INITIAL CHANNEL SCAN automatically. Press the OK button.
To 120V AC outlet. INITIAL setup 7 ...
Owners Manual - Page 13

... such as shown. DVI TO HDMI
(Only HDMI1 is necessary. (refer to page 20)
2 Connect the audio out of copy-protected digital content. BACK-SIDE VIEW OF HDTV
(Coaxial) DIGITAL AUDIO CABLE (Not supplied)
MULTICHANNEL RECEIVER
AUDIO OUT JACKS 1 Connect the Audio output to a multichannel
receiver as a HD Cable Box, HD Satellite Receiver, DVD Player, and Game System. It...
Owners Manual - Page 14

...MENU OPERATING TIPS
The Picture settings in the PC menu. NOTE: Power on the HDTV and any cables, disconnect the AC Power Cords of both from the PC and the HDTV VOLUME + / - ...the HDTV and tighten the screws. (Monitor Cable not supplied).
2 Insert one end of a Stereo Mini-Audio cable into the HDTV PC AUDIO INPUT jack. (Stereo Mini-Audio Cable not supplied). buttons.
3 Select Auto Adjustment...
Owners Manual - Page 15

...English
SPORTS MODE
By simply pressing the " SPORTS" button on the remote control, the TV will automatically optimize both picture and sound settings for the programs shown.
■■ ...
■■ Marine Sports
−− For swimming, diving programs etc. −− Sparkling blue of sea, azure sky −− Delightful splashing and surf sounds
■■ Indoor Sports
...
Owners Manual - Page 18

... select the options you want to adjust and press the OK button. (MPAA,Block All,TV-Y,TV-Y7,TV-G,TV-PG,TV-14,and TV-MA.)
5 Use the CURSOR ▲ and ▼buttons to select the options you ....
Decides which kind of America) and TV Parental Guidelines rating codes. ON-SCREEN MENU OPERATION (CONTINUED)
English
PARENT ADJUSTMENT
This SANYO television is correct, it
will automatically return to...
Owners Manual - Page 20

...the factory default value.
1 Use the CURSOR ◄ and ► buttons to select
YPbPr or Video. Press the OK button.
2 Use the CURSOR ◄ and ► buttons to highlight Color... Press the OK button.
4 Use the CURSOR ◄ and ► buttons to highlight
AUDIO. PICTURE/ AUDIO/ ADVANCED ADJUSTMENT
PICTURE
ADJUSTING THE PICTURE LEVELS PICTURE MODE OPERATION
1 Press the MENU button on ...
Owners Manual - Page 21

... or Balance. Press the OK button.
3 Use the CURSOR ▲ and ▼ buttons to select
Noise Reduction. Press the OK button. During this setting, the audio input signal will be no sound output. Press the OK button. DVD player, cable/satellite box and digital camera
Owners Manual - Page 24

...9650; and ▼ buttons to highlight
Analog CC. Choose from eight types of captions for Analog TV signal for your choice of setting the desired caption type to highlight
Power Saving. Press the OK ...min for your choice of setting the desired caption type to be displayed with Analog TV signal programs on your panel.
1 Press the MENU button on the remote control to display the Main menu.
...
Owners Manual - Page 29

...watching Analog)
"No Signal" message appears on screen
Pixilation of Digital image
Cannot select or scan some channels
No Cable... channels above number 13
• Check if the program is a normal condition during warm - up and cool down of TV.
7, 9
Cabinet makes popping sound
• This is in color. • Try... ON.
• Check the Audio / Video connections.
• Press the INPUT...
Owners Manual - Page 30
...AUDIO JACK
1
HDMI/DVI 3
ANT 1
Video 1
Video 2/3
USB
AV AV Audio YPbPr YPbPr Audio
1
1
2
2
1
29
English
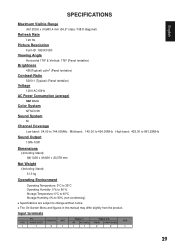
SPECIFICATIONS
Maximum Visible Range
(H)1209.6 x (V)680.4 mm (54.6" class /138.8 diagonal)
Refresh Rate
120 Hz
Picture Resolution
Full HD 1920X1080
Viewing Angle
Horizontal 178° & Vertical: 178° (Panel...Menu and figures in this manual may differ slightly from the product.
Owners Manual - Page 31
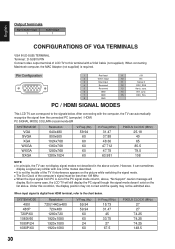
...TV can sometimes display a signal very similar with a VGA Cable (not supplied). When input signal is digital from the connected PC (computer) / HDMI...
Blue Input
11
4
Reserved
12
5
Reserved
13
6
GND
14
7
GND
15
8
GND
PC / HDMI ...Audio Output 1
Audio Output 1
CONFIGURATIONS OF VGA TERMINALS
VGA IN (D-SUB) TERMINAL Terminal : D-SUB15 PIN Connect video output terminal of LCD TV...
Similar Questions

I'm A Watching My Blu Ray And While I'm Watching The Previews, The Audio Says Do
audio says Dolby digital while watching previews, perfect sound, but when I hit play on movie it aut...
audio says Dolby digital while watching previews, perfect sound, but when I hit play on movie it aut...
(Posted by jamesmurawski 8 years ago)

How Do You Connect A Blue Ray, Sound System To A Sanyo Dp55441 Flat Screen Tv
(Posted by Vilbo 9 years ago)

Sanyo Dp55441 How To Find A Channel To Watch Dvd Player
(Posted by flybton 10 years ago)

Sanyo Dp55441 - Have Sound, No Picture, Green Light Is On.
(Posted by markr38 11 years ago)

Sanyo Model Dp50747 Plasma Flat Screen 50' Turns Off Seconds After I Turn It On
(Posted by dalea121 12 years ago)